
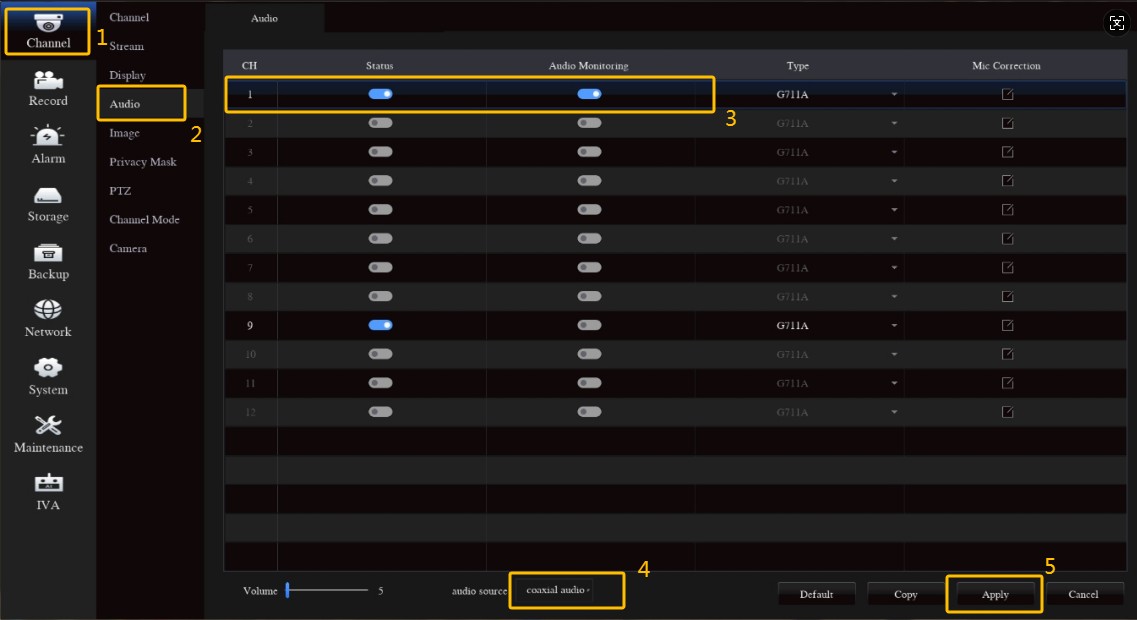
1. Enable “Audio Monitoring” and “Coaxial Audio” as below.
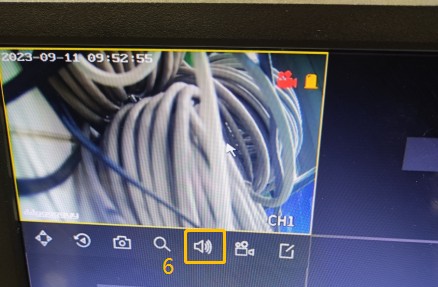
2. Enable button “Speaker” as below.
Steps
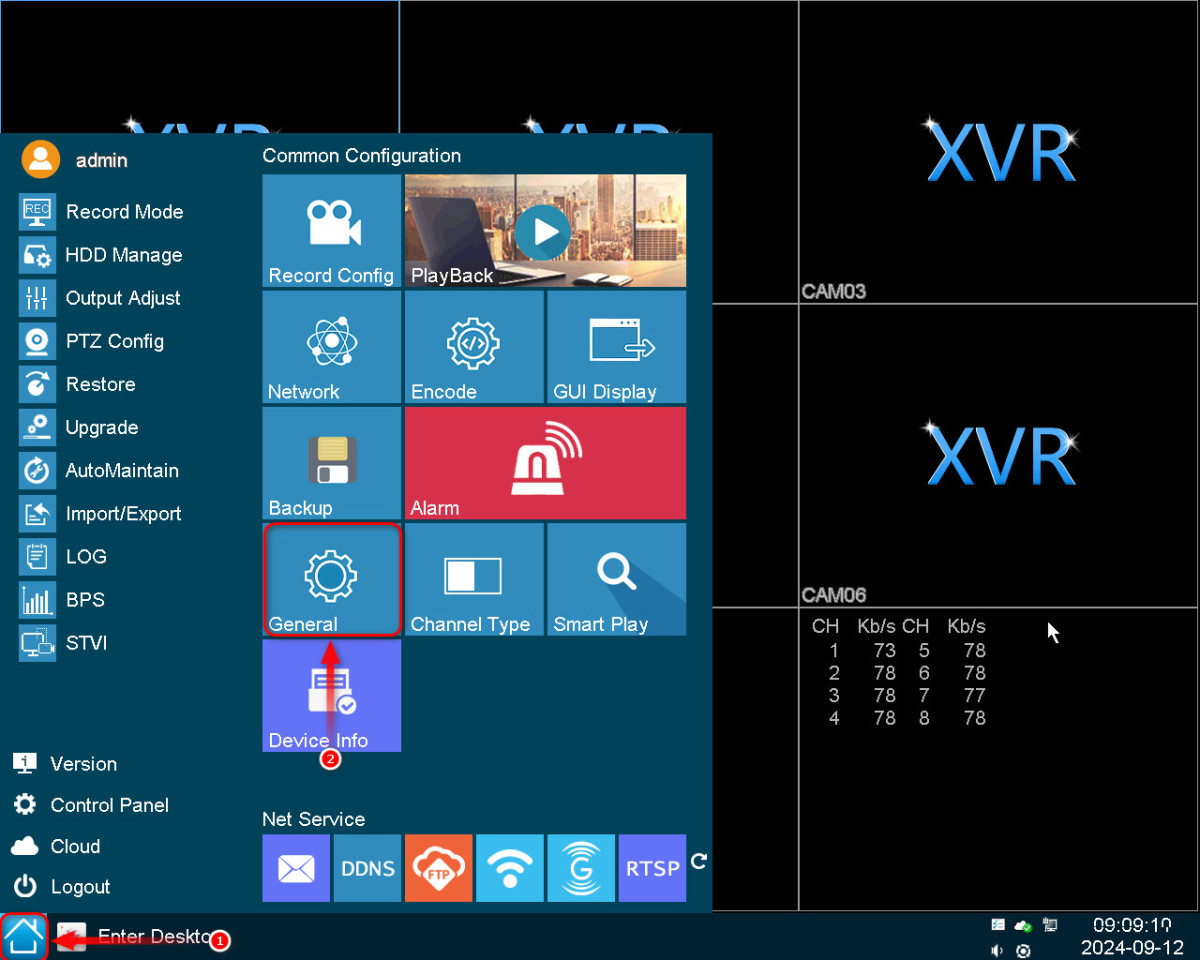
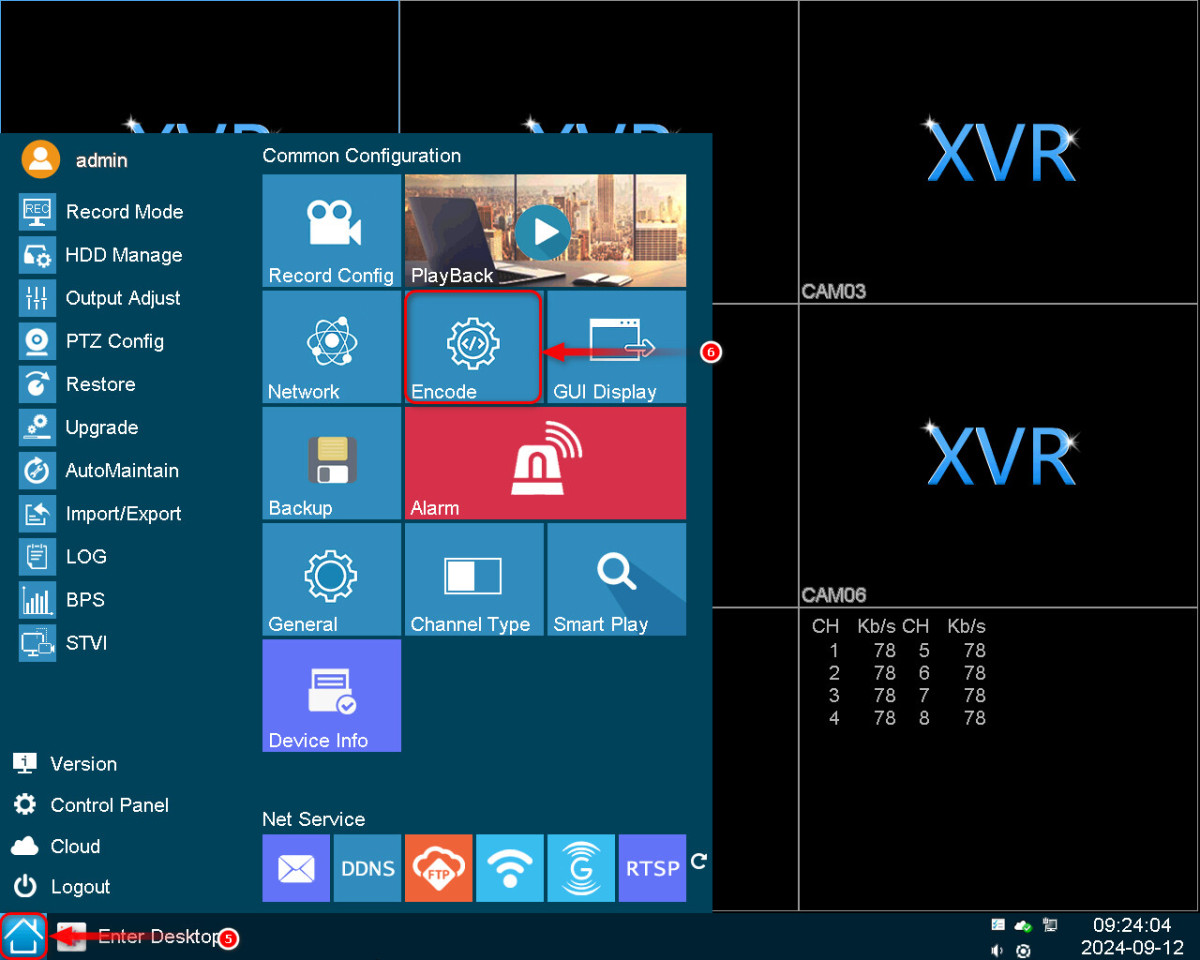
1. Click the Home button, then go to General.
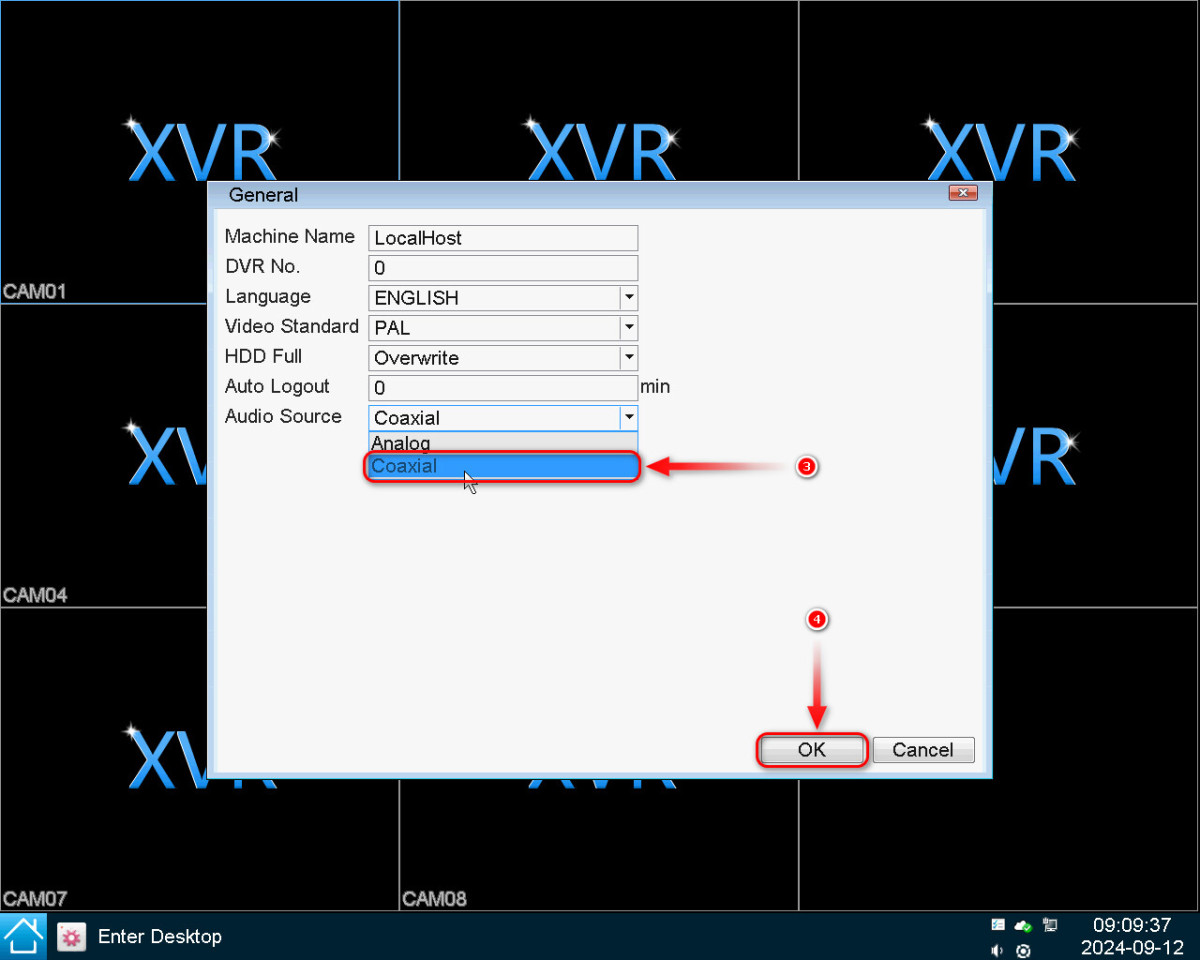
2. Under Audio Source, select Coaxial, and click OK to save the settings.
3. Click the Home button again, then select Encode.
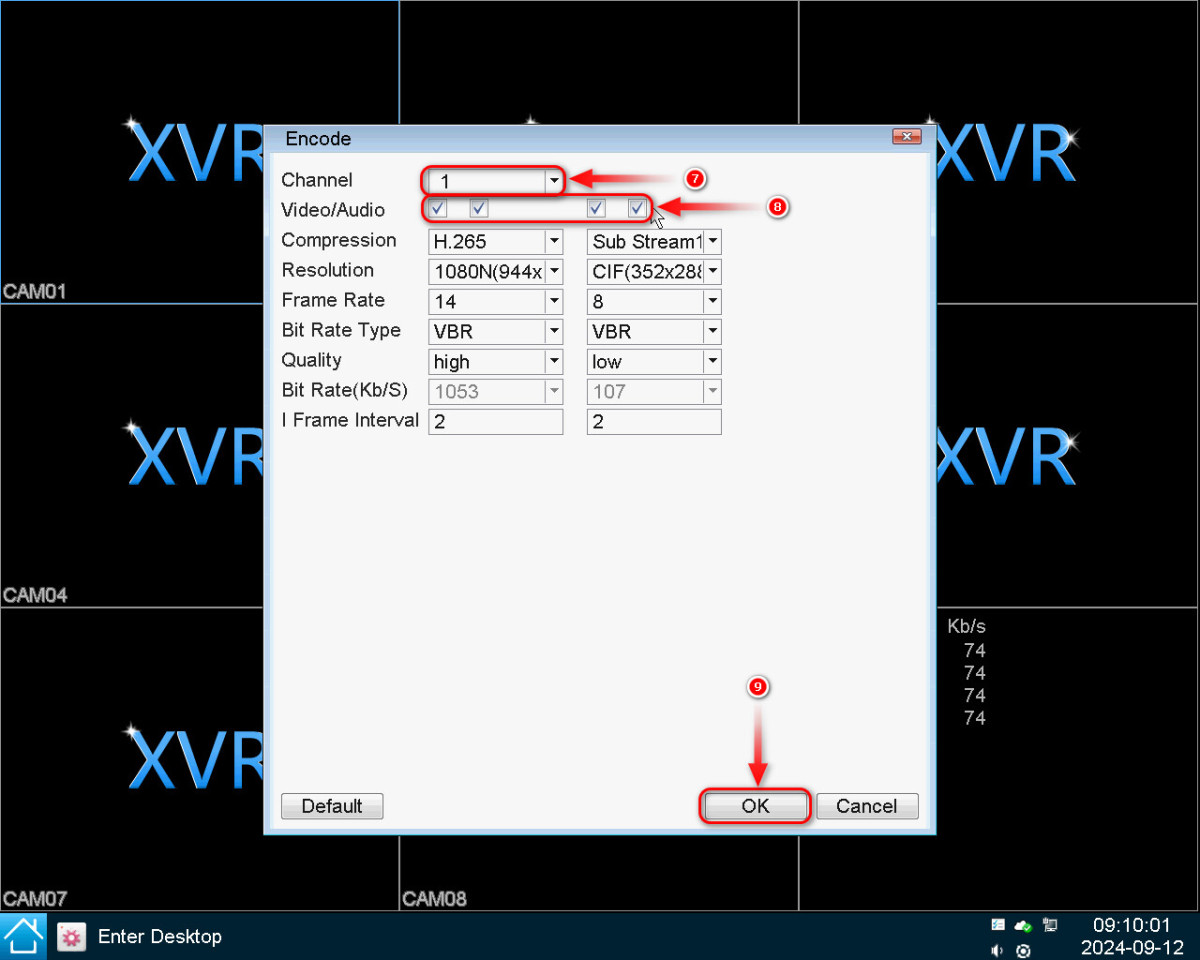
4. Choose the Channel and ensure the Video/Audio option is enabled. If it is not, enable it and click OK to save the settings.
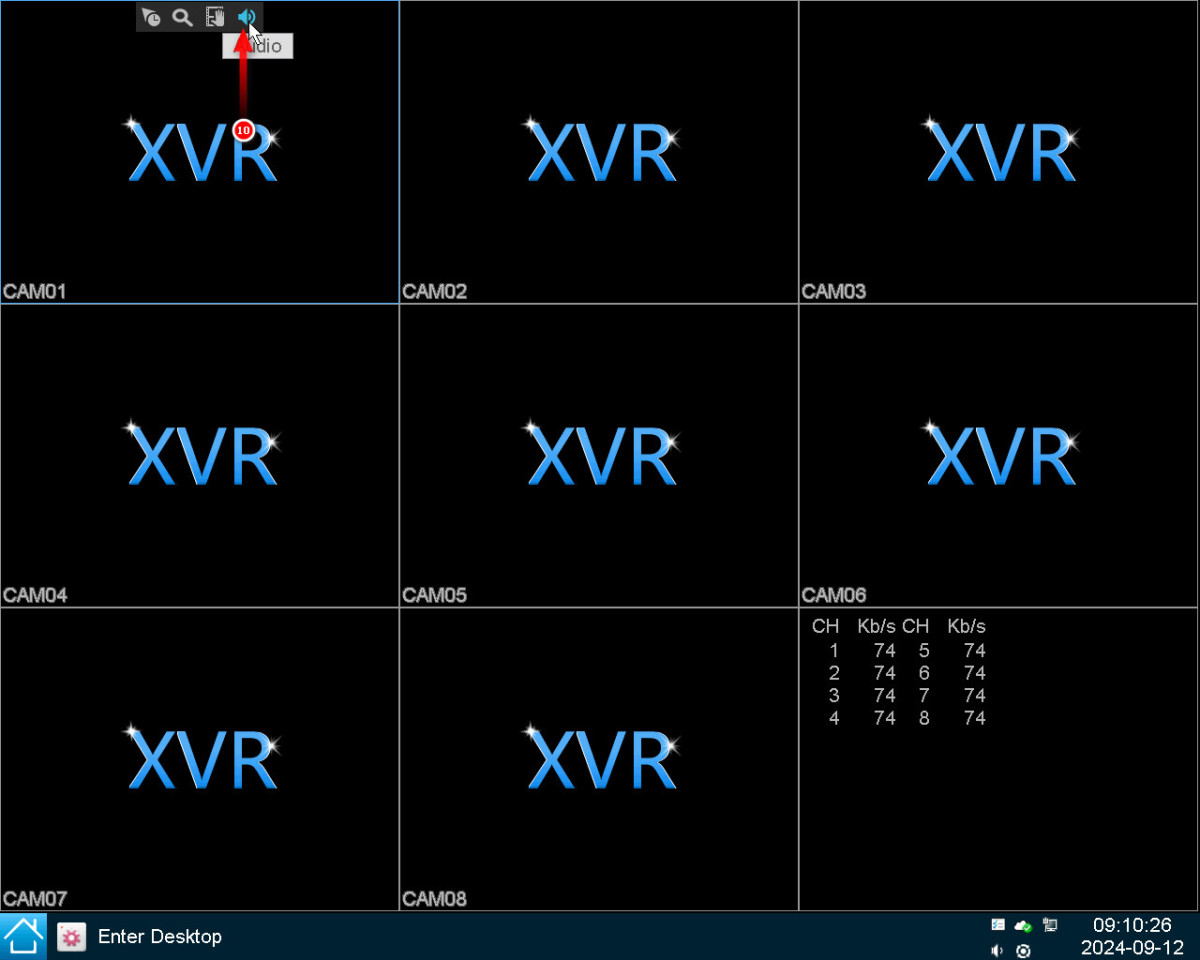
5. Return to the Preview screen. Move your mouse pointer to the top of the desired channel. A pop-up will appear; click the Audio button to unmute.
Models
JVS-XD2504-FC10T / JVS-XD2508-FC10T / JVS-XD2516-FC10T
JVS-XD2704-FC10T / JVS-XD2708-FC10T / JVS-XD2716-FC10T
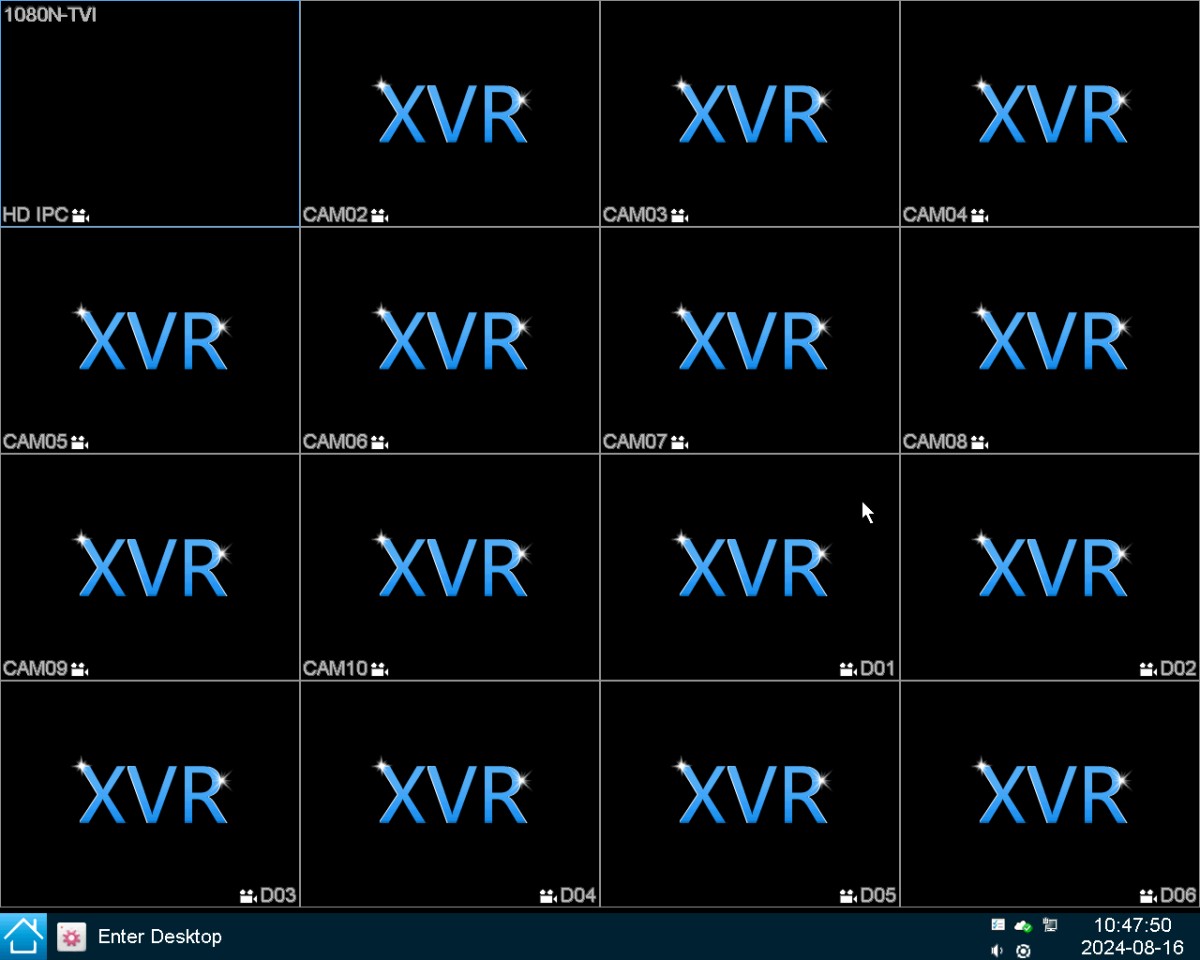
Insert the USB flash drive into the USB port of the XVR
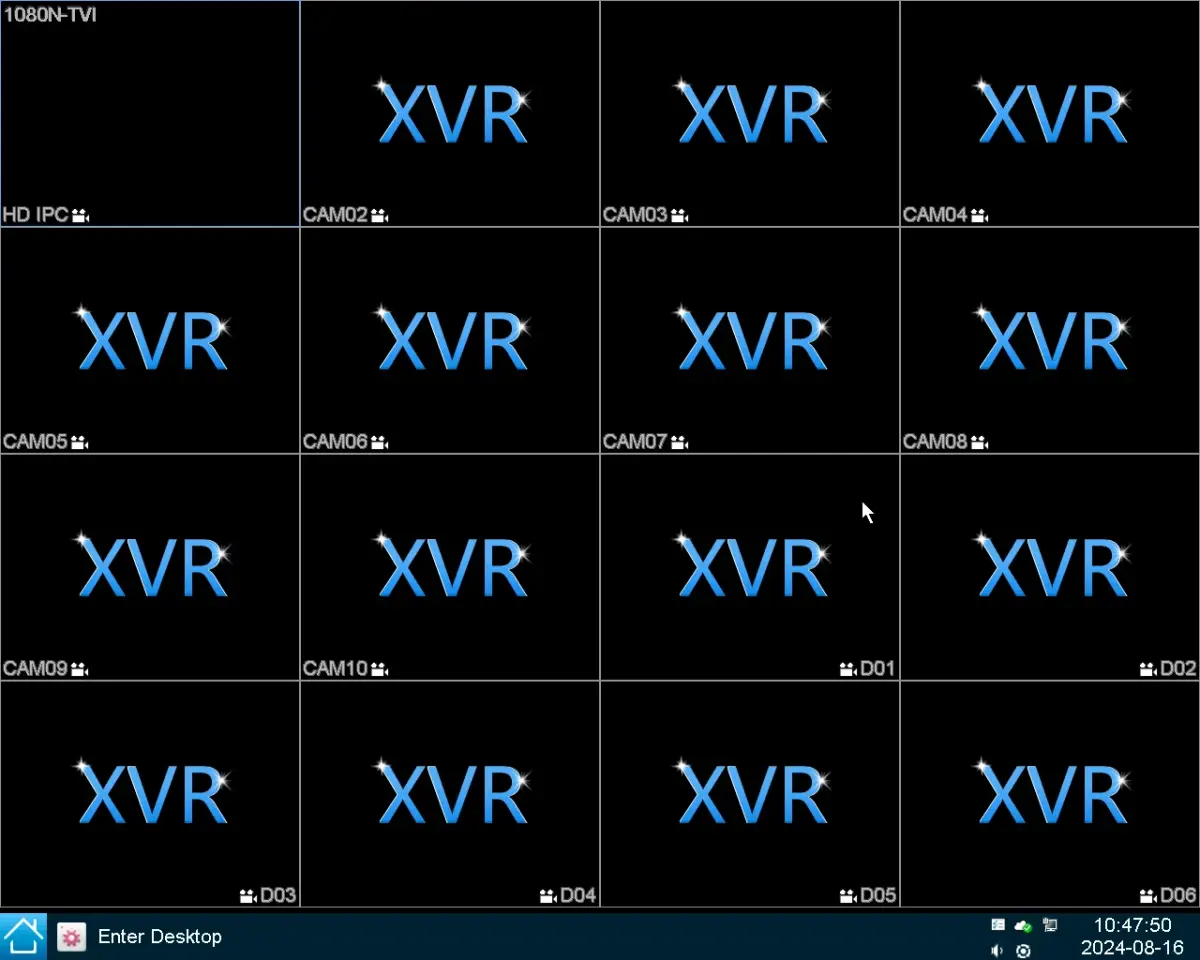
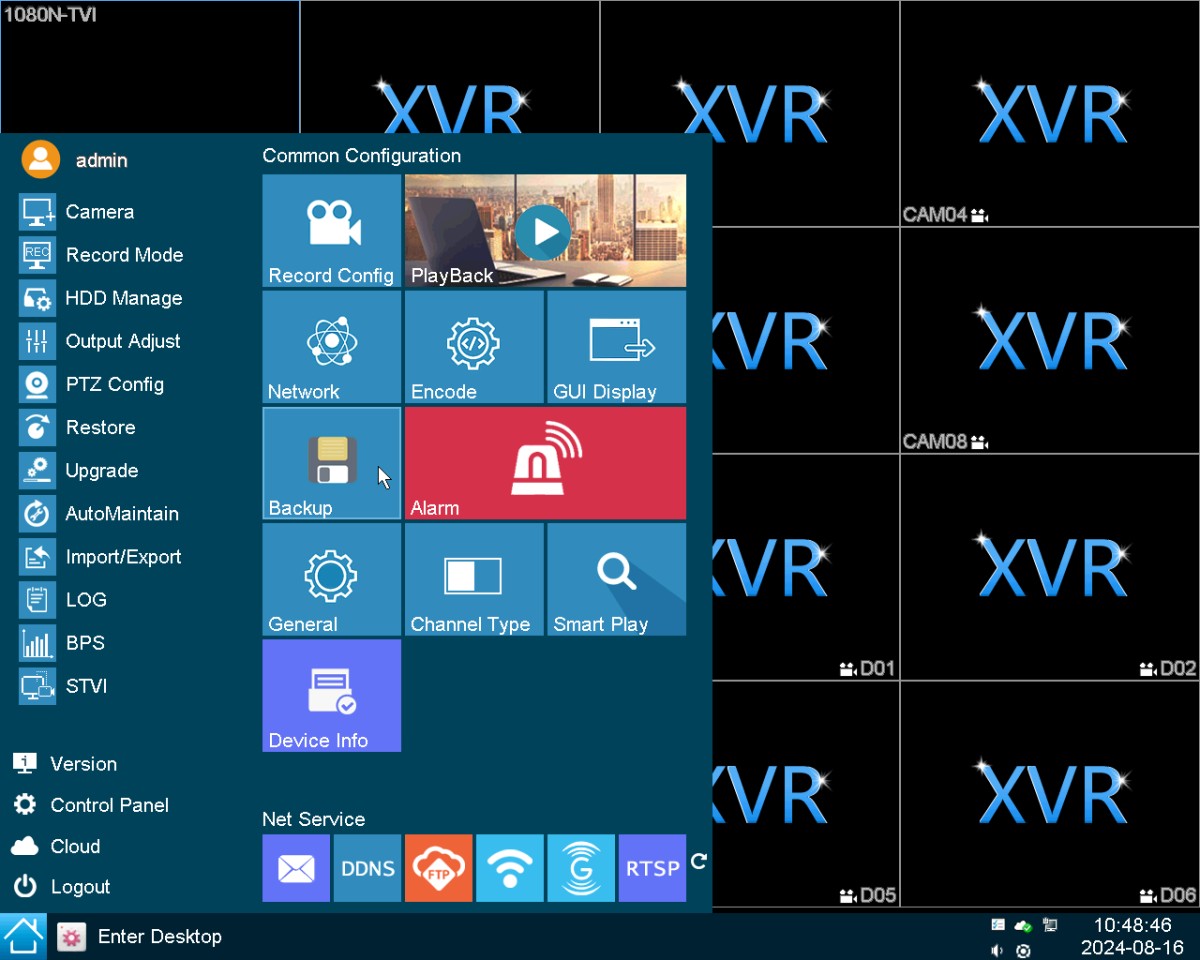
Press button as below on XVR’s GUI
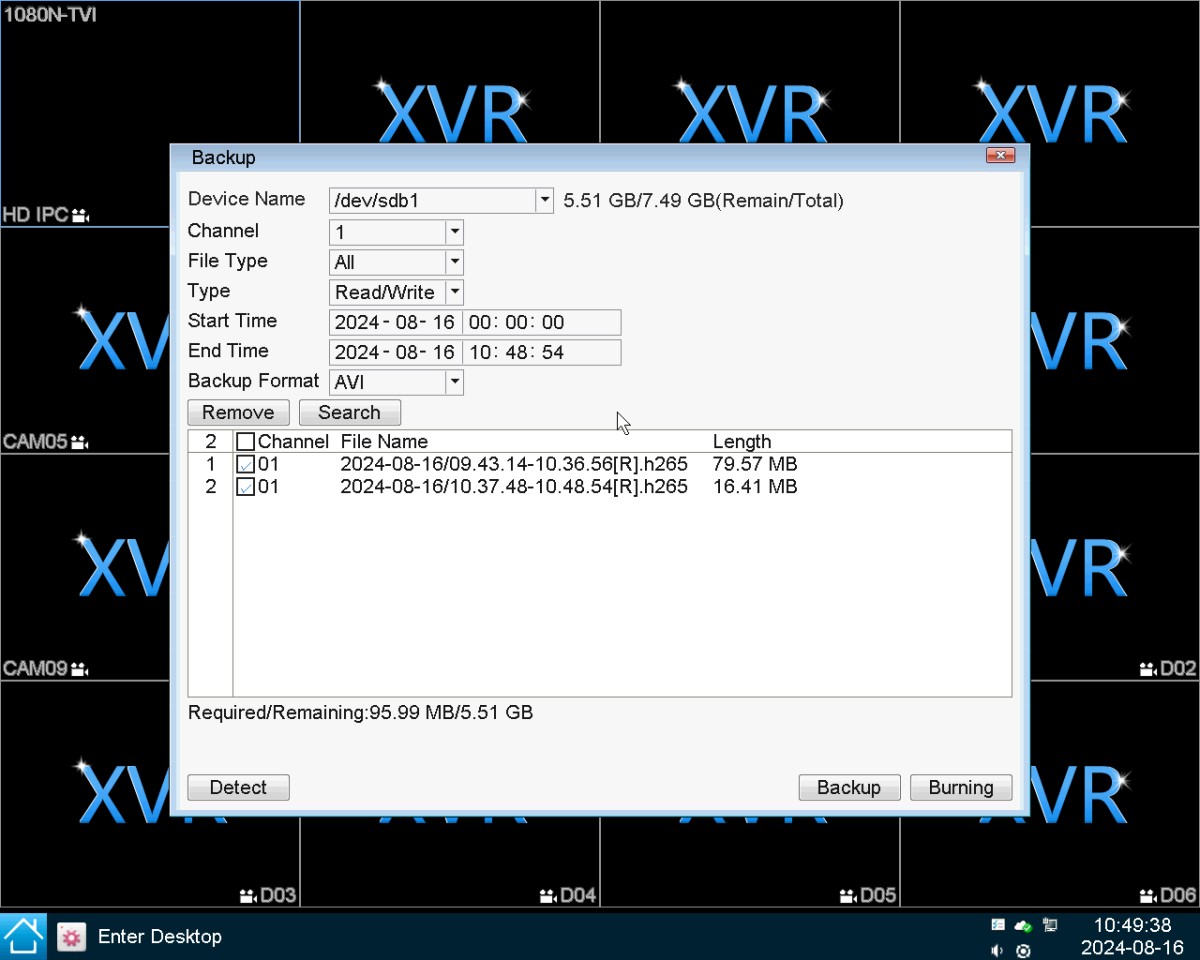
Press button “Backup” as below
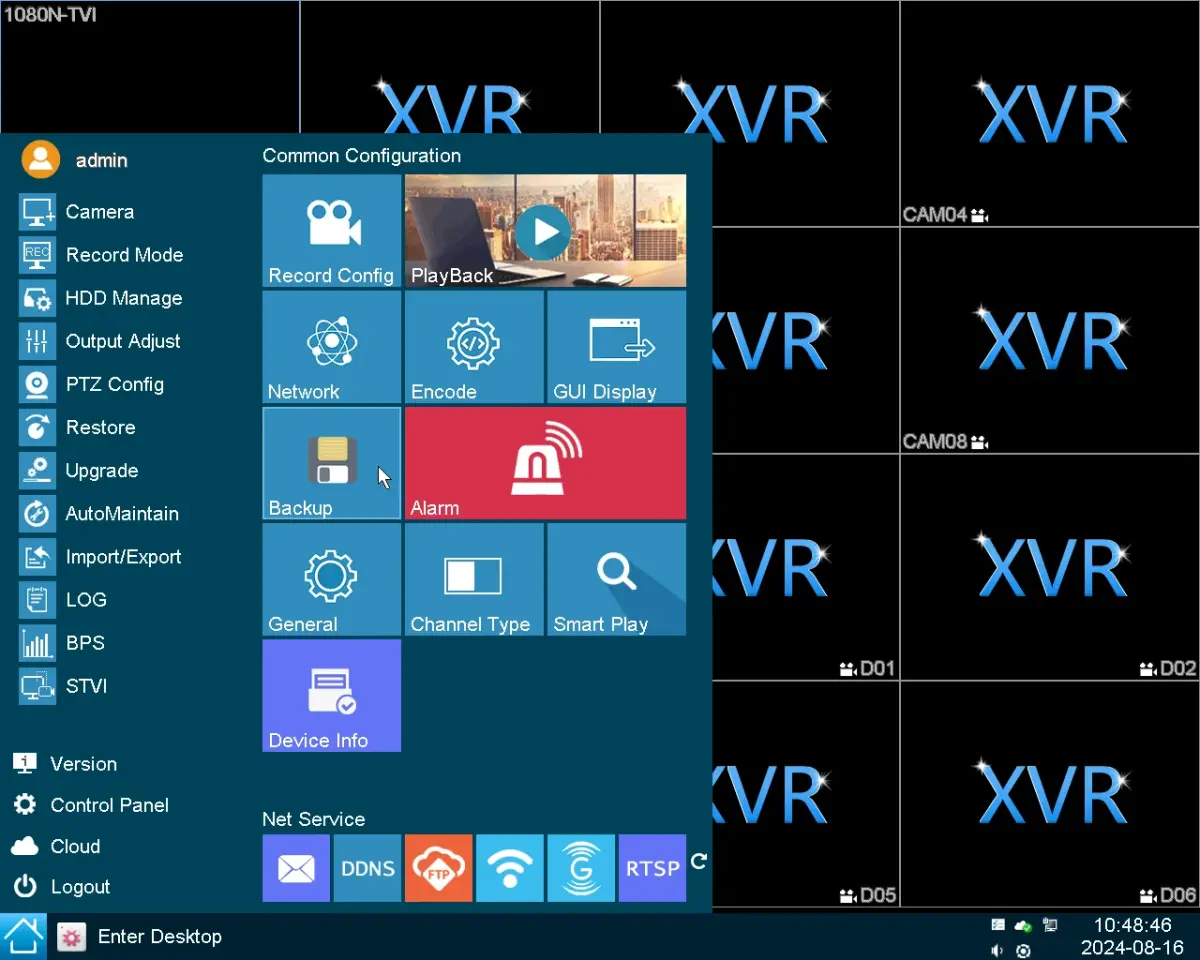
Set parameters as required
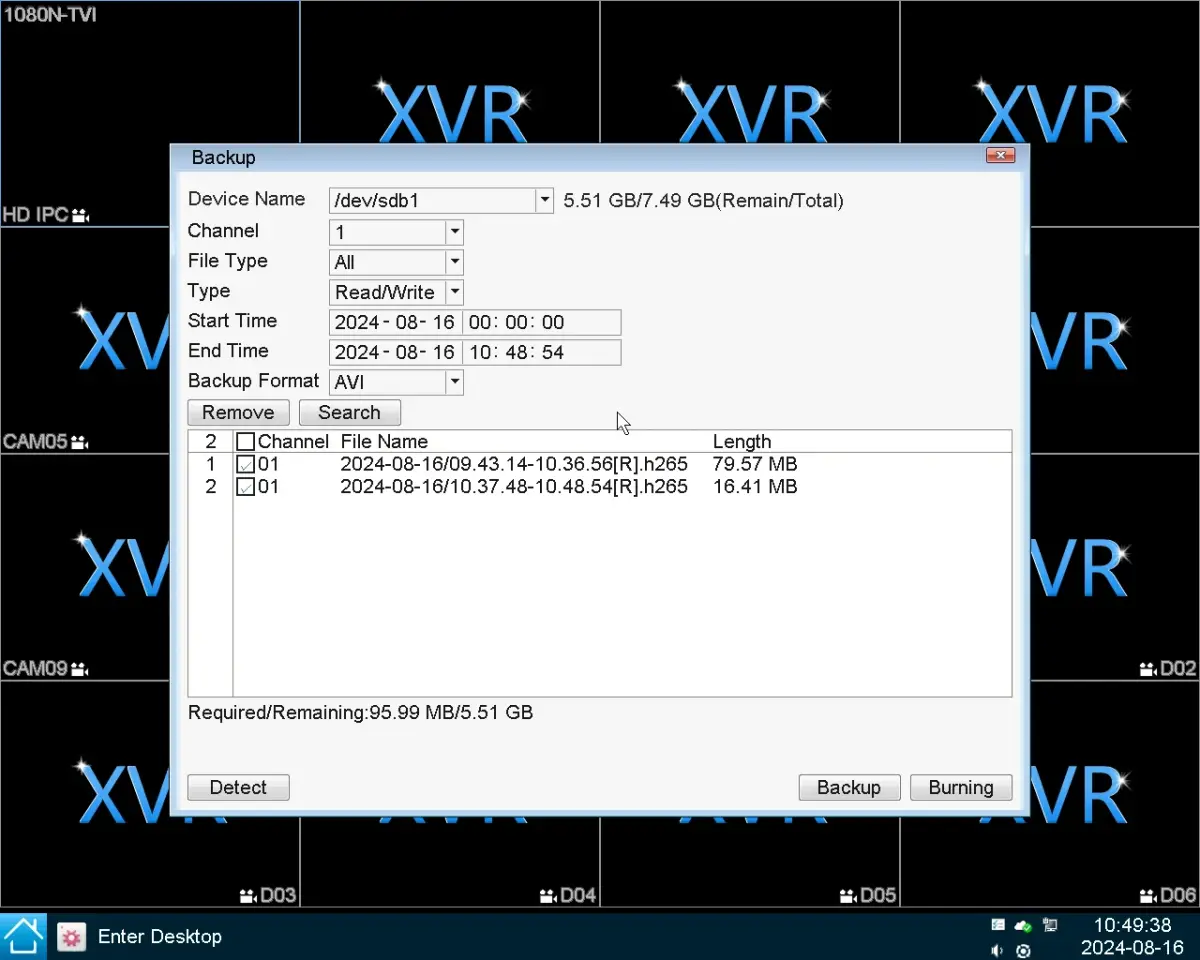
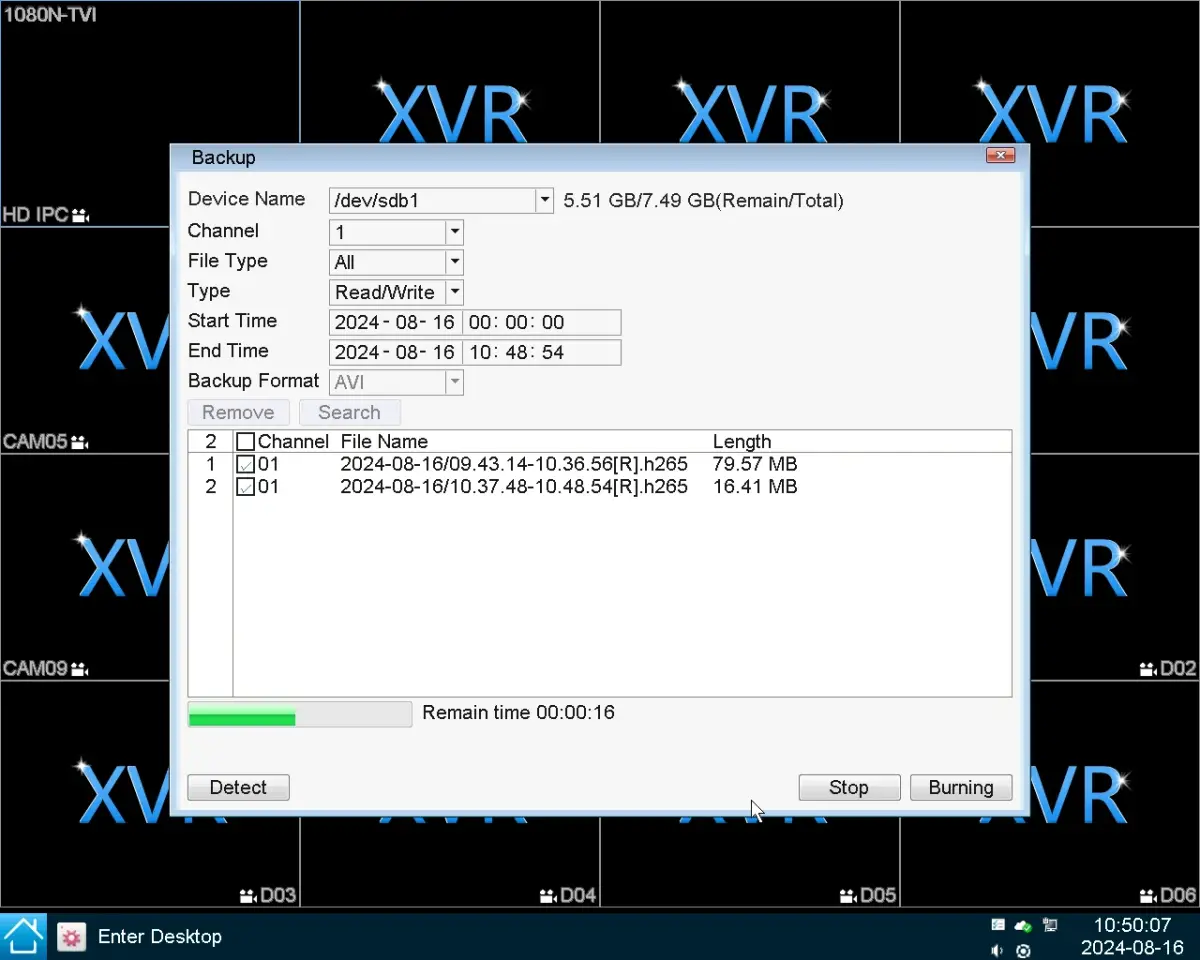
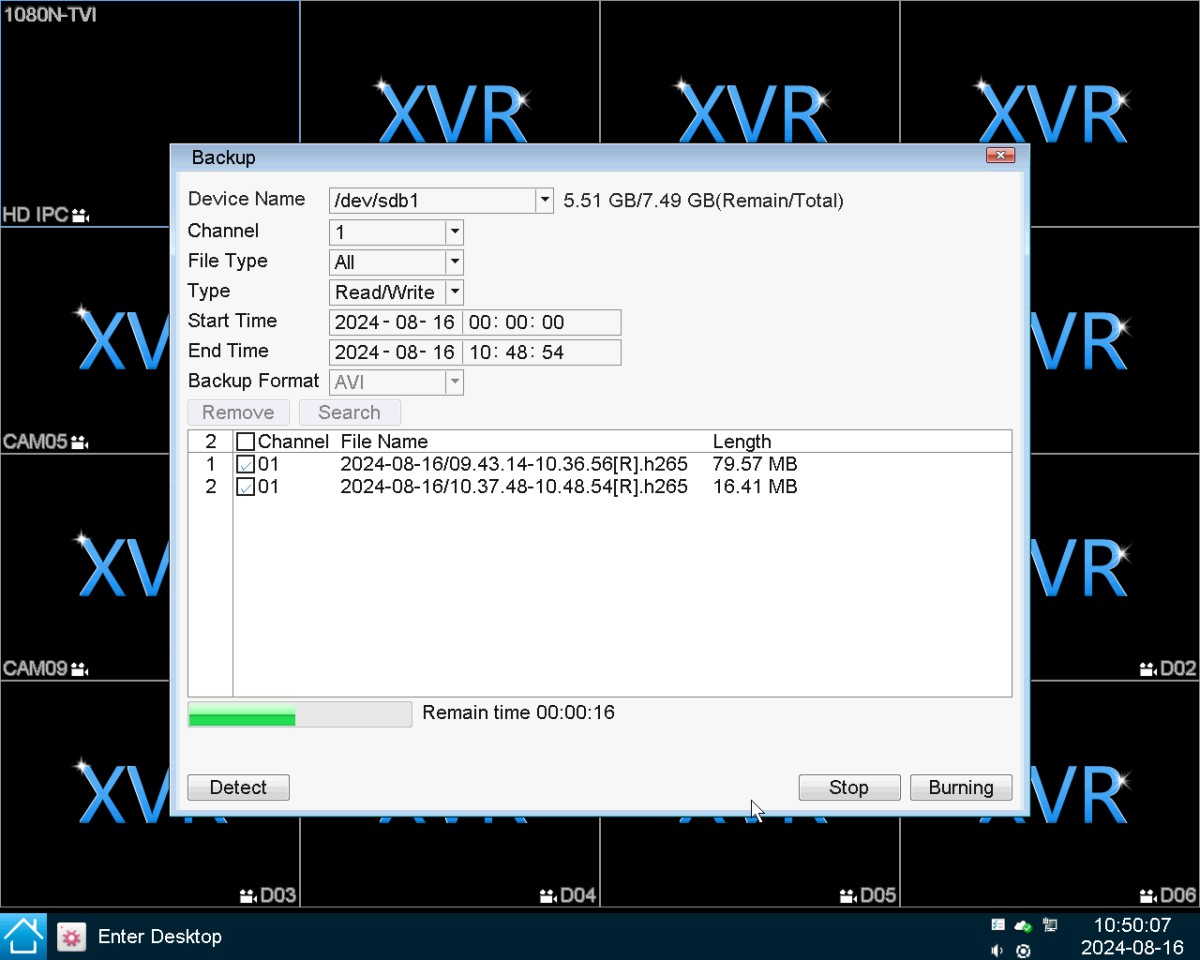
Press “Backup” button to start backup files to USB flash disk
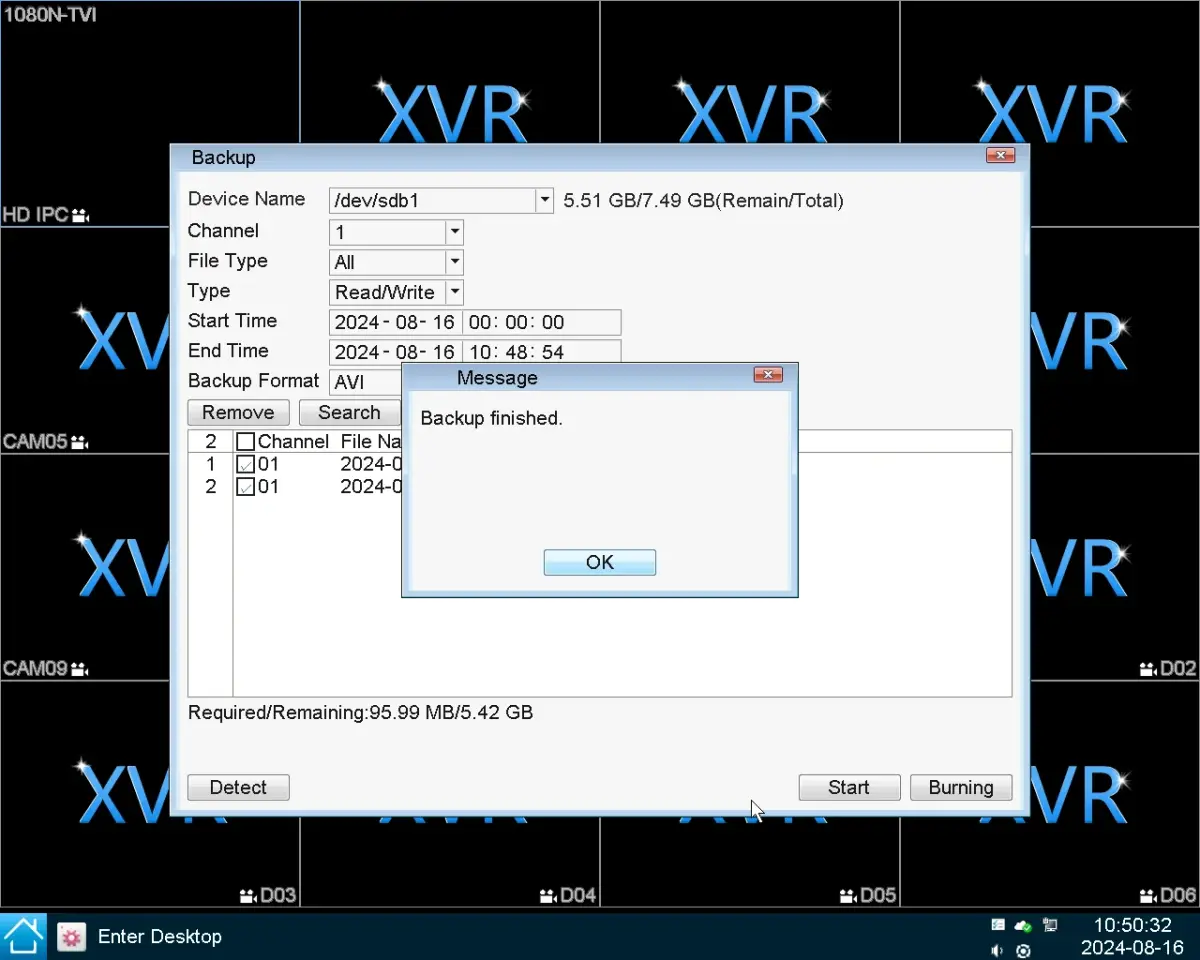
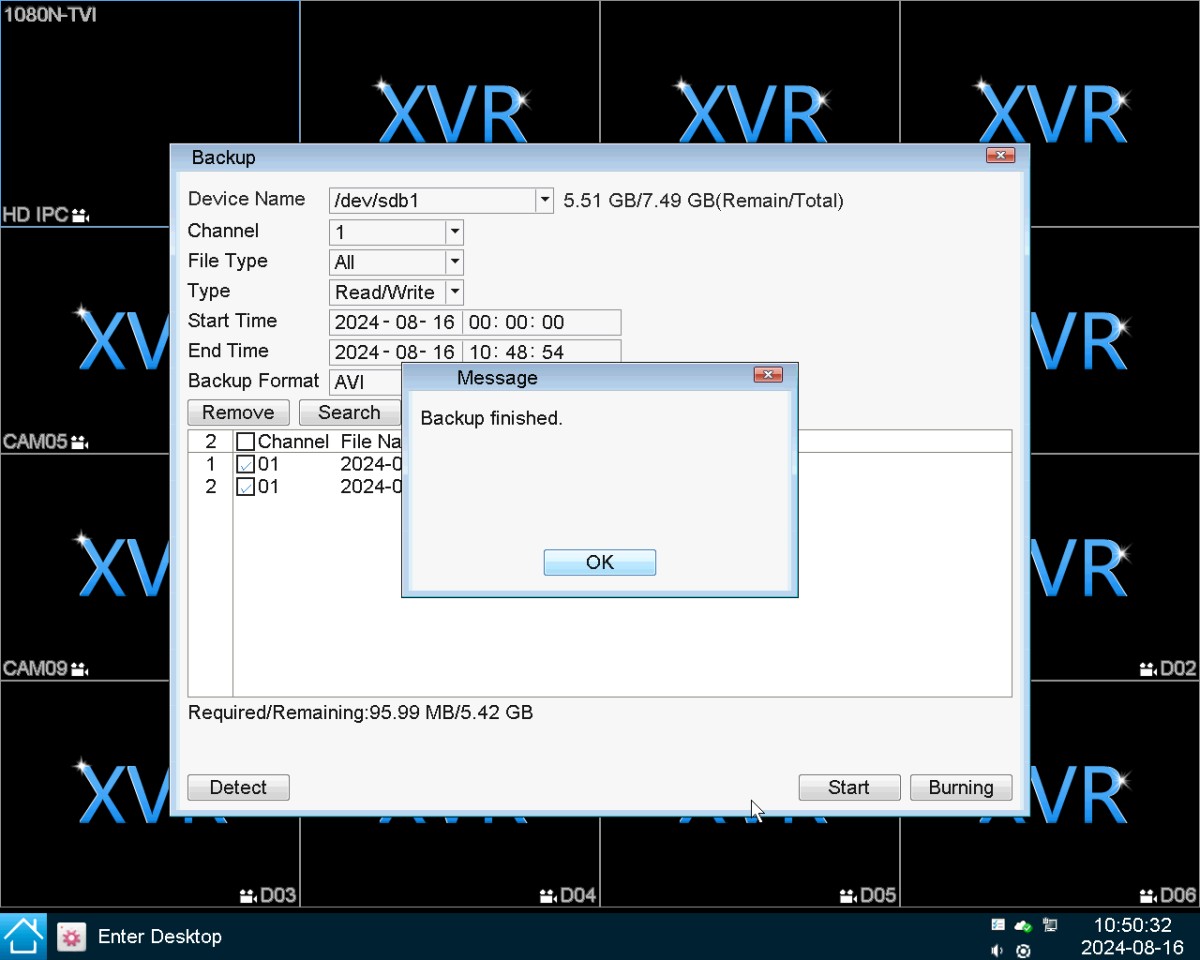
Backup competed
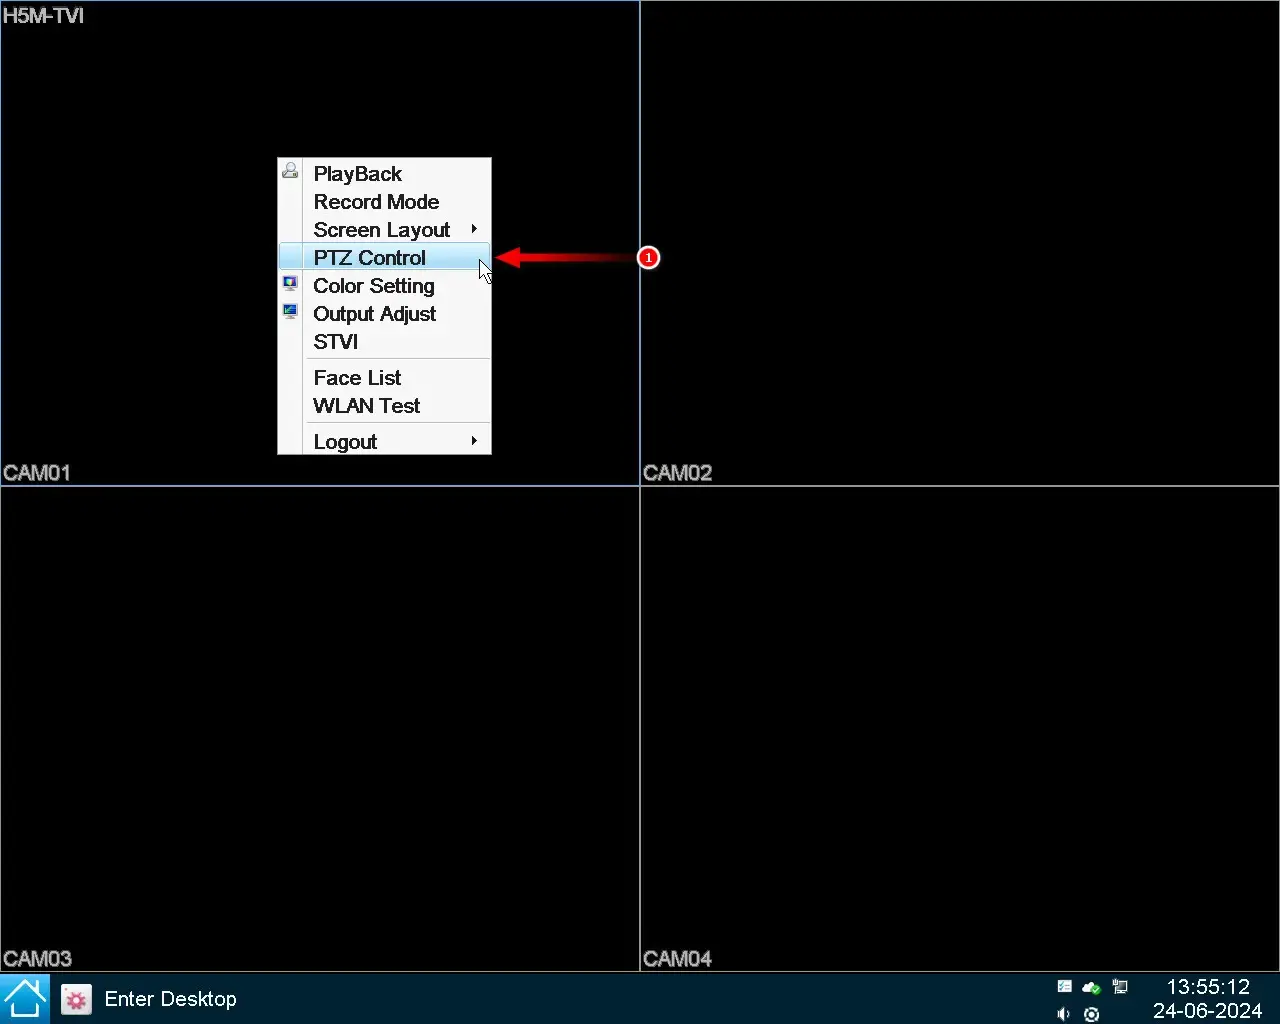
To resolve this issue, you need to adjust the camera's frame rate through the camera's OSD Menu. Follow these steps:
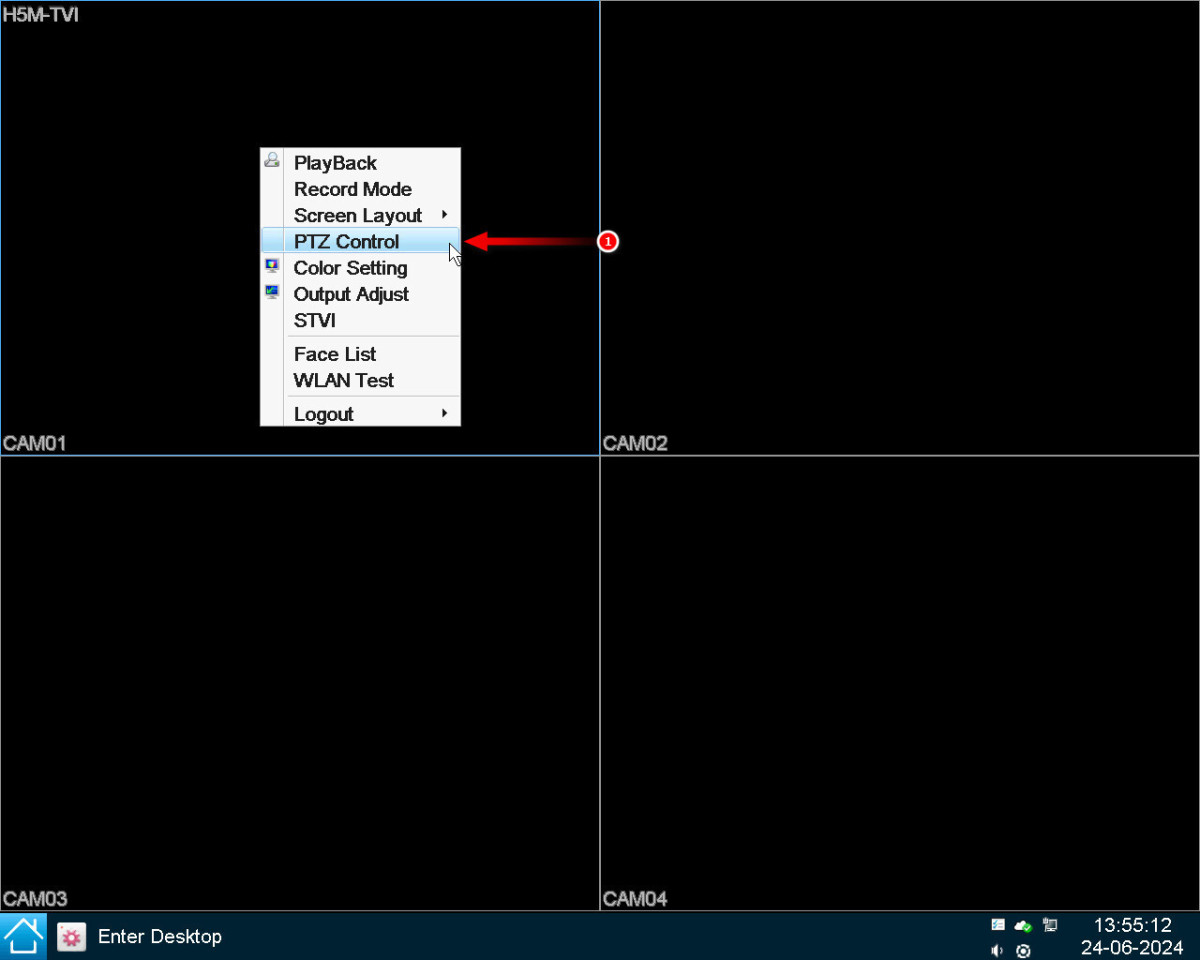
1. Right-click on the channel and select PTZ Control.
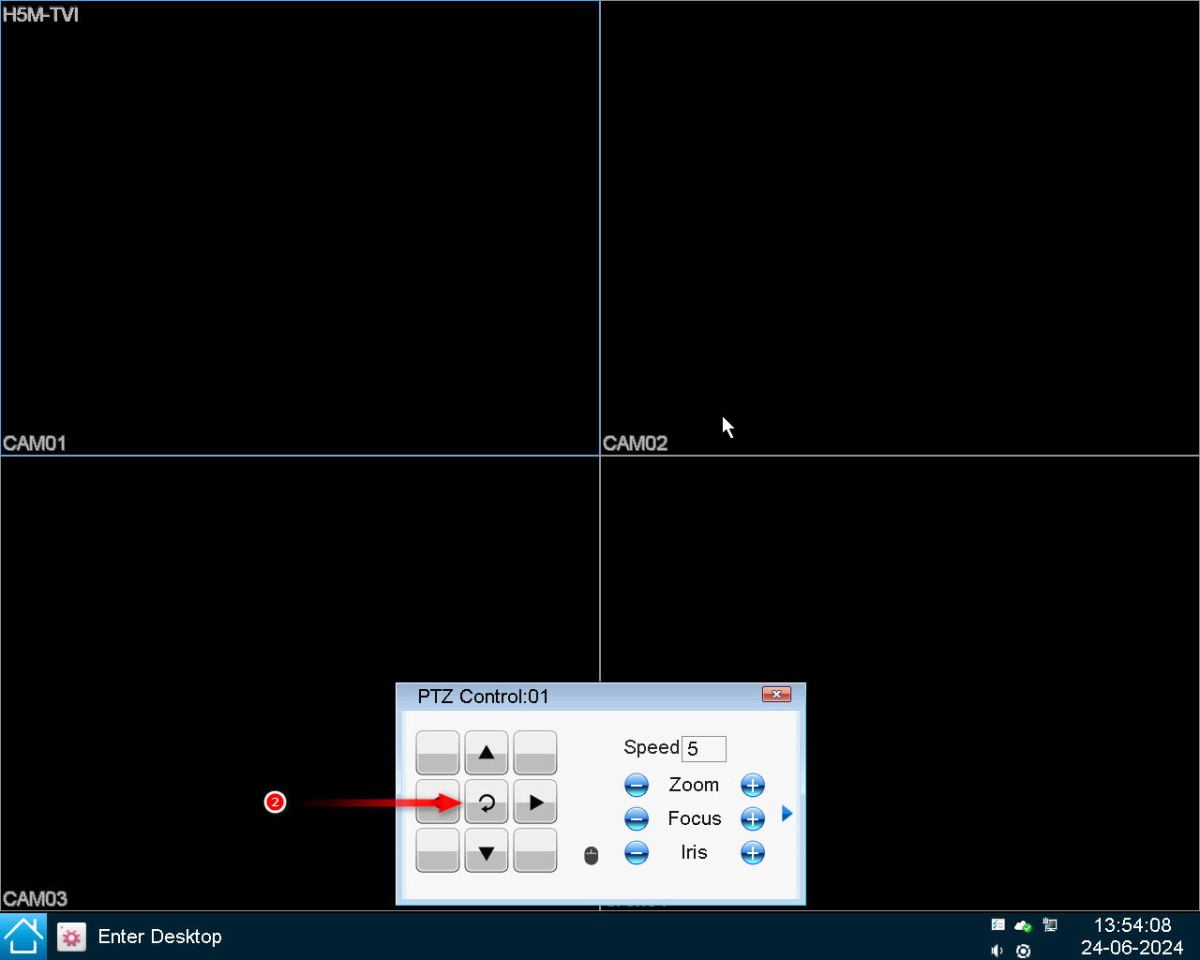
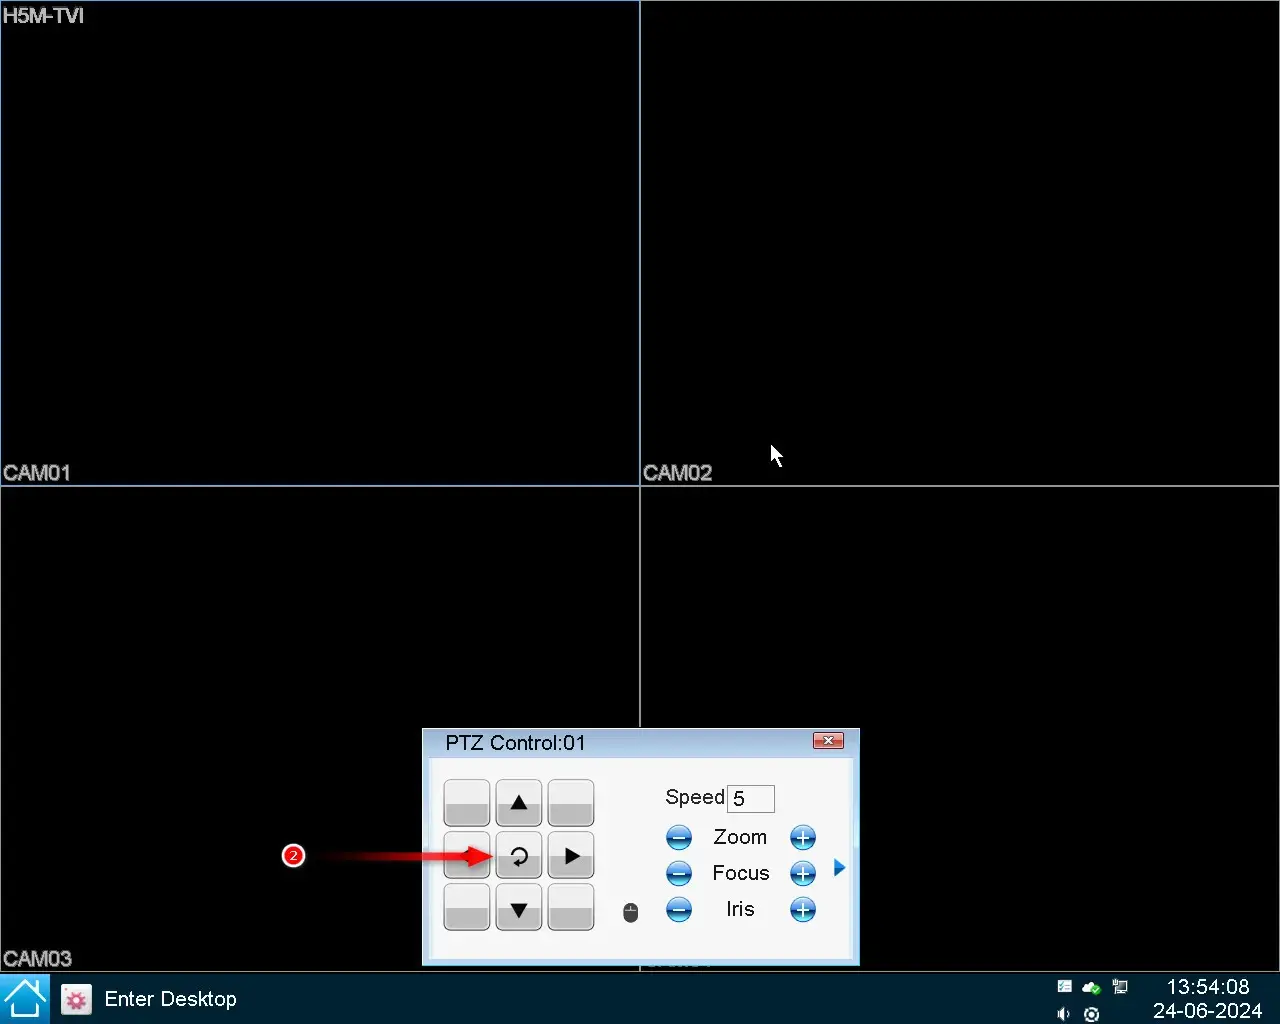
2. Double-click the 360° rotate button to open the OSD Menu.
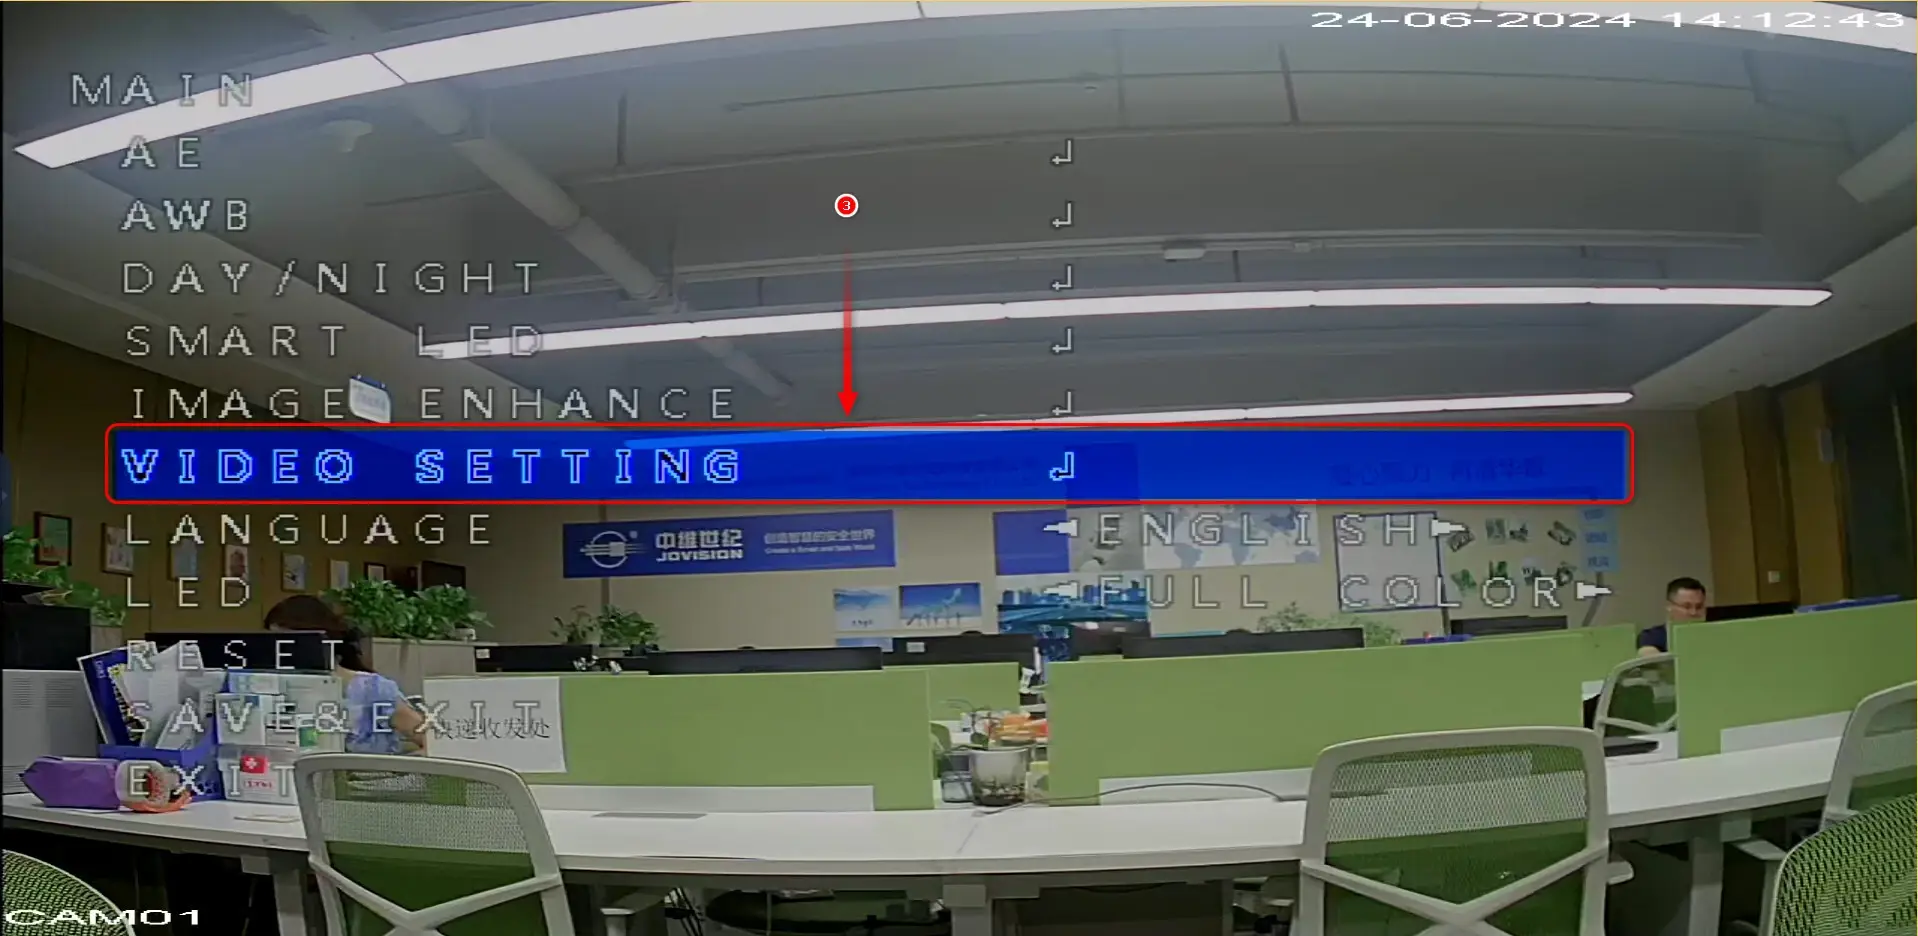
3. Use the Up/Down/Right/Left buttons to navigate through the OSD Menu.
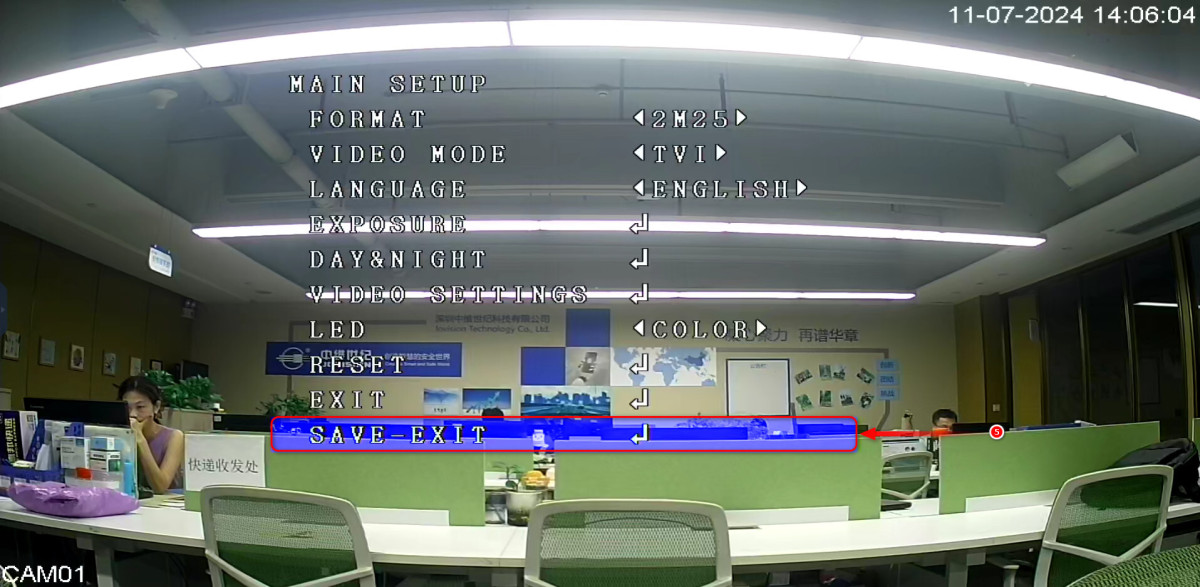
4. Check the FORMAT. If the resolution displays 2MP25 (25FPS), it is set to the PAL system.
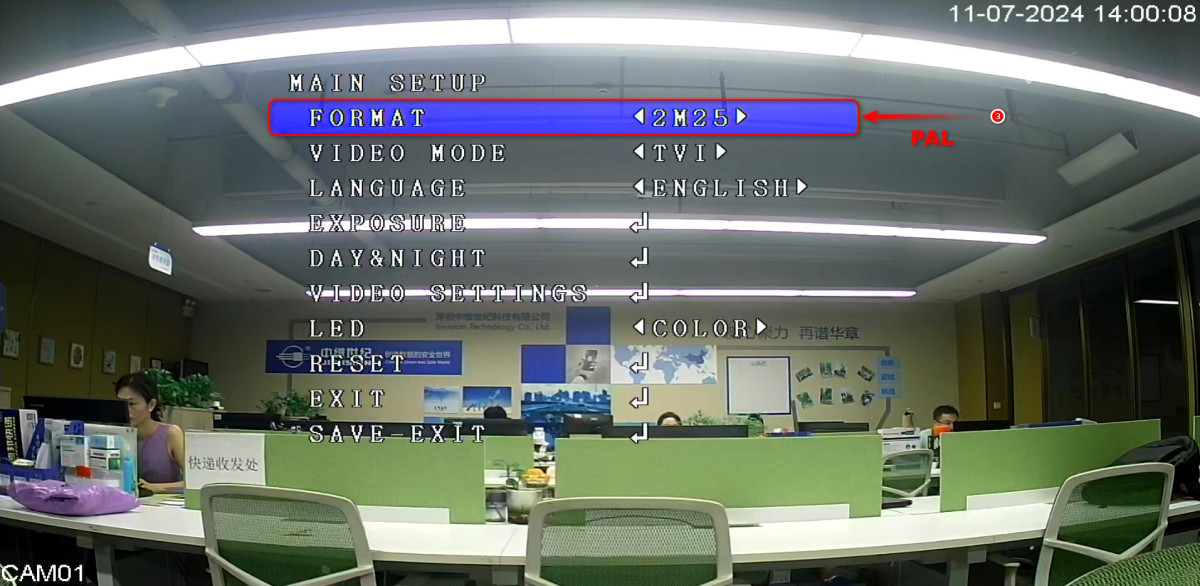
5. Use the Right/Left button to switch it to 2MB30 (30FPS), which is the NTSC system.
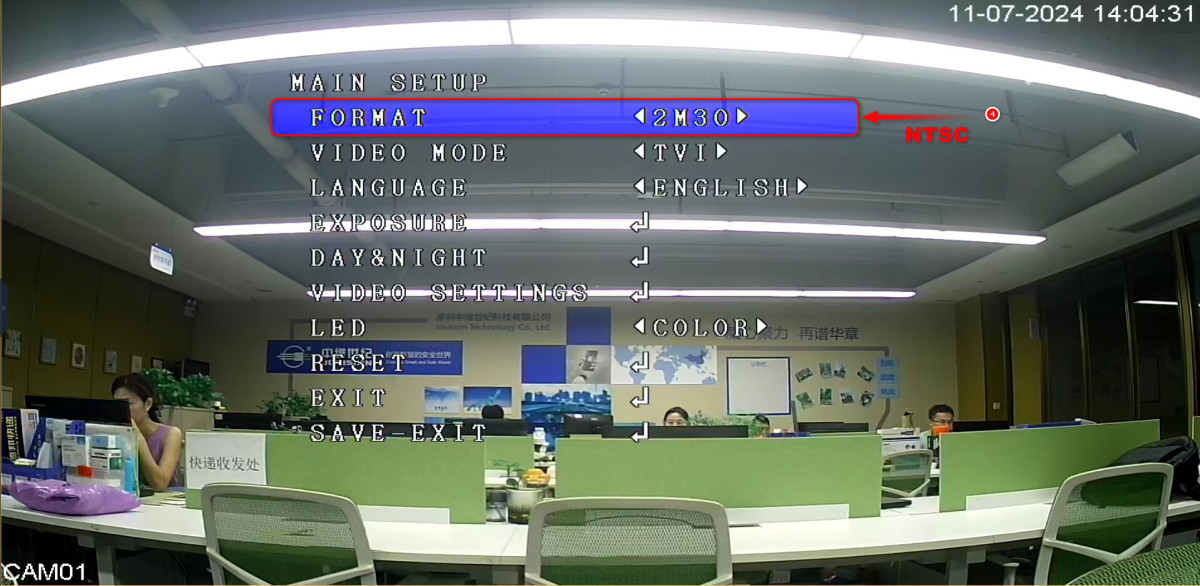
6. After switching the FORMAT according to your requirement, press the Down button to navigate to SAVE - EXIT, then click the 360° rotate button to save the settings.
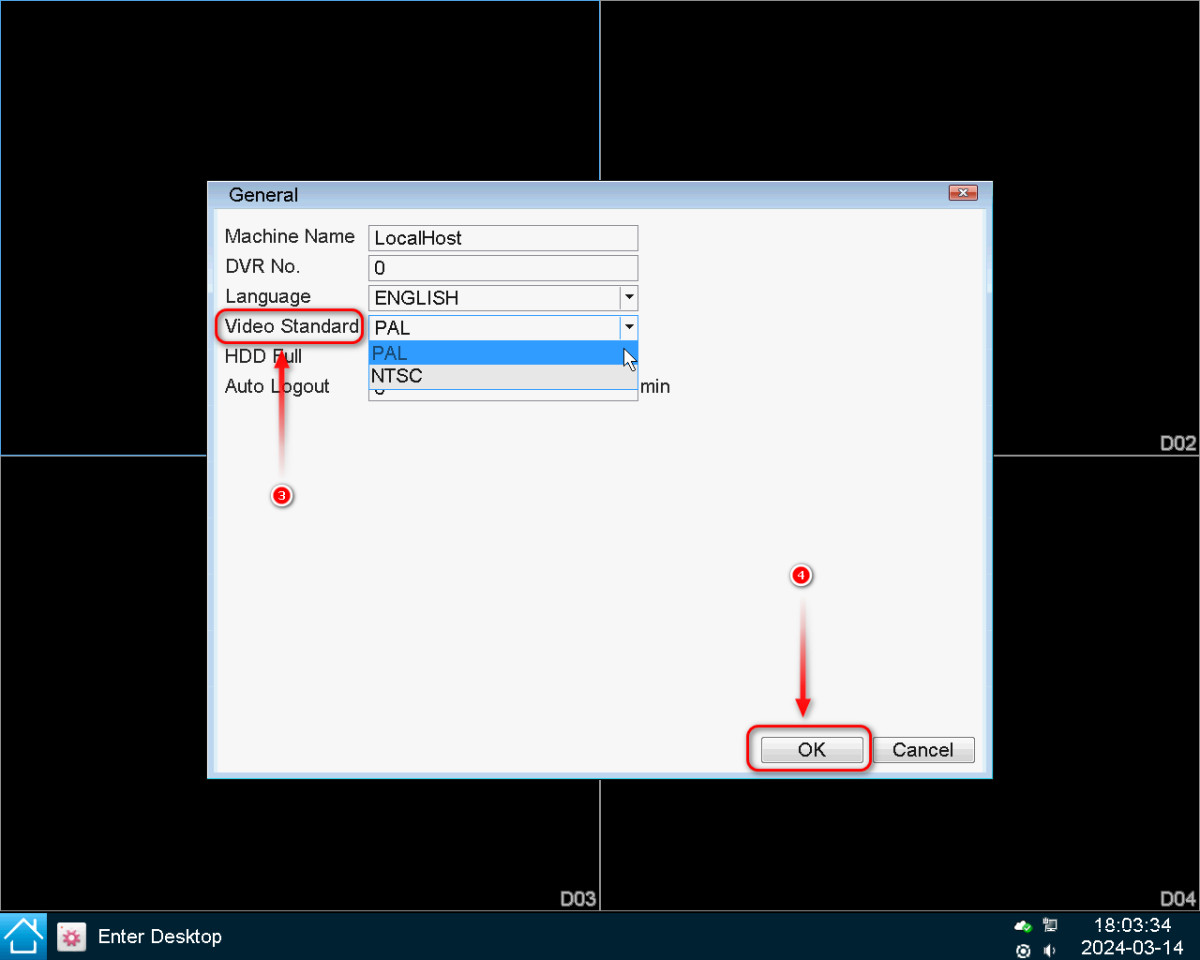
Ensure that the XVR system and the camera FORMAT are the same. To check and adjust the XVR system settings:
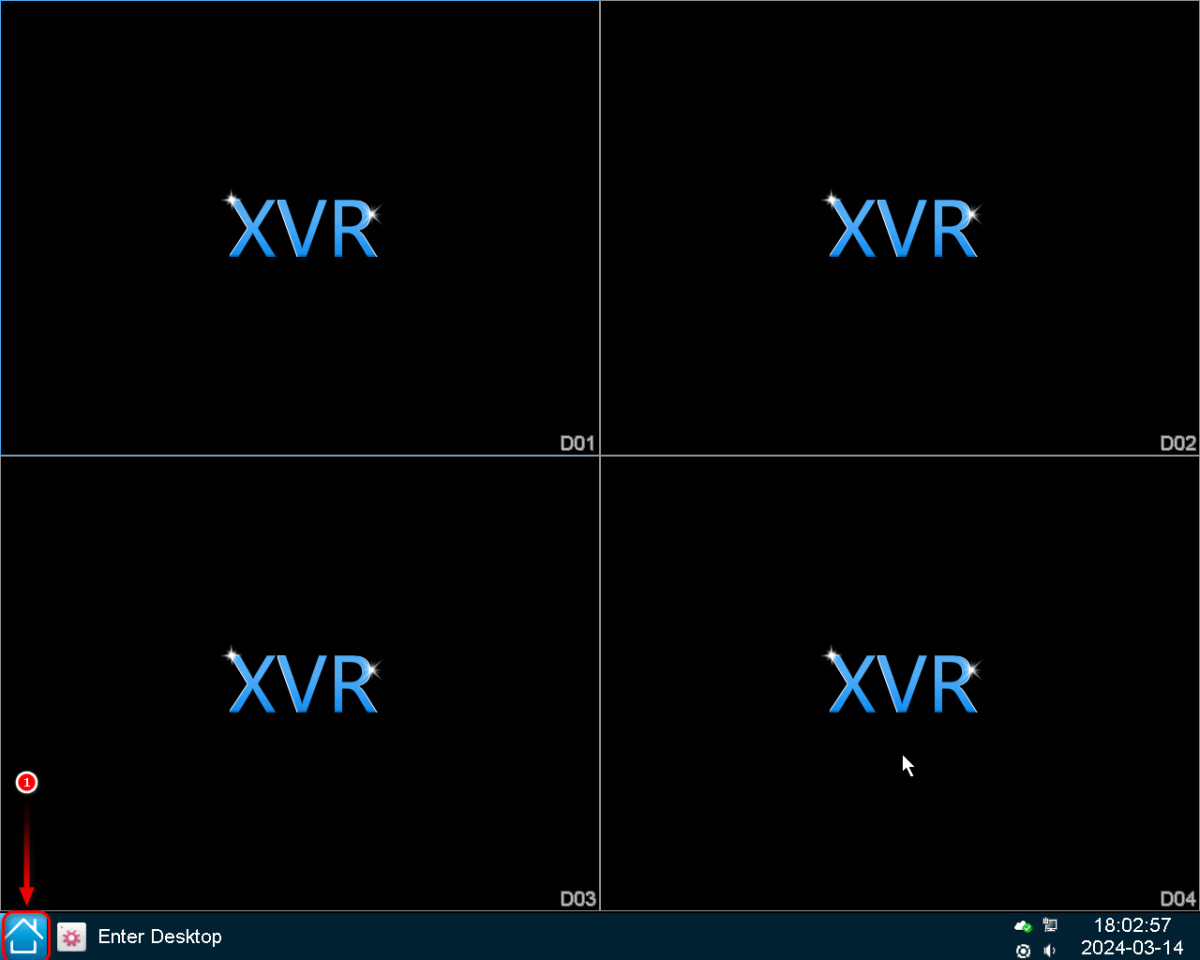
1. Click the Home button on the lower-left corner of the XVR GUI.
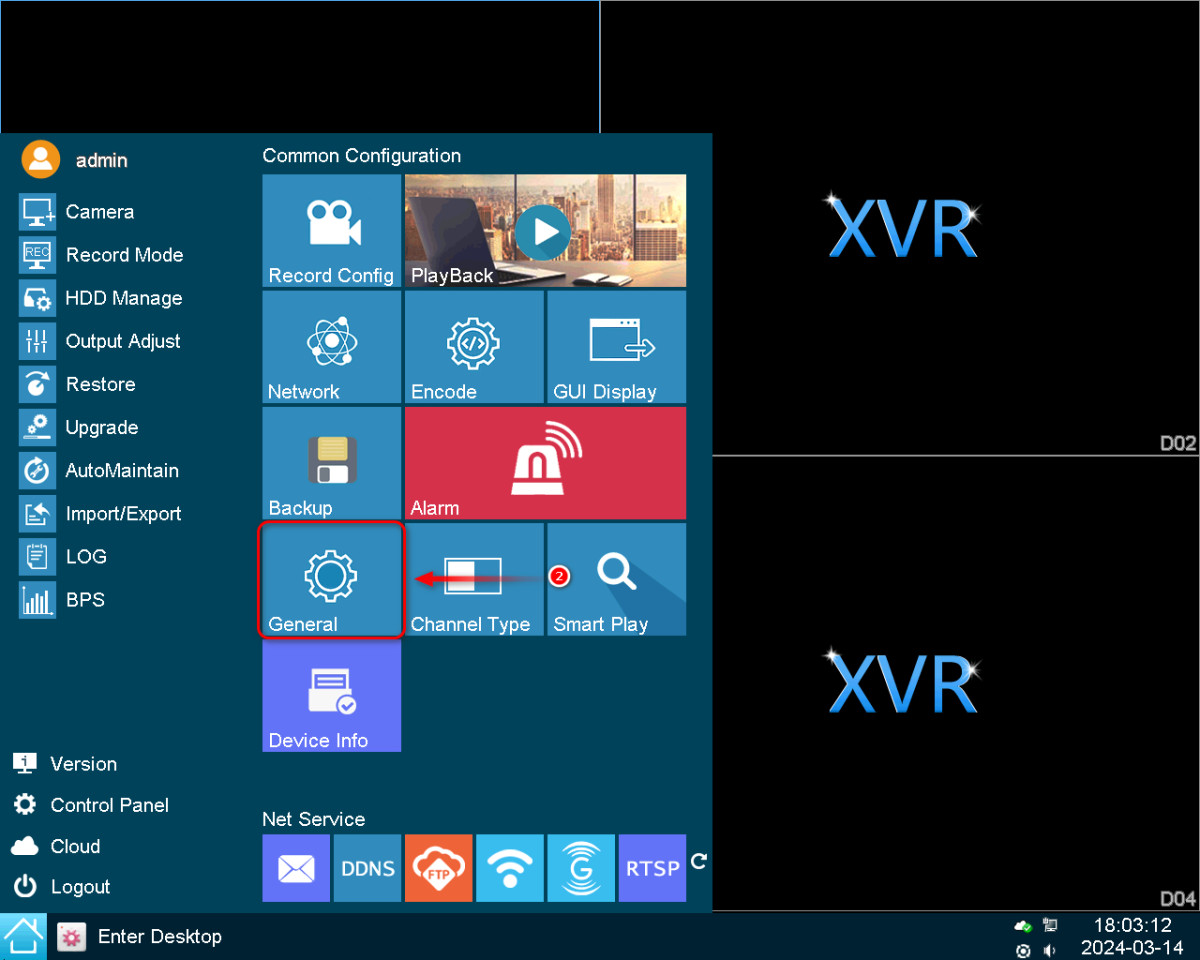
2. Click General.
3. Select the Video Standard to PAL / NTSC, according to the camera FORMAT then click OK to save the settings.
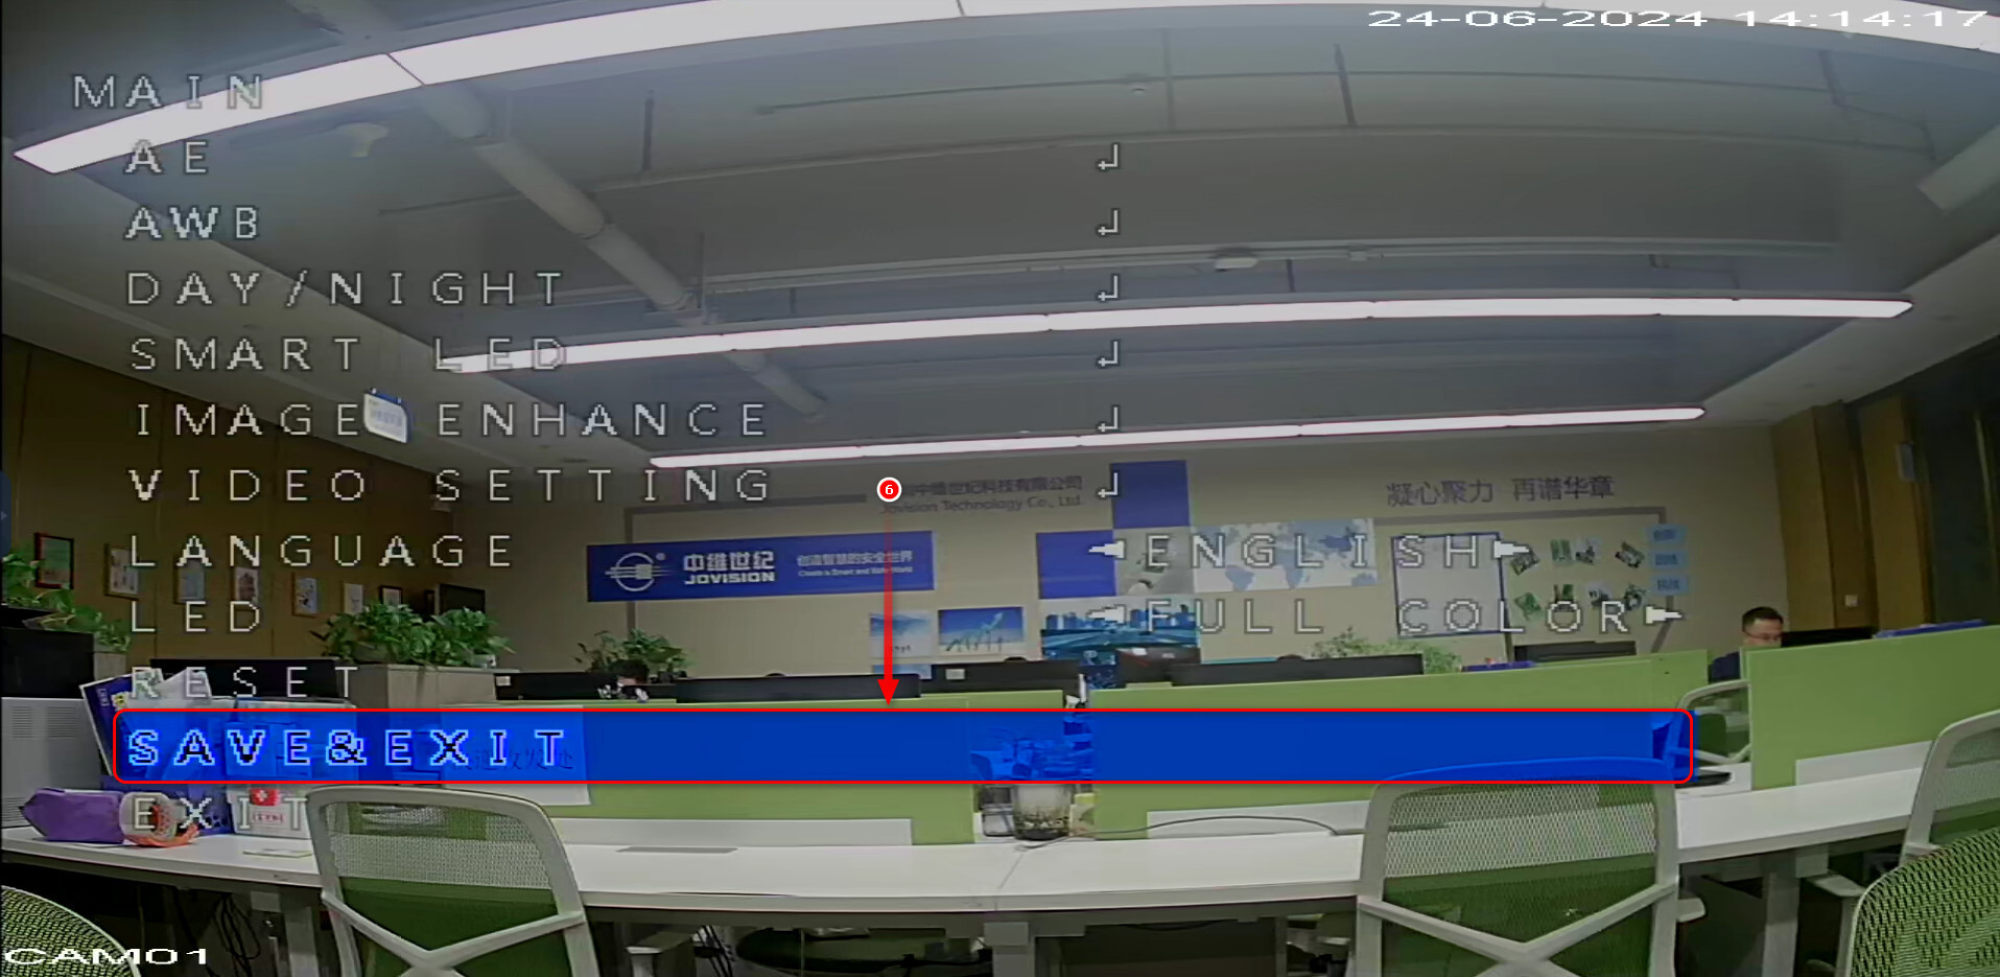
To fix this issue, you need to reduce the frame rate of the camera by accessing the camera's OSD Menu.
Follow these steps:
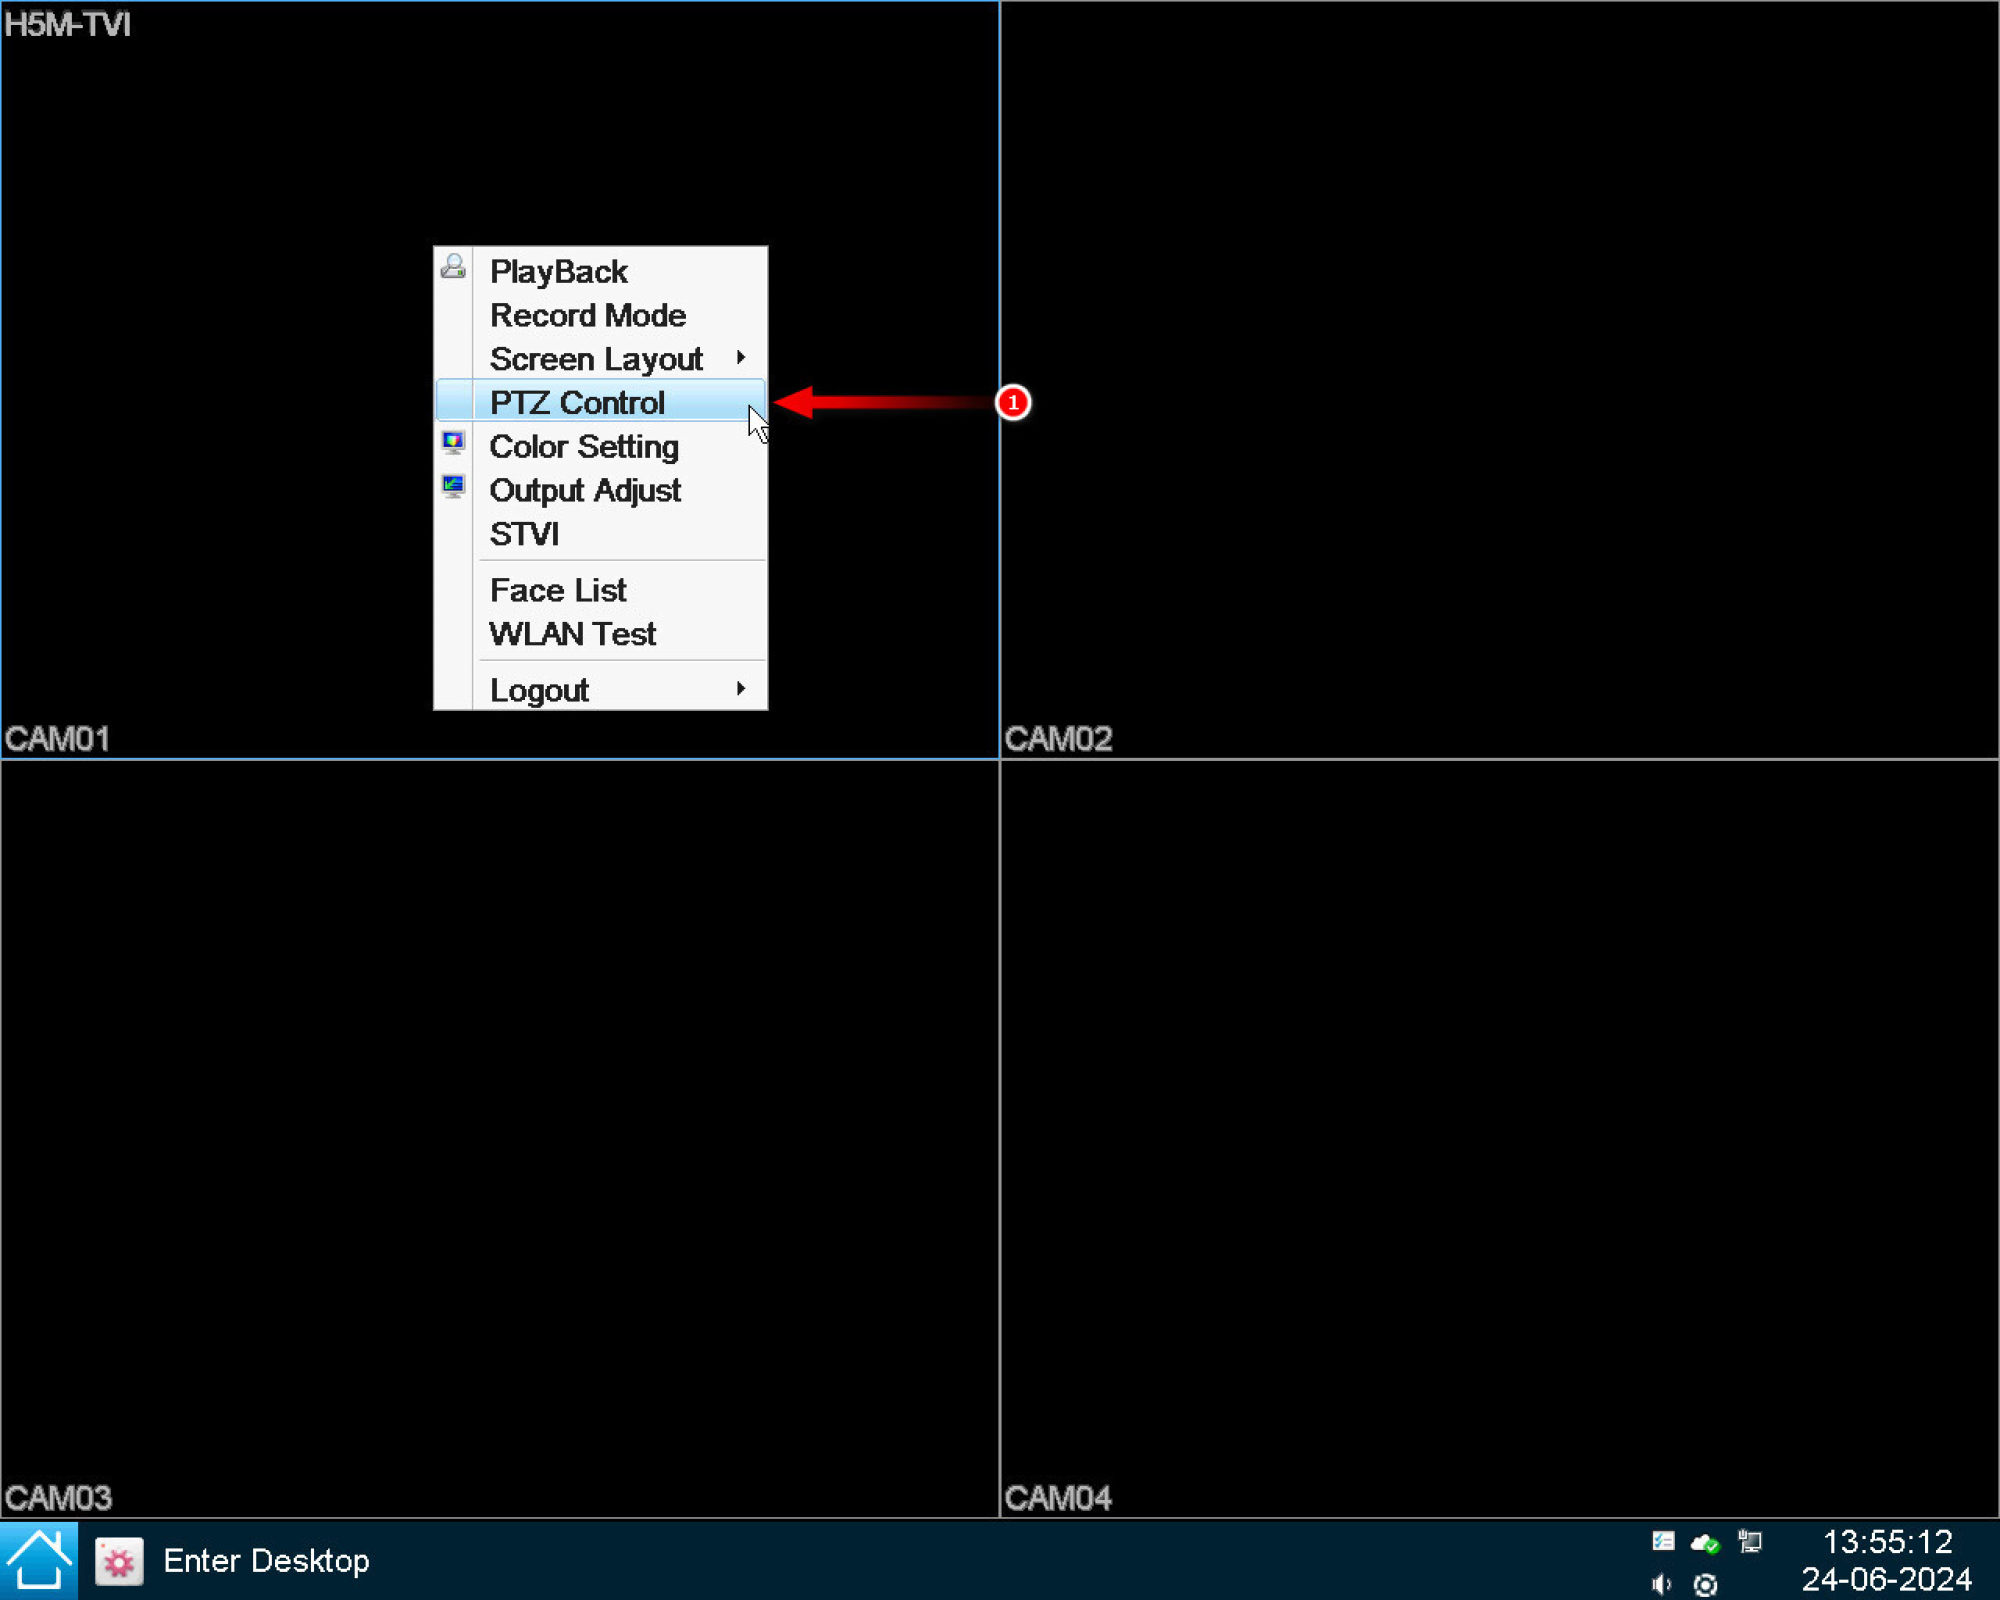
Right-click on the channel and select PTZ Control.
Double-click the 360° rotate button. This will open the OSD Menu.
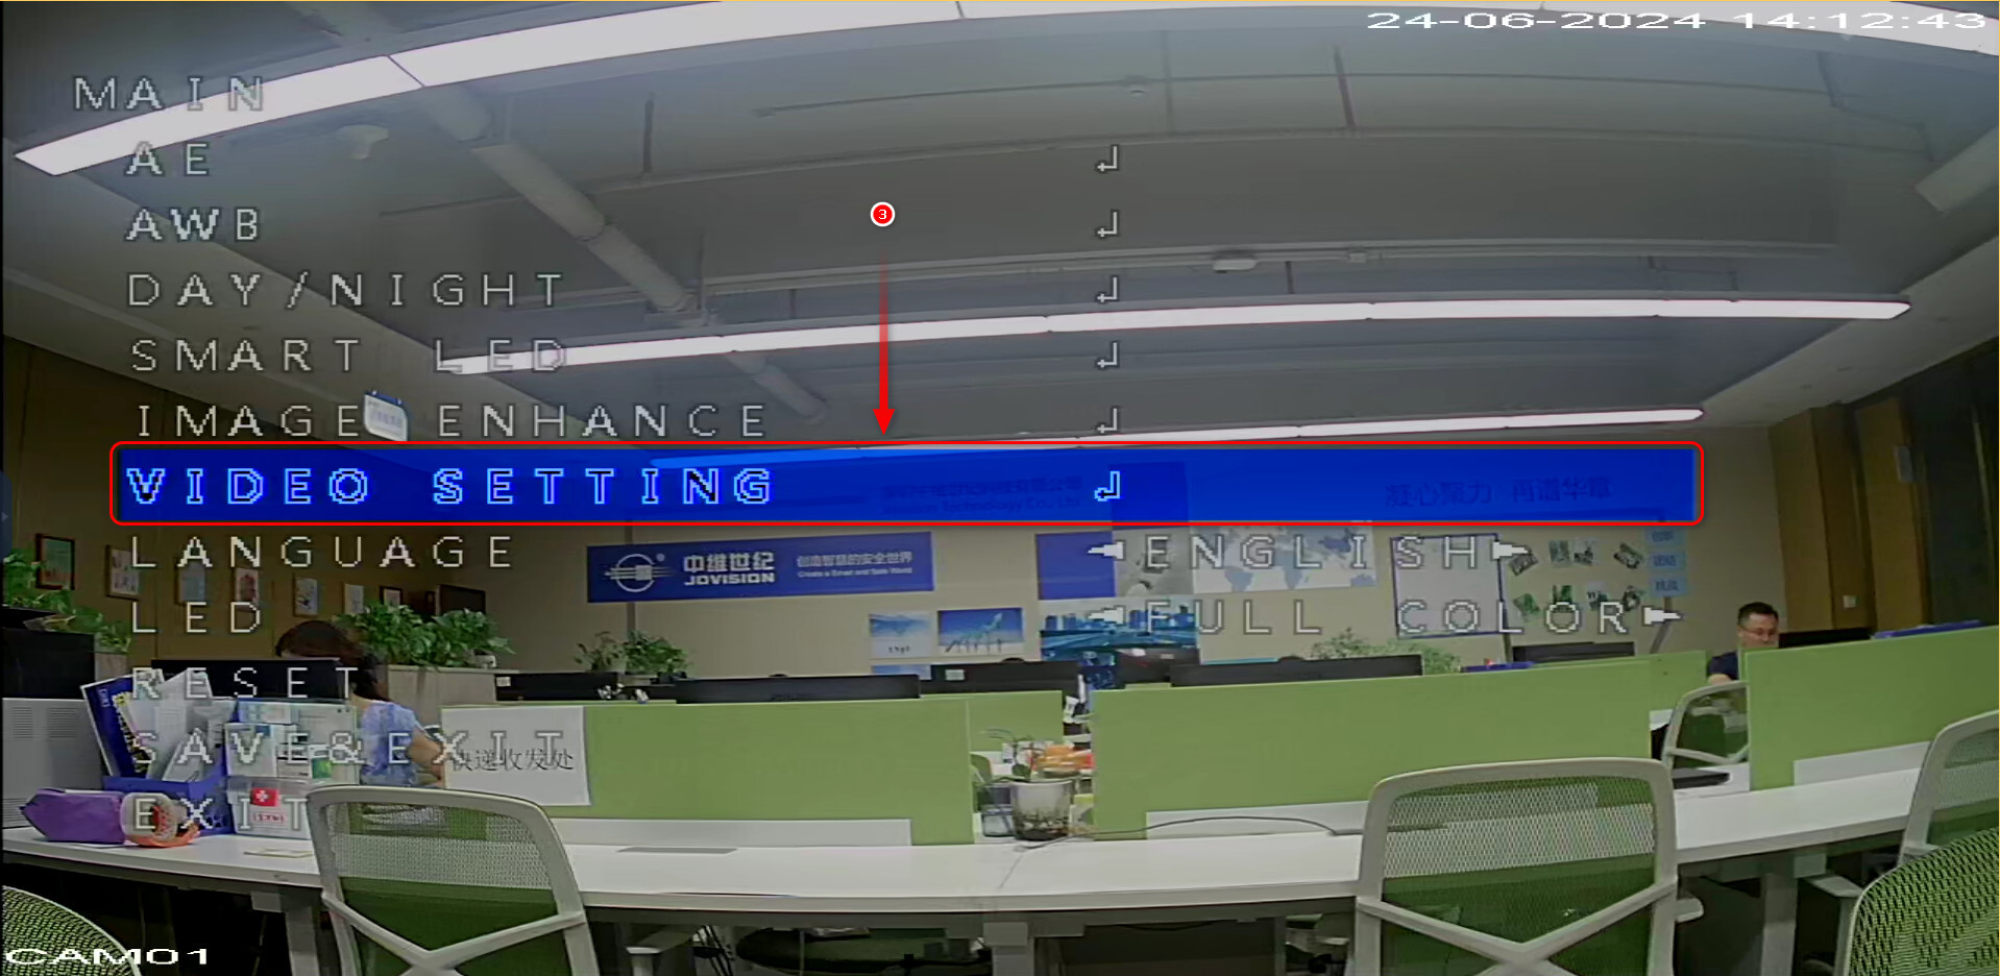
Use the Up/Down buttons to navigate through the OSD Menu. Go to Video Settings and press the 360° rotate button to enter the settings.
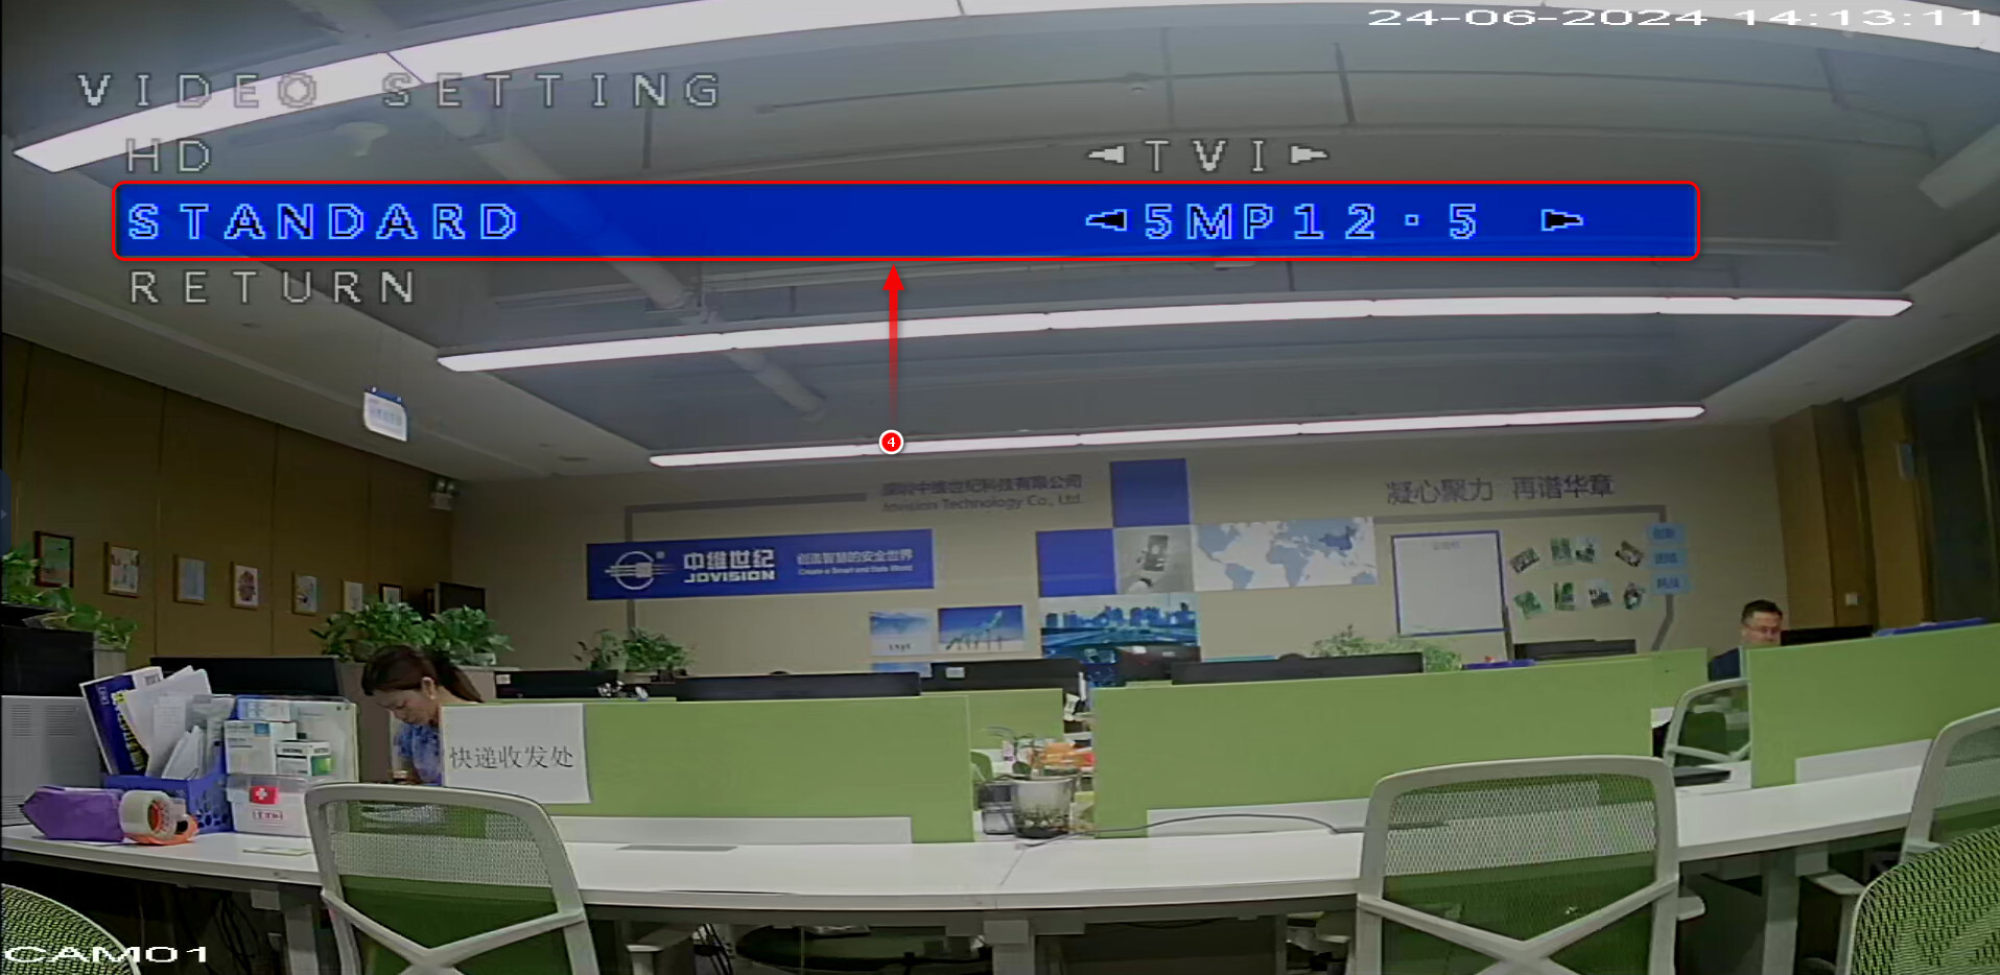
Navigate to Standard and use the Right/Left buttons to change the frame rate to 12.5fps (5MP 12.5).
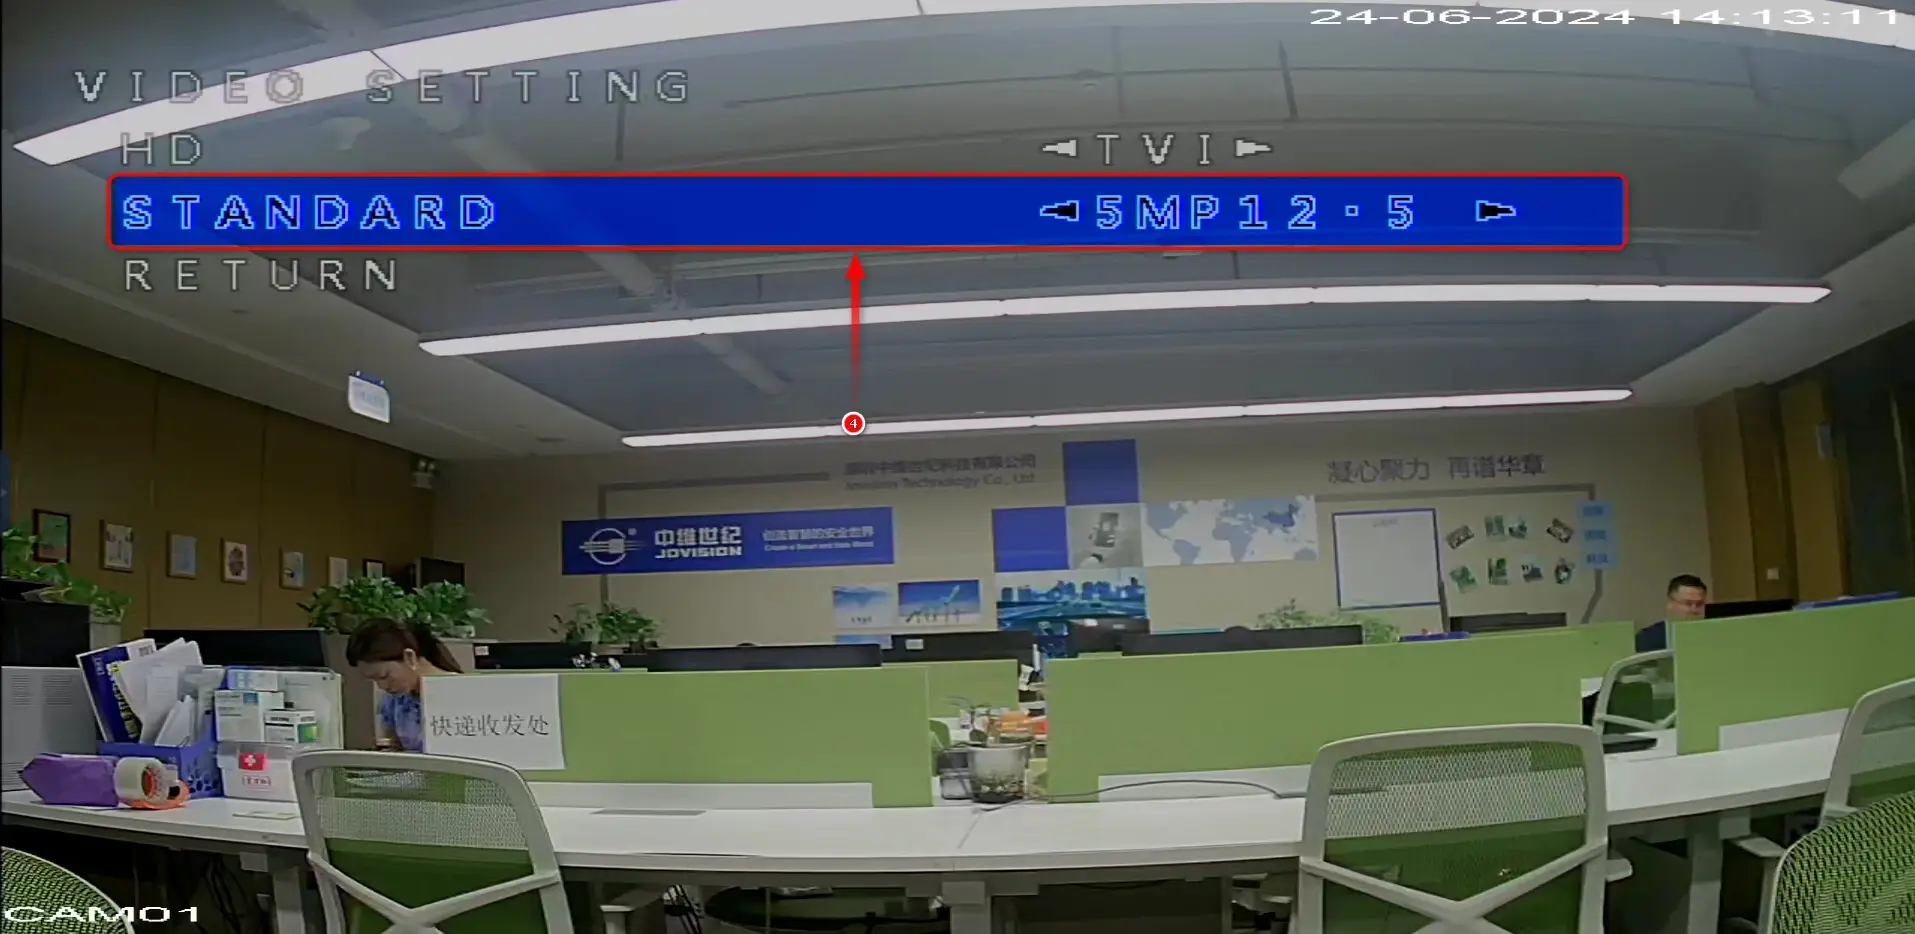
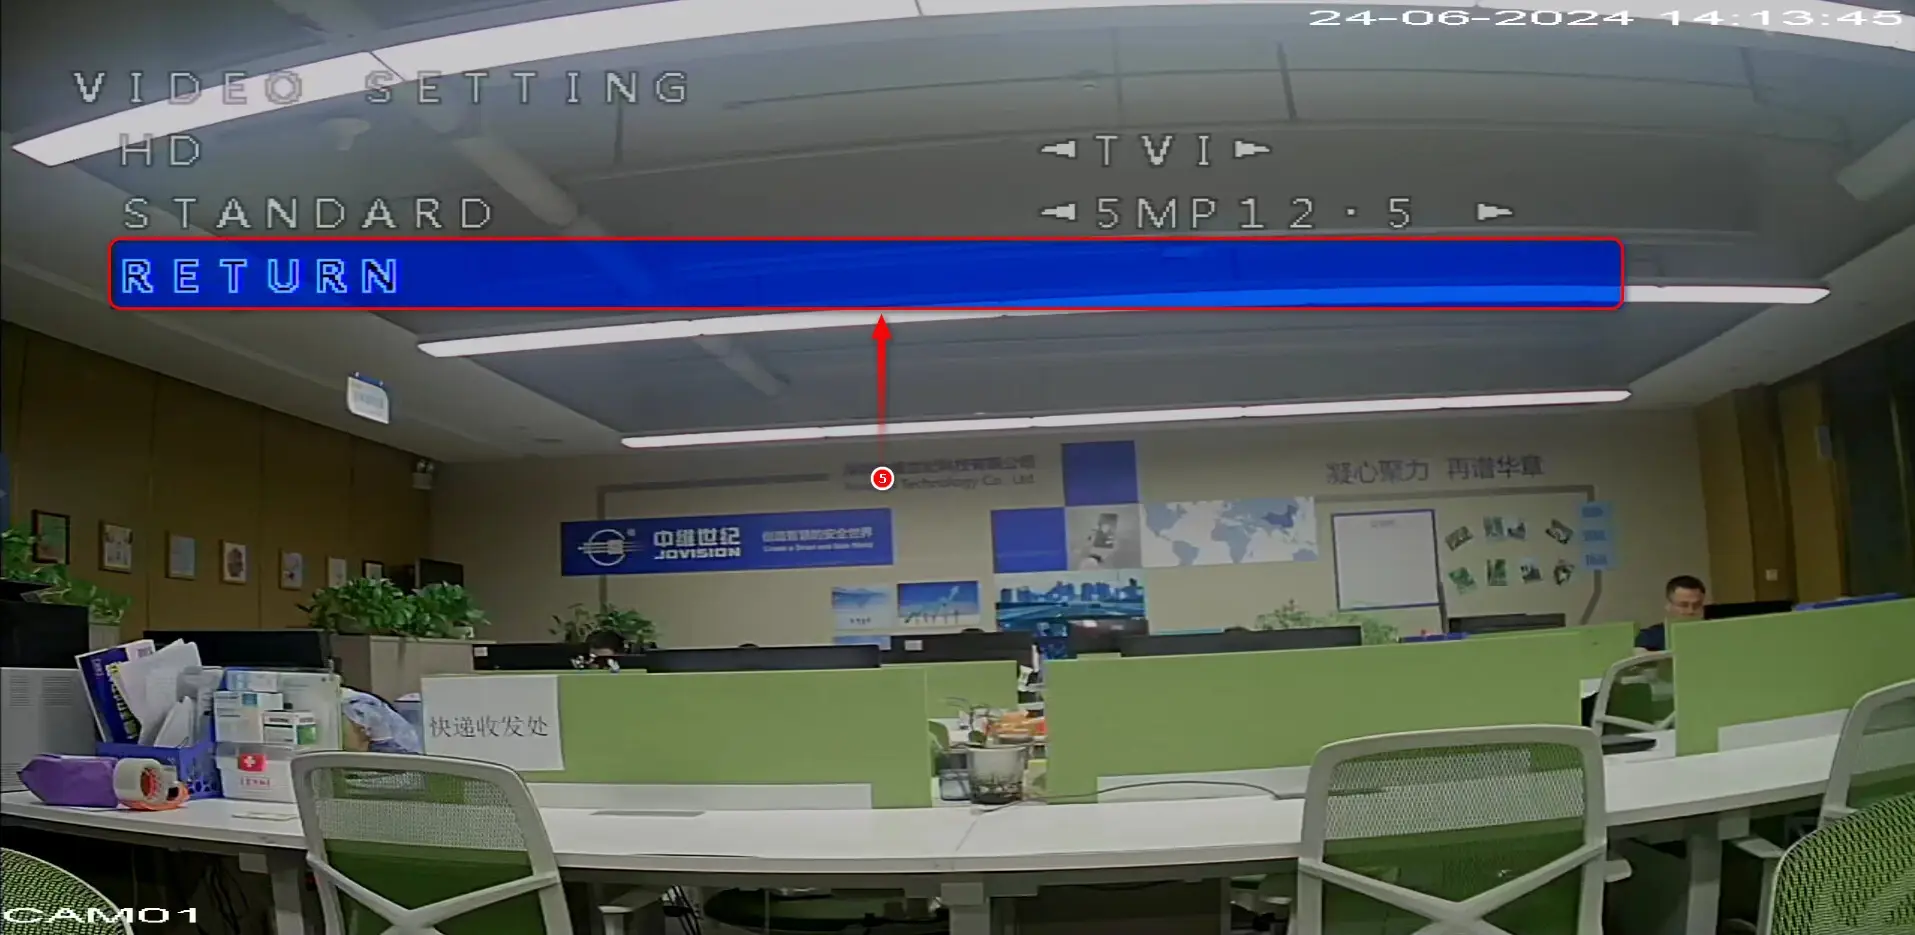
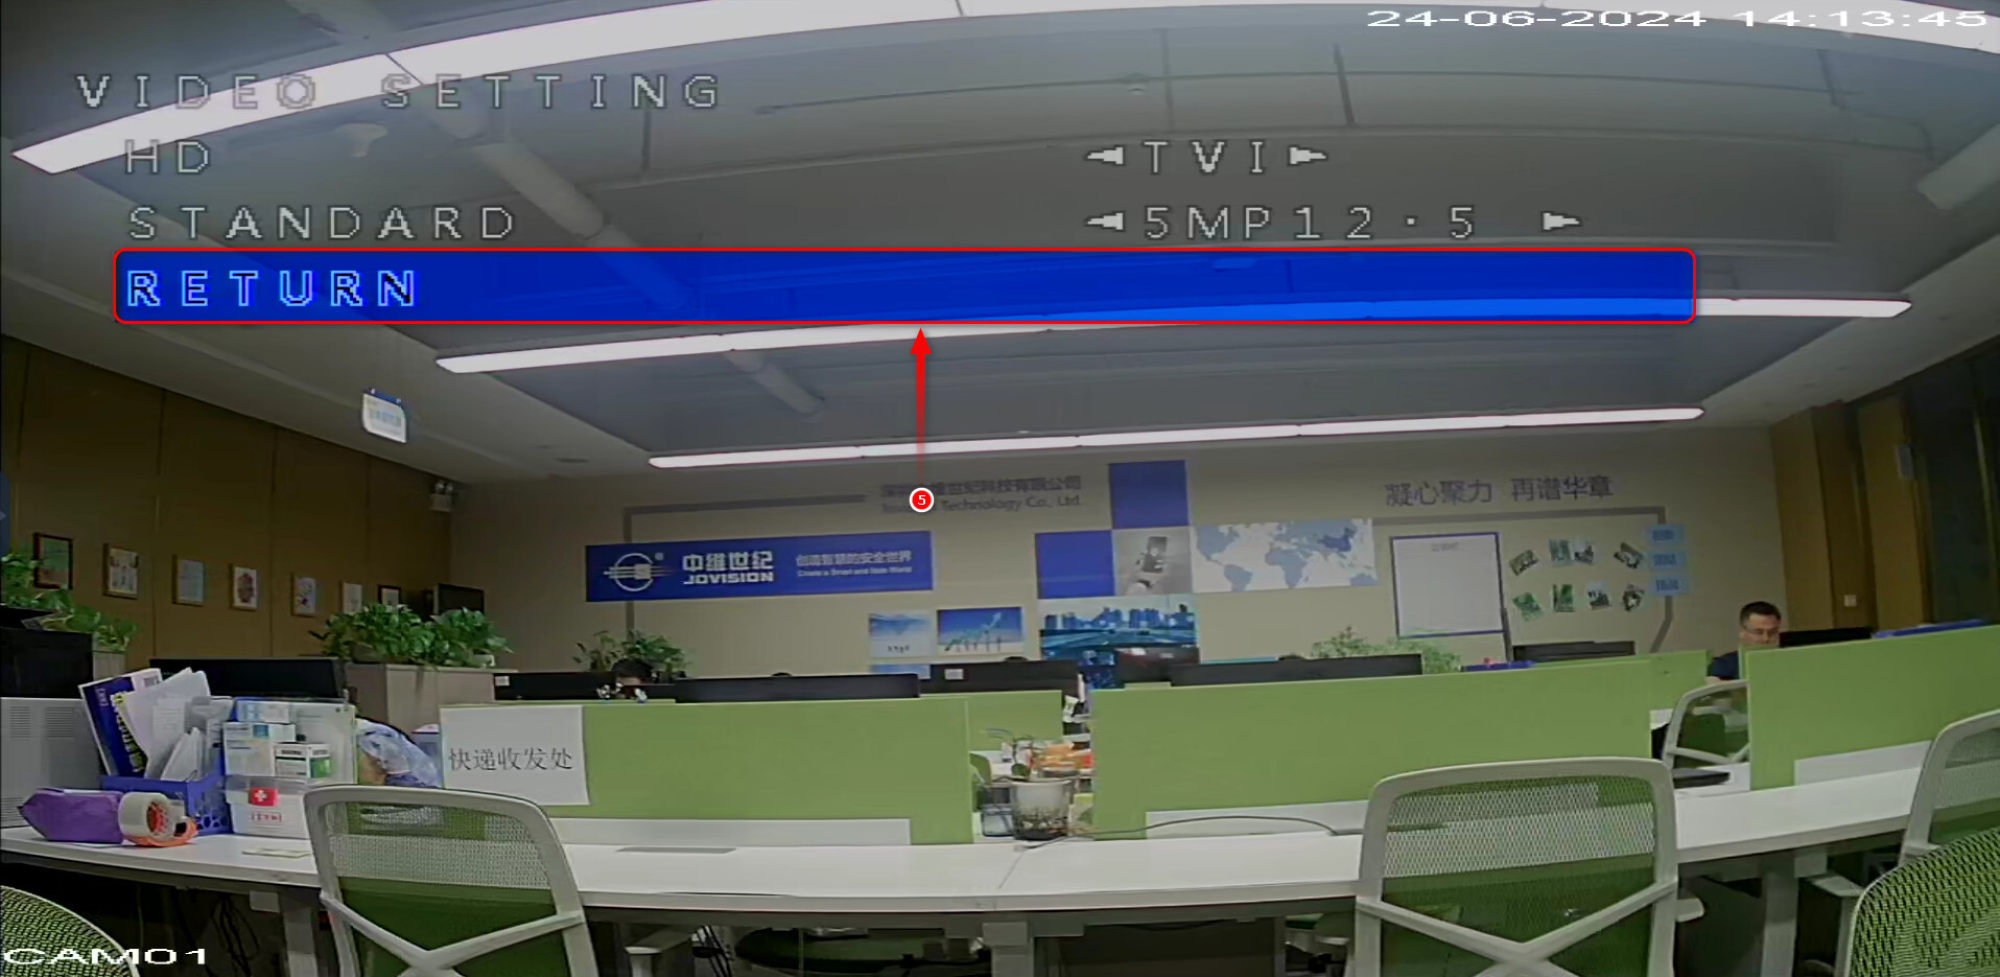
Press the Down button to select Return and press the 360° rotate button to go back.
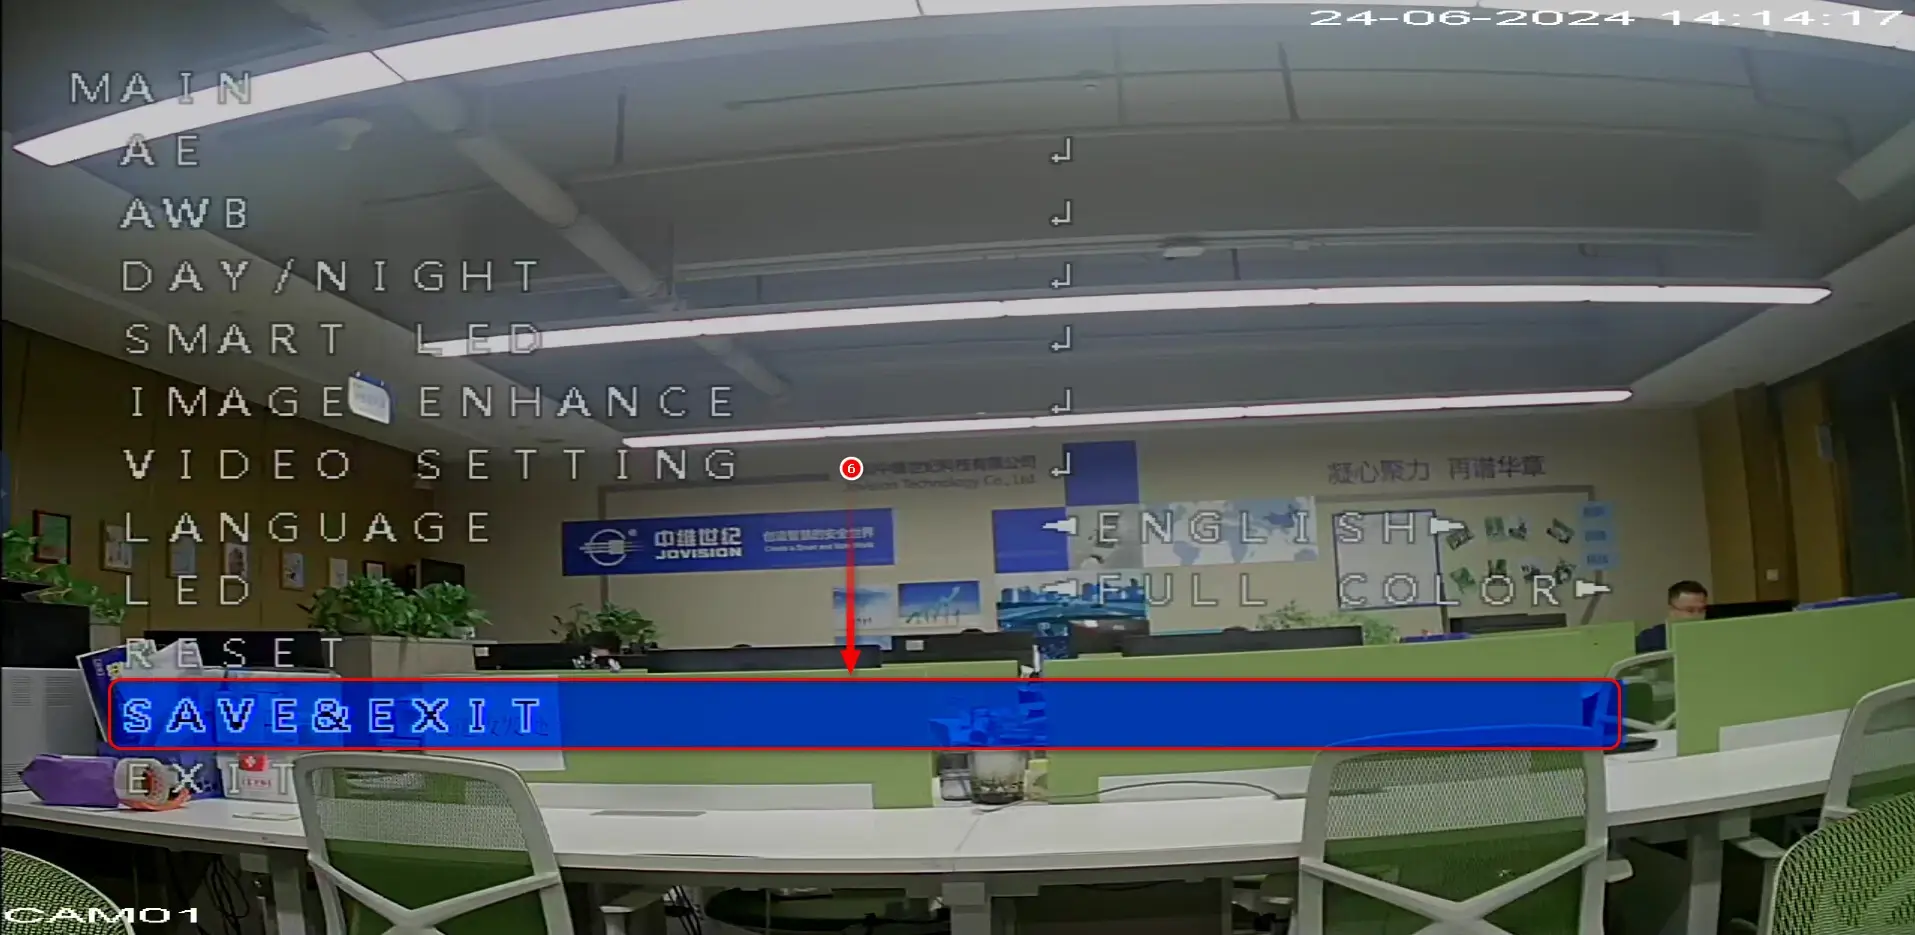
Navigate to Save & Exit by pressing the Down button. This will save the settings, and the channel will start displaying the video feed.
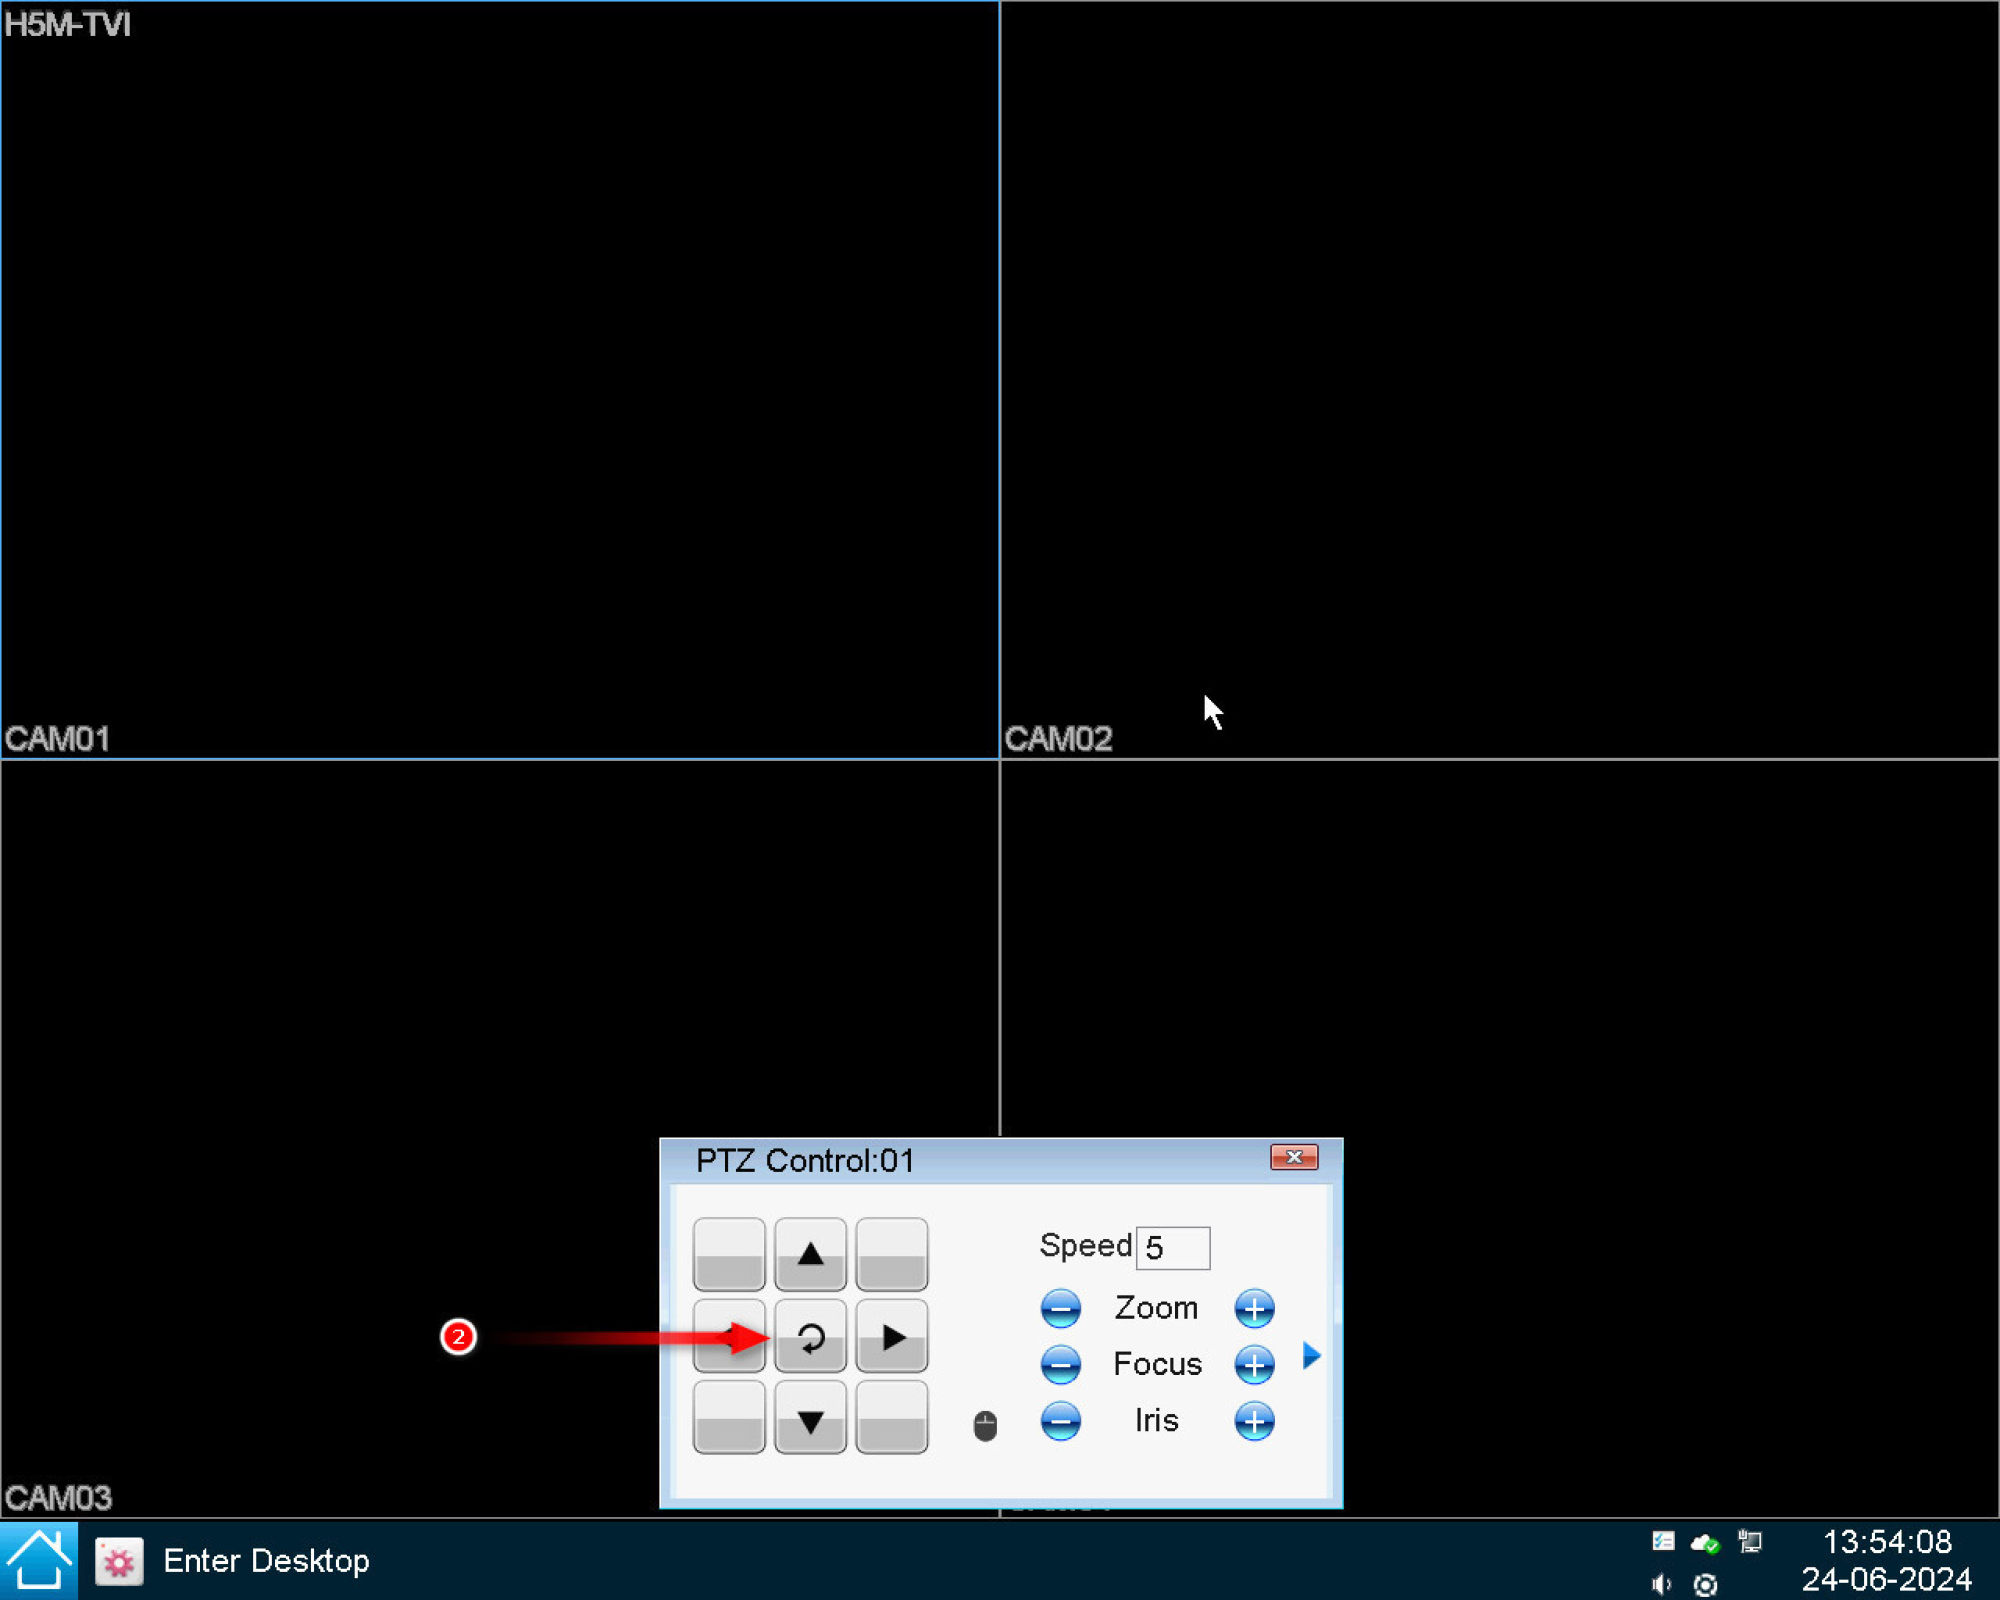
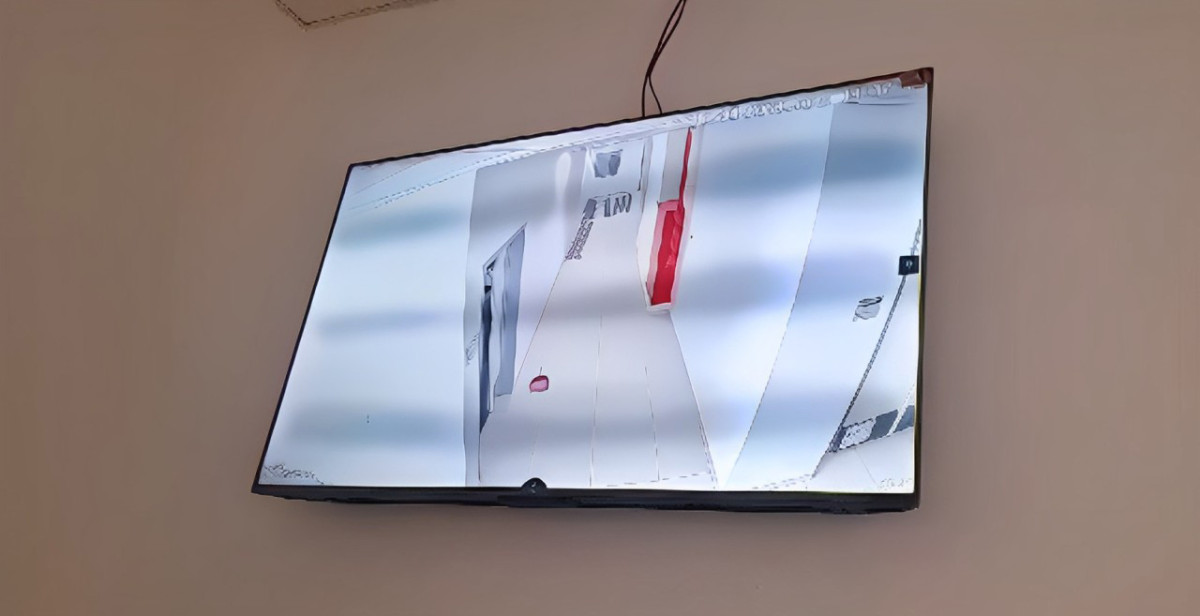
You can fix the live preview flickering issue on XVR models JVS-XD25XX-FC10T and JVS-XD27XX-FC10T by adjusting the video standard of the device. Here are the steps:
XVR Preview Flicker
1. Click the "Home" button on the lower left corner of the XVR GUI
2. Click "General"
3. Select the "Video Standard" to "PAL" then click "OK" to save the settings.
To perform USB system recovery, please follow these steps:
Prepare a USB 2.0 flash disk which must be formatted in FAT32 file system.
Copy the recovery files to the root directory of the flash disk. (Like X:recover-ndxxxx-sx.bin)
Power off the NVR/XVR/DVR, unplug HDD SATA cable and power cable.
Insert the USB flash disk into a USB port of the NVR/XVR/DVR.
Power on the NVR/XVR/DVR, system will perform recovery automatically.
System will reboot automatically after the successful recovery.
When the recovery starts, the screen will display like this:
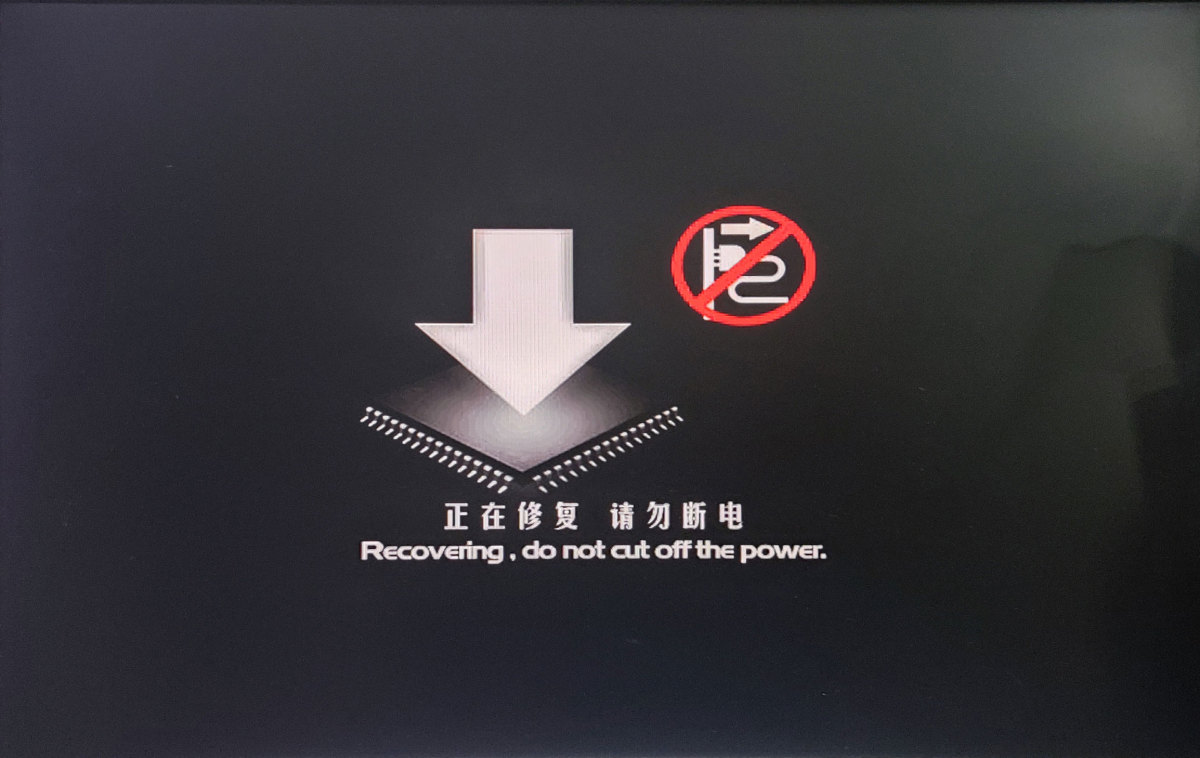
If the recovery screen doesn't appear, please check the following points:
USB 2.0 flash disk must be formatted with FAT32, and the capacity should between 2GB~8GB, any well known brand is better.
USB 3.0 not support the recovery.
Make sure the recovery file is in the root directory of the flash disk.
Check if the model and the recovery file are corresponding.
Change another USB flash disk and try again.
NOTE
DO NOT unplug the power and USB flash disk during recovery! Disconnect the USB flash disk after successful recovery in case the system might recover again.
Restart the NVR/XVR first. The camera preview will appear on the display after restart. Send us the device model number and current date displayed on the right bottom corner of the screen (Send us the picture) to support@jovision.com. We shall send you the super password for the corresponding date. Just input super password in the device login and follow the instruction on the screen.
This is due to corrupted firmware. You need to recover the device. Download recovery firmware from https://www.jovisionsecurity.com/download.html
If you don’t find the firmware, please contest us at support@jovision.com
Check the recovery tutorial here
1.Access IPC’s web page, Set the HTTPS Port for IPC:
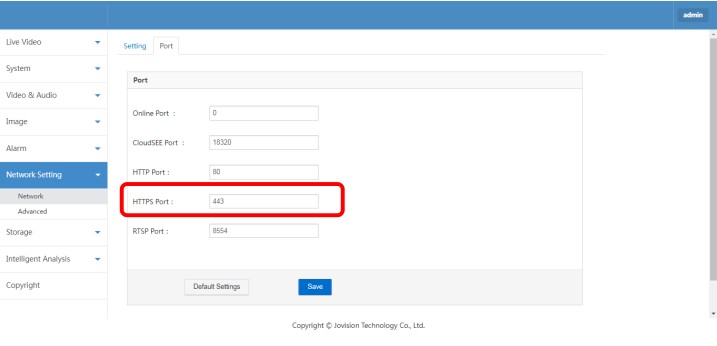
2.Access the router, start the virtual server, and set internal and external network ports
External port: It is the port number used for public network connections(for example:443)
Internal port: IPC port(for example:443)
IP address: The IP address of the IPC you want to connect to the public network
Protocol Type: Select ALL
3.Find and Click the "Advanced Add" button on NVR’s GUI
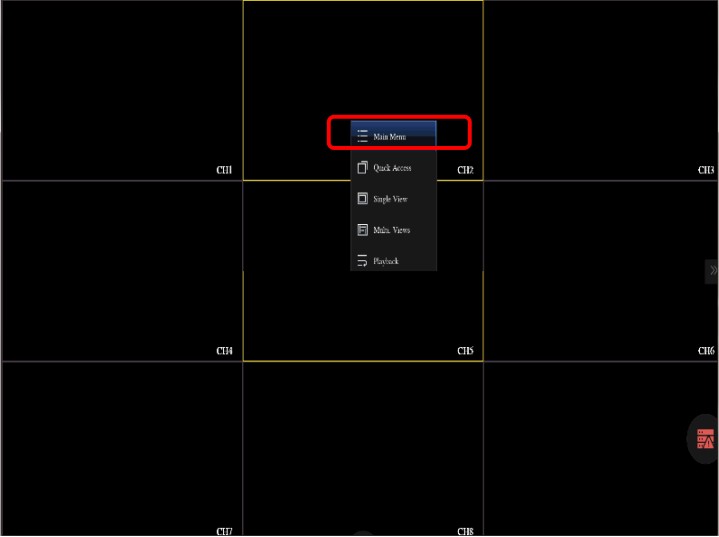
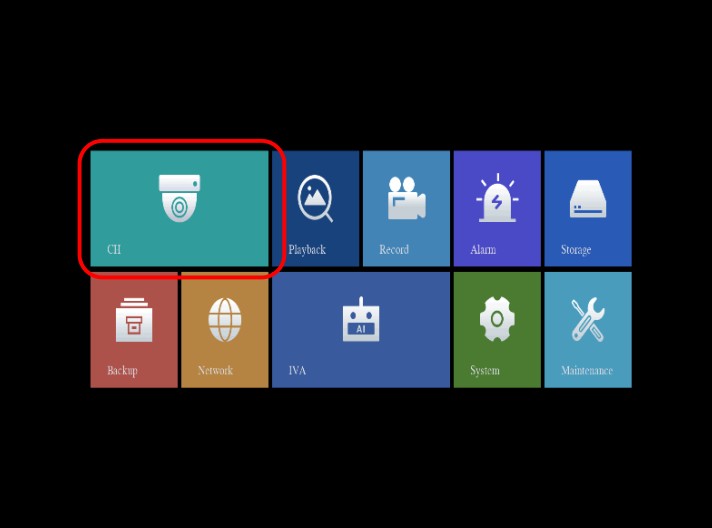
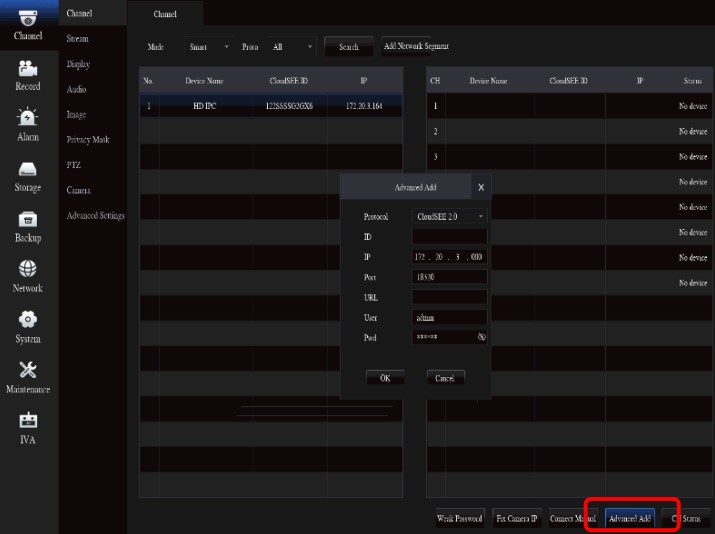
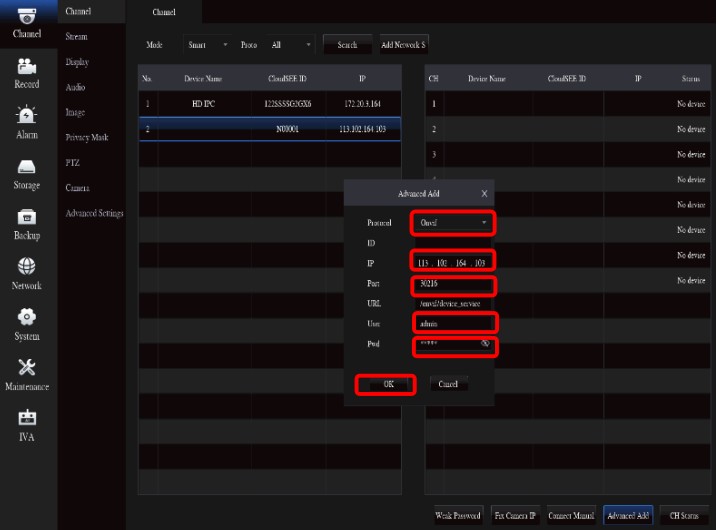
4.Set Parameters
Protocol:Onvif
IP: Input the public IP address, (for example: 113.102.164.103)
Port: Enter an external access port for IPC, (for example: 443)
User:Input user name
Pwd:Input password
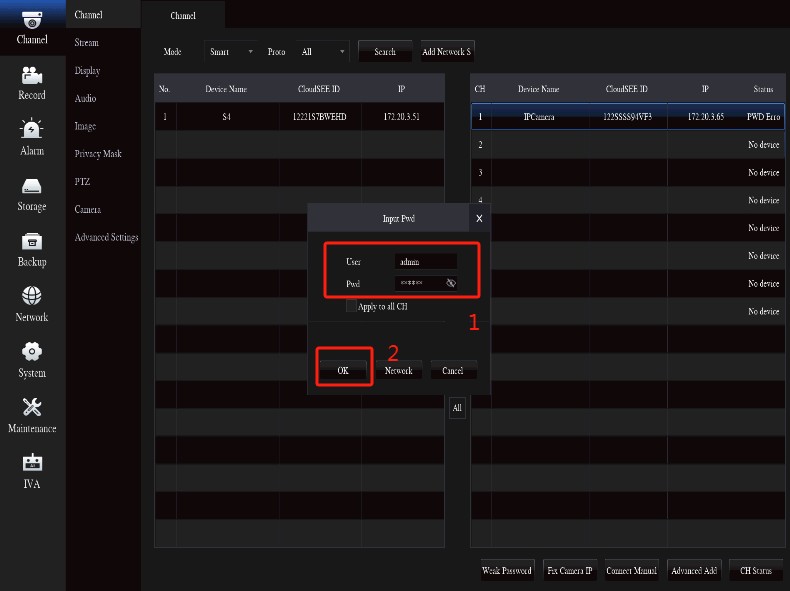
Click OK button to add IPC to NVR, operation completed.
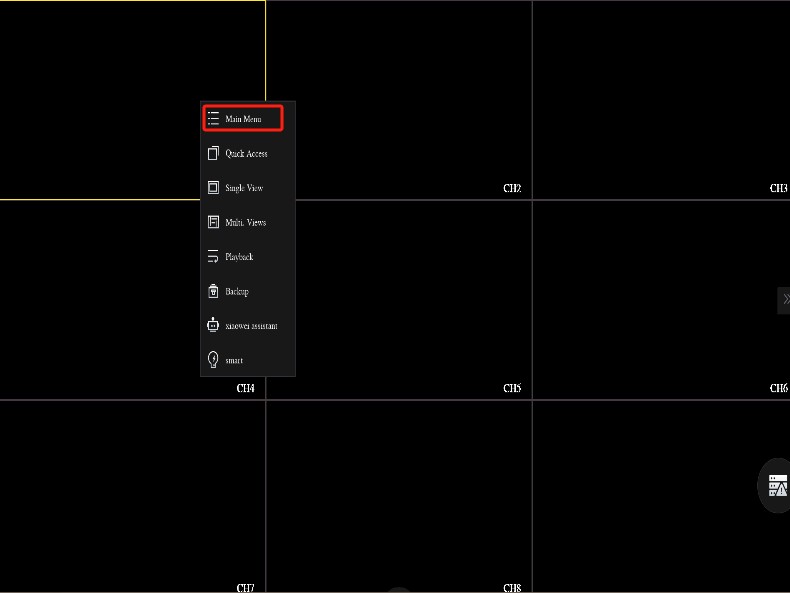
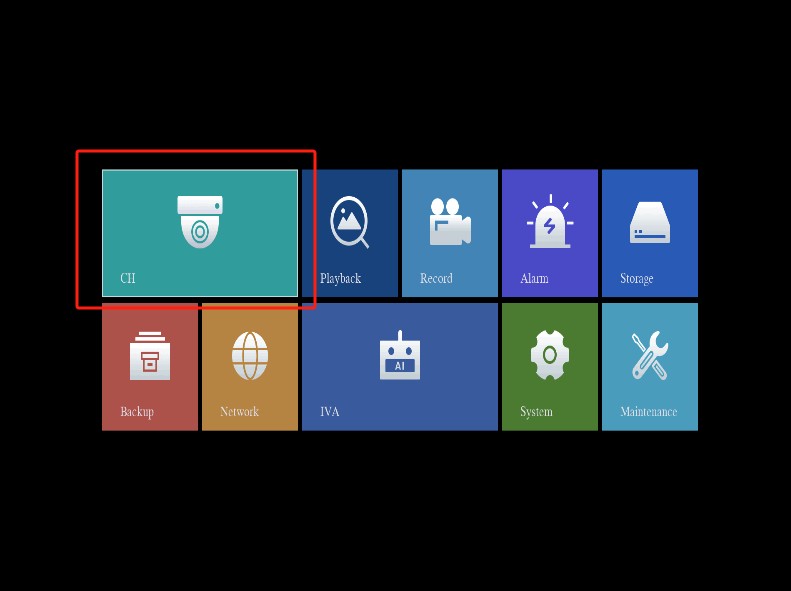
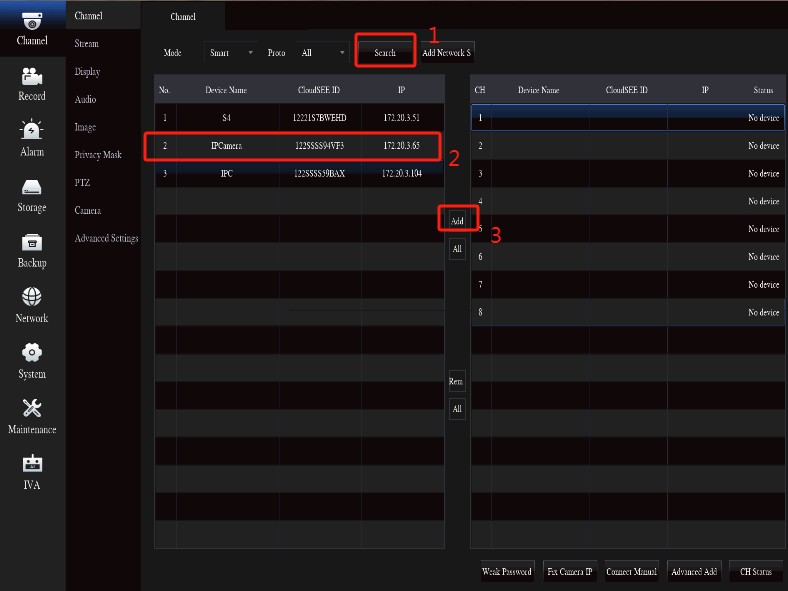
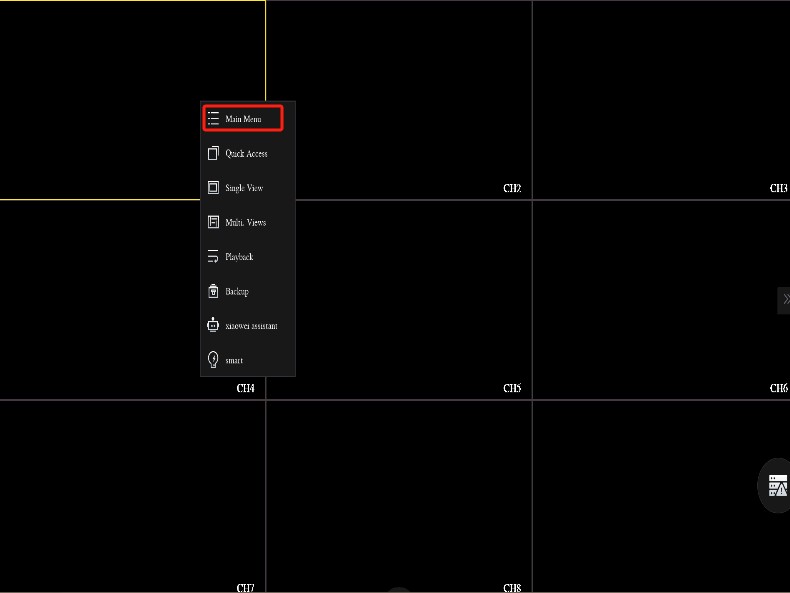
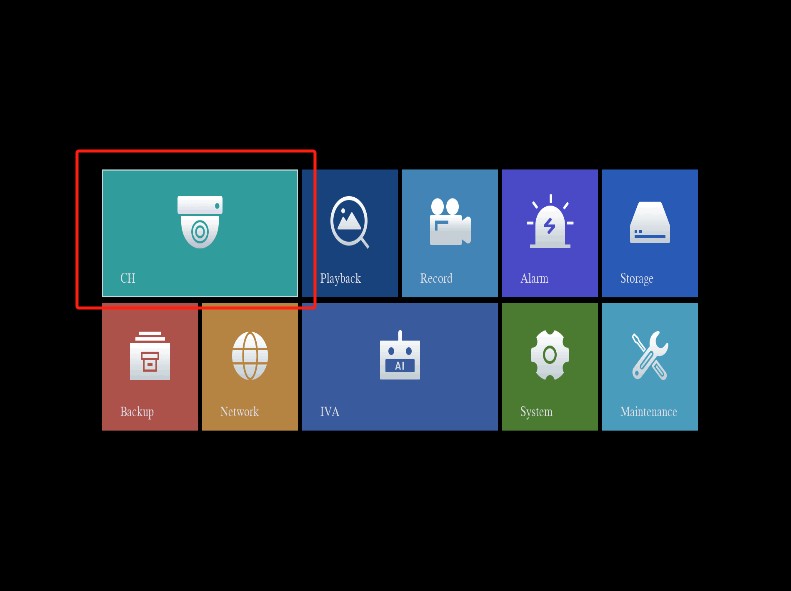
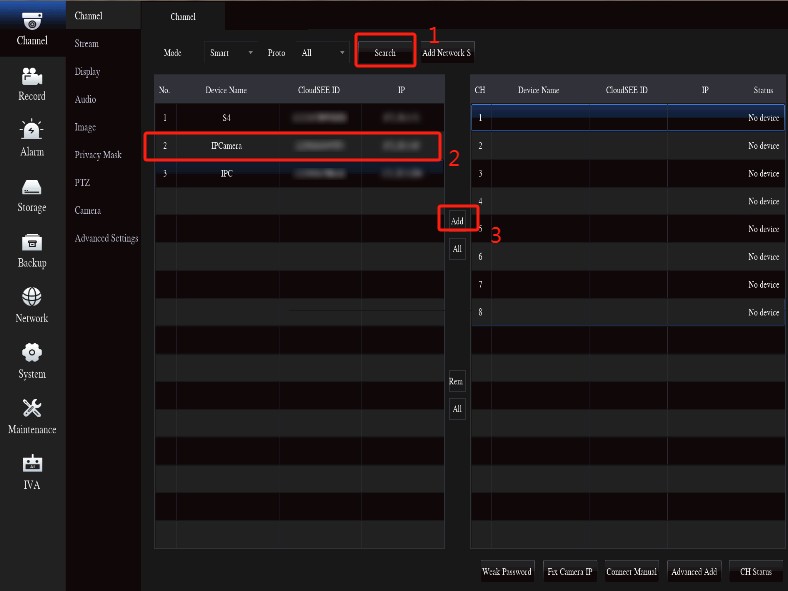
1.Click the right mouse button to call the menu on NVR’s GUI, find “CH” icon to search and add your camera.
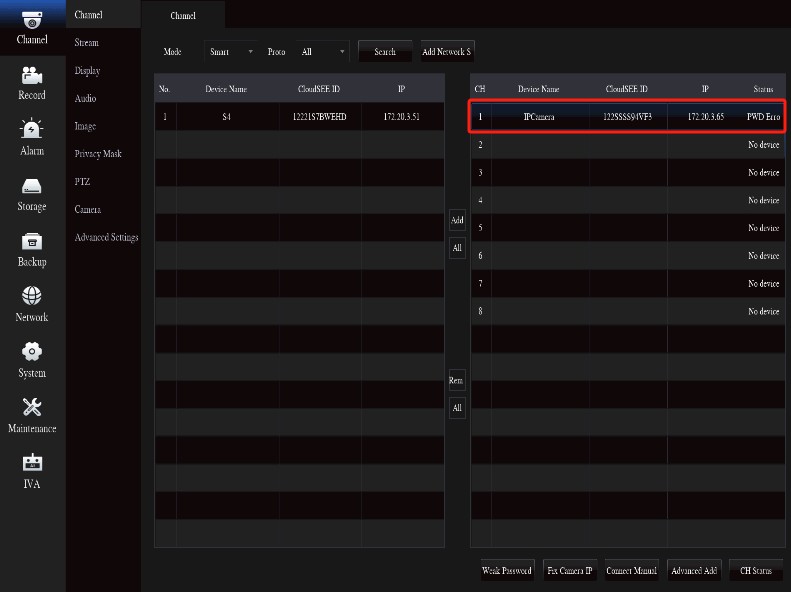
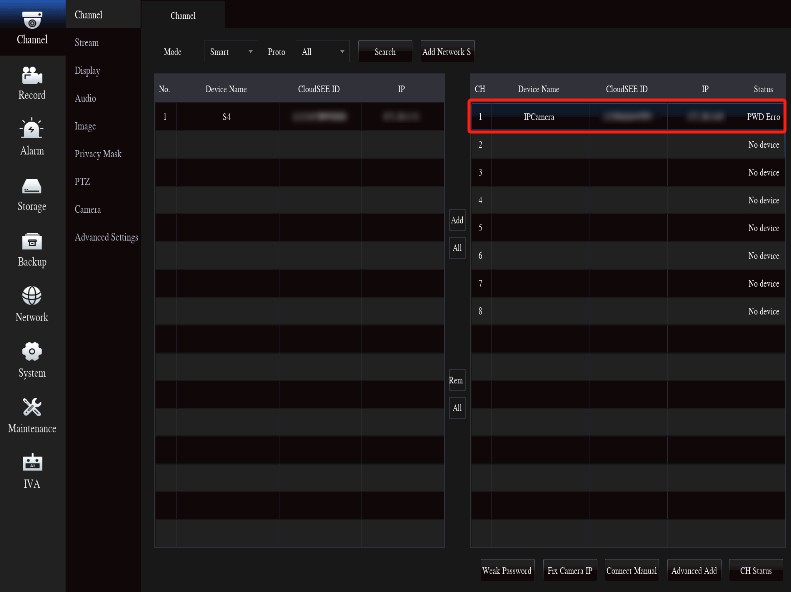
2. Double-click the camera, enter the correct password in the pop-up menu, now operation is complete. The End.
Models:
JVS-ND6606-HD / JVS-ND6610-HD / JVS-ND6616-HD / JVS-ND7604-HP
JVS-ND7608-HP / JVS-ND7616-HP / JVS-ND7004-PD01 / JVS-ND7008-PD01
JVS-ND7932-DV / JVS-ND7932-HV / JVS-ND9164-HZ / JVS-ND92128-HV
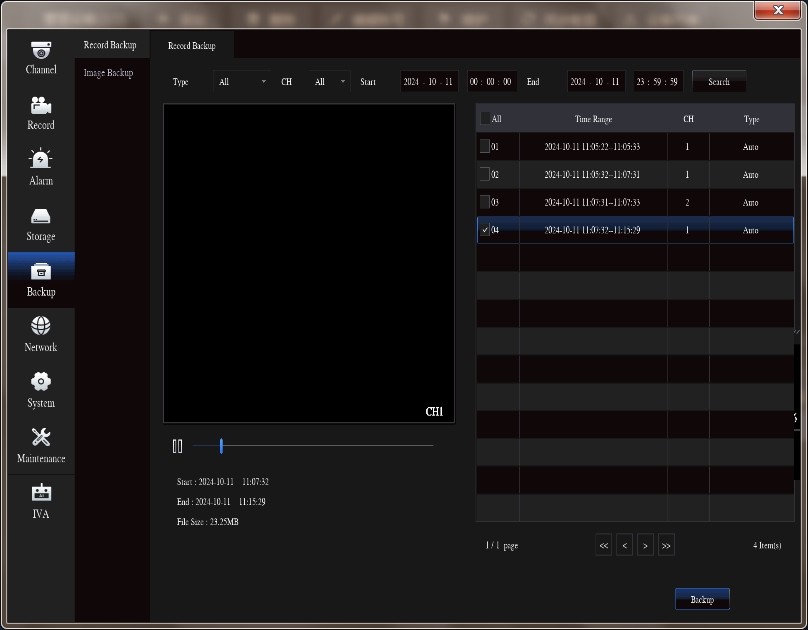
1.Insert the USB flash drive into the USB port of the NVR
2.Press button as below on NVR’s GUI
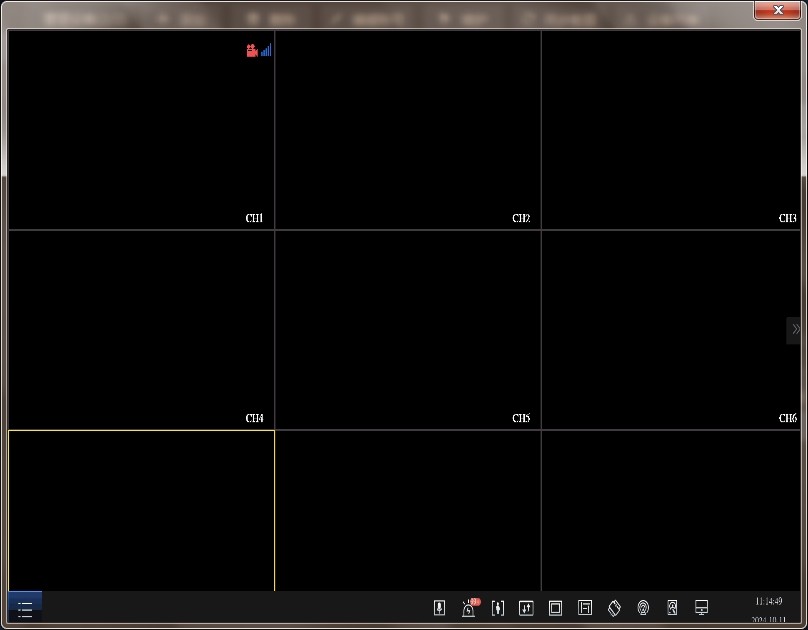
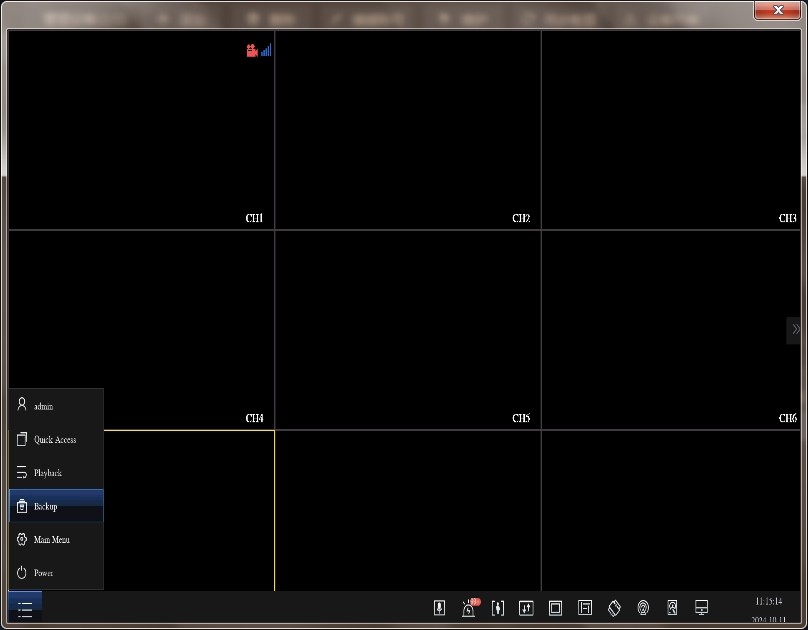
3.Press button “Backup” as below
4.Set parameters as required
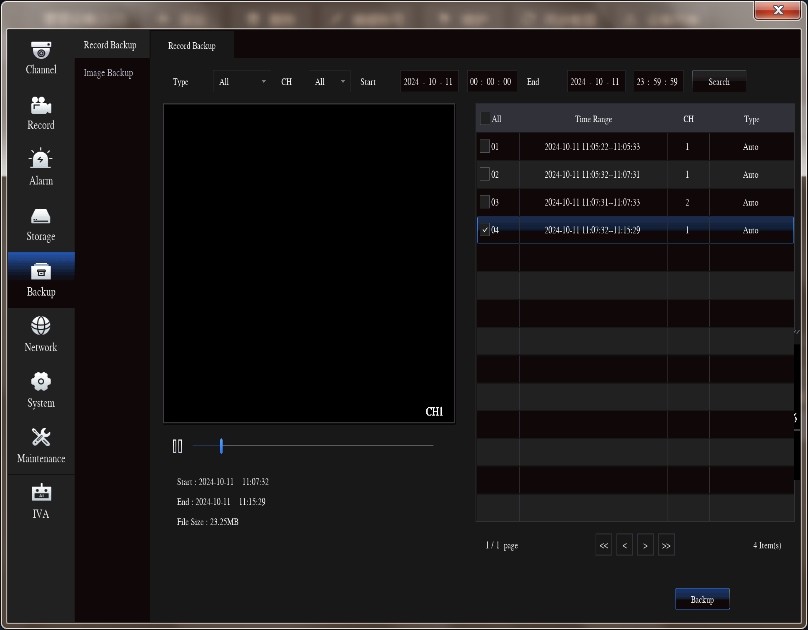
5. Press “Backup” button to start backup files to USB flash disk
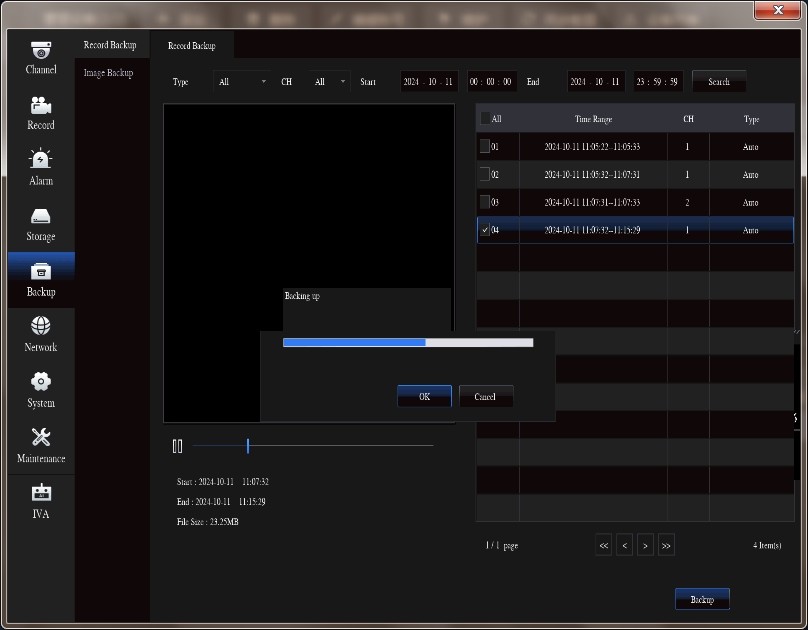
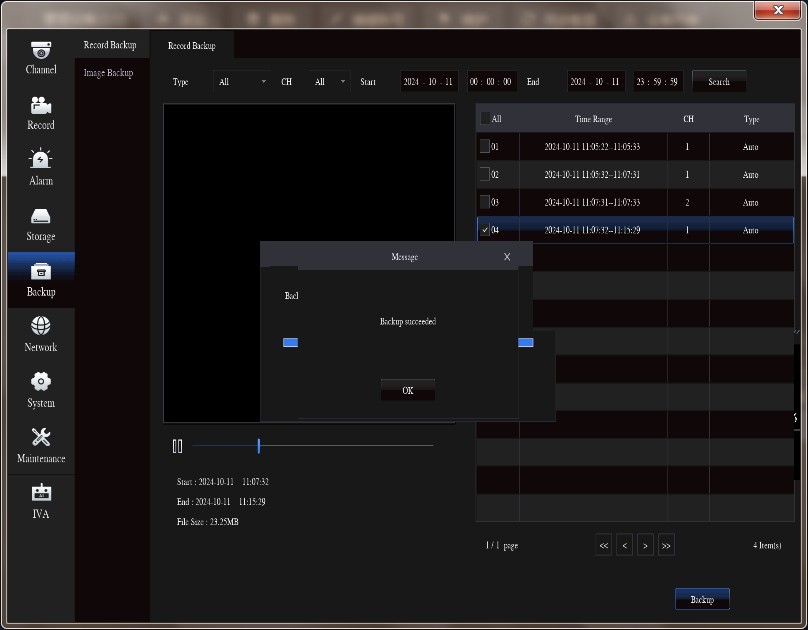
6.Backup complete
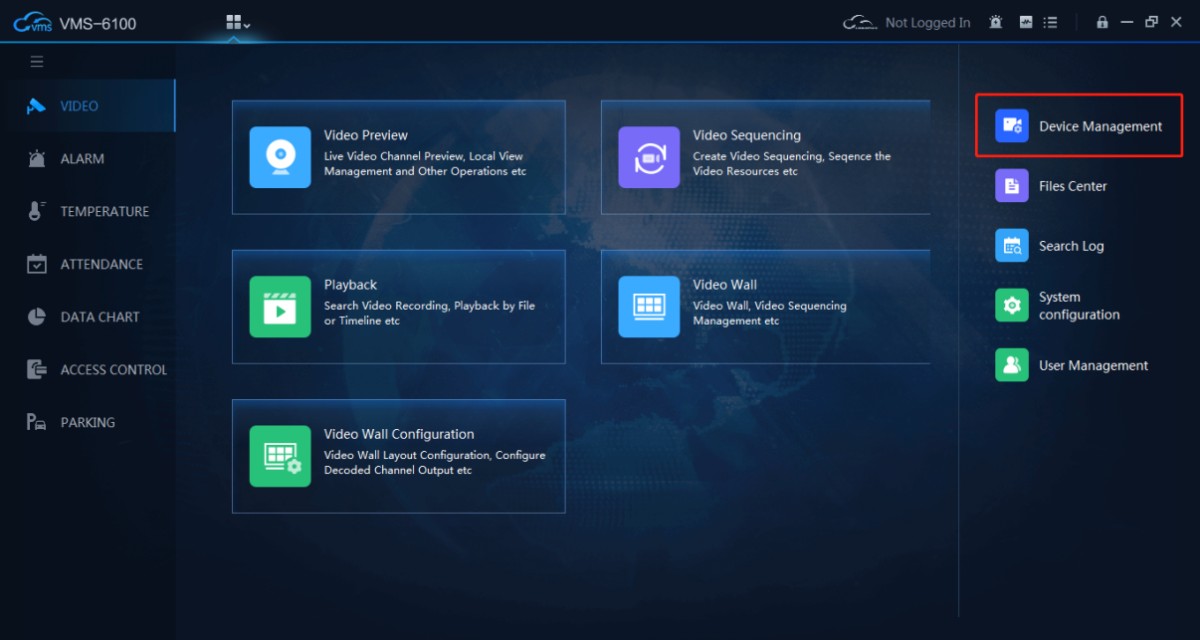
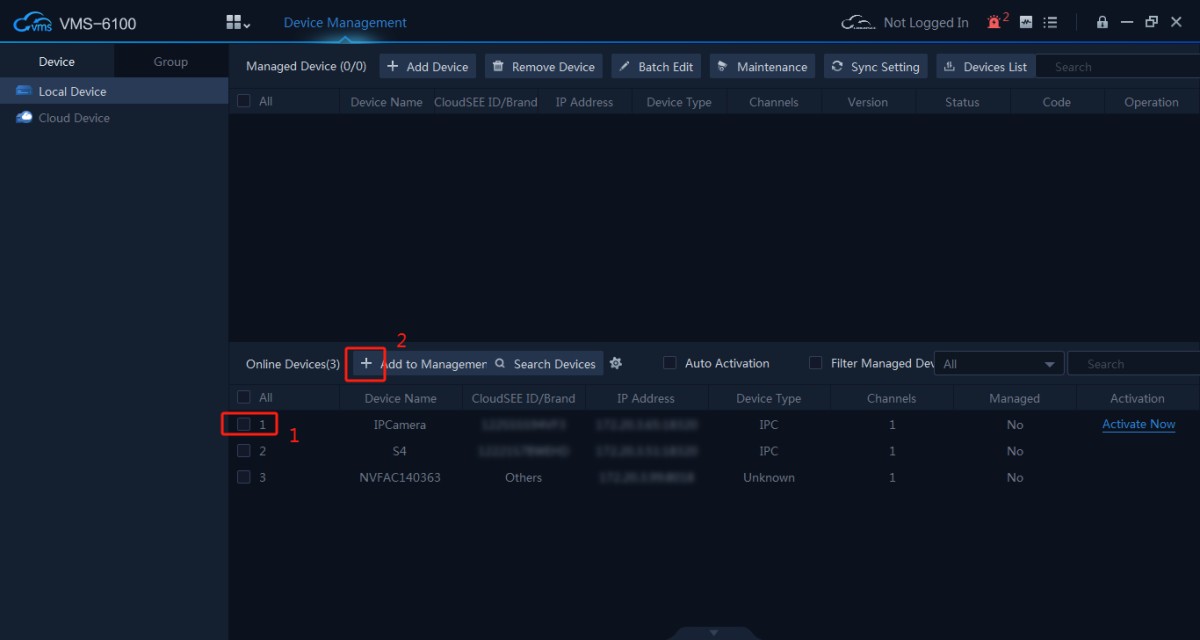
Download software VMS-6100 and install it on your PC (You can find VMS-6100 on our website: https://www.jovisionsecurity.com/download.html), connect the Camera in the same subnet with your local network, and use VMS-6100 software to search and access the Camera.
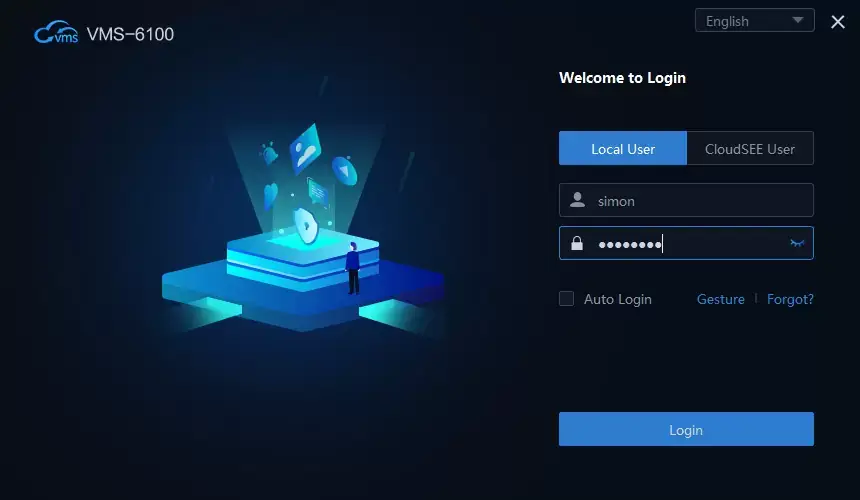
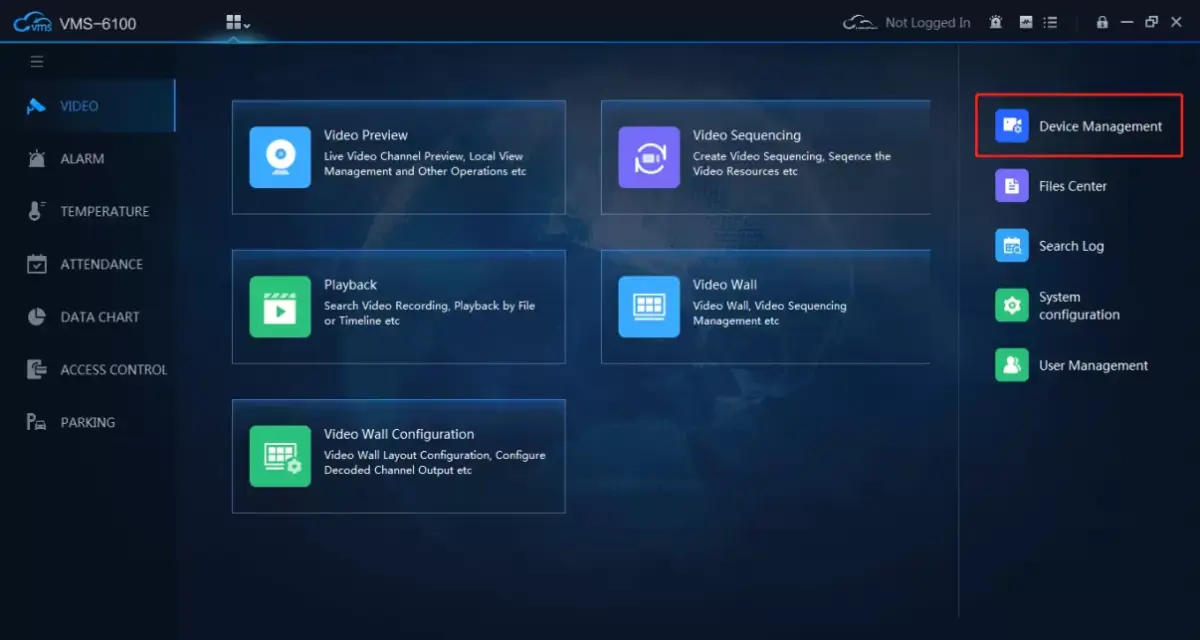
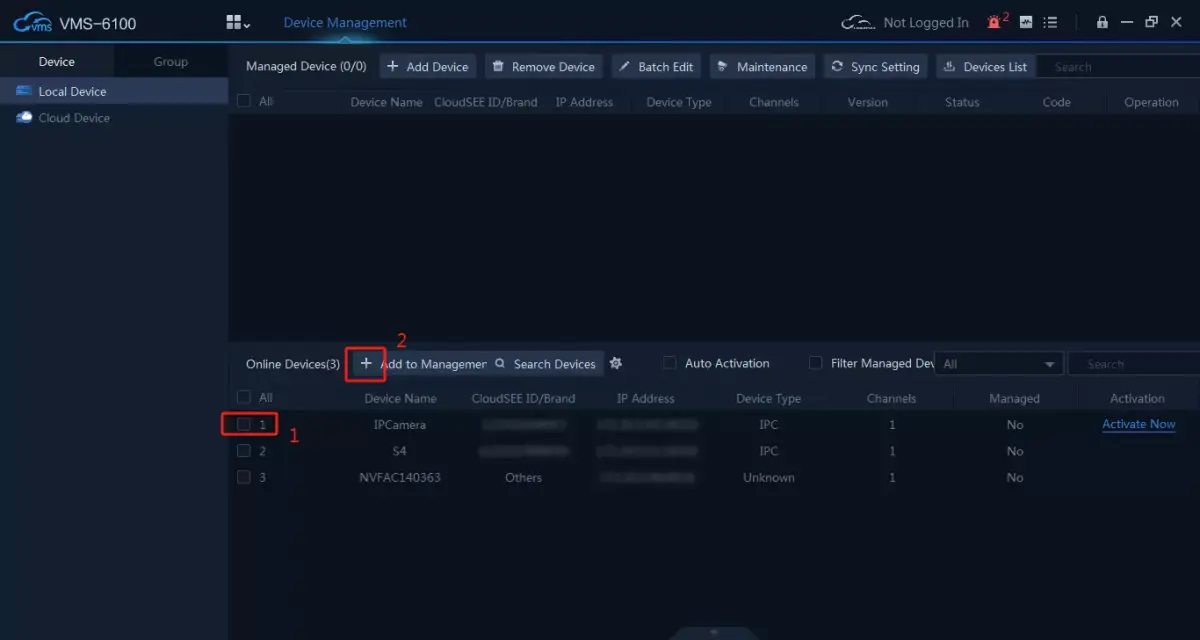
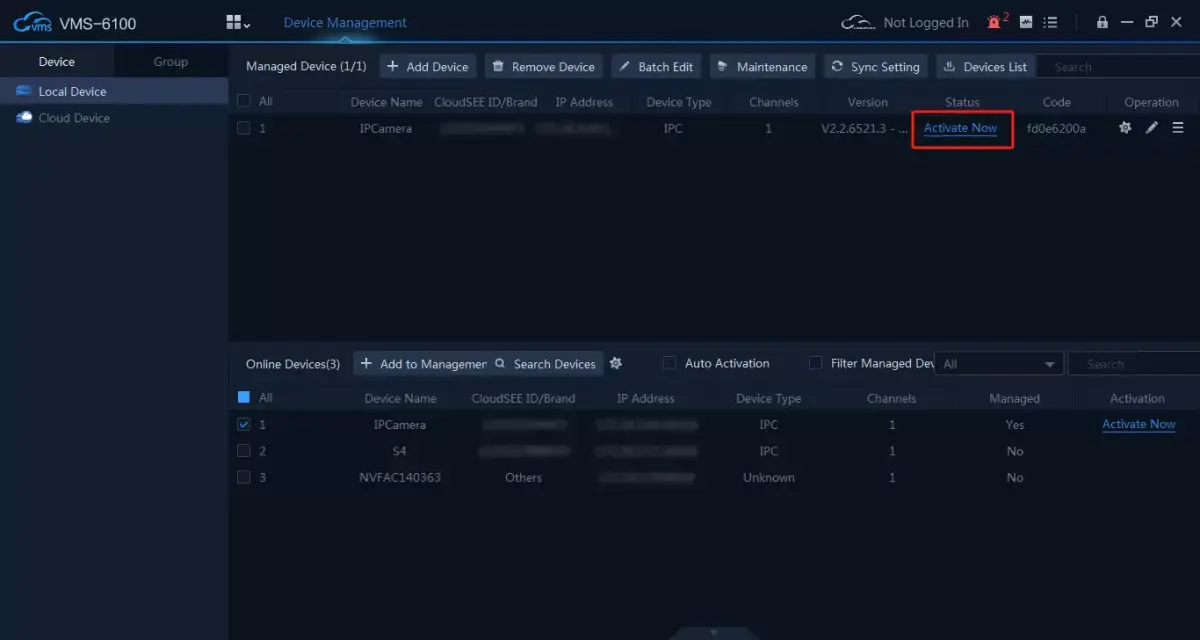
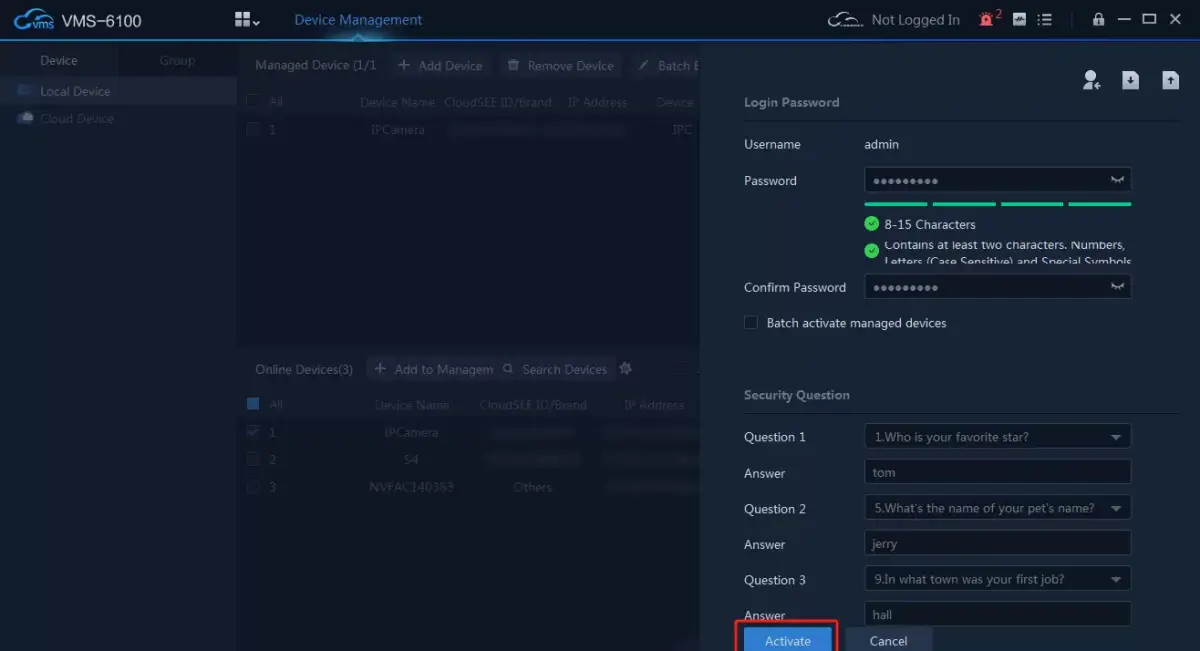
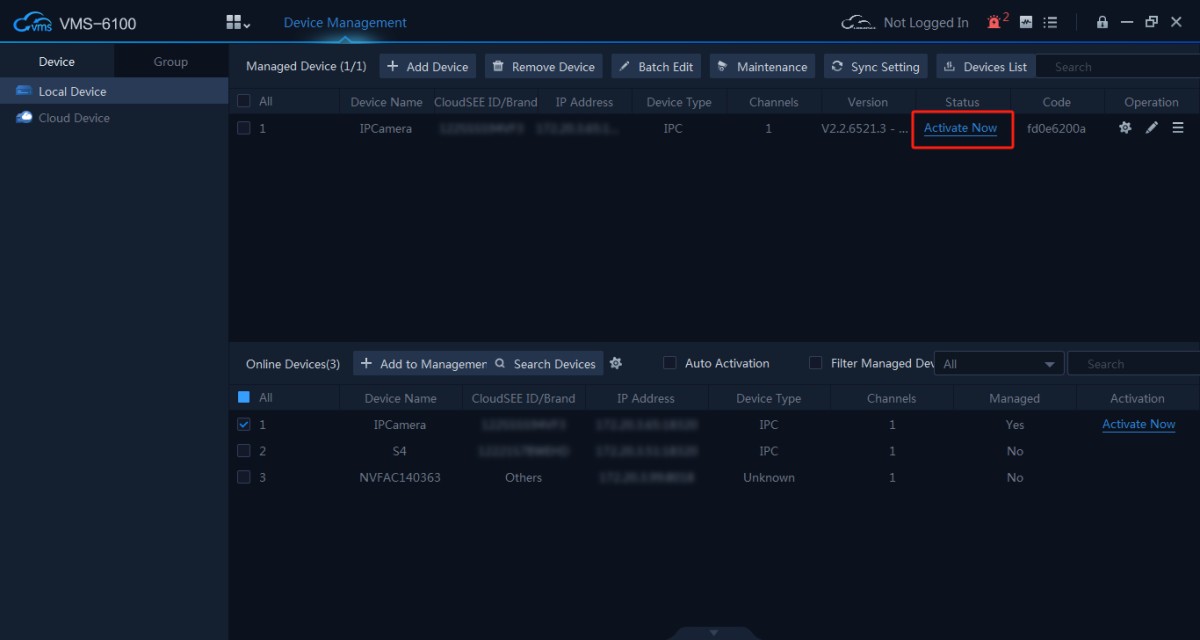
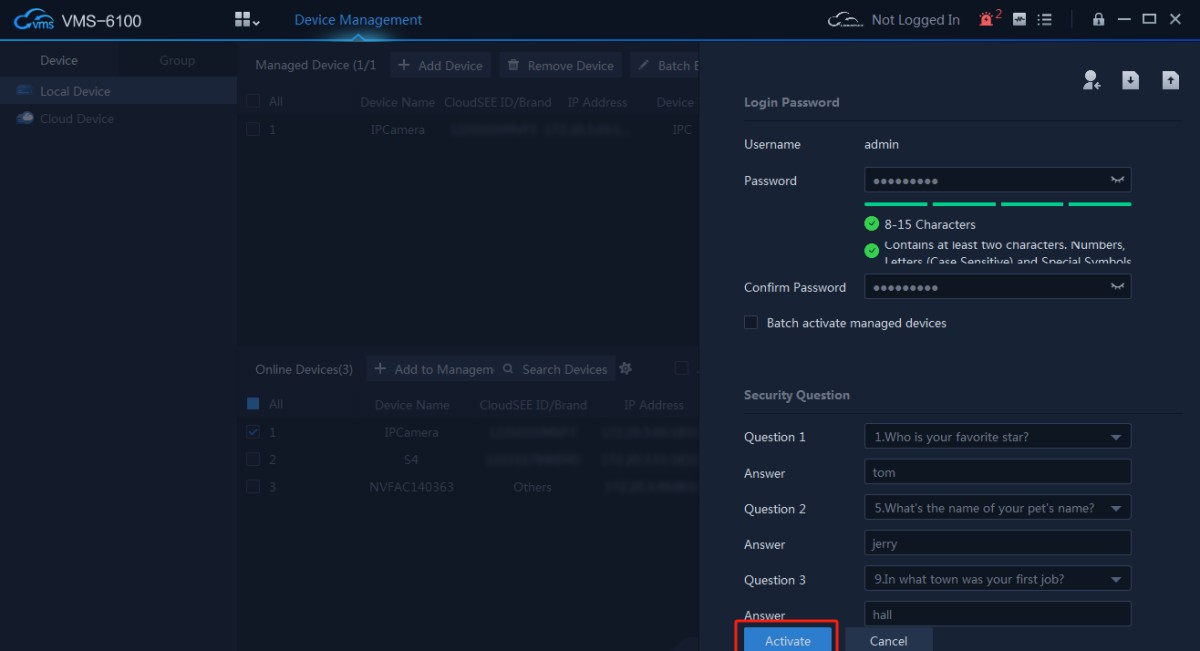
Activate the camera, set the password and password protection
Click the right mouse button to call the menu on NVR’s GUI, find “CH” icon to search and add your camera
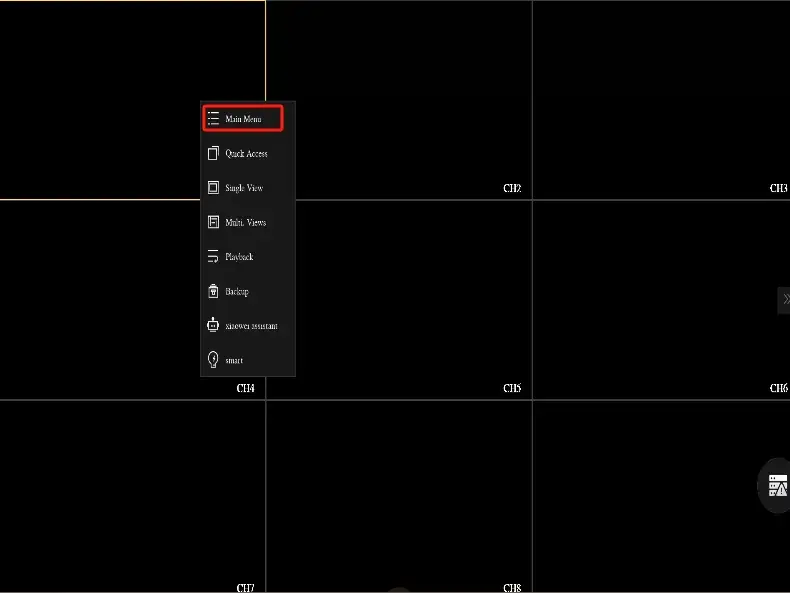
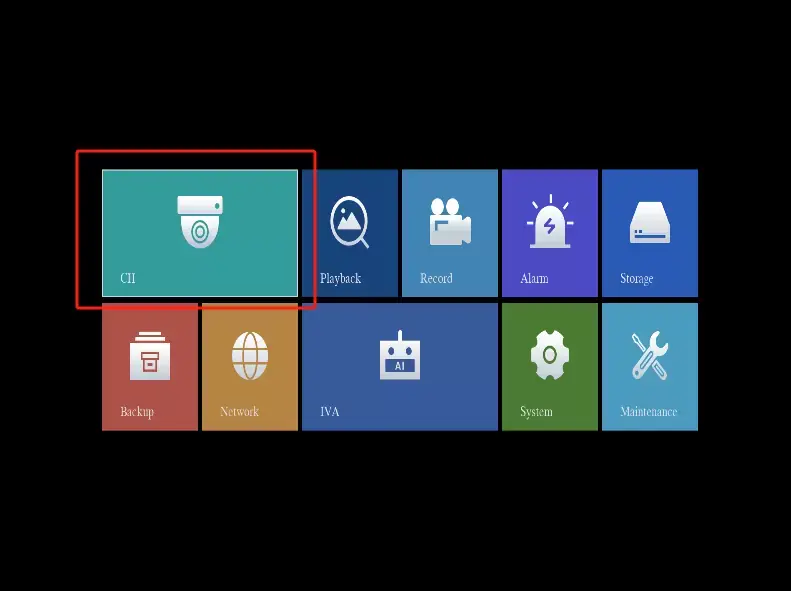
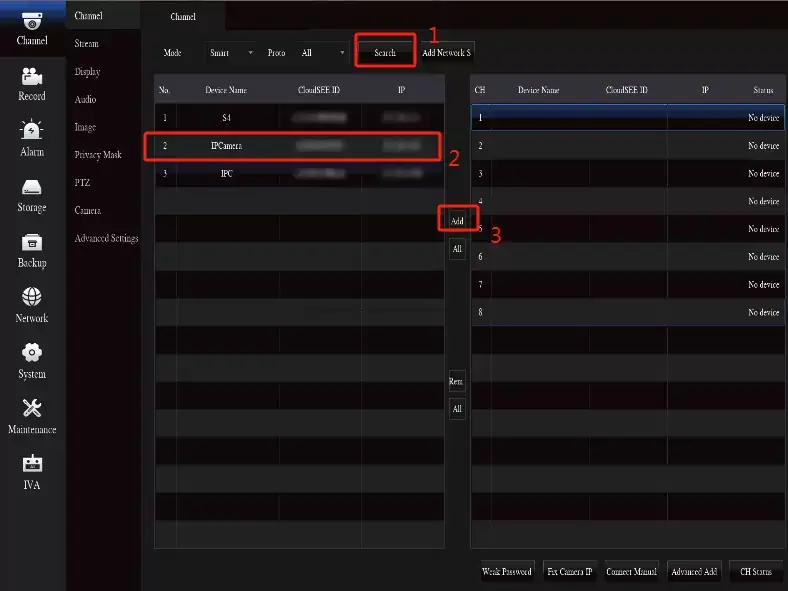
Double-click the camera, enter the correct password in the pop-up menu, now operation is complete.
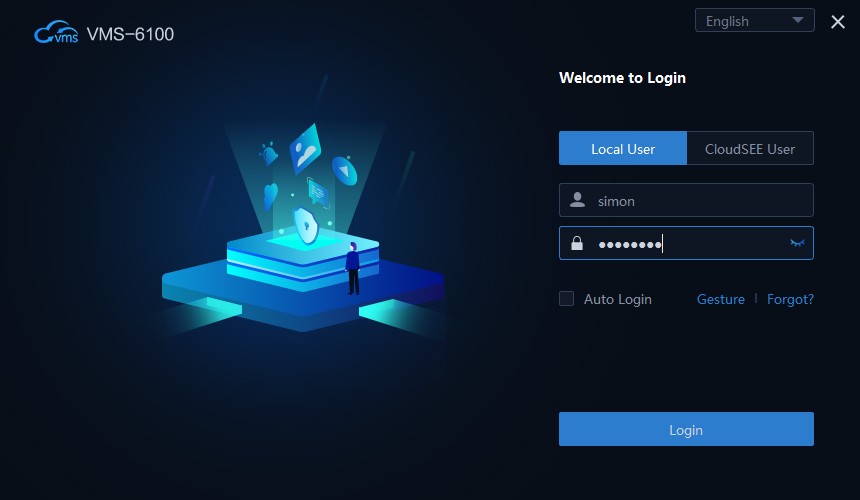
To perform USB system recovery, please follow these steps:
Prepare a USB 2.0 flash disk which must be formatted in FAT32 file system.
Copy the recovery files to the root directory of the flash disk. (Like X:recover-ndxxxx-sx.bin)
Power off the NVR/XVR/DVR, unplug HDD SATA cable and power cable.
Insert the USB flash disk into a USB port of the NVR/XVR/DVR.
Power on the NVR/XVR/DVR, system will perform recovery automatically.
System will reboot automatically after the successful recovery.
When the recovery starts, the screen will display like this:
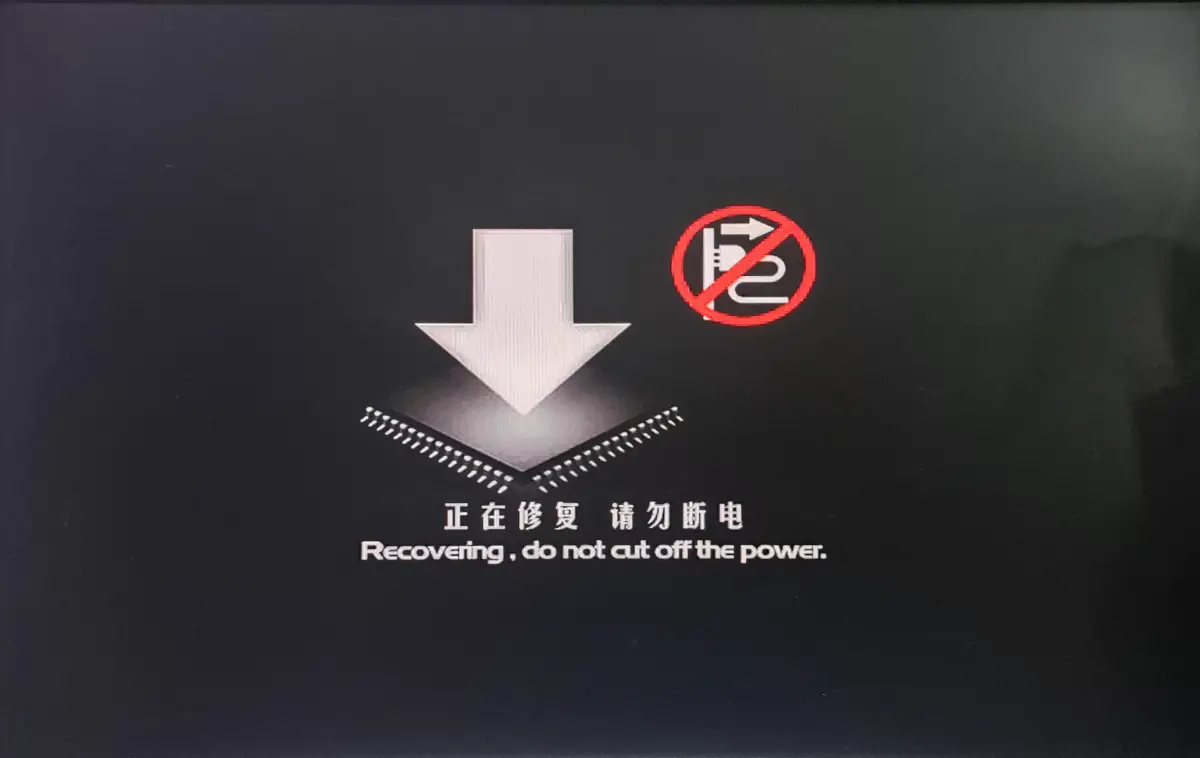
If the recovery screen doesn't appear, please check the following points:
USB 2.0 flash disk must be formatted with FAT32, and the capacity should between 2GB~8GB, any well known brand is better.
USB 3.0 not support the recovery.
Make sure the recovery file is in the root directory of the flash disk.
Check if the model and the recovery file are corresponding.
Change another USB flash disk and try again.
NOTE
DO NOT unplug the power and USB flash disk during recovery! Disconnect the USB flash disk after successful recovery in case the system might recover again.
The PoE NVRs give preference to IP Cameras connected to the PoE port. When you add non-PoE IP Cameras through ethernet port, the camera will automatically disconnect. You can change this priority by disabling Port Binding option in the NVR. Go to Main Menu -> System -> Features then disable Port Binding. Save settings and try again.
We would recommend to add ONVIF IP Camera manually instead of search and add. Go to the Channel Menu and click Advance Add option. Select ONVIF type and input the IP Address, Port, Username and Password of the camera manually and add it.
Note:
If the IP Camera required to enable ONVIF, you have to enable that first before adding it into NVR. Some manufacturer disable ONVIF by default. You need to enable it manually and setup seperate username and password for ONVIF. If you create a username and passwod for ONVIF, please use that username and password when you add such devices in the NVR.
This is due to corrupted firmware. You need to recover the device. Download recovery firmware from https://www.jovisionsecurity.com/download.html
If you don’t find the firmware, please contest us at support@jovision.com
Check the recovery tutorial here
Please make sure the HDD is in good condition. Please try to replace the SATA or the power cable. If it’s still not solved the problem, try to replace the power adapter.
First, make sure there is proper internet connectivity to the device. Check the ethernet cable as well as the RJ45 connector fault. If the cable is good and there is proper internet connection, check the device network settings.
For CloudSEE1.0 device
Disable DHCP if enabled.
Set DNS to 8.8.8.8
Change port from 9101 to 10020.
Save settings and reboot the device.
For CloudSEE2.0 device
Disable DHCP if enabled
Set DNS to 8.8.8.8
Save settings and reboot the device.
Make sure you are using the latest version CloudSEE Int’l Pro app. If this not solve the issue, contact us at support@jovision.com
Steps:
1. Open "VMS-6100" and go to "Device Management".
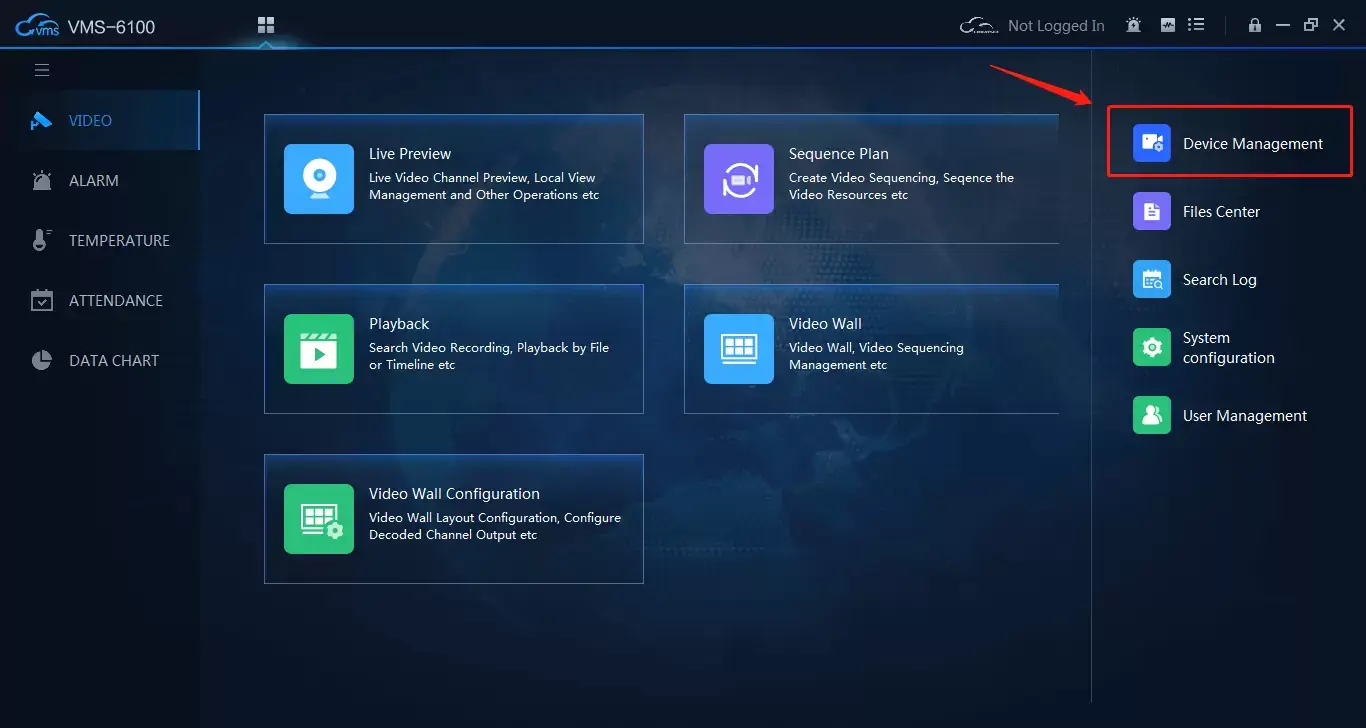
2. Click "Search Devices" in "Device Management", search for the newly installed camera, and check the camera’s IP address
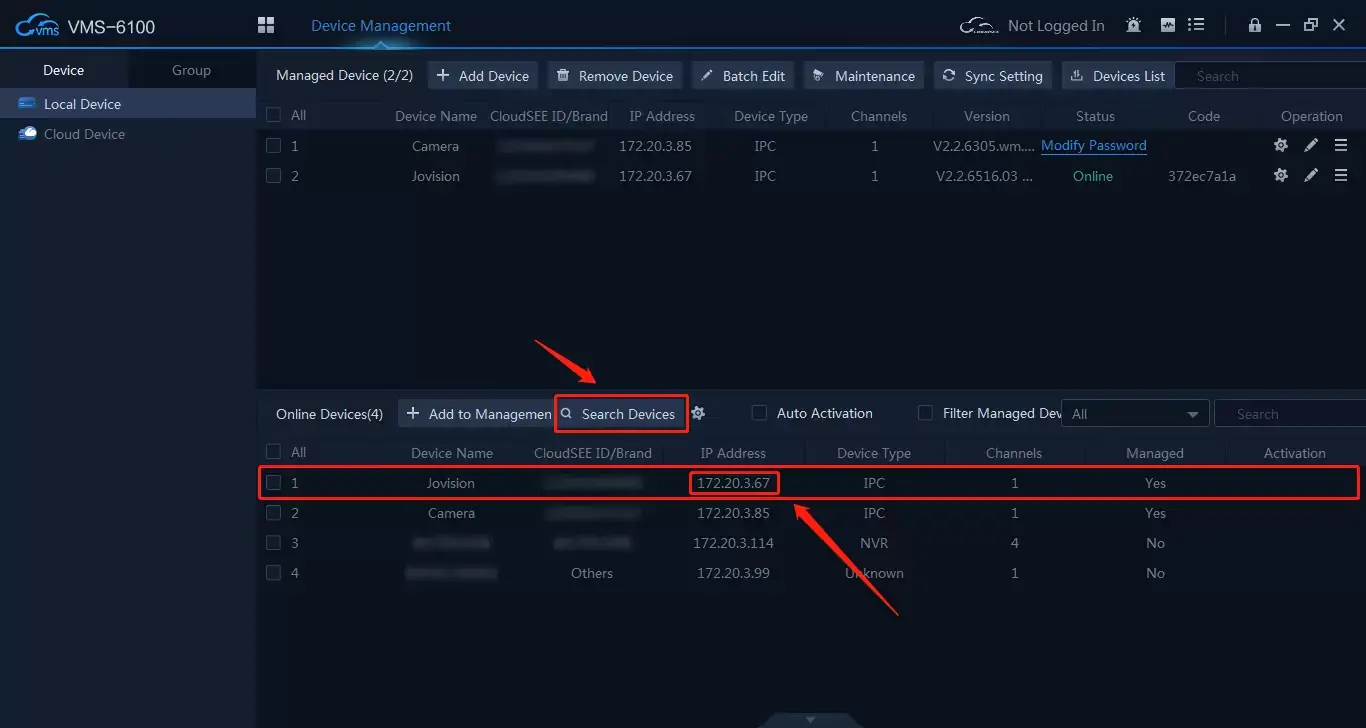
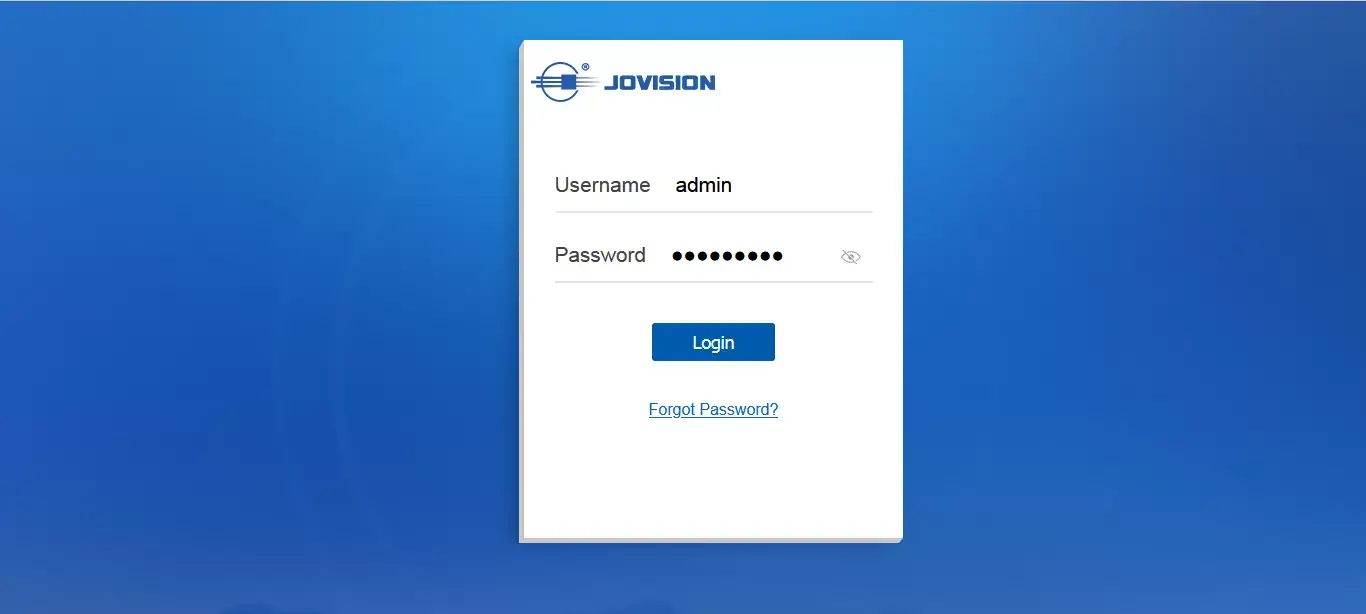
3. Open the browser, enter the camera’s IP address, follow the steps to activate the camera(If needed), and enter the background
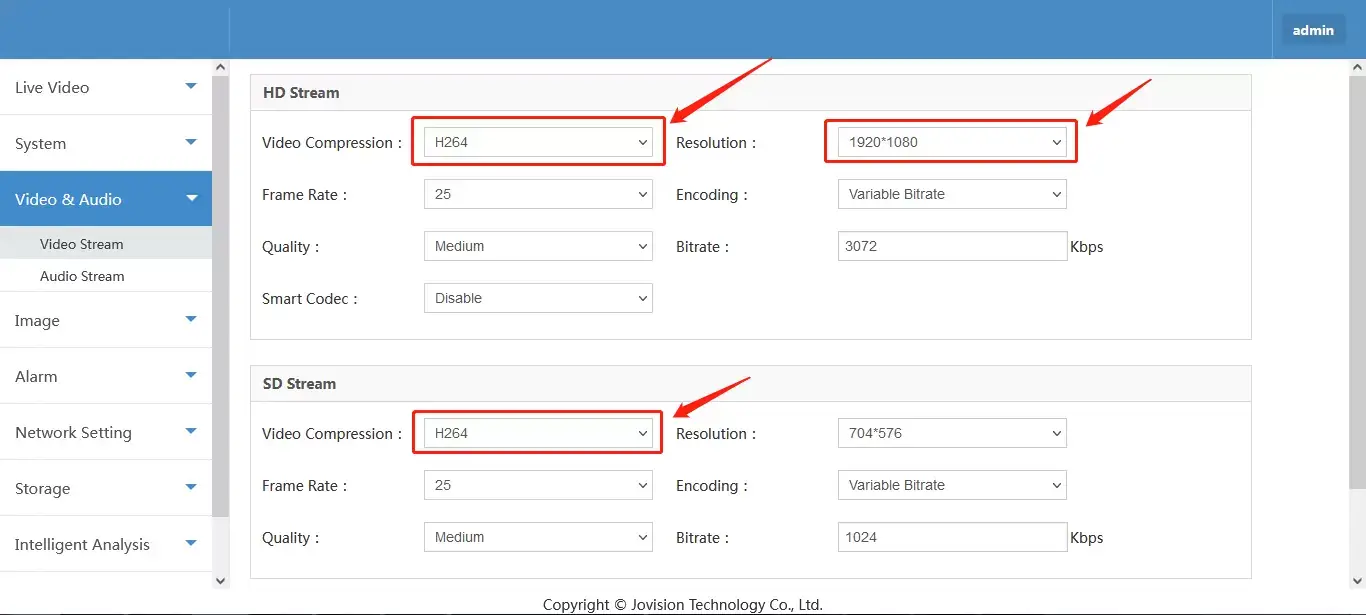
4. Go to the background to find "Video & Audio -> Video Stream", change "Video Compression" to "H.264", "Resolution" to "1920x1080", save the setting.
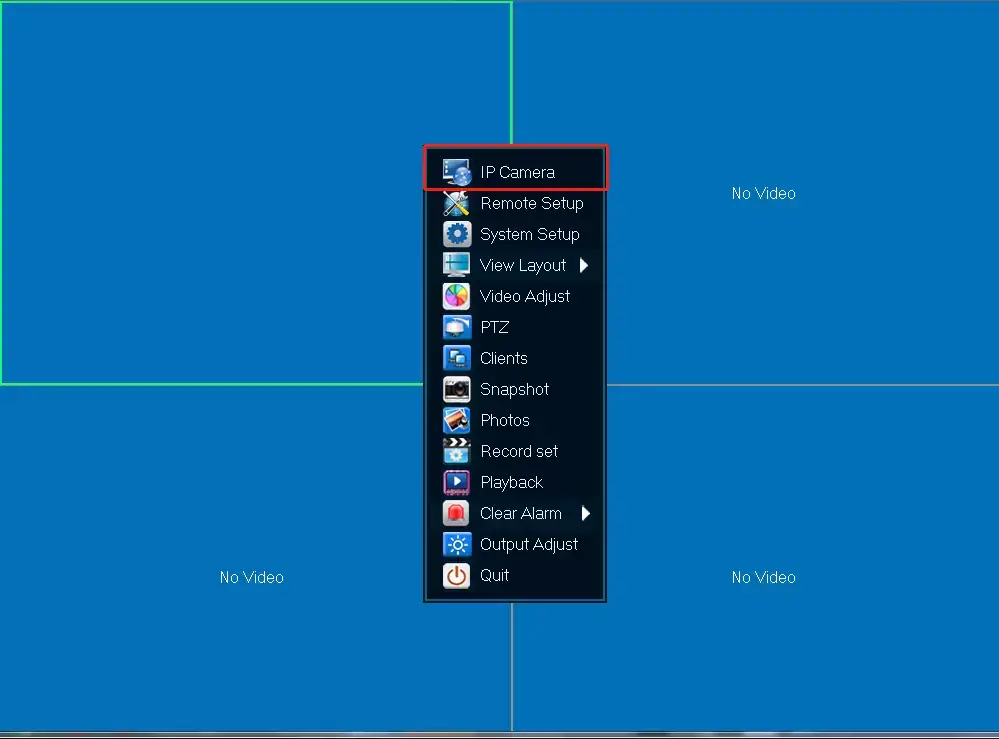
5. Right click NVR -> IP Camera -> Advanced Add
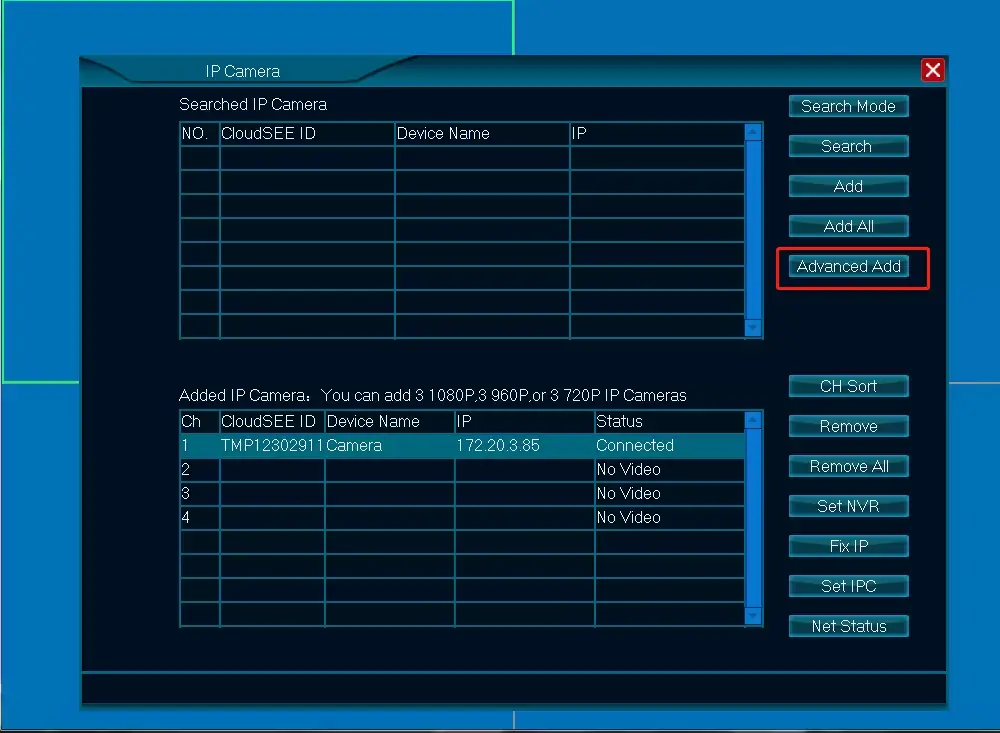
6. Set Agreement to "ONVIF", Input"camera’s IP address" on item IP, Input "80" or "6688" on item Port , Input camera’s username and password, then click button “Add”. Now setup complete.
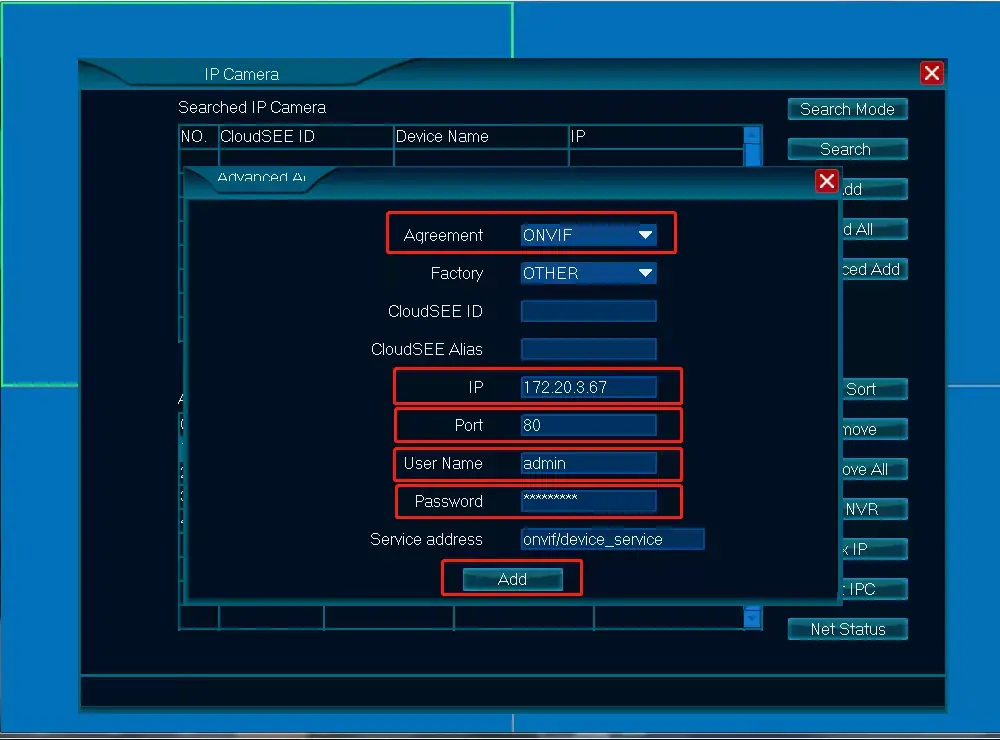
Ans:
Setup Motion Detection in CloudSEE2.0 NVR
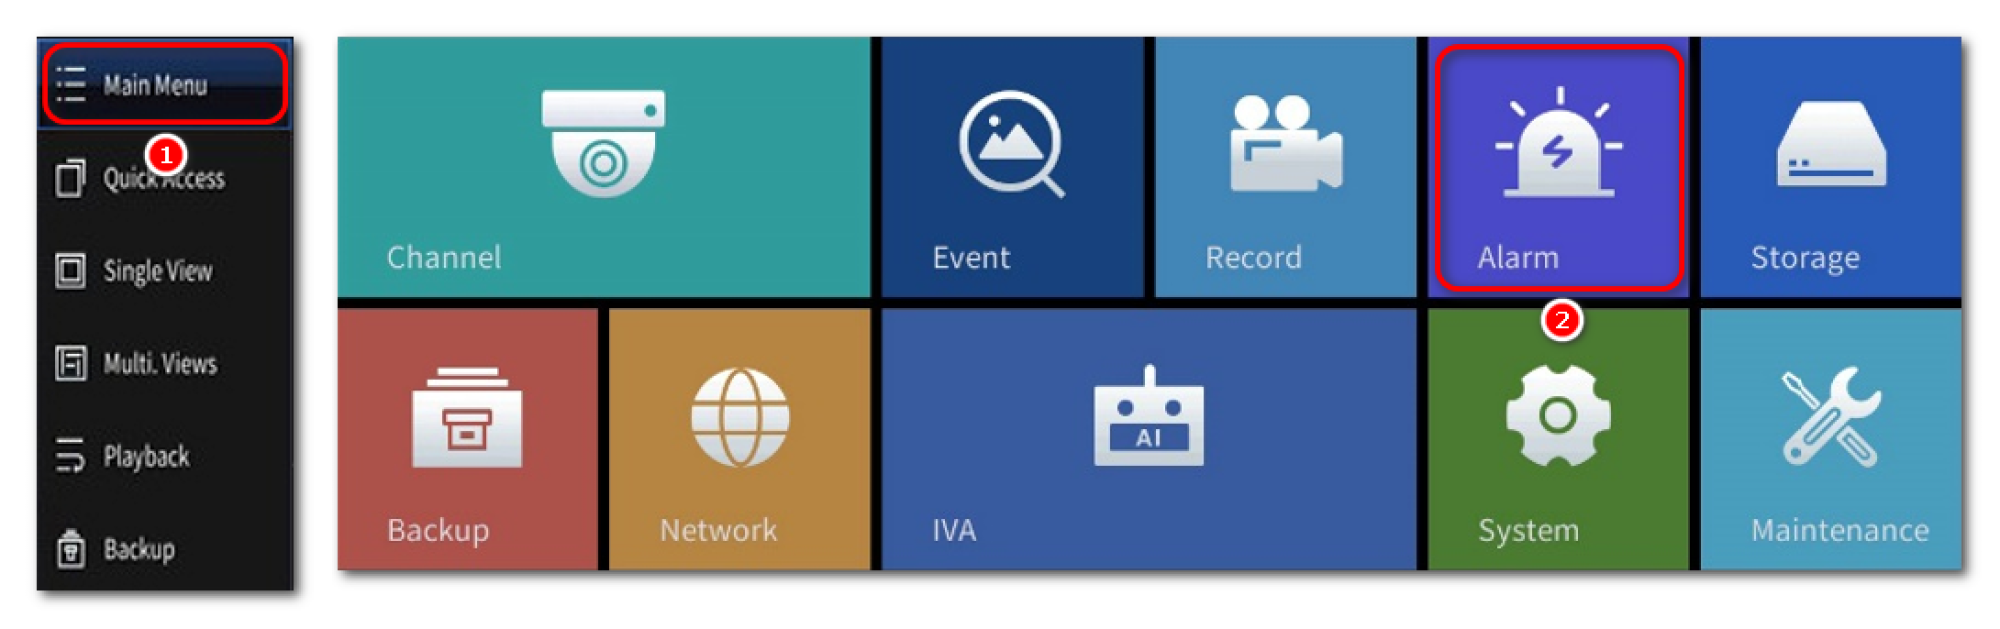
Right click on the video preview screen and select Main Menu. Login with username and password. Then click Alarm icon. Motion detection window will open.

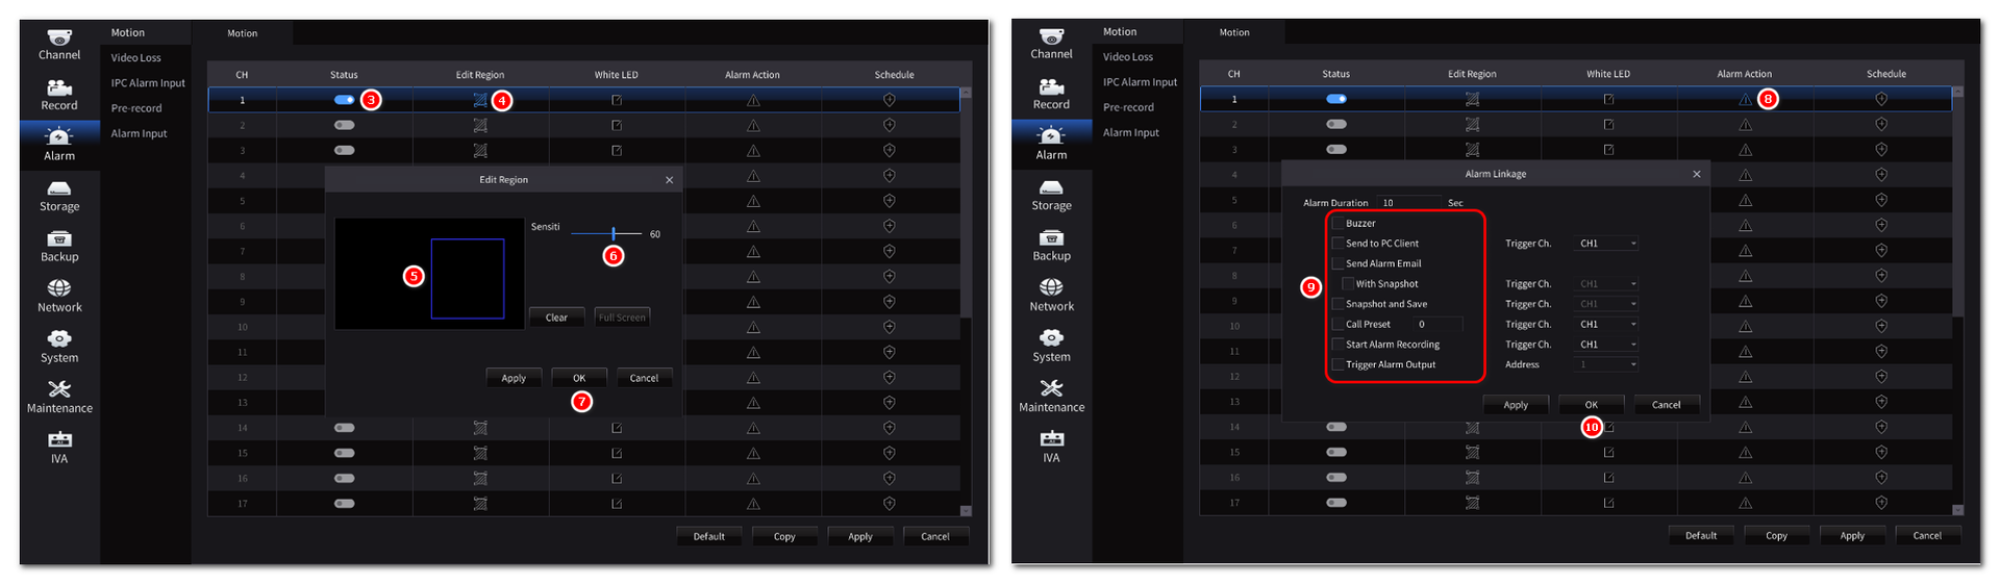
The IP cameras added in the NVR will listed there. Enable the button under status to enable the motion detection. Next step is to select the motion detection region. Click on the region icon and draw the region and the set the motion detection sensitivity. After set the sensitivity, choose the alarm action, you can set basic settings like Send to Client, Send Alarm Email, With Snapshot and Start Alarm Recording.

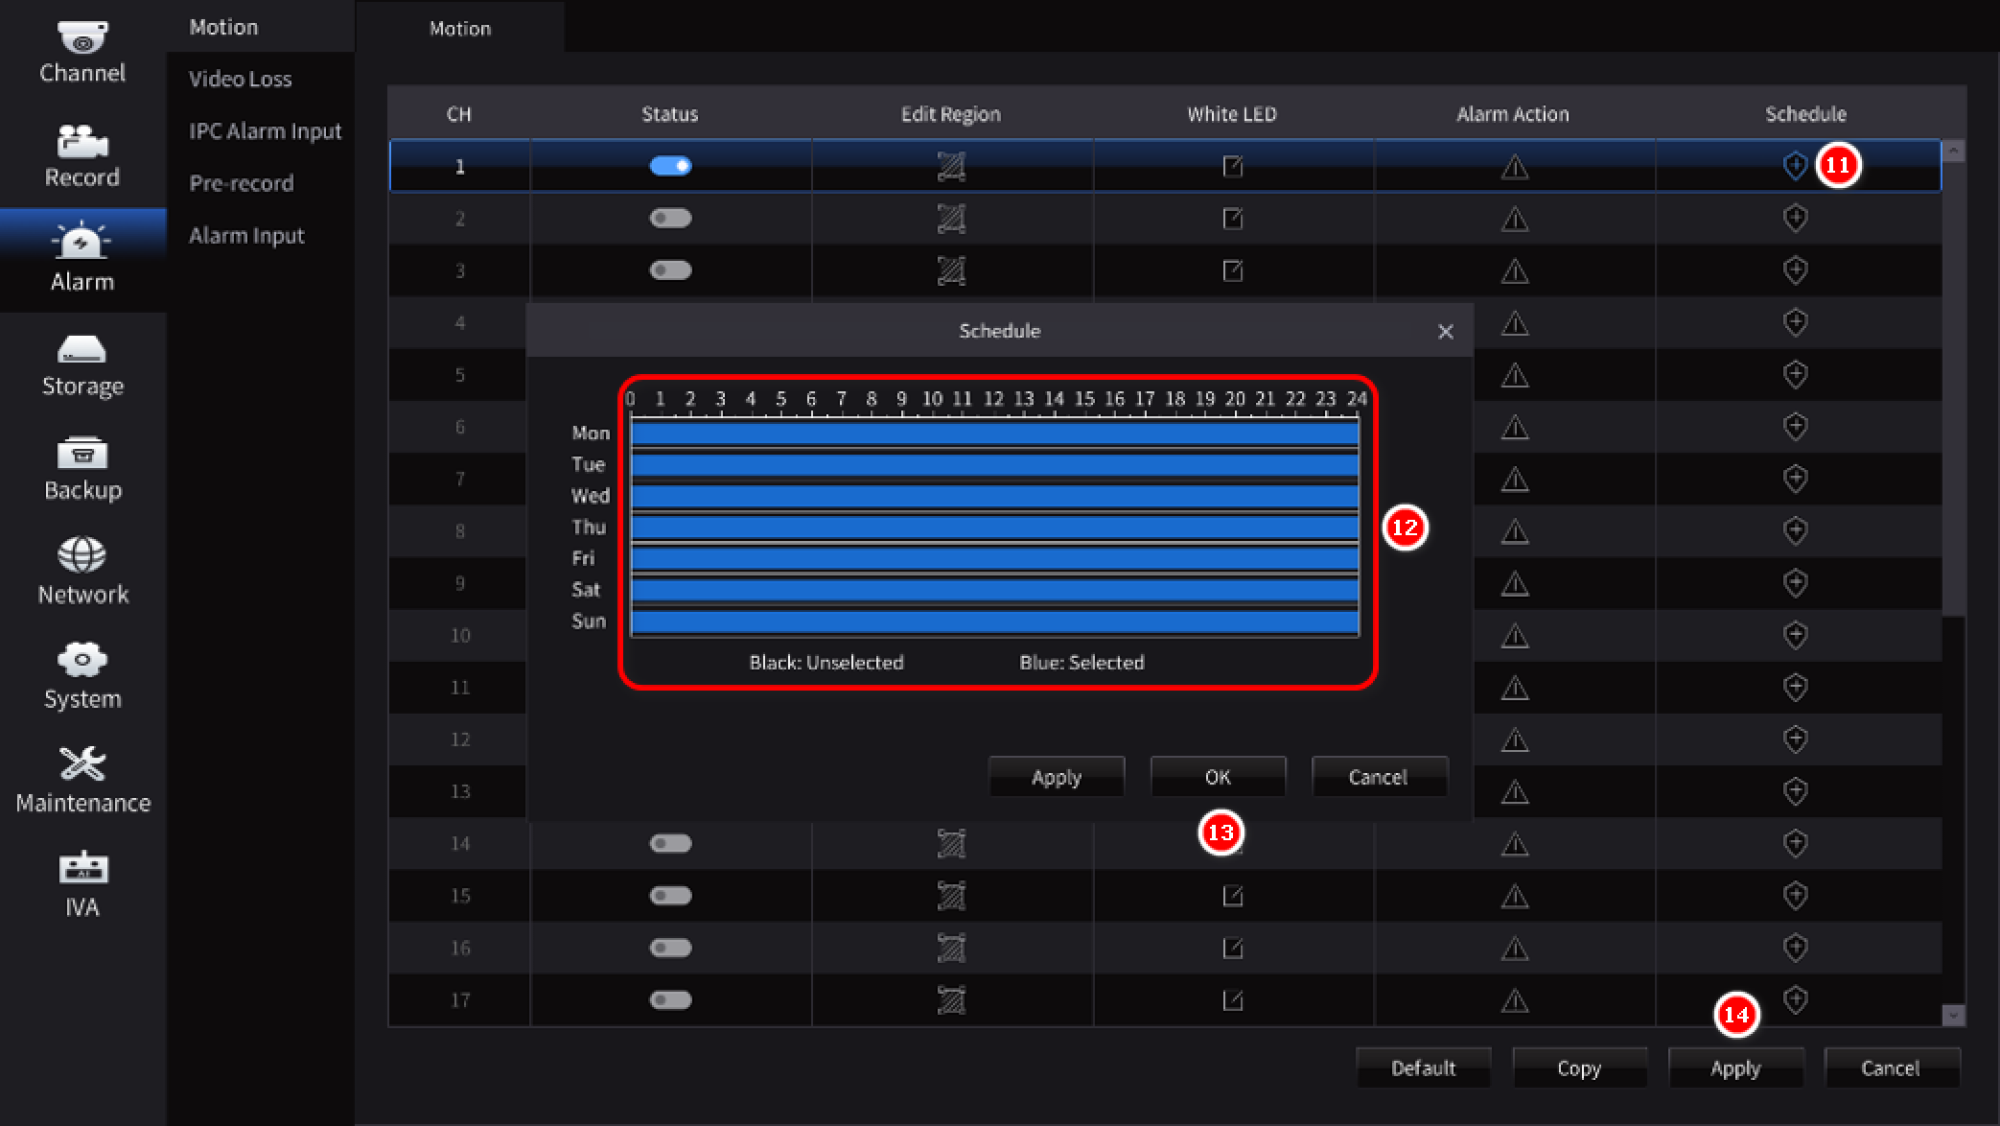
Once you set the alarm action, you can schedule the alarm if you required. By default, its 24x7. After all this, you set the motion detection configured successfully.

2.Setup Motion Detection in CloudSEE1.0 NVR
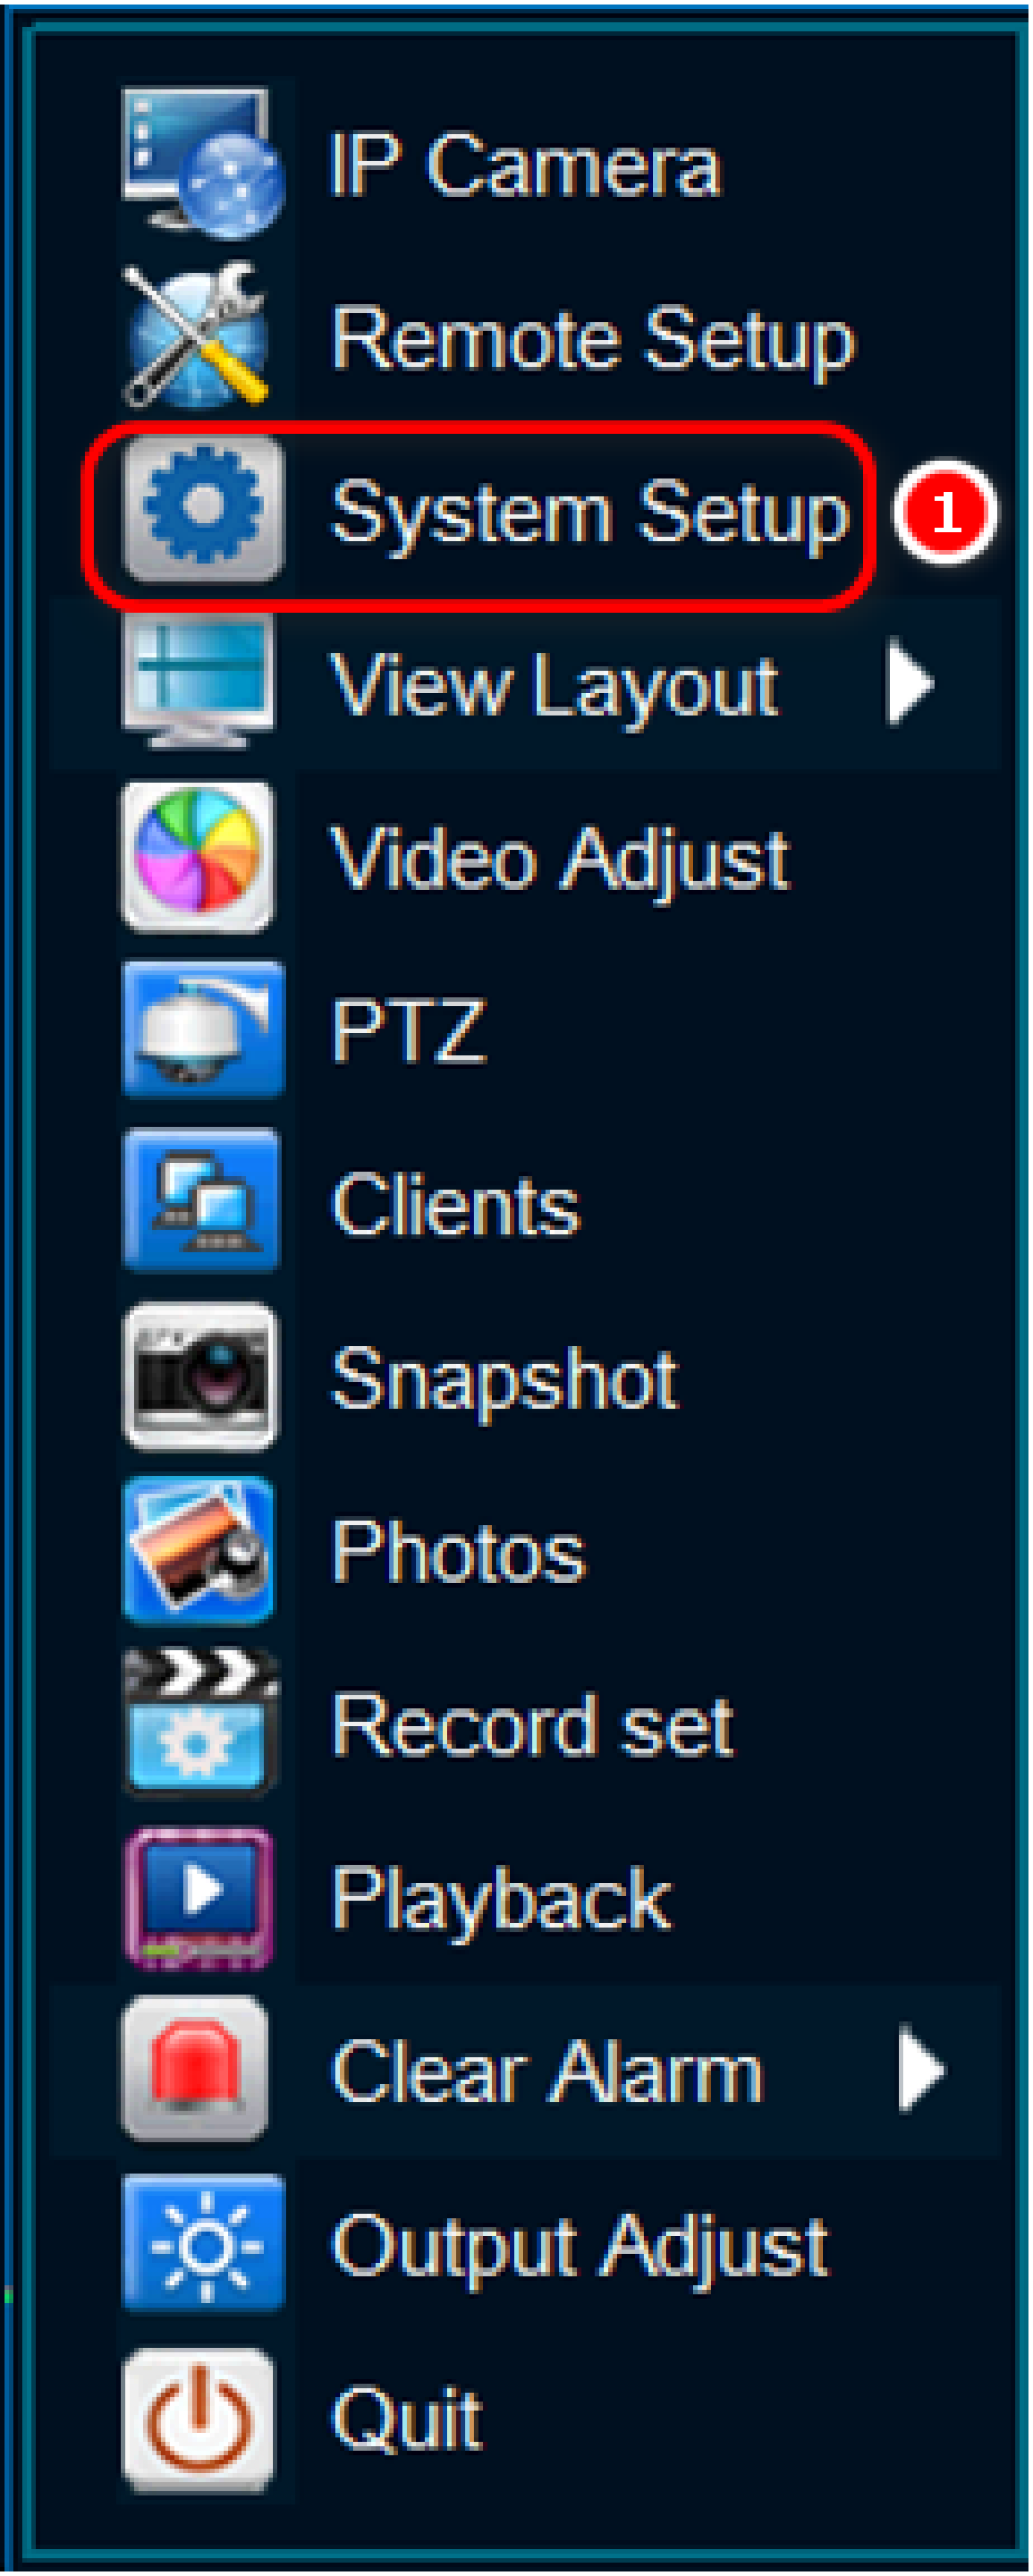
Right click on the video preview screen and select System Setup. Login with username and password.

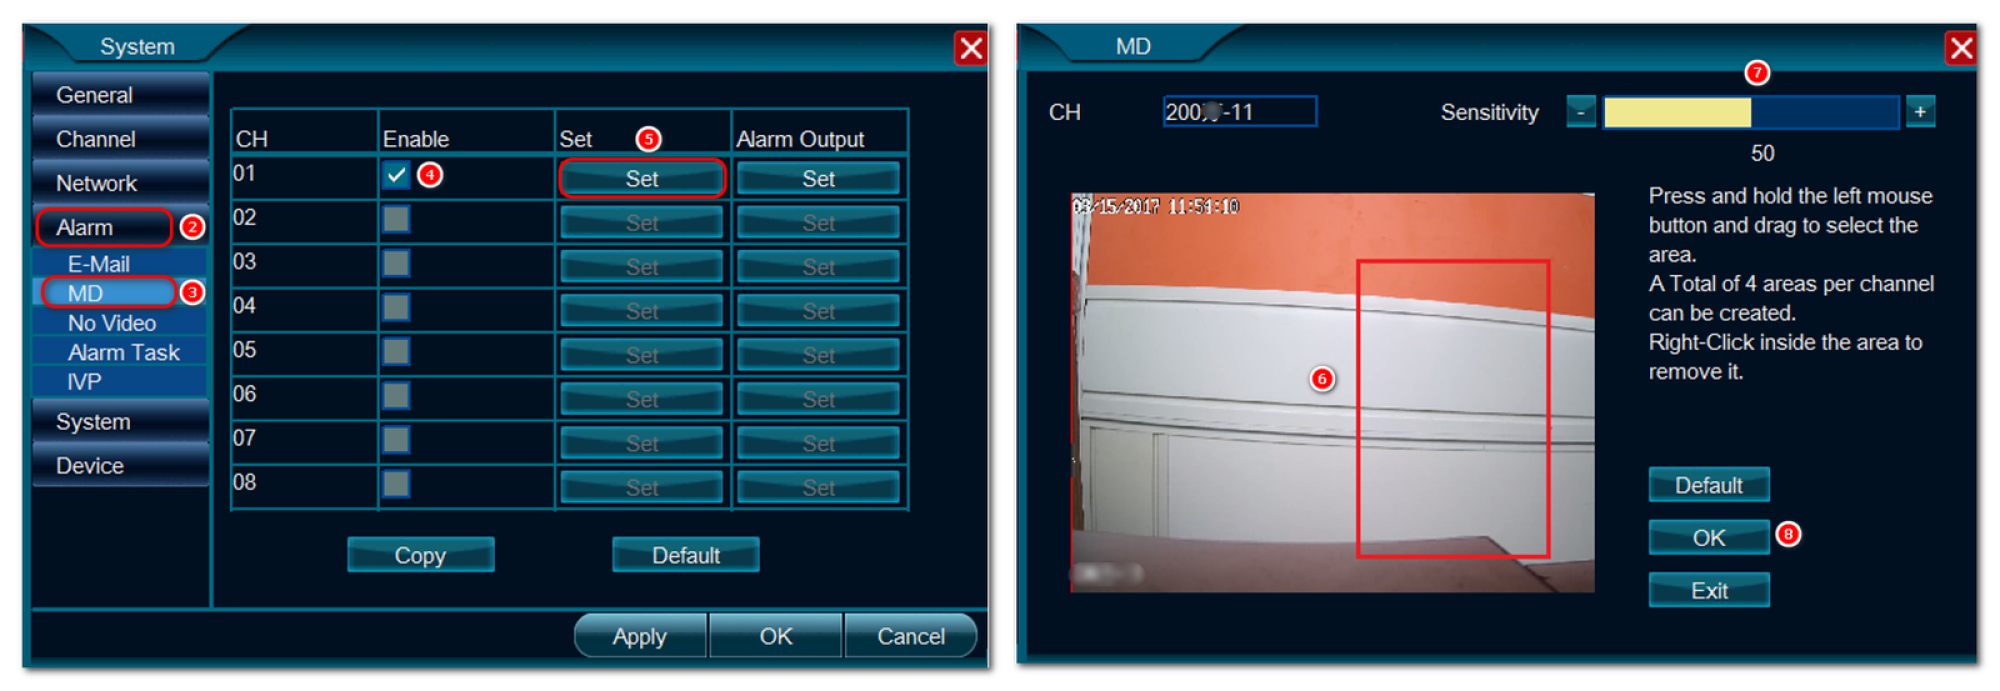
Then click Alarm and then MD (Motion Detection). Tick the desired channel to enable the motion detection. Then click Set button to select the region and sensitivity. Once you set the region and motion detection sensitivity, save the settings.

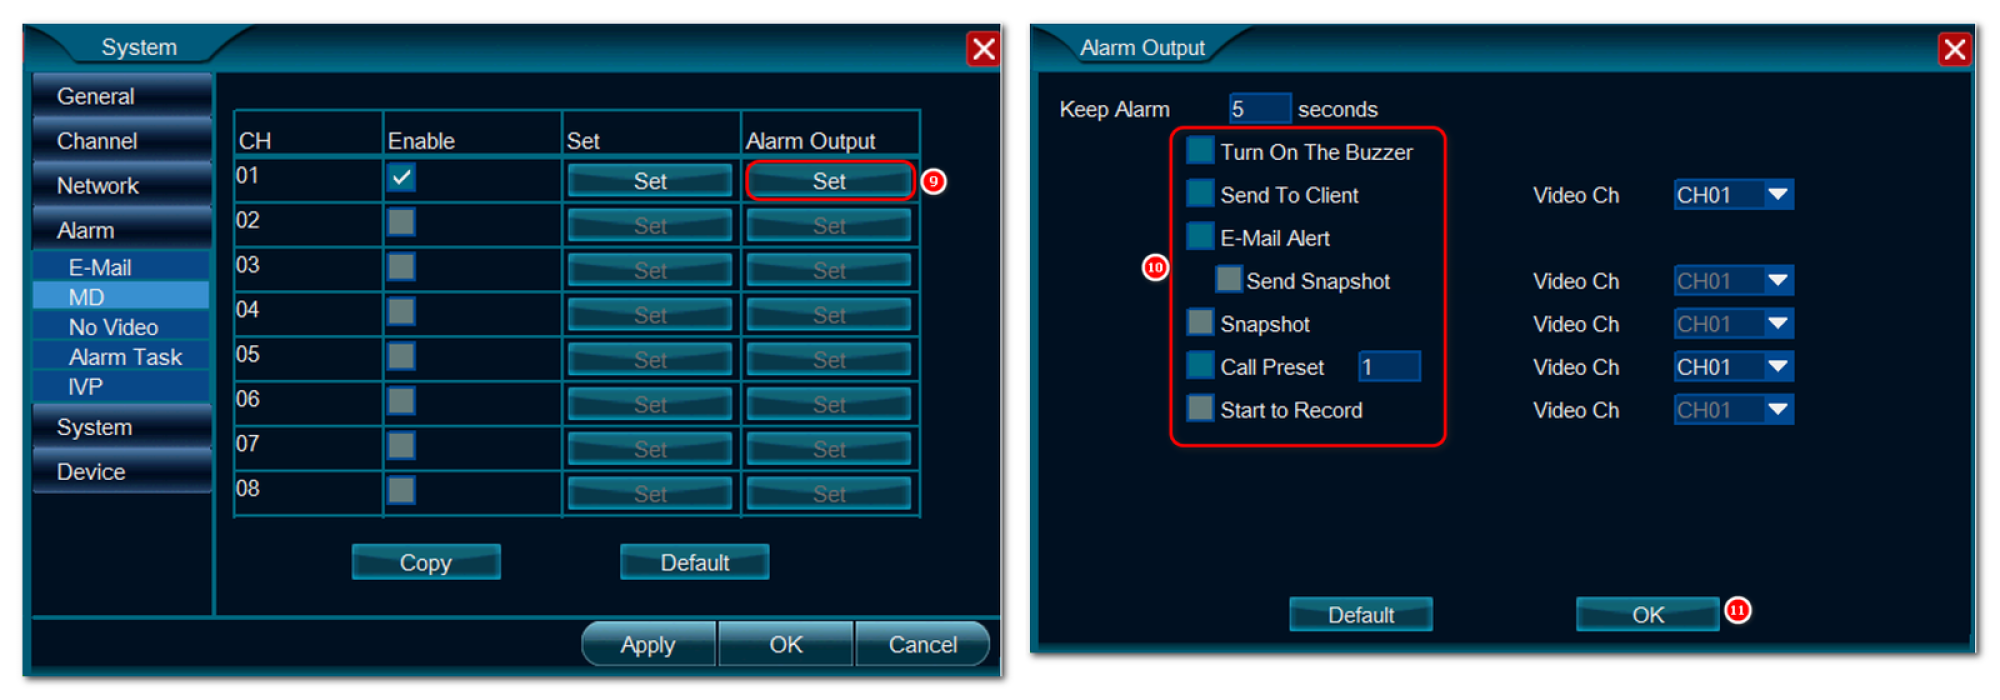
And then click Set button under Alarm Output column. You can set basic settings like Send to Client, Email Alert, Send Snapshot and Start to Record.

Once you set the alarm output, you can schedule the alarm if you required. Go to Alarm Task and set the schedule. By default, its 24x7. After all this, you set the motion detection configured successfully.
3.Setup recording only on motion detection on CloudSEE2.0 NVR
Right click on the video preview screen and select Main Menu. Login with username and password. Then click Record icon. In the record menu, disable all the Auto options and save the settings. The NVR will record only on motion detection. This will save more HDD space.
4.Setup recording only on motion detection on CloudSEE1.0 NVR
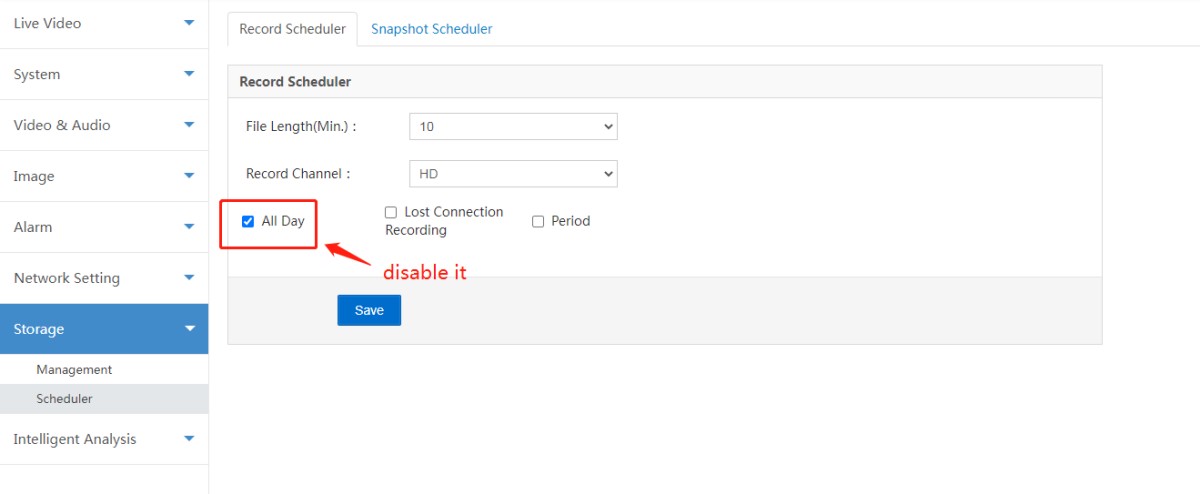
Right click on the video preview screen and select Record Setup. Login with username and password. Then disable all the All Day and save settings. Then the NVR will record only on motion detection. This will save more HDD space.
Ans:
Please make sure the HDD is in good condition. And then check the HDD is formatted. If not, please format it first. Or, please replace the SATA or the power cable. If its still not solve the problem, try to replace the power adapter.
Download software VMS-6100 and install it on your PC ( you can find VMS-6100 on our website: https://www.jovisionsecurity.com/download.html), connect the Camera in the same subnet with your local network, and use VMS-6100 software to search and access the Camera.
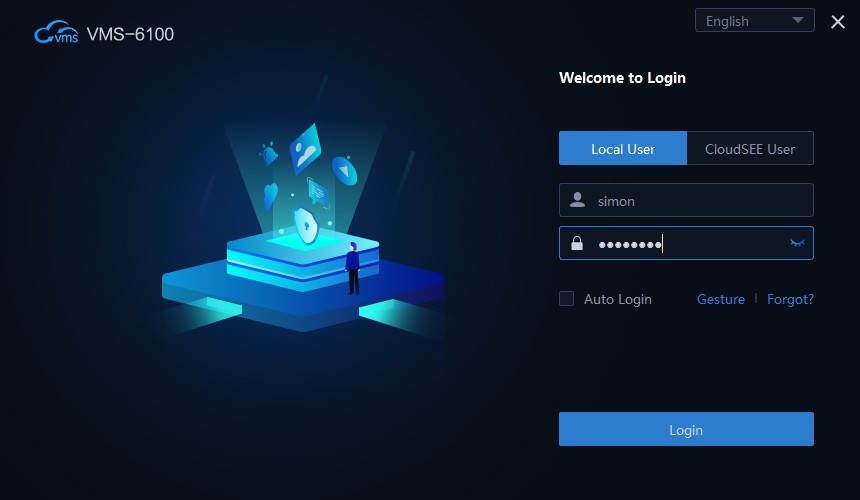
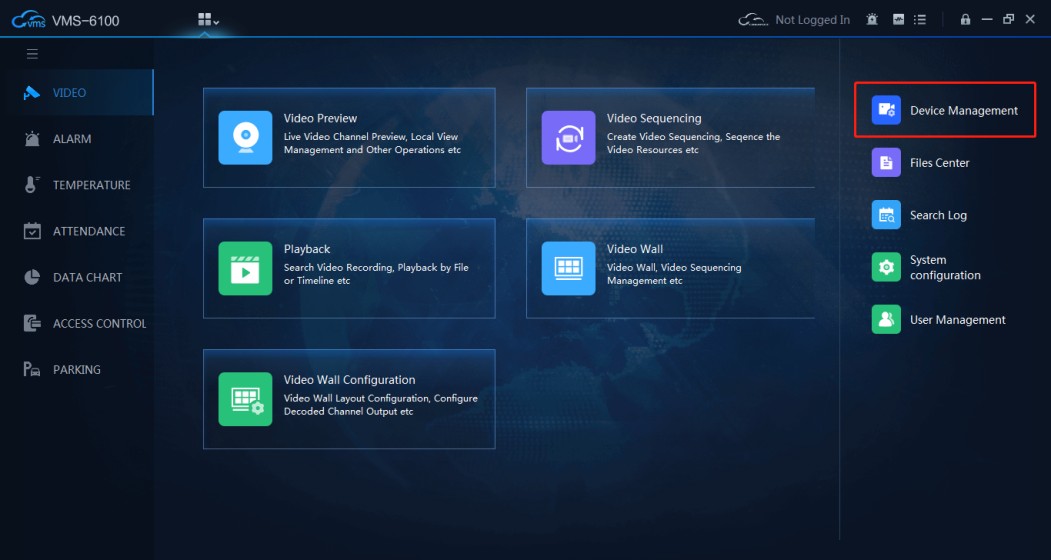
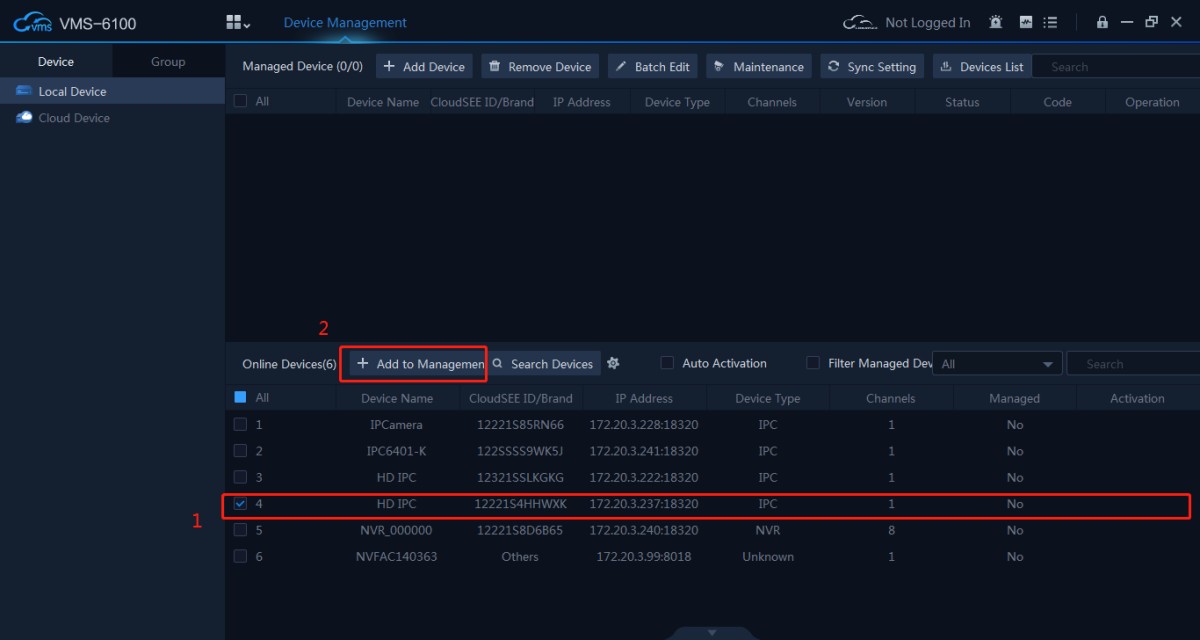
2. VMS-6100 will add device with default IP Camera account (Username: admin Password:<empty password>). If you changed the password, the device will not connect and show “Wrong Username or Password” in the Status.
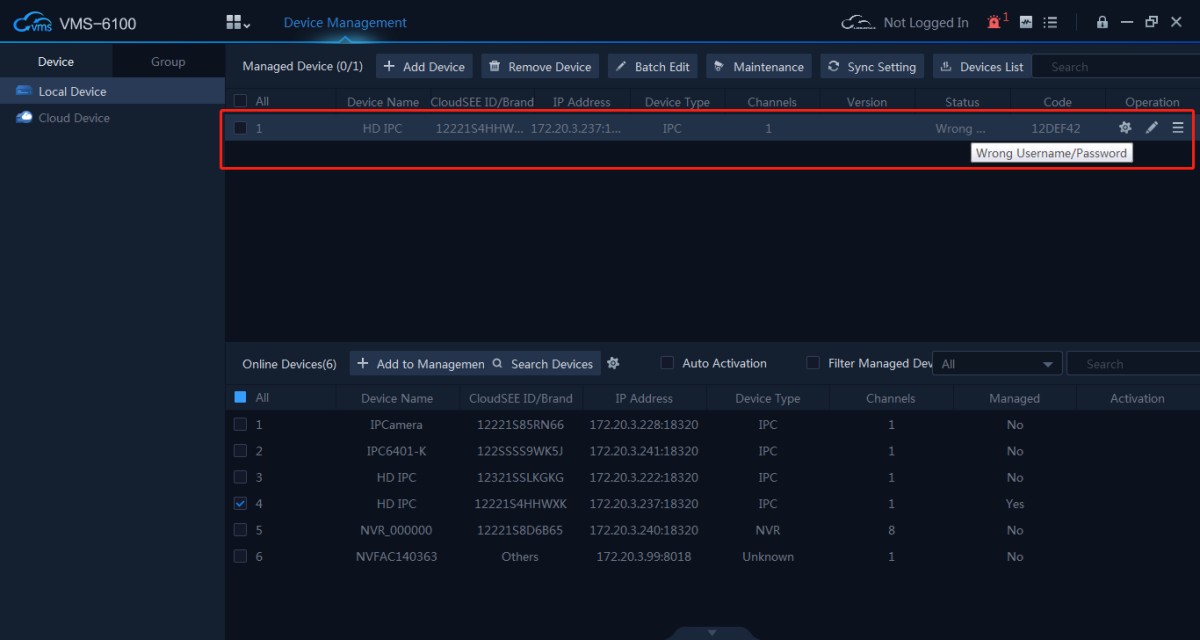
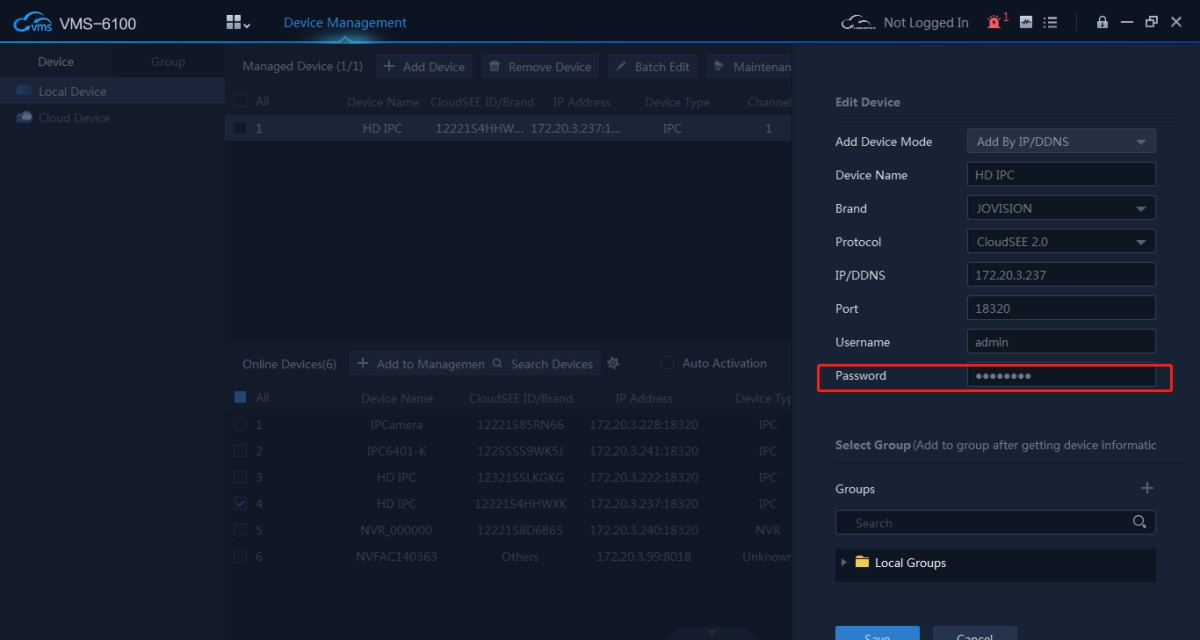
3. Double click the device or click  , and input correct Username and Password. Click OK. The camera status will become Online.
4. Click  to access Camera’s web page to set IPC to record only alarm video. Operation completed...
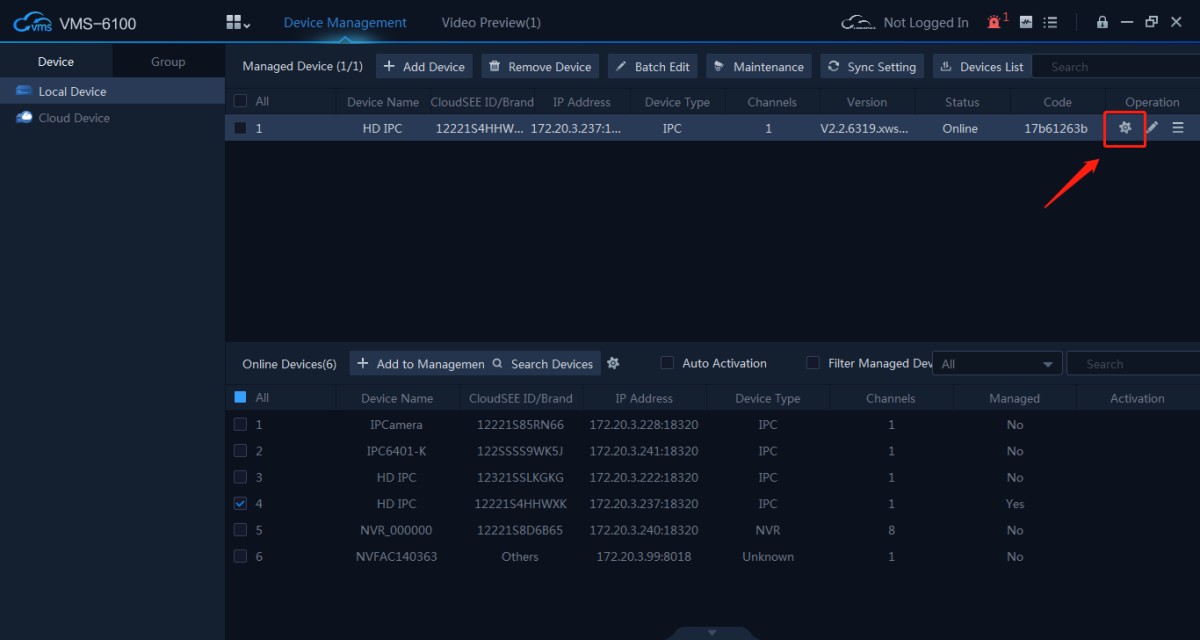
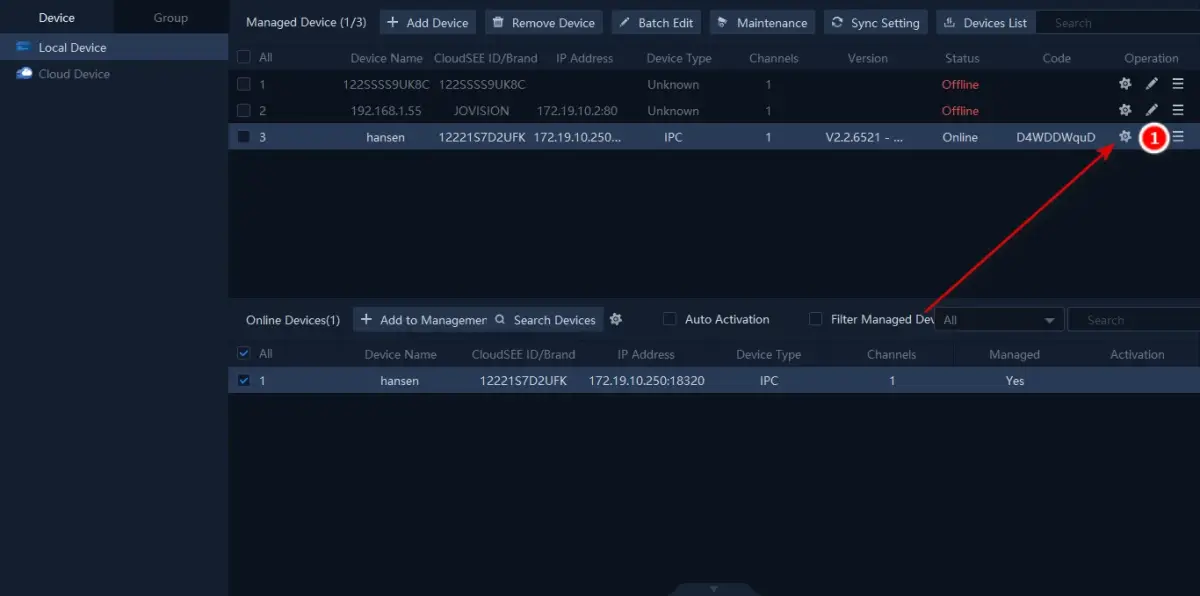
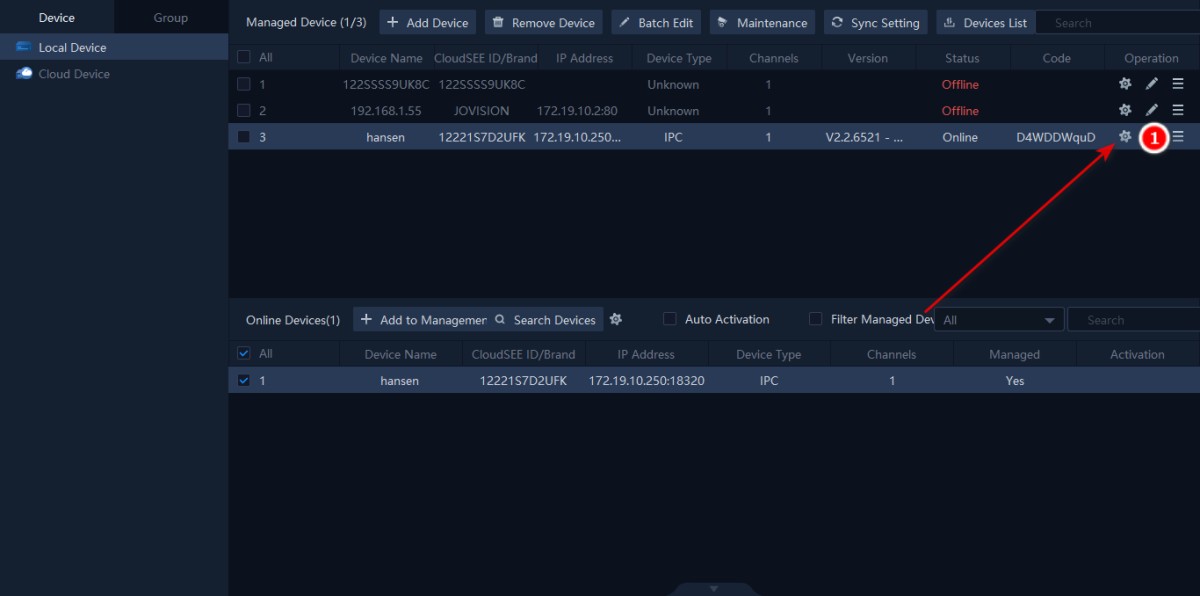
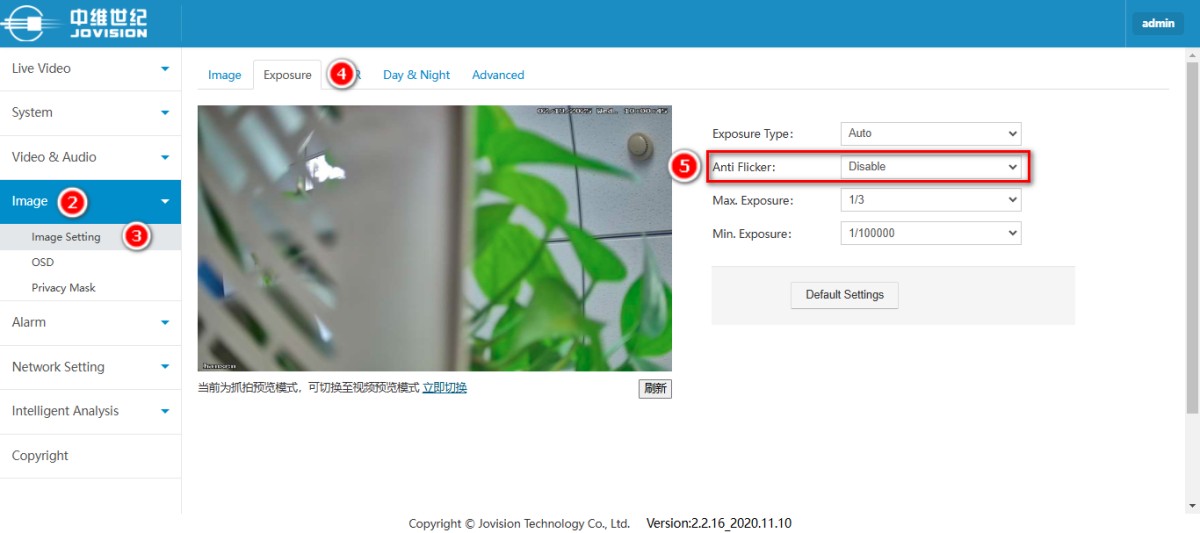
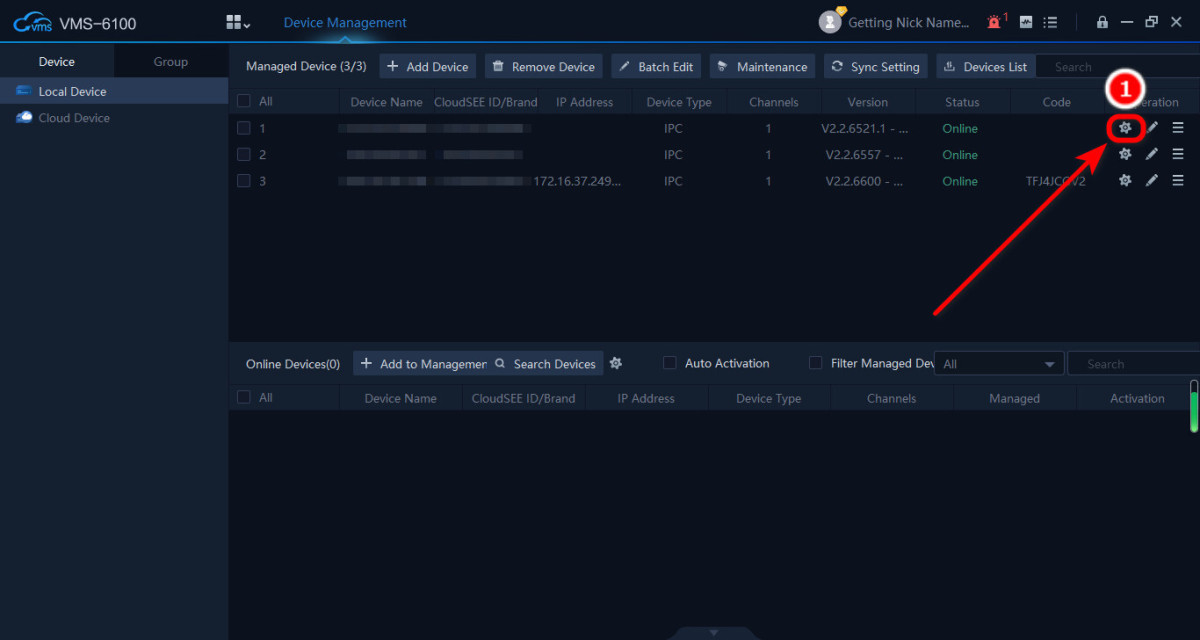
In the device management interface of VMS-6100, click the small gear at the end of the camera status to enter the camera's web interface background.
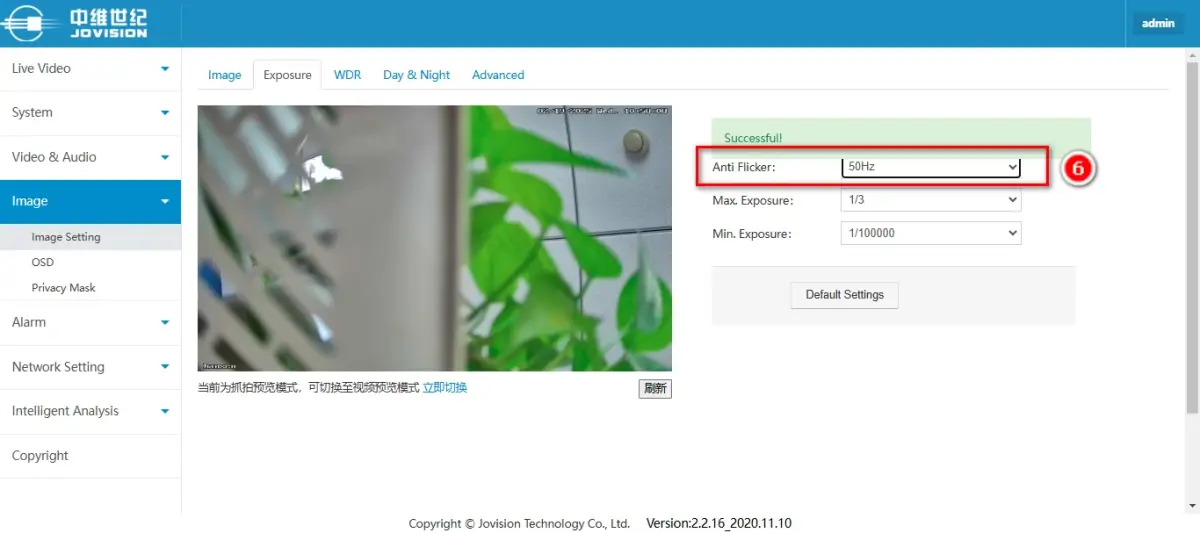
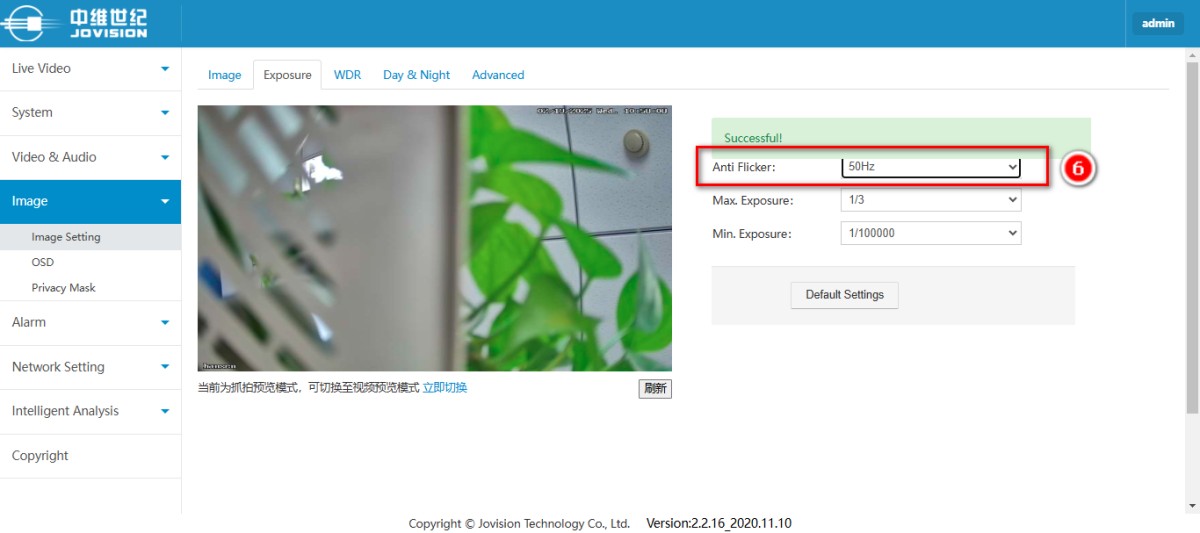
After opening the camera web interface in the browser, click Image --- Image Setting -- Exposure in sequence. Enable the Anti Flicker function on the right side of the preview screen.
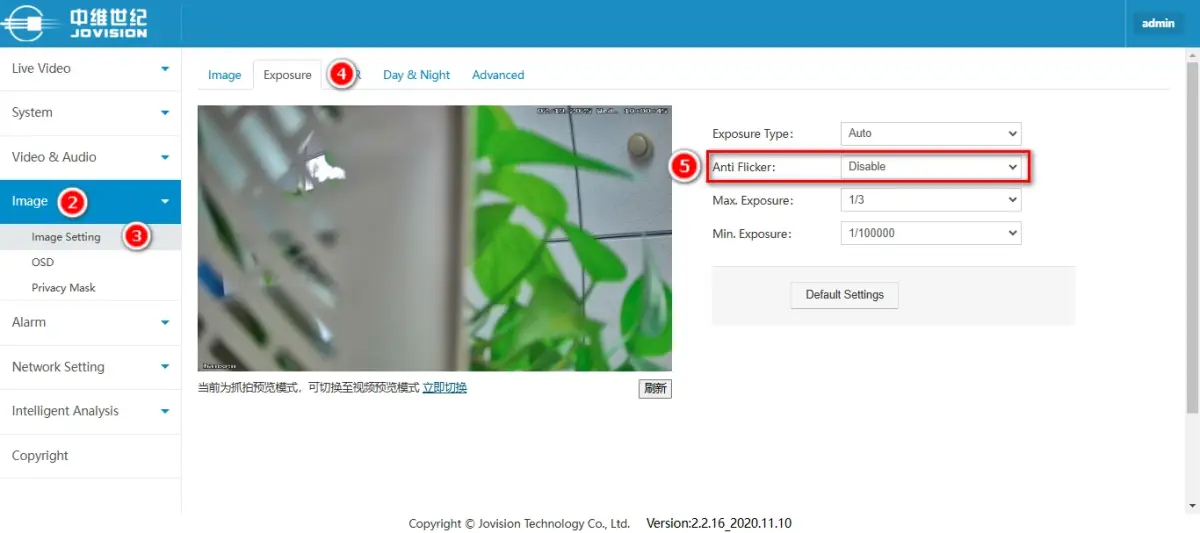
Set the threshold to 50HZ.
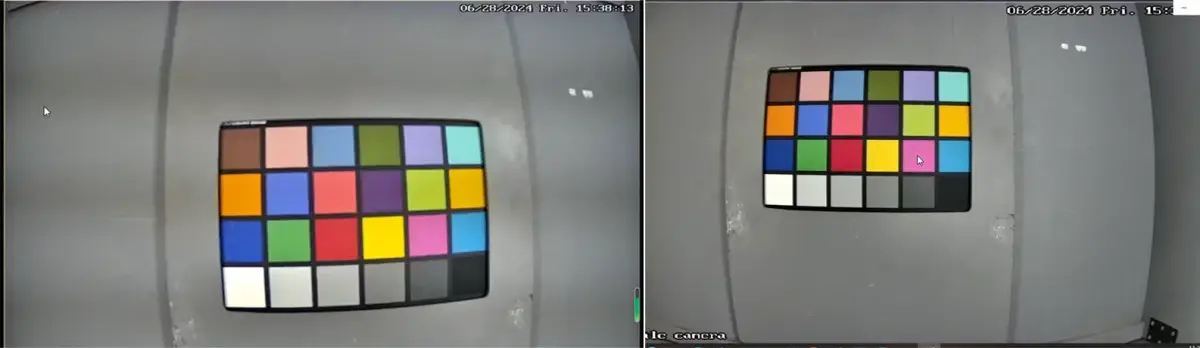
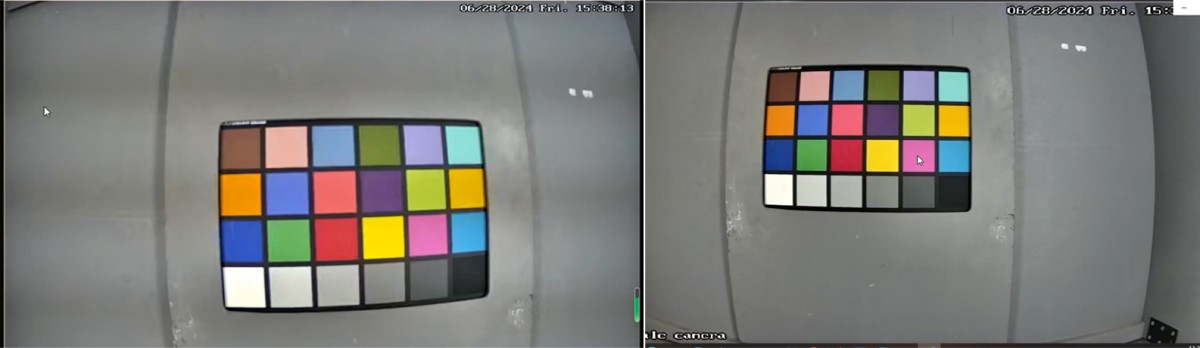
- Comparison of effects before and after turning on the Anti Flicker function.
1.Access IPC’s web page, Set the HTTPS Port for IPC:
2.Access the router, start the virtual server, and set internal and external network ports
External port: It is the port number used for public network connections(for example:443)
Internal port: IPC port(for example:443)
IP address: The IP address of the IPC you want to connect to the public network
Protocol Type: Select ALL
3.Find and Click the "Advanced Add" button on NVR’s GUI
4.Set Parameters
Protocol:Onvif
IP: Input the public IP address, (for example: 113.102.164.103)
Port: Enter an external access port for IPC, (for example: 443)
User:Input user name
Pwd:Input password
Click OK button to add IPC to NVR, operation completed.
If you want to enable the motion detection alarm but wish to avoid disturbing others with sound or light alarms, please follow these steps:
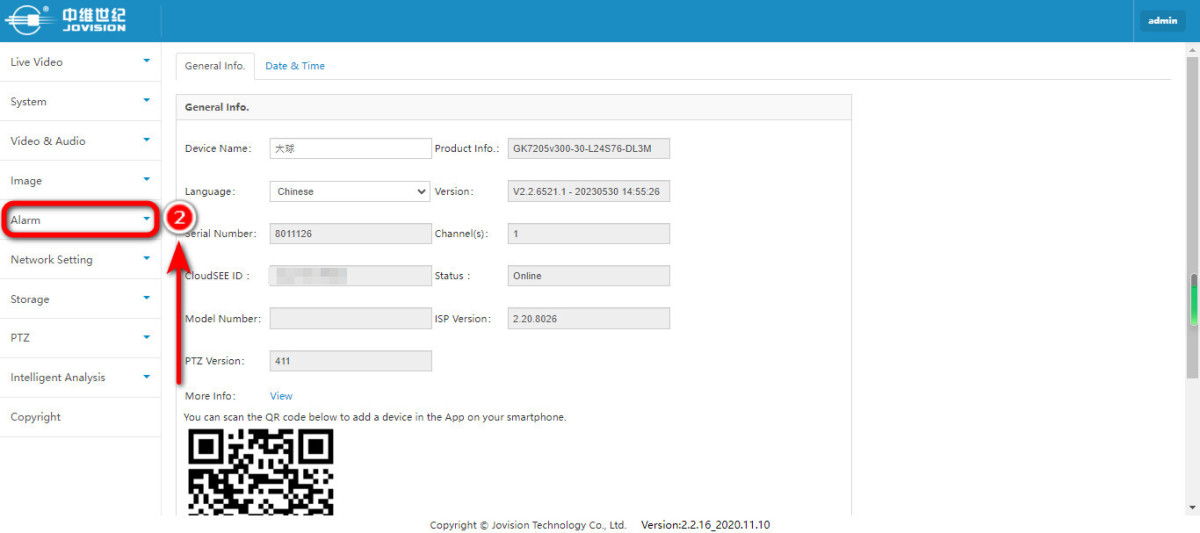
1. In the device management interface of VMS-6100, click the settings icon to access the web settings of the camera.
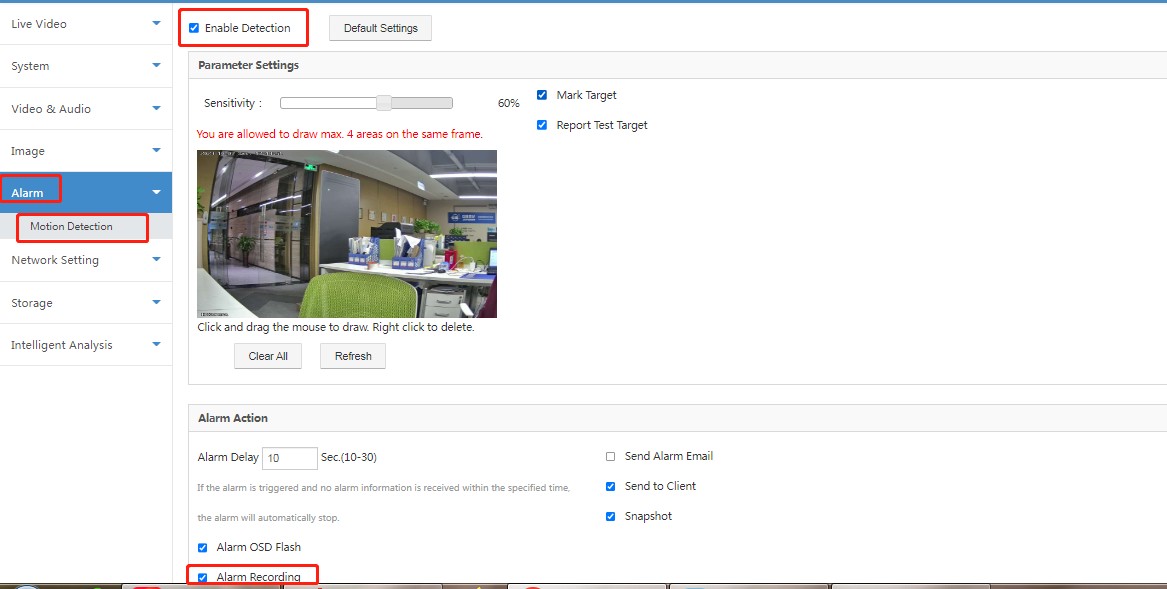
2. Once you're in the camera's web interface, navigate to the "Alarm" section to adjust the camera's alarm settings.
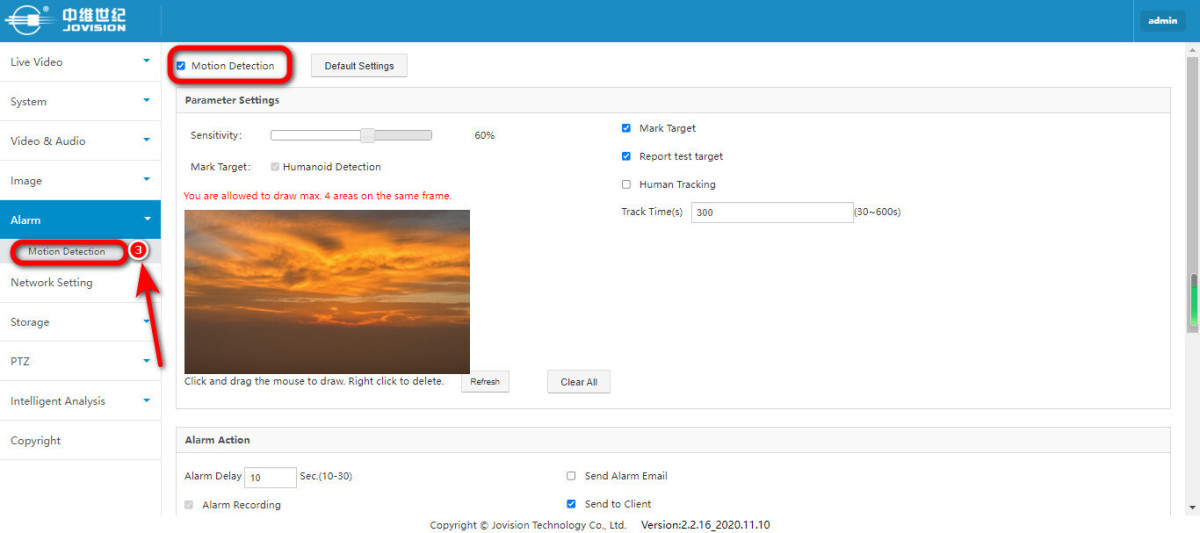
3. In the "Alarm" settings, select "Motion Detection" and ensure that the motion detection feature is enabled in the upper-left corner.
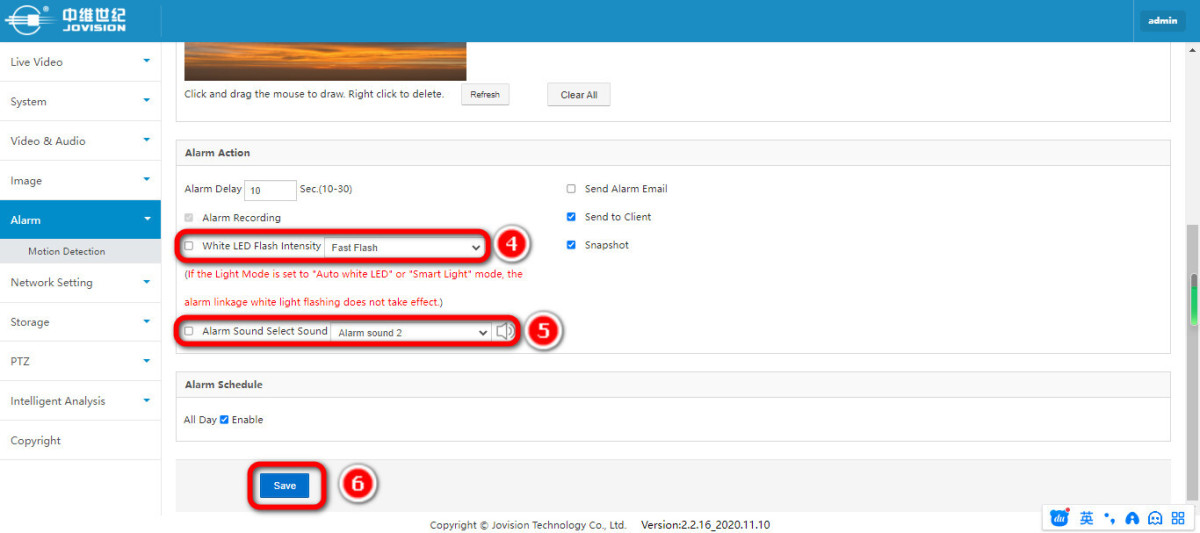
4. Scroll down to the settings for sound and light alarms. Make sure that both "Alarm Sound" and "White LED Flash" are disabled. Save the changes to apply the settings.
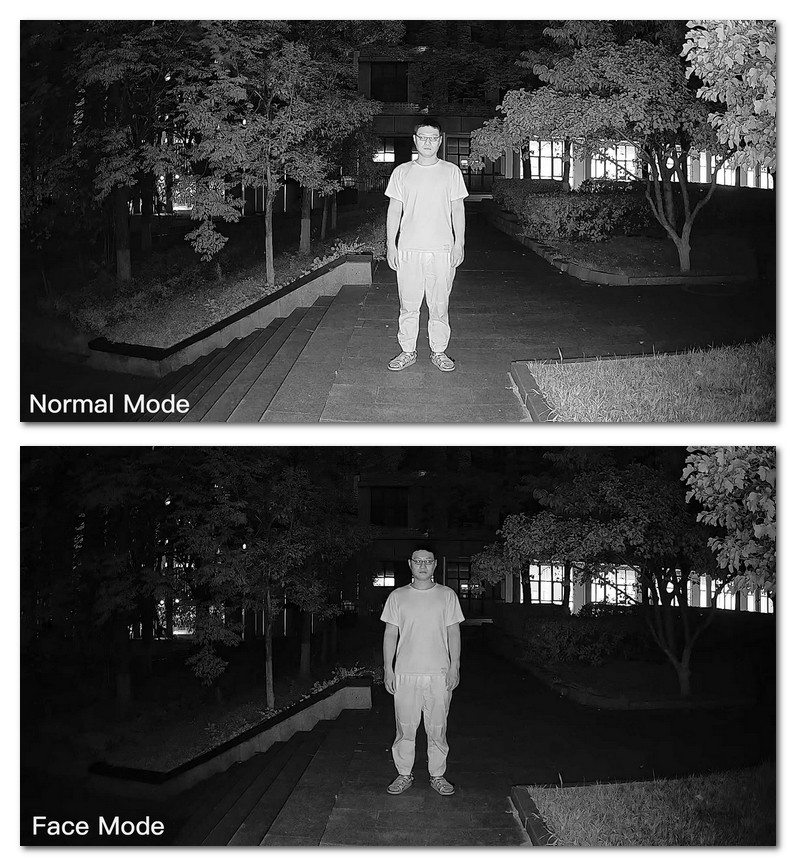
At night, under certain circumstances, the camera's infrared light may cause the face to be overexposed, thus affecting the clarity of the face. In order to solve this problem, Jovision cameras developed the face mode function to ensure clearer images when shooting human faces. For enabling the Face Mode feature, follow the steps.
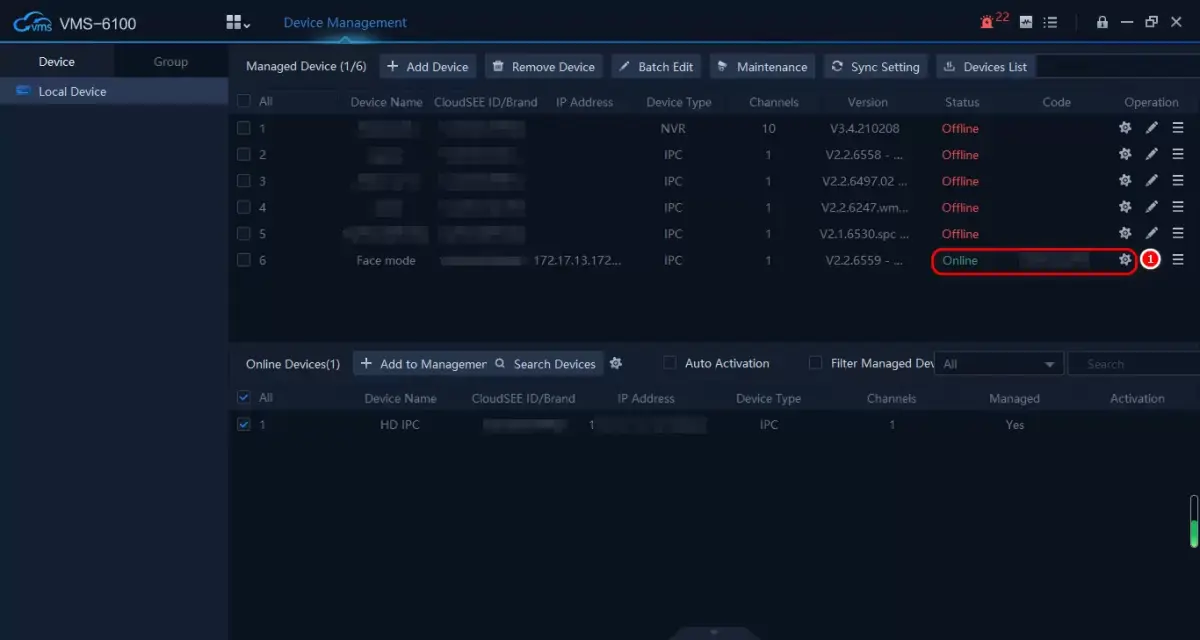
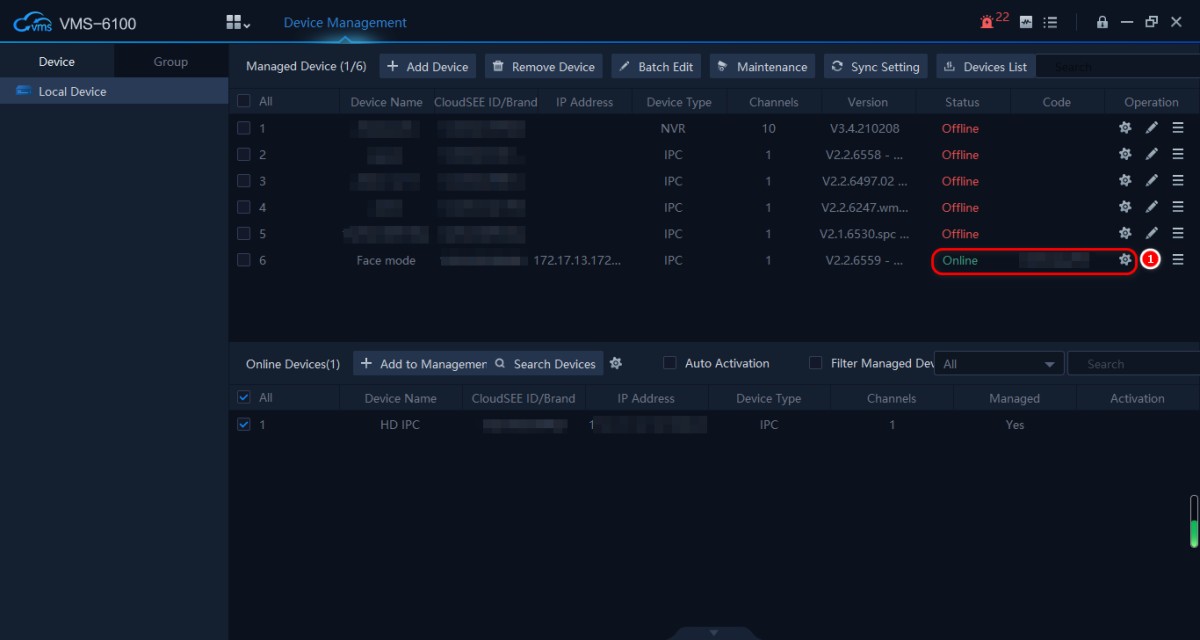
In the device management interface of VMS-6100, click the small gear at the end of the camera status to enter the camera's web interface background.
After entering the background of the camera, click the "Image" option and select the "Advanced" option in Image Setting.
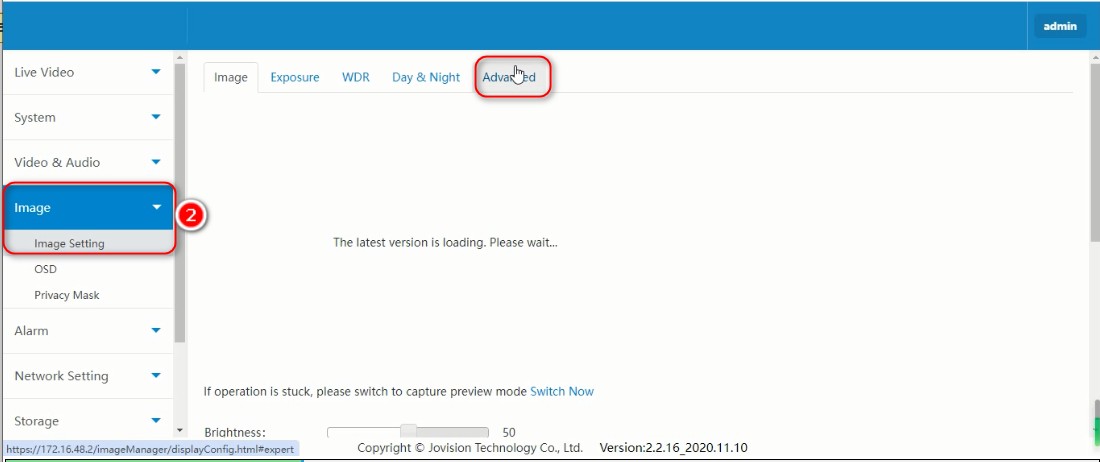
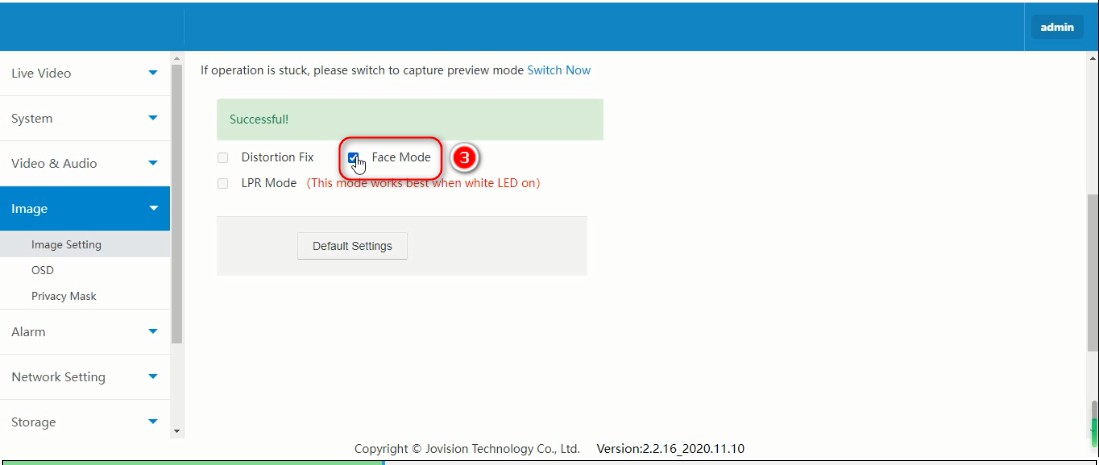
On the Advanced page, check the "Face Mode" option and save the settings.
Effect
When pointing a CCTV camera to an entrance, door or a window, you can notice parts of the image with an excess of light and other parts that are too dark, to obtain a better image, the camera must compensate for this kind of situation.
Through the use of the WDR/DWDR, it is possible to compensate for these different areas and to balance them.
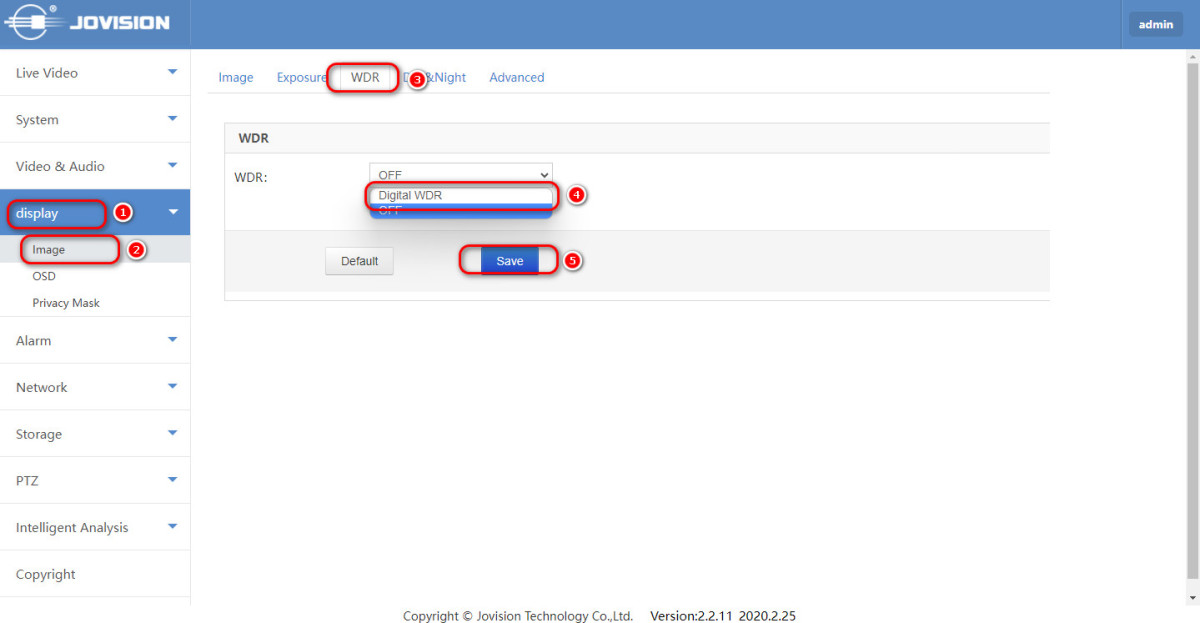
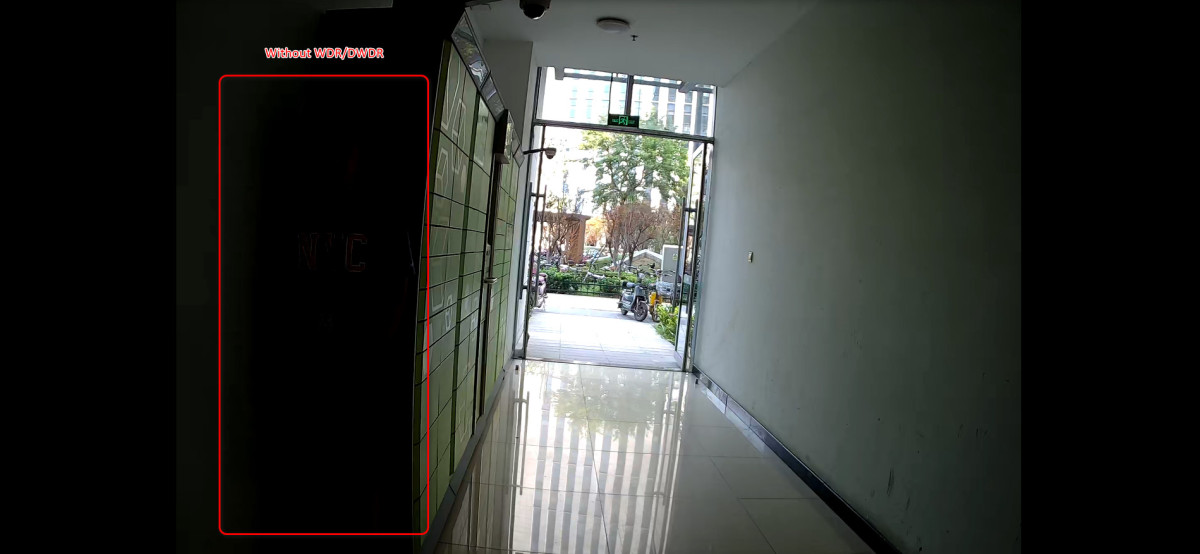
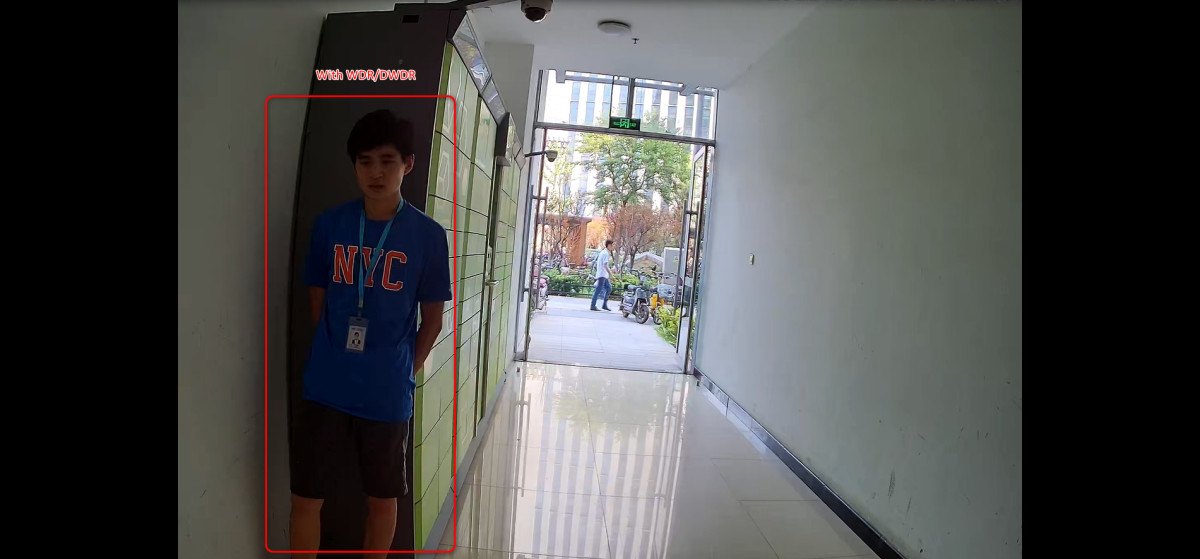
By activating the WDR on the camera, the shutter will automatically exposure the camera to light twice and merge the pictures for a better result. Check the difference of WDR/DWDR On and Off below.
WDR/DWDR OFF
WDR/DWDR ON
Steps:
Download software VMS-6100 and install it on your PC. You can find VMS-6100 on our website:
https://www.jovisionsecurity.com/download.html
Connect the Camera in the same subnet with your local network, and use VMS-6100 software to search and access the Camera.
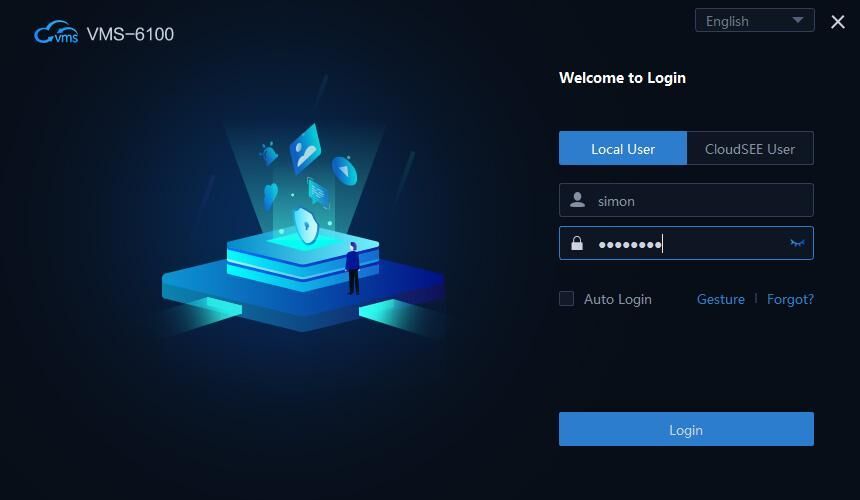
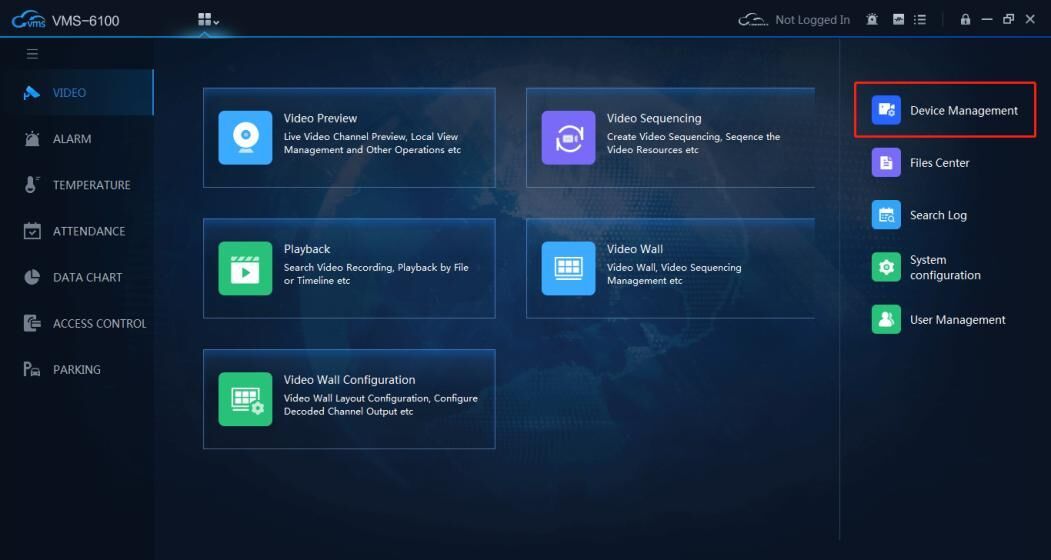
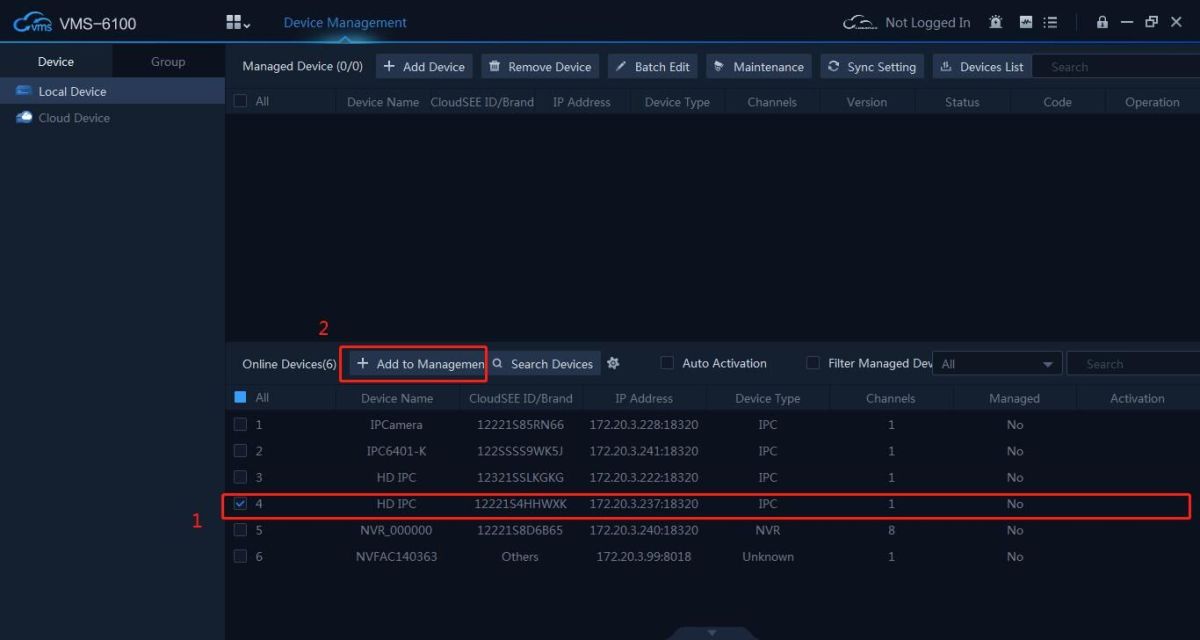
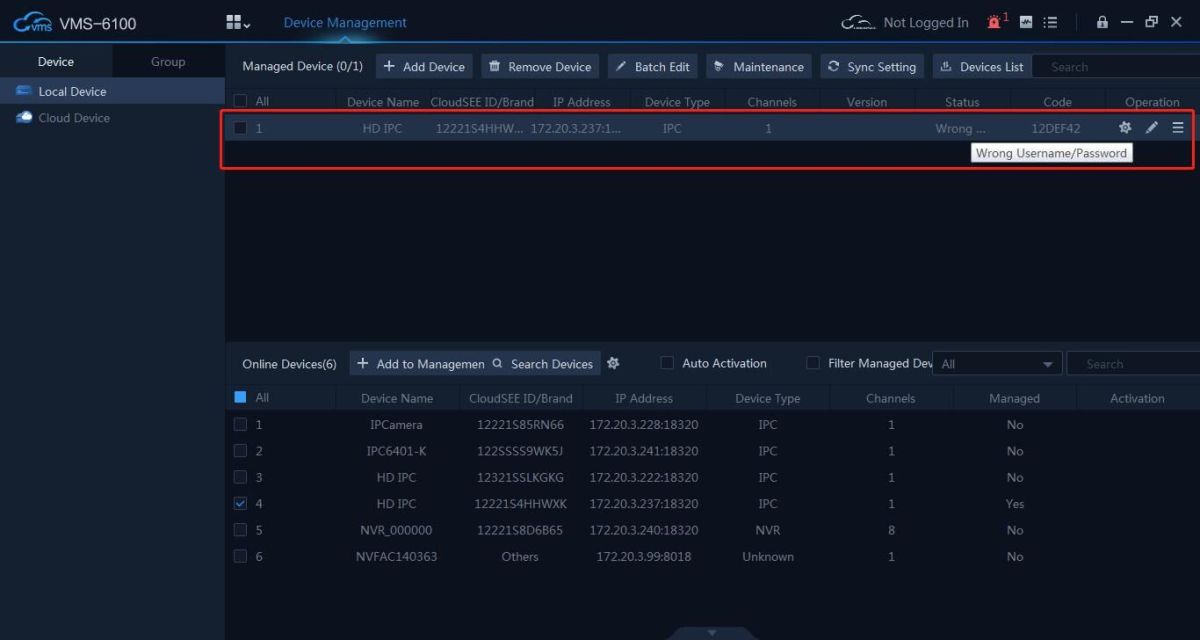
VMS-6100 will add device with default IP Camera account (Username: admin Password:<empty password>). If you changed the password, the device will not connect and show “Wrong Username or Password” in the Status.
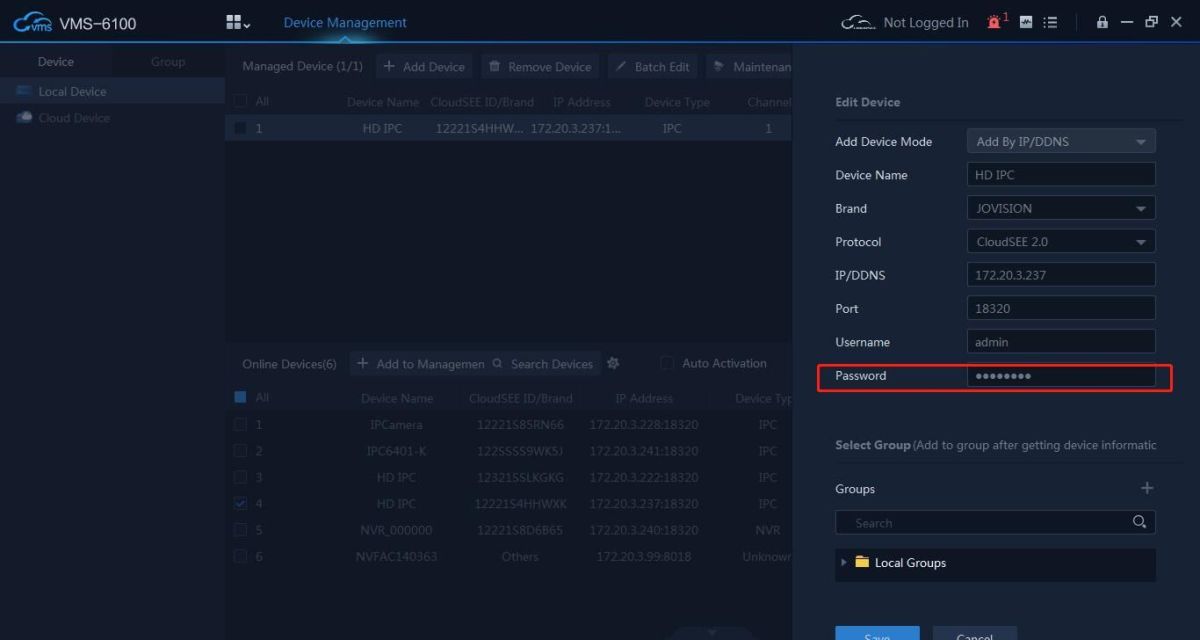
Double click the device or click Edit button, and input correct Username and Password. Click OK. The camera status will become Online.
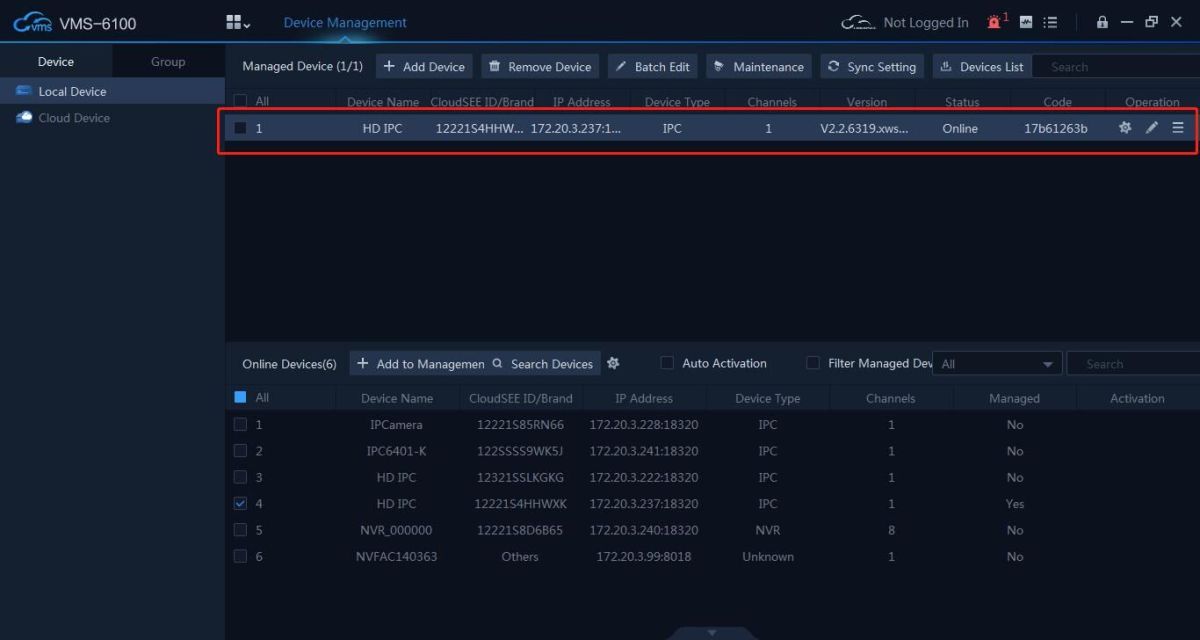
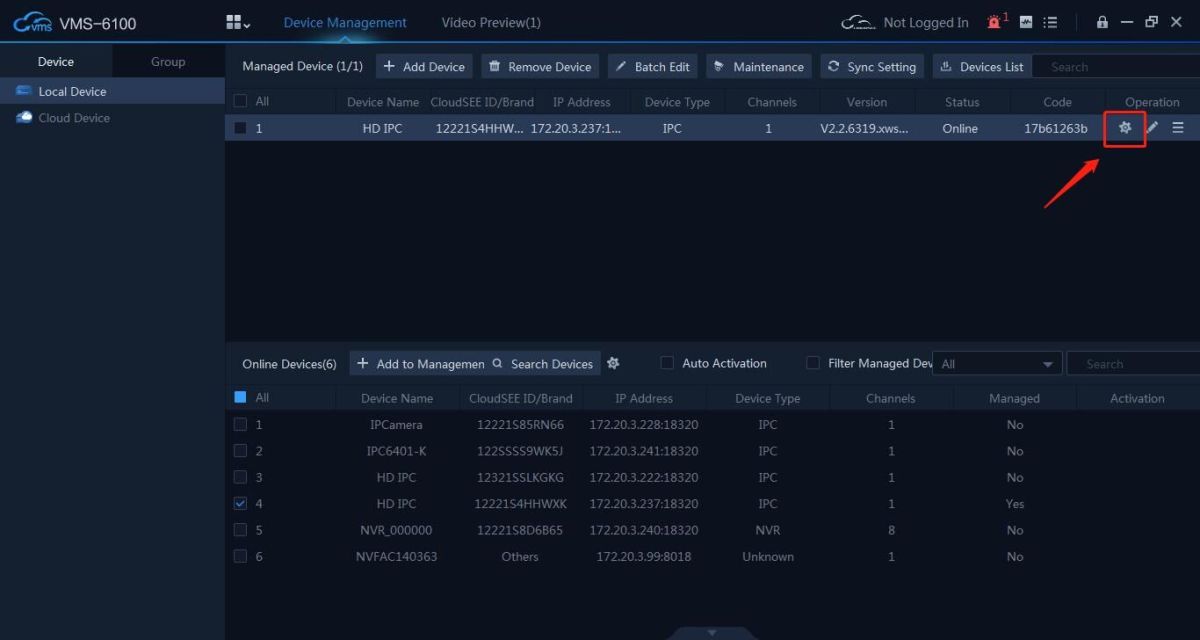
Click Setting button to access Camera’s web page, find the Settings page: Image Management -> Image-> Day&Night. Set “Light Mode” to “Auto. IR LED”, then save the setting.
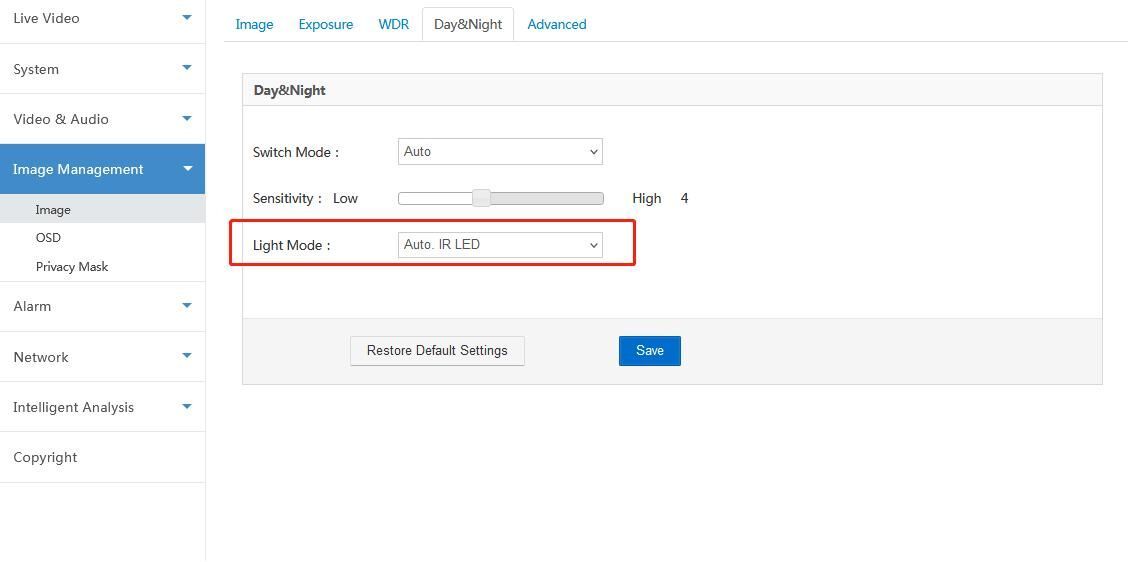
Find the Settings page: Alarm -> Motion Detection. Enable “Enable Motion”, “ White LED Flash blink intensity setting” and “ play alarm sound play sound selection”, then save the setting.
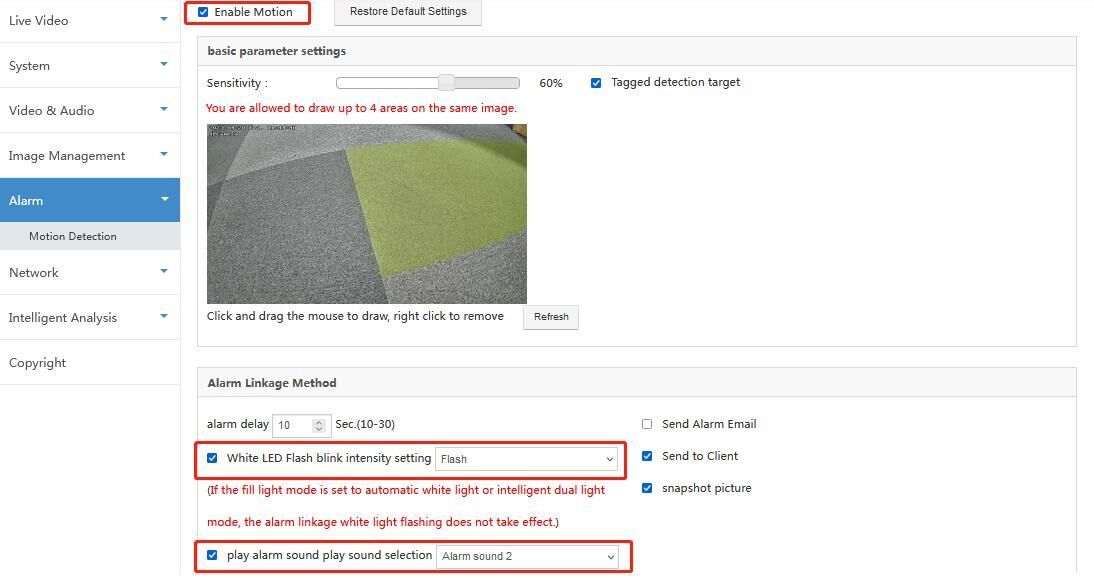
The setting is complete, when the alarm is triggered during the day, there will be a sound alarm, and when the alarm is triggered at night, there will be a sound and light alarm.
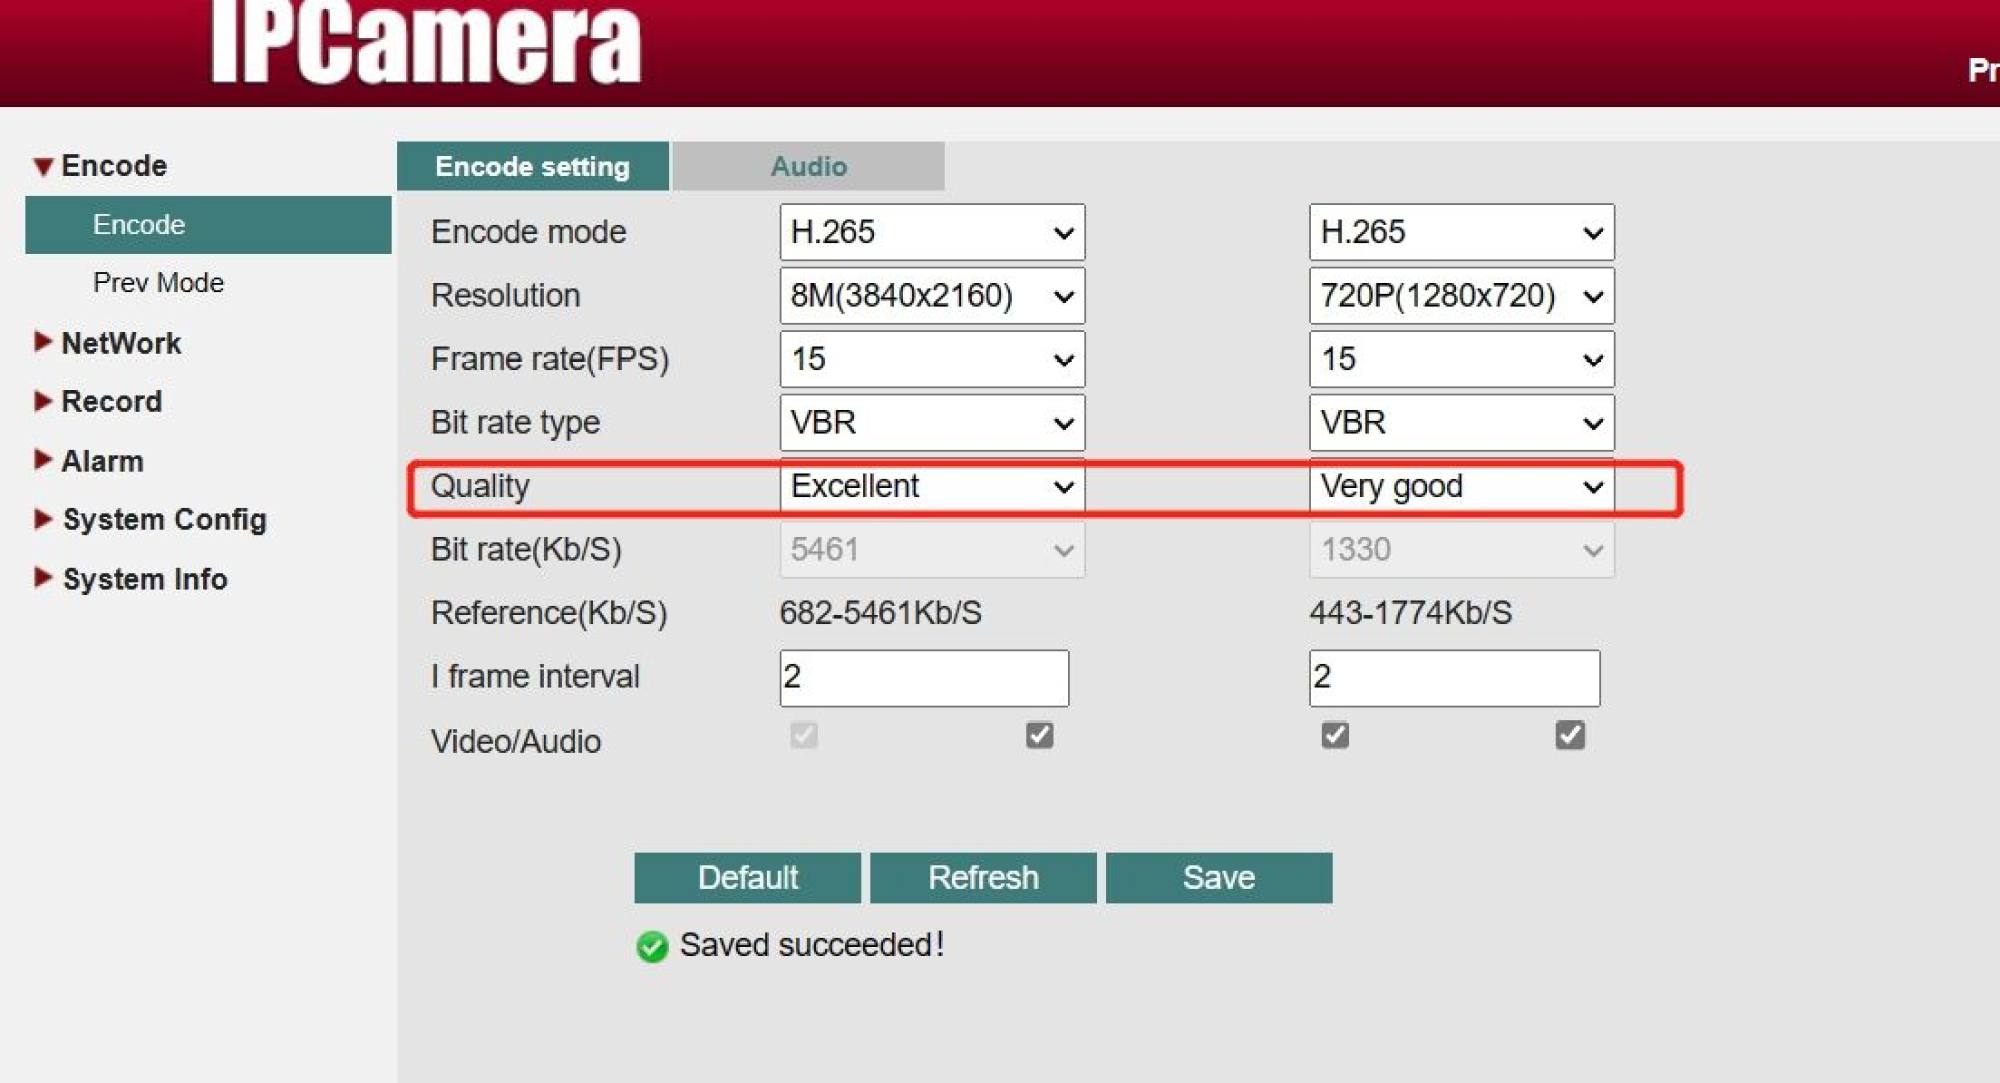
Please try log in camera’s webpage, then click Encode -> Encode Setting and set “Quality” parameter as below image. Save the setting and check it.
Please check the power supply. We would recommend to use separate power supply for cameras. If you are using DC power distributor, use little bit high ampere power supply than regular.
Steps:
1. Open "VMS-6100" and go to "Device Management".
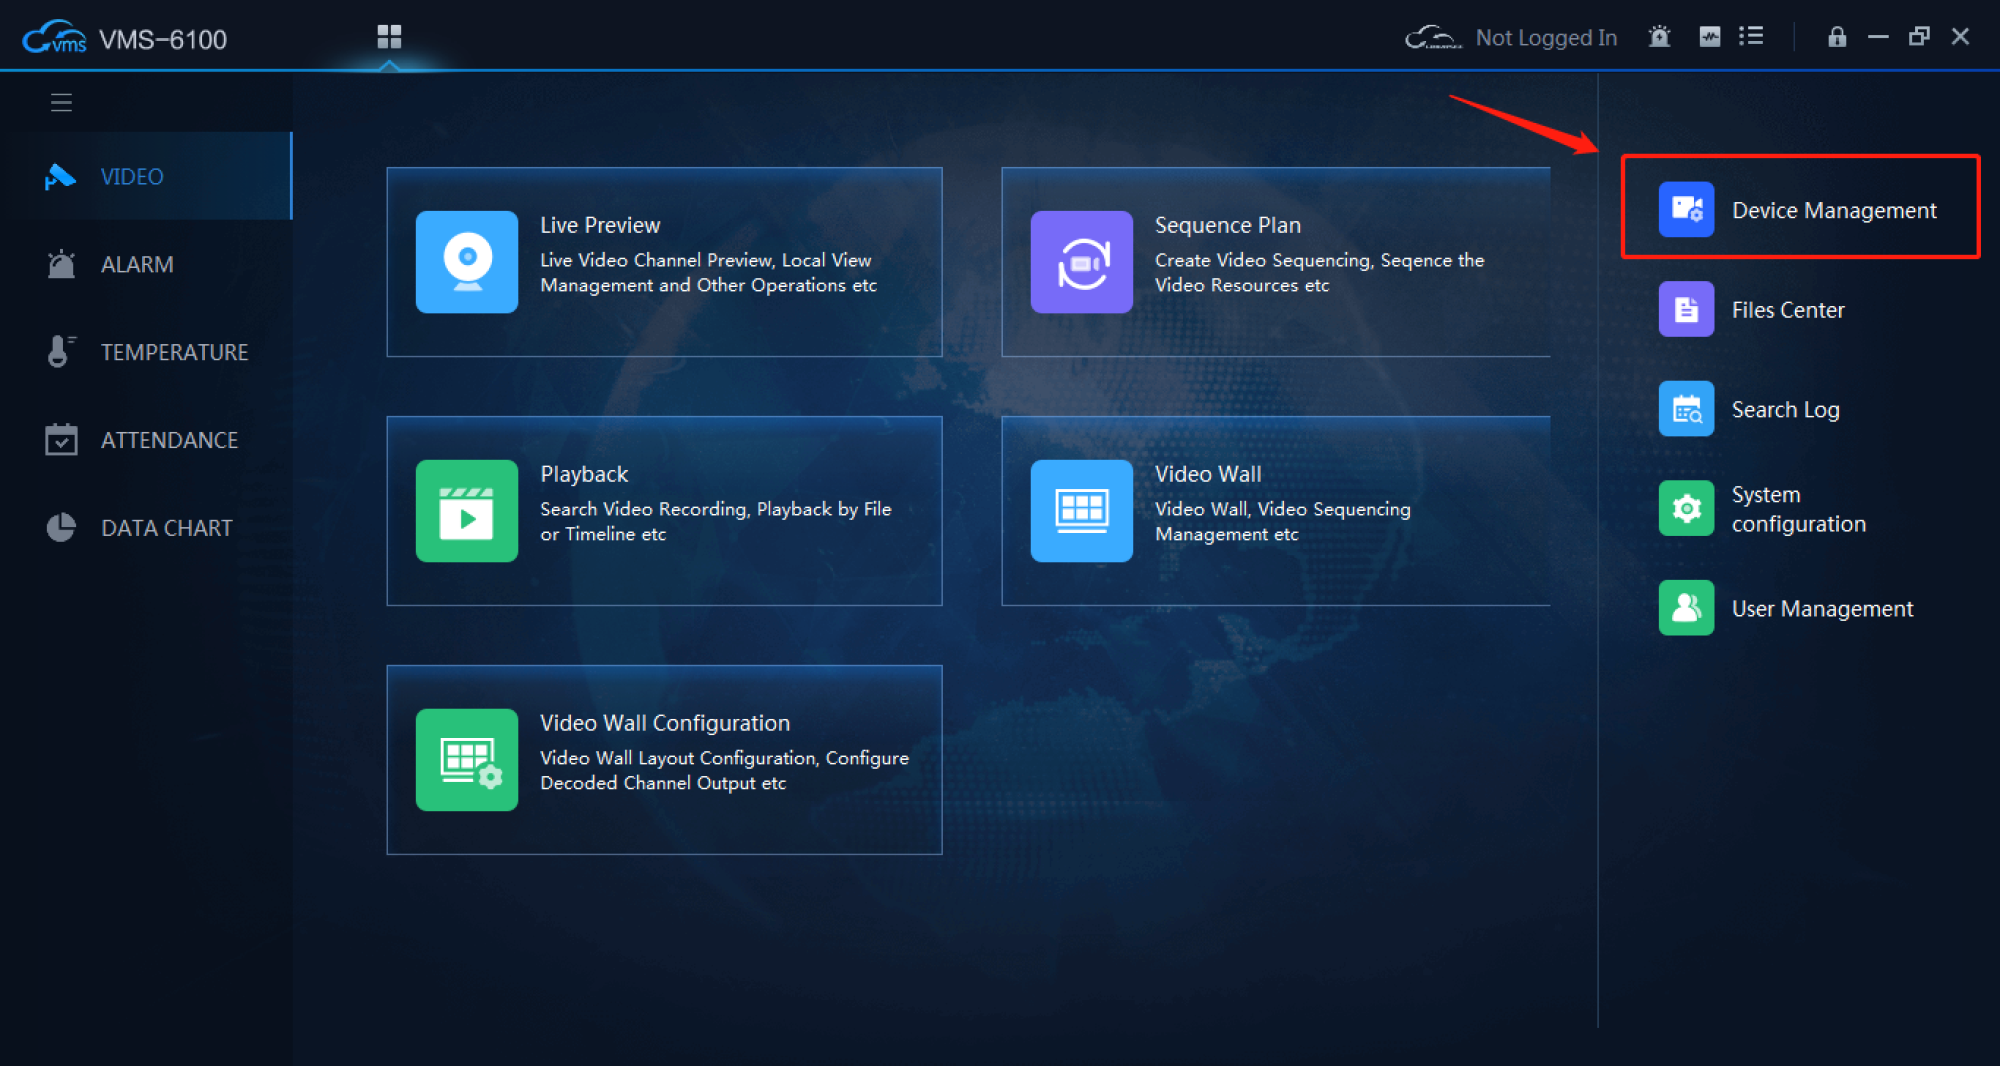
2. Click "Search Devices" in "Device Management", search for the newly installed camera, and check the camera’s IP address
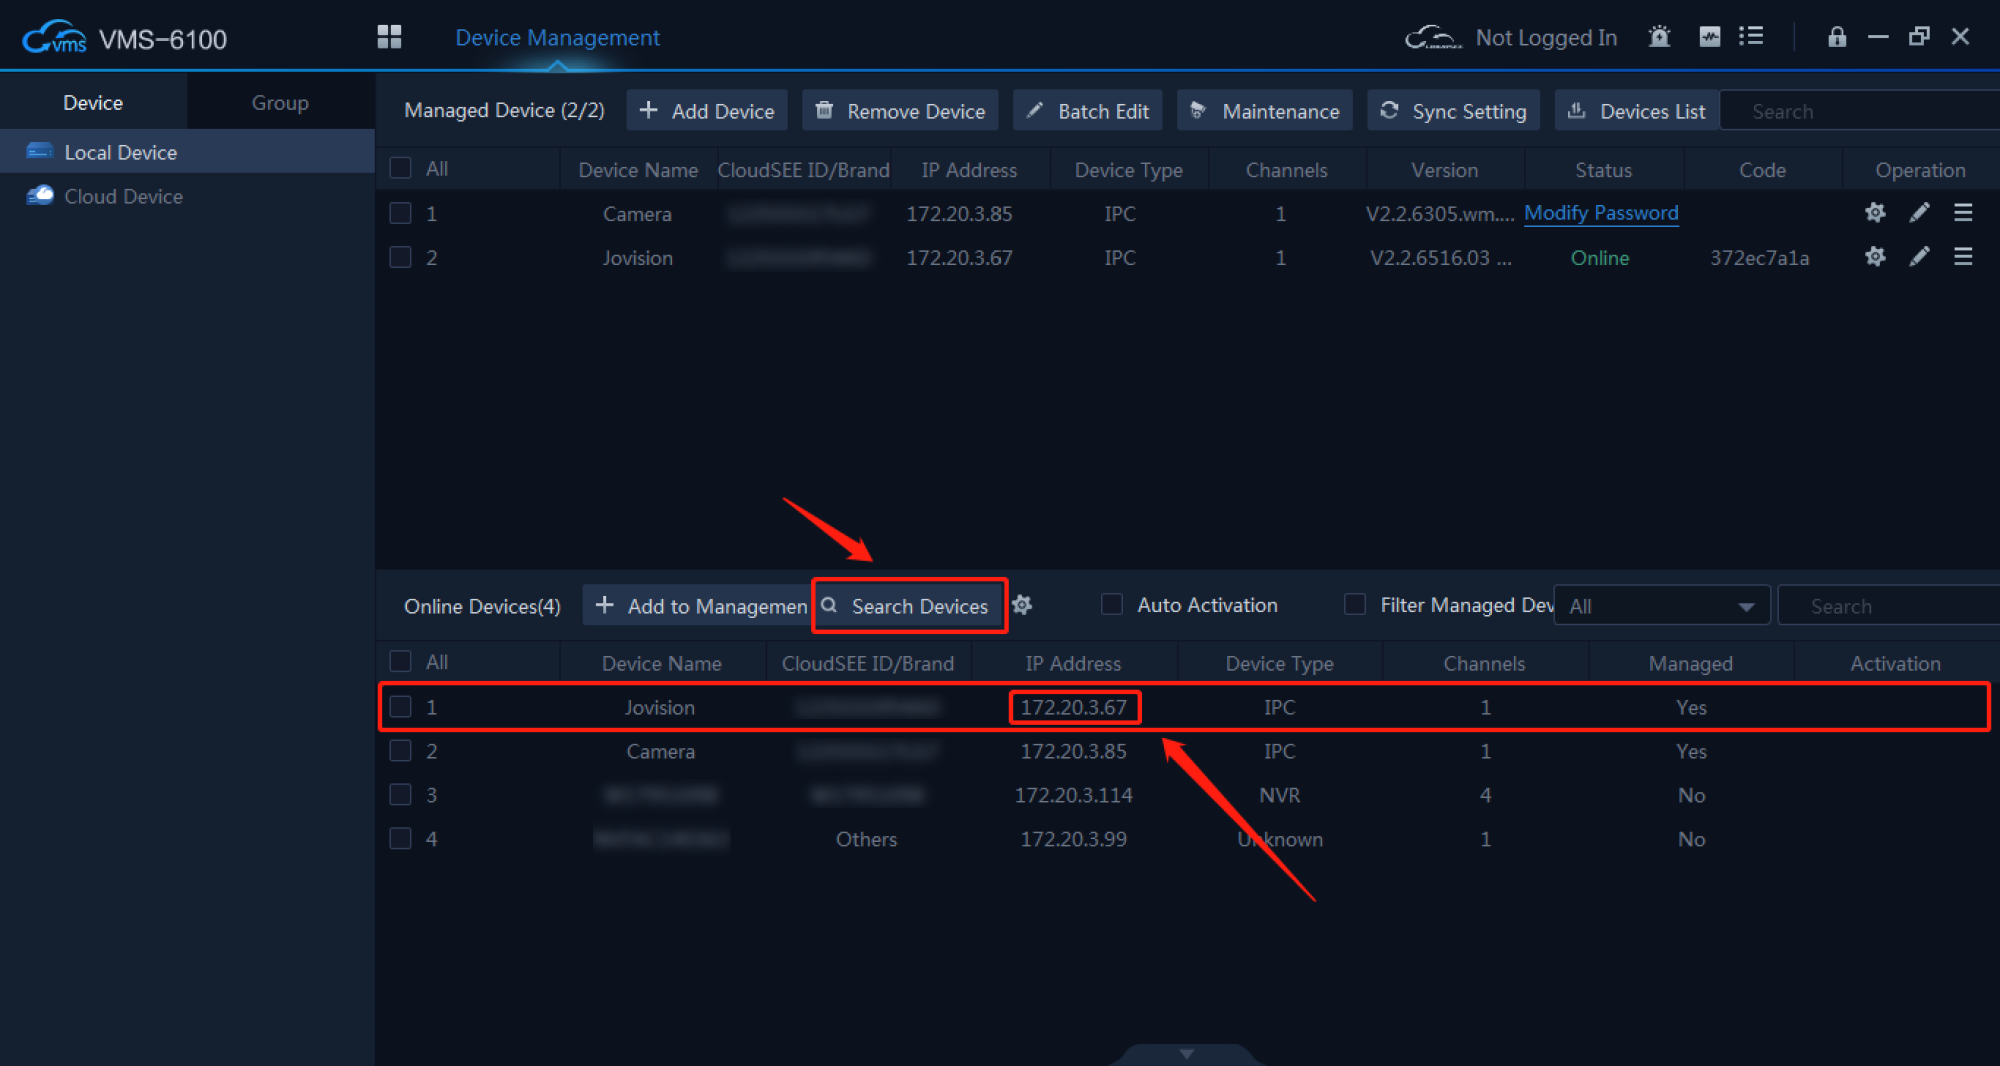
3. Open the browser, enter the camera’s IP address, follow the steps to activate the camera(If needed), and enter the background
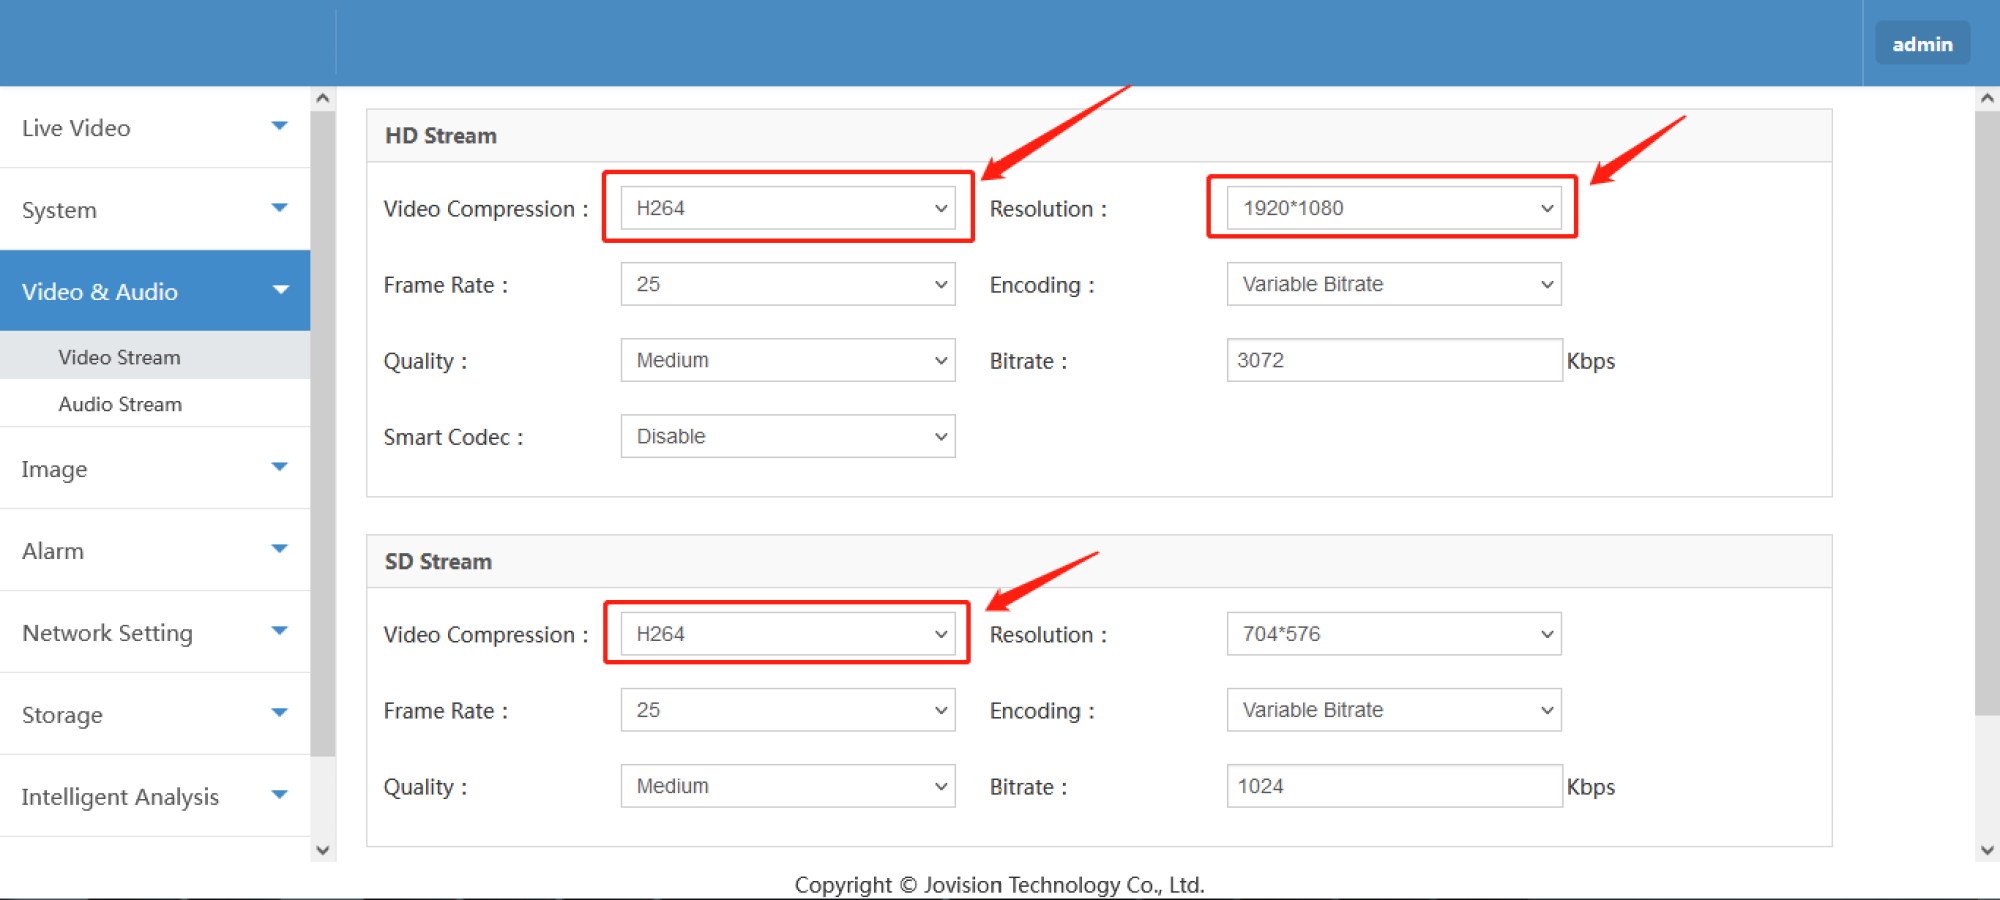
4. Go to the background to find "Video & Audio -> Video Stream", change "Video Compression" to "H.264", "Resolution" to "1920x1080", save the setting.
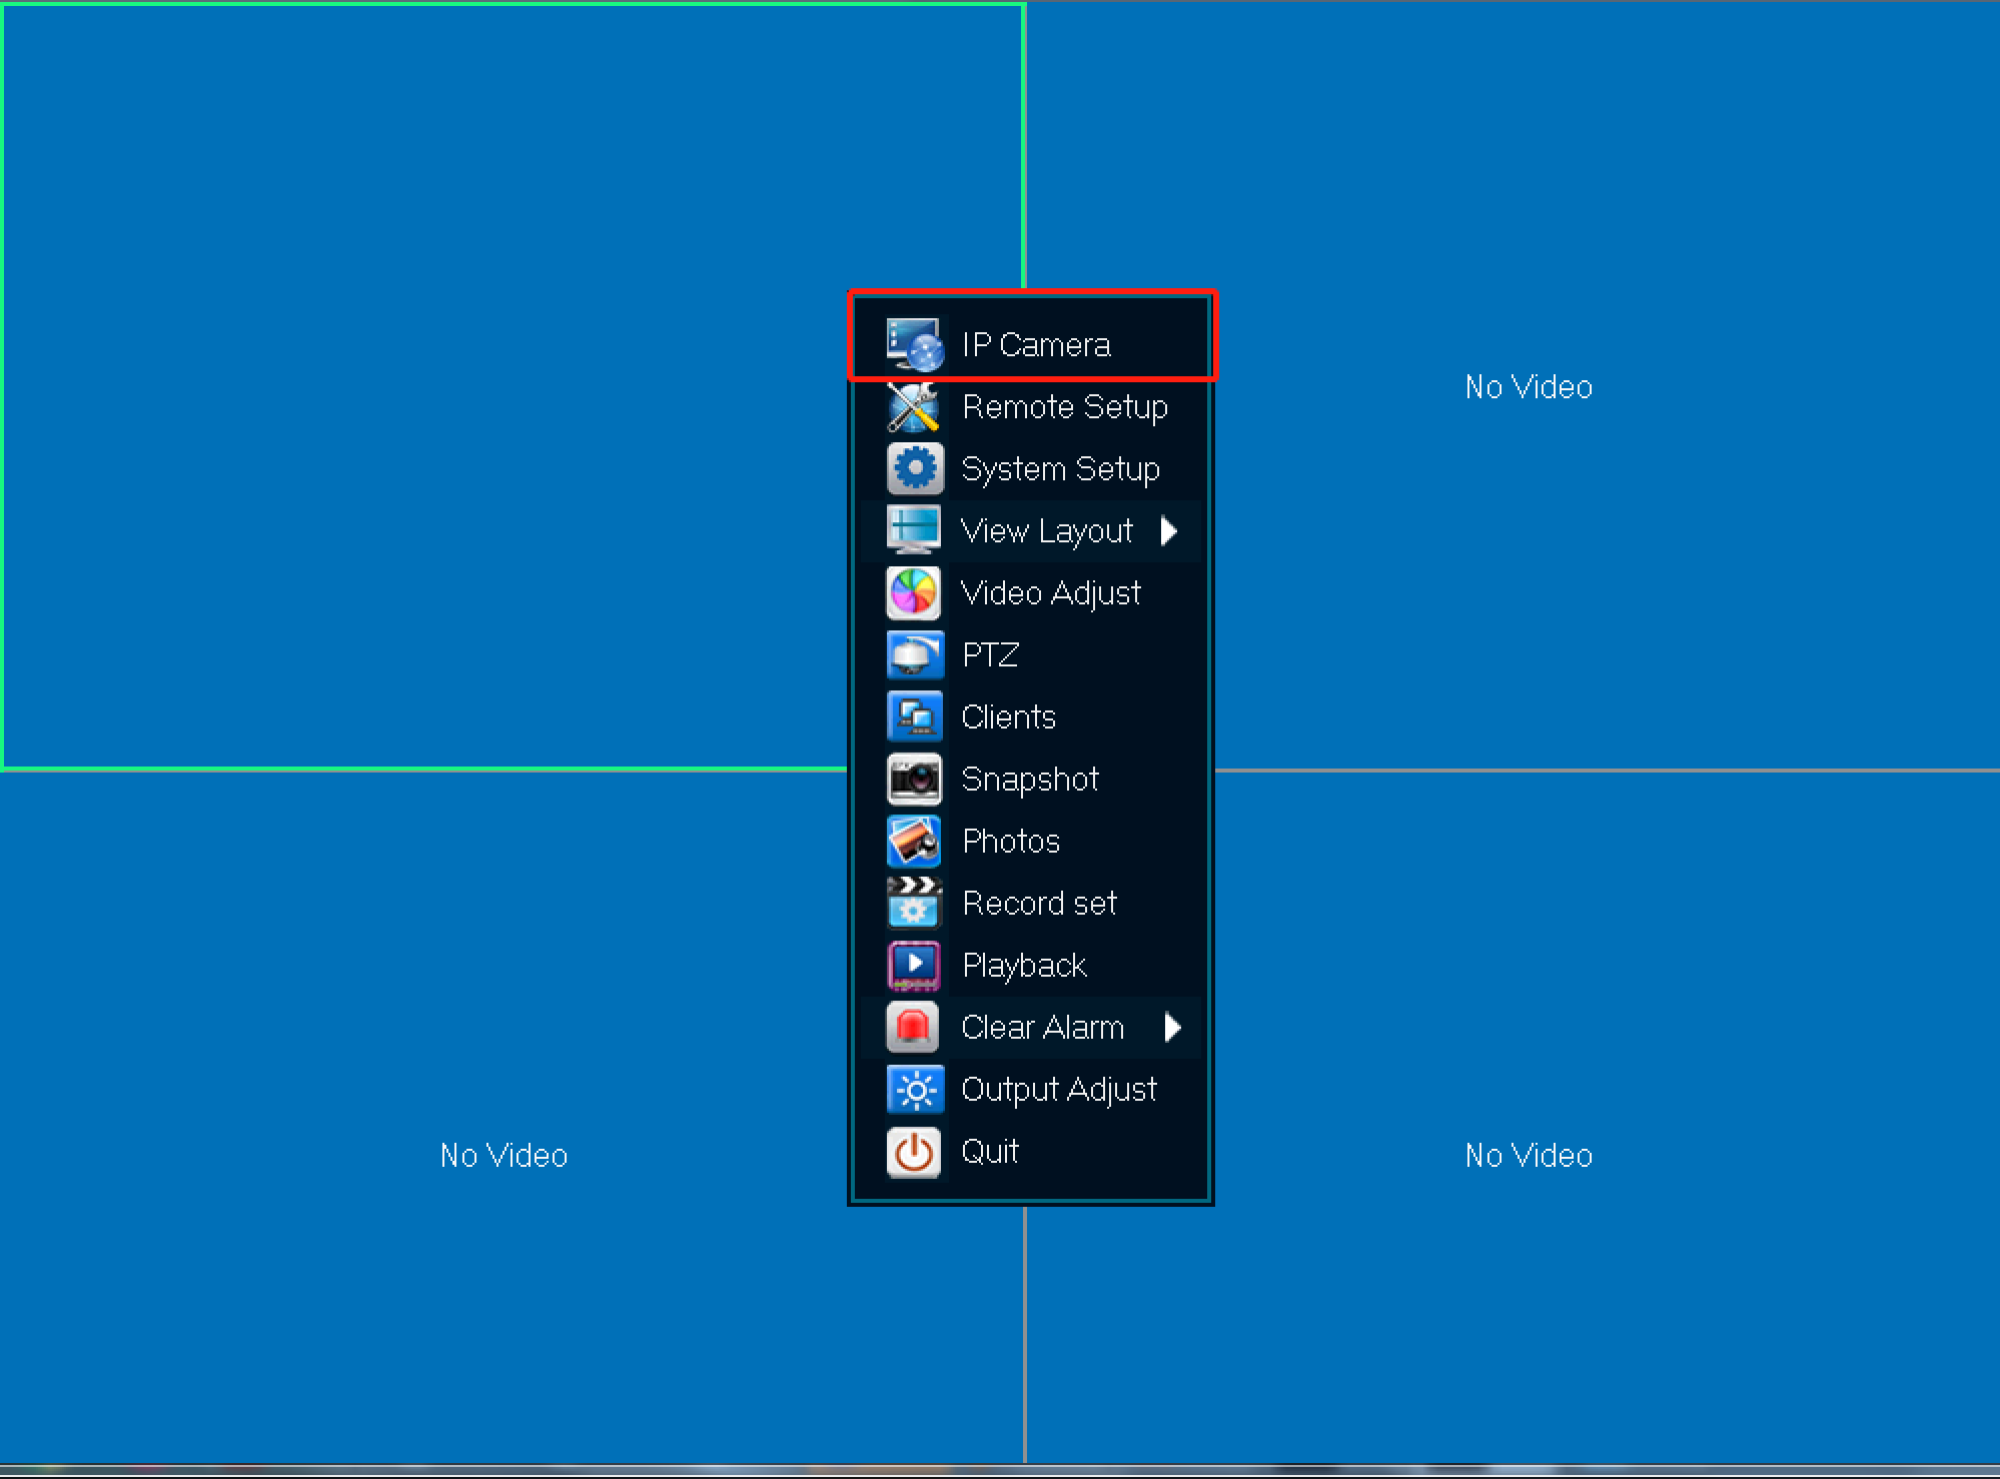
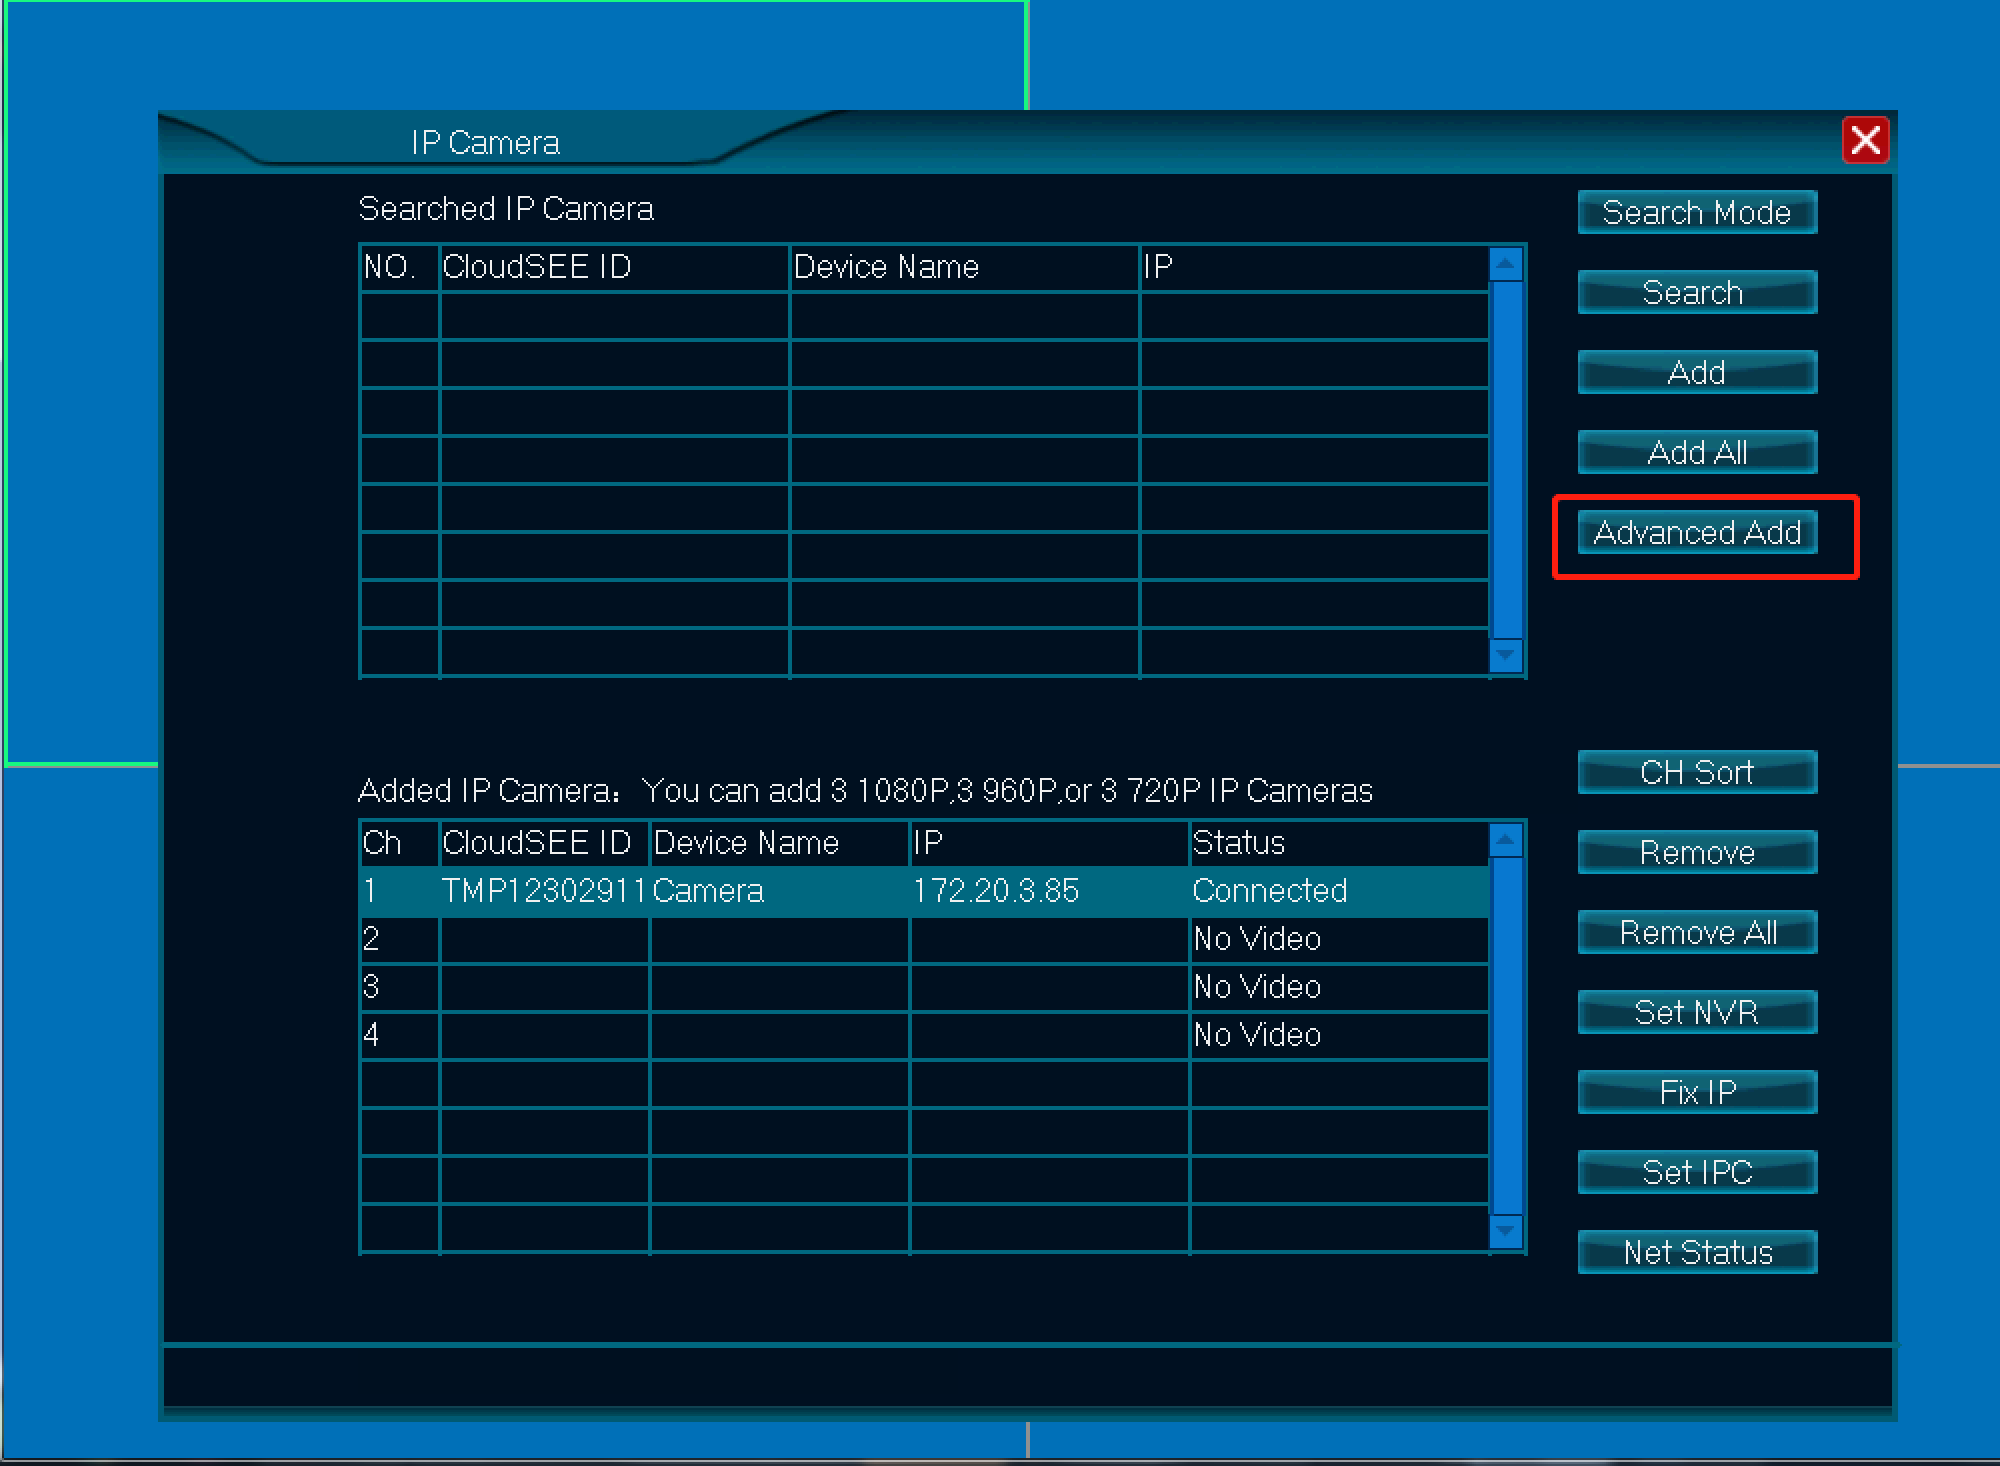
5. Right click NVR -> IP Camera -> Advanced Add
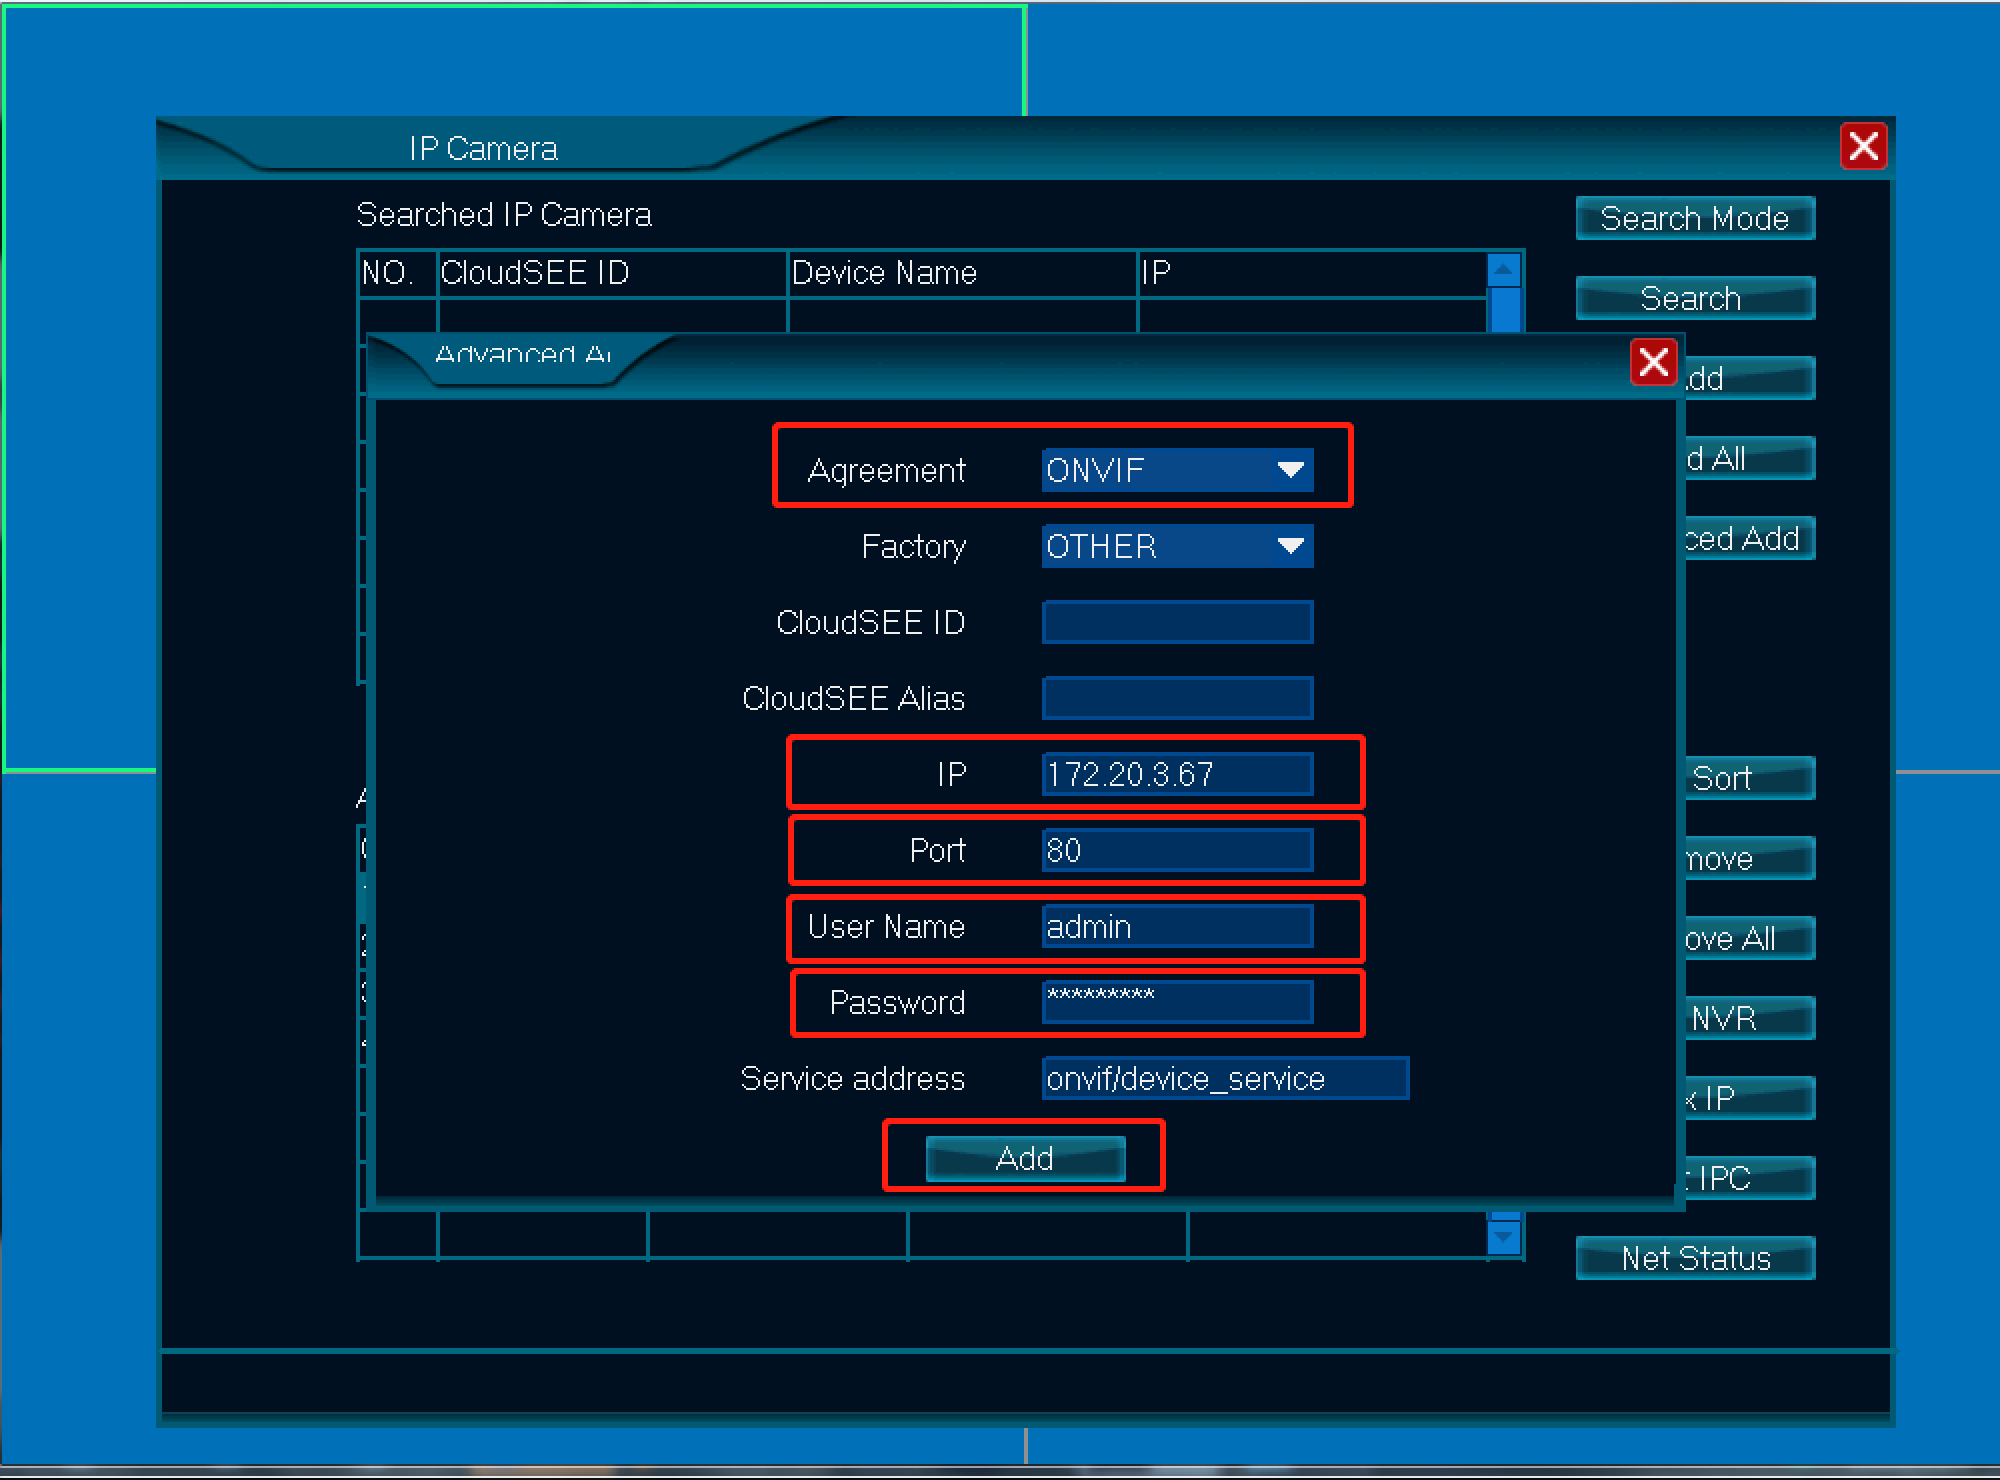
6. Set Agreement to "ONVIF", Input"camera’s IP address" on item IP, Input "80" or "6688" on item Port , Input camera’s username and password, then click button “Add”. Now setup complete.
Steps:
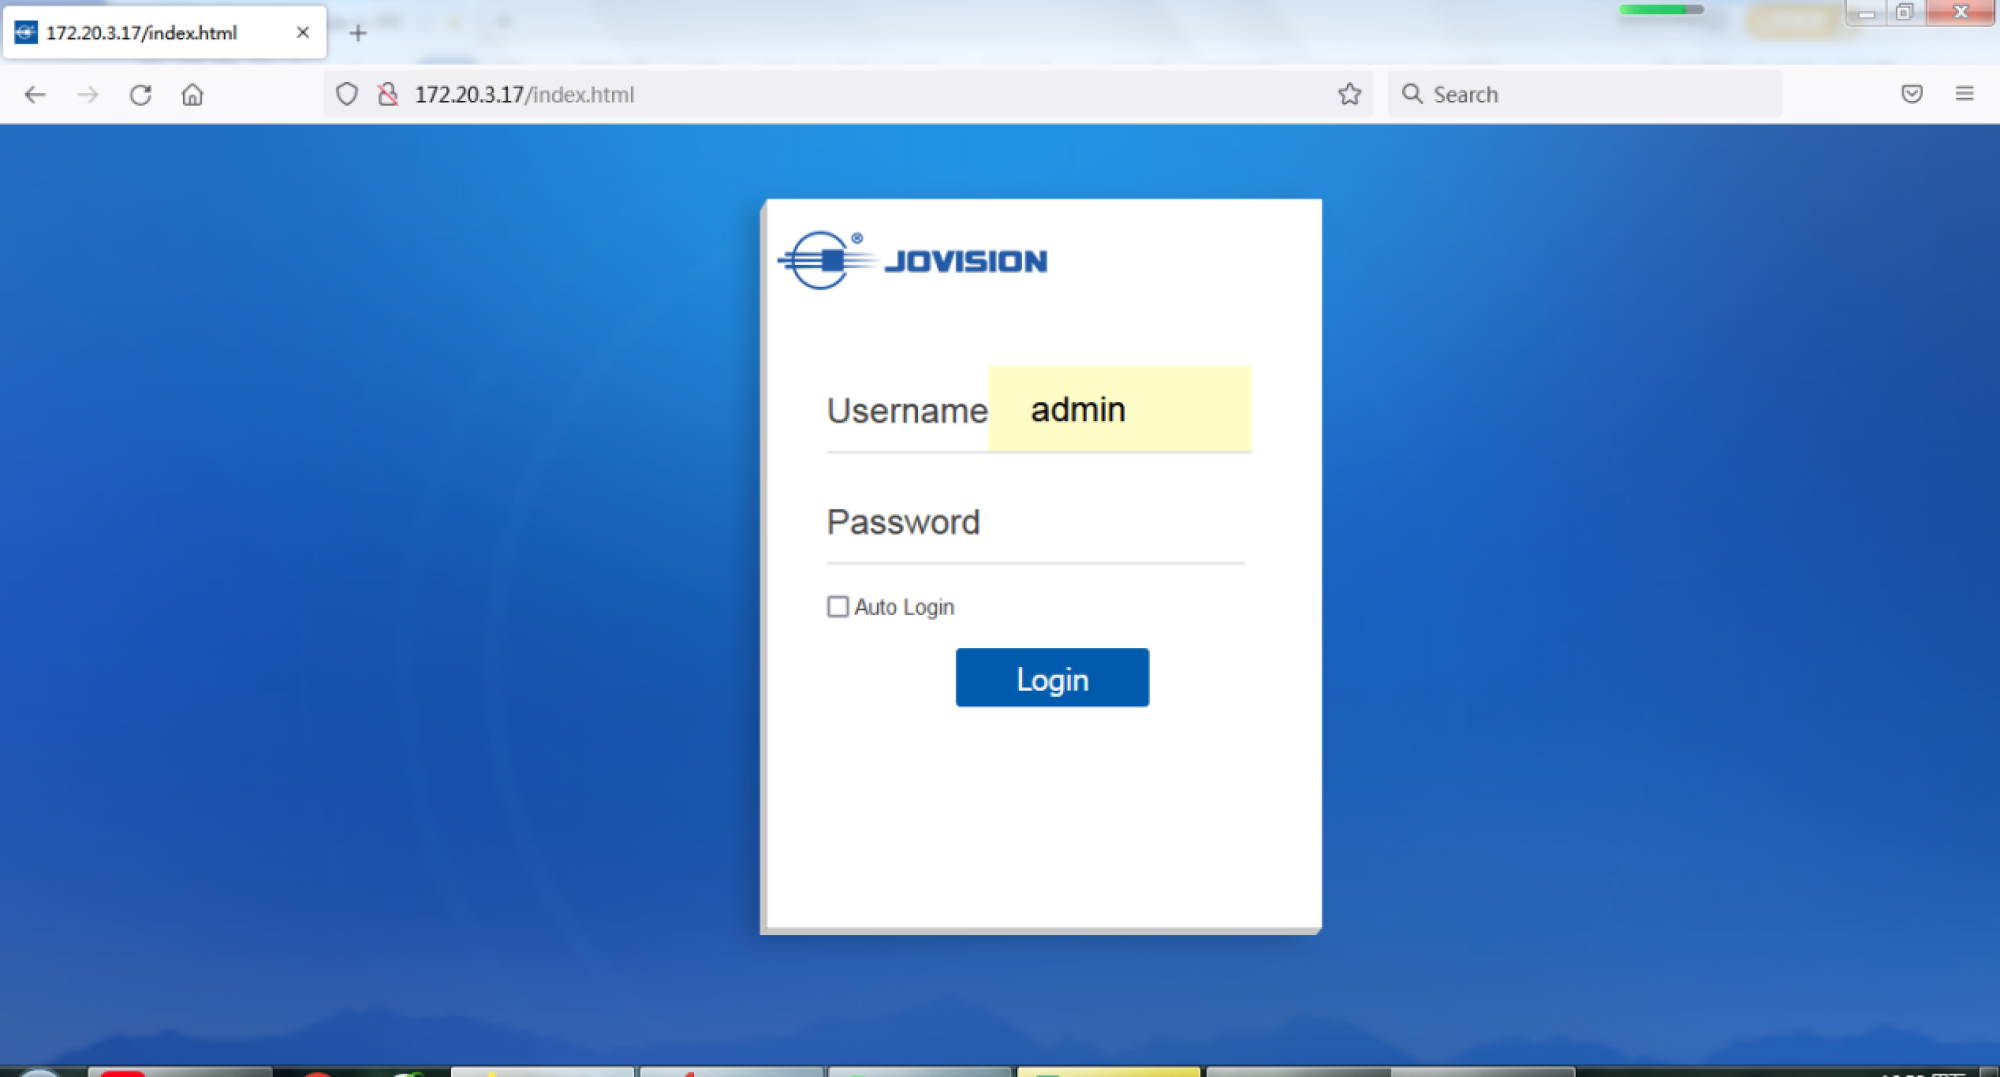
1. Log in web page of your IPC.
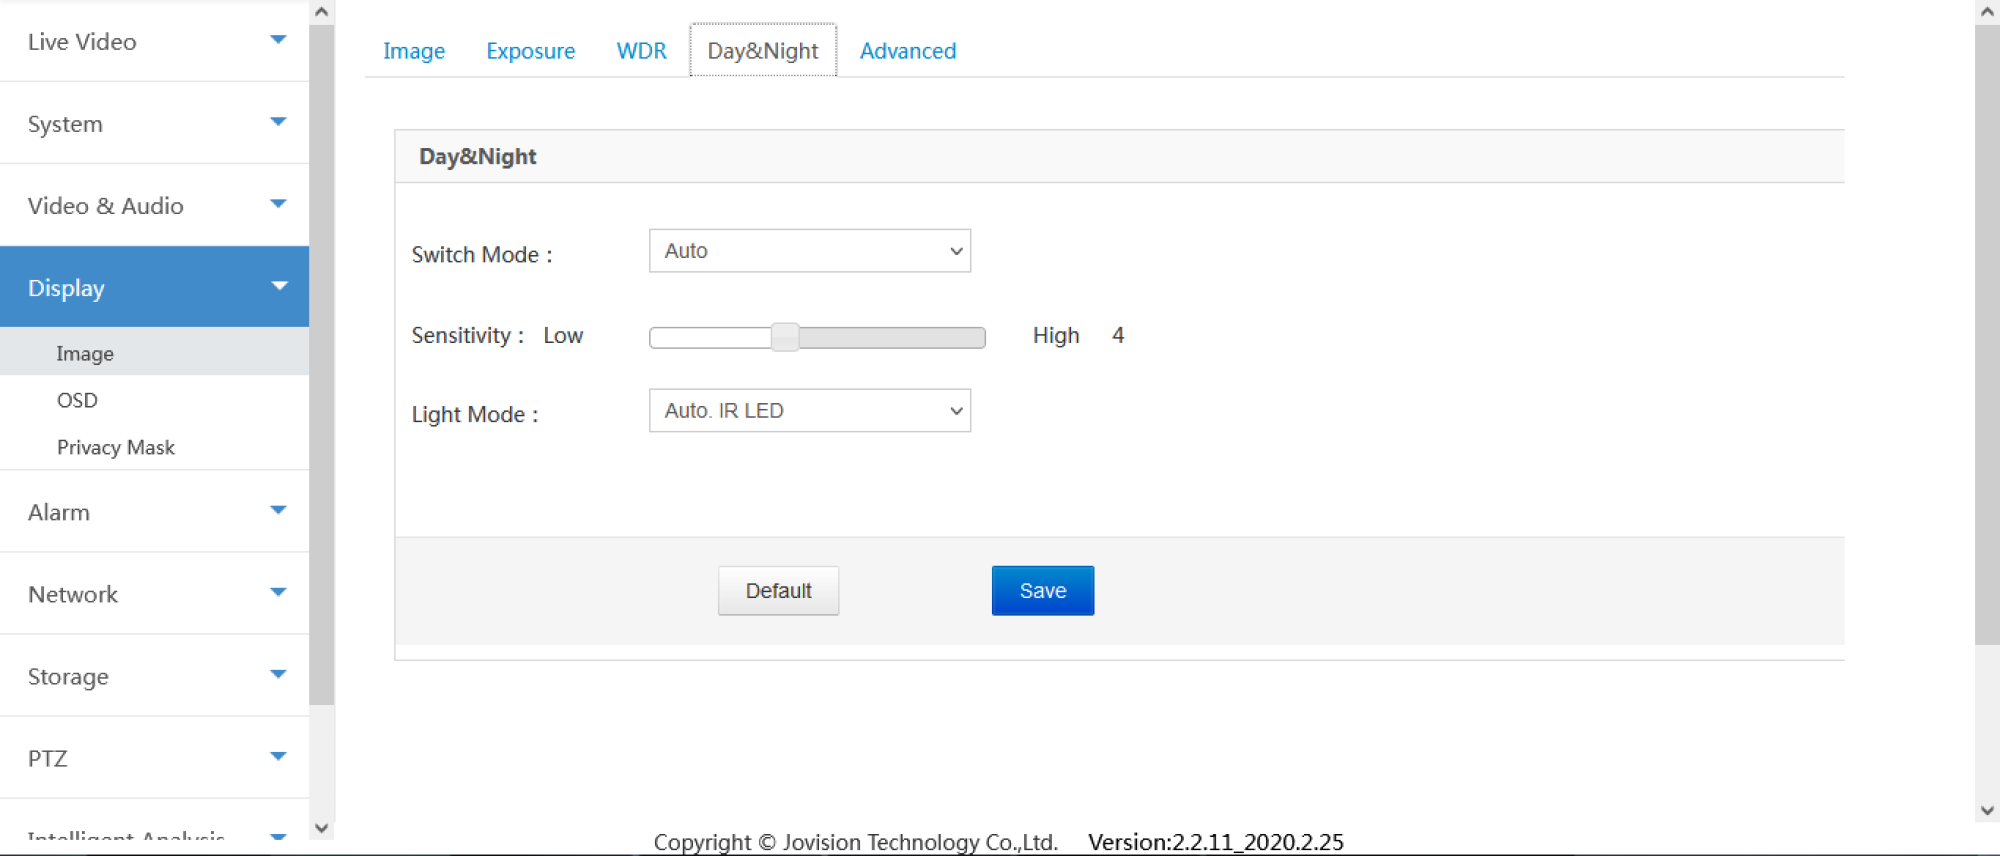
2. After successfully logging in, find the Settings page: Display->Image->Day&Night
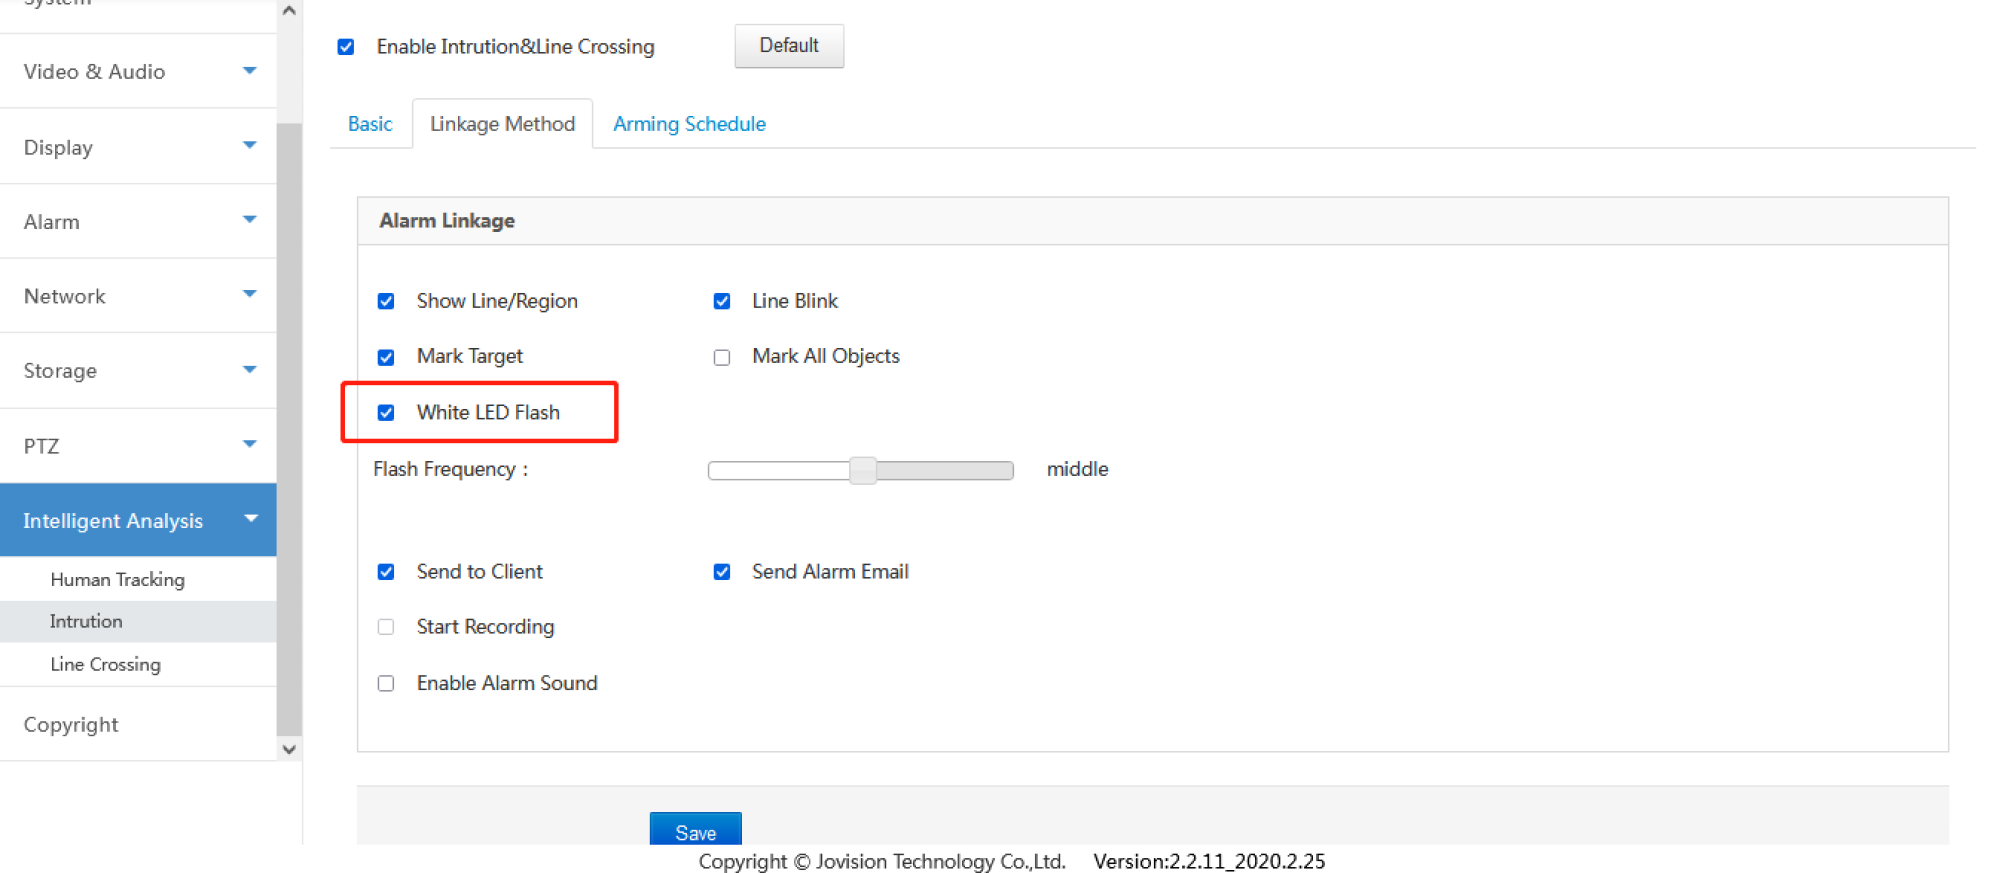
3. Full-Color mode will be turned on after set “Light Mode” as Auto White LED.
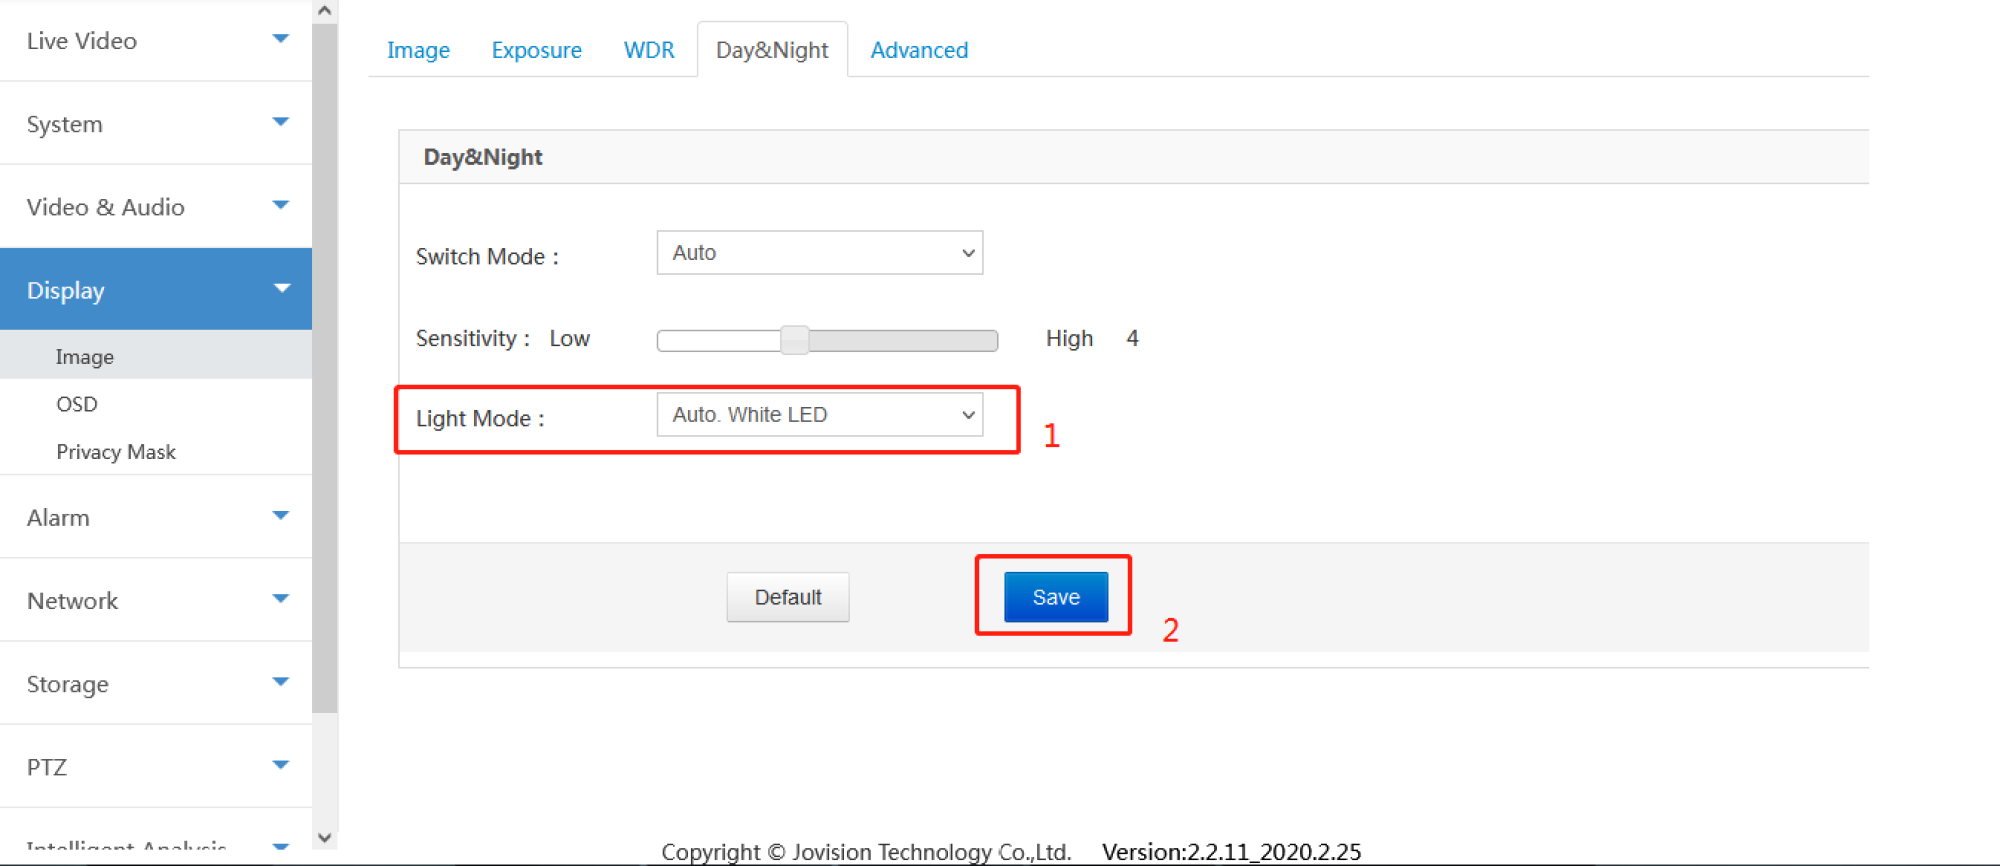
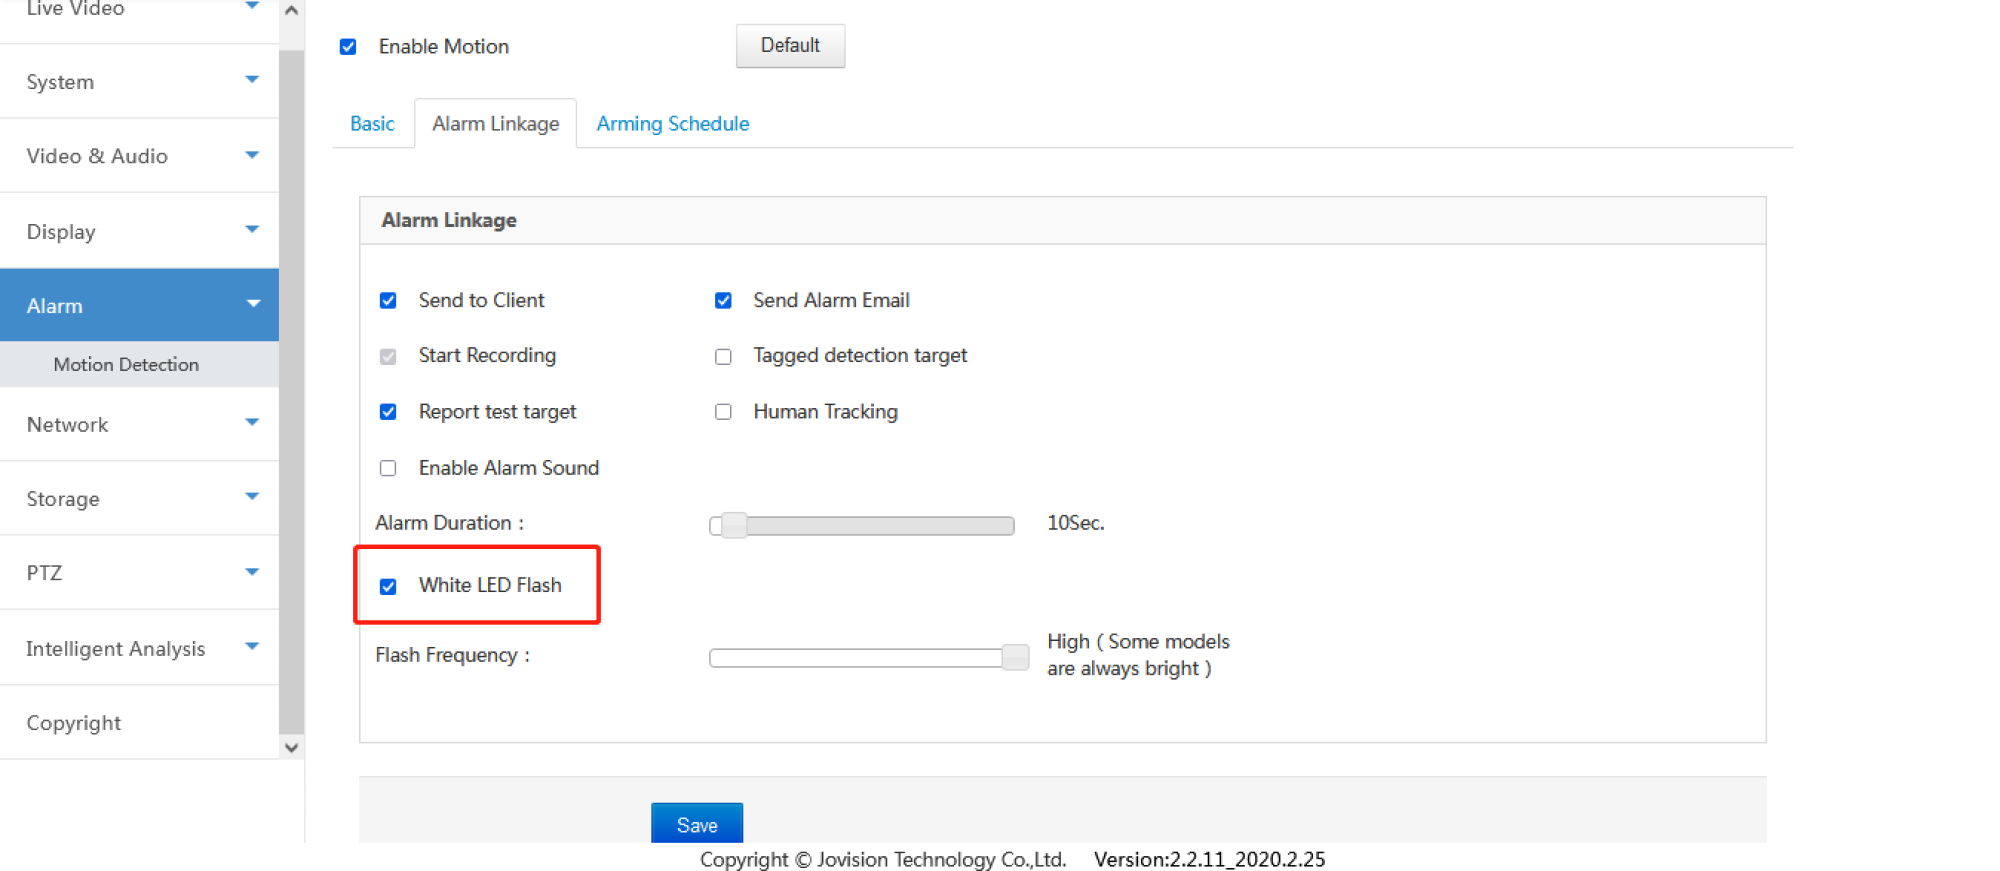
Note: If it cannot set Light Mode as Auto White LED successfully as below.
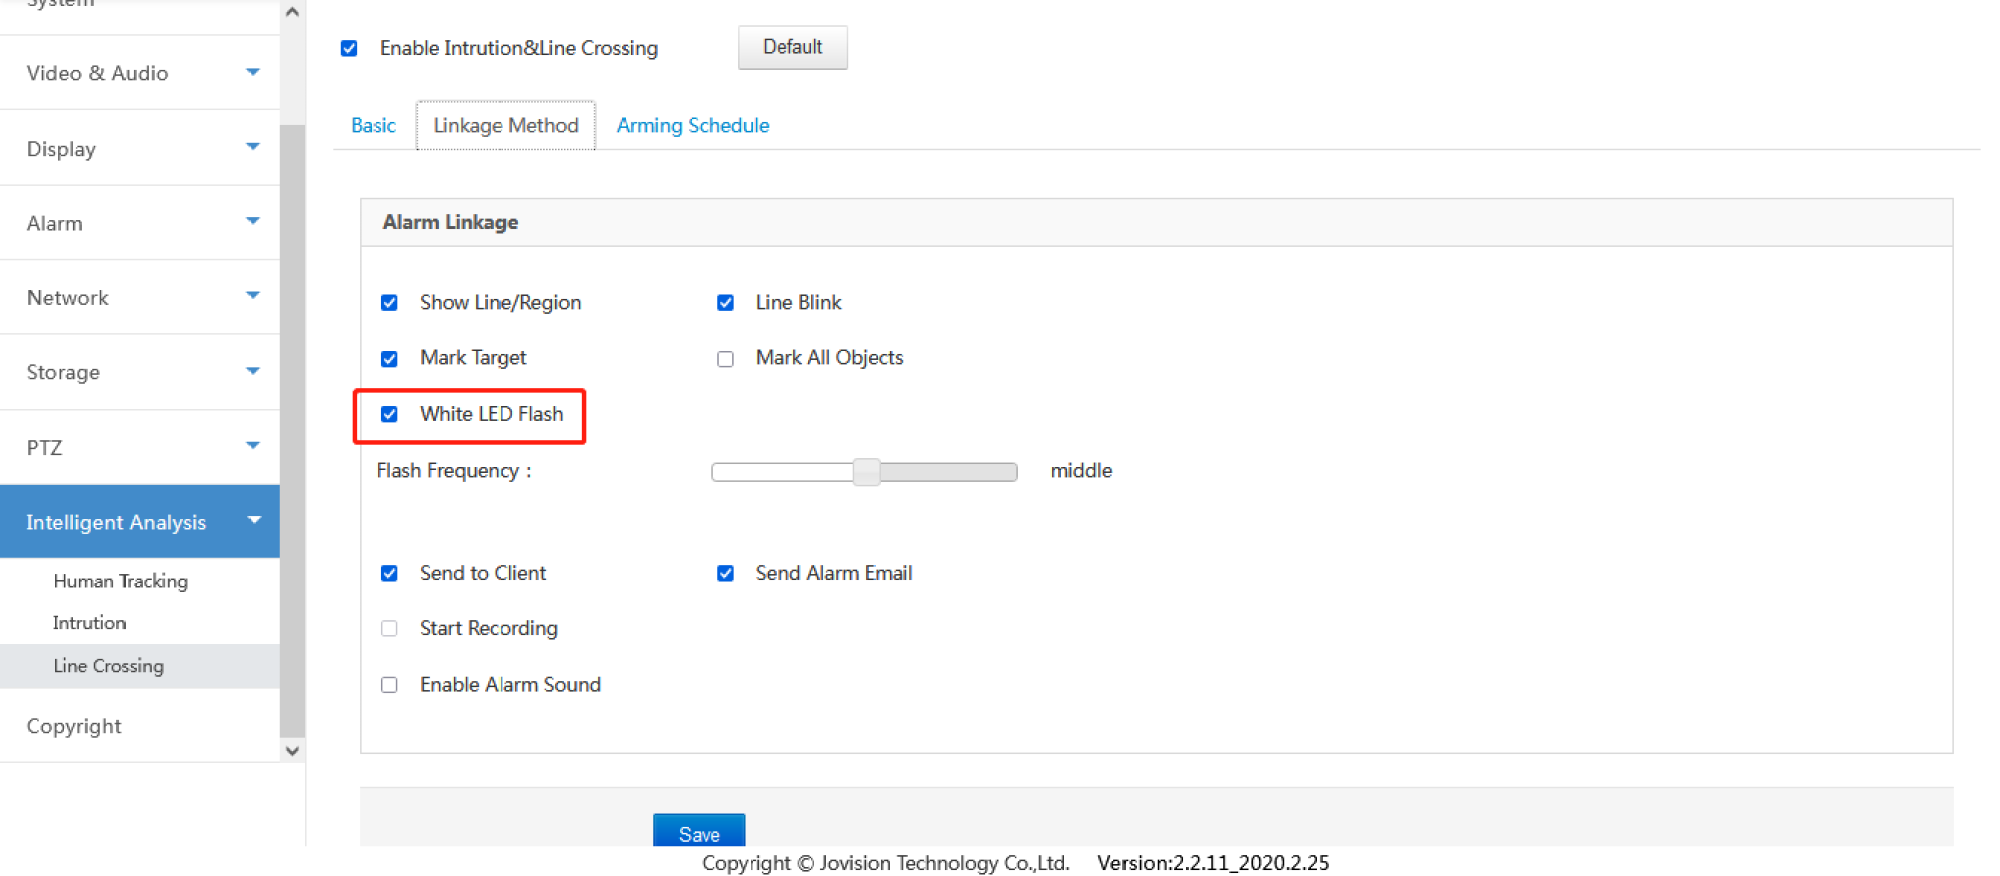
Please check setting page (Alarm Linkage) as below to untick “White LED Flash” to solve.
1. Alarm Linkage 1
2. Alarm Linkage 2
3. Alarm Linkage 3
Ans:
Setup Motion Detection in CloudSEE2.0 IPC
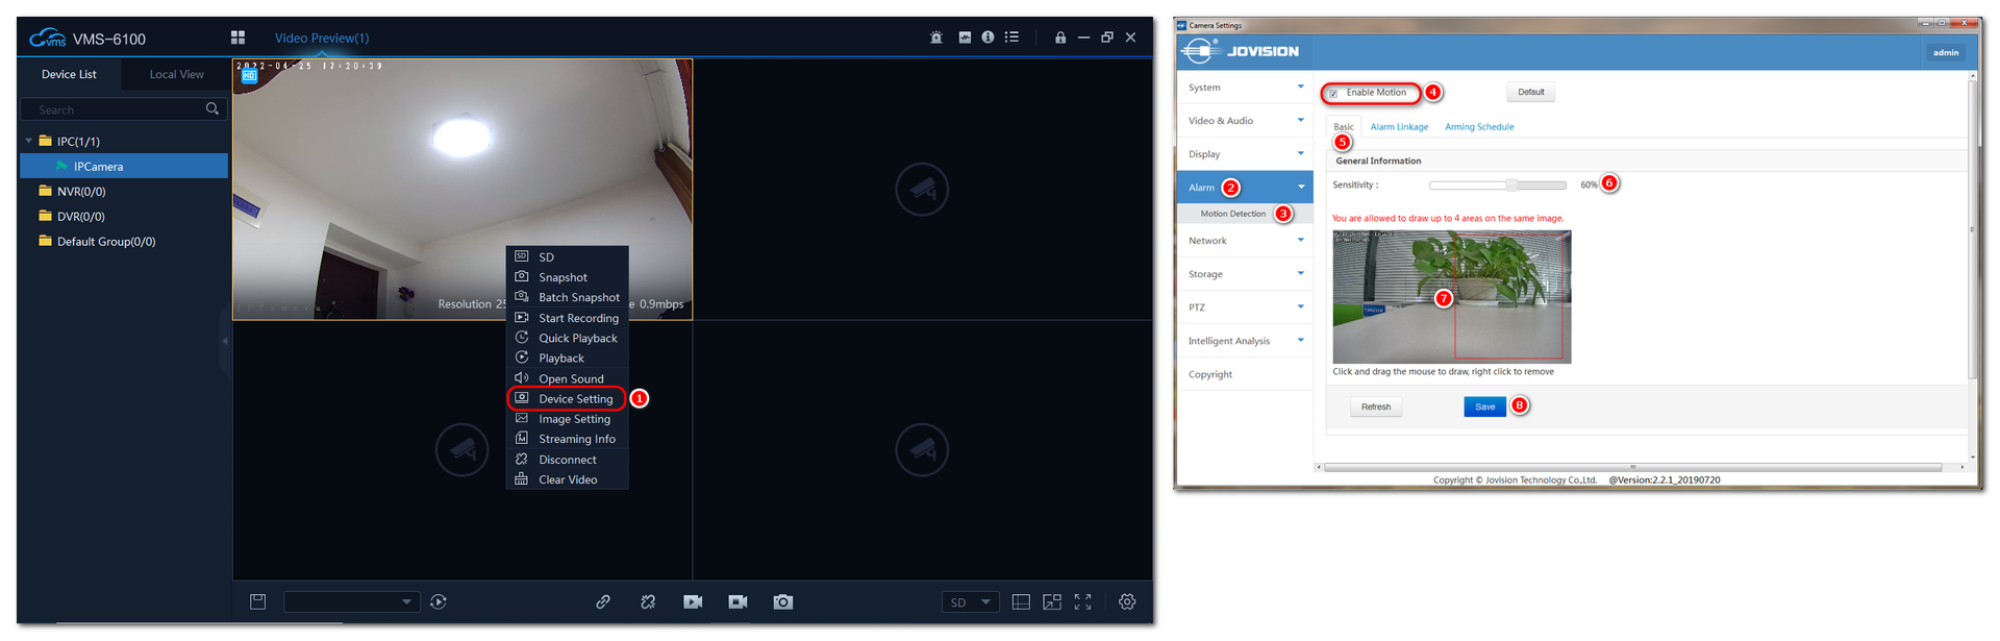
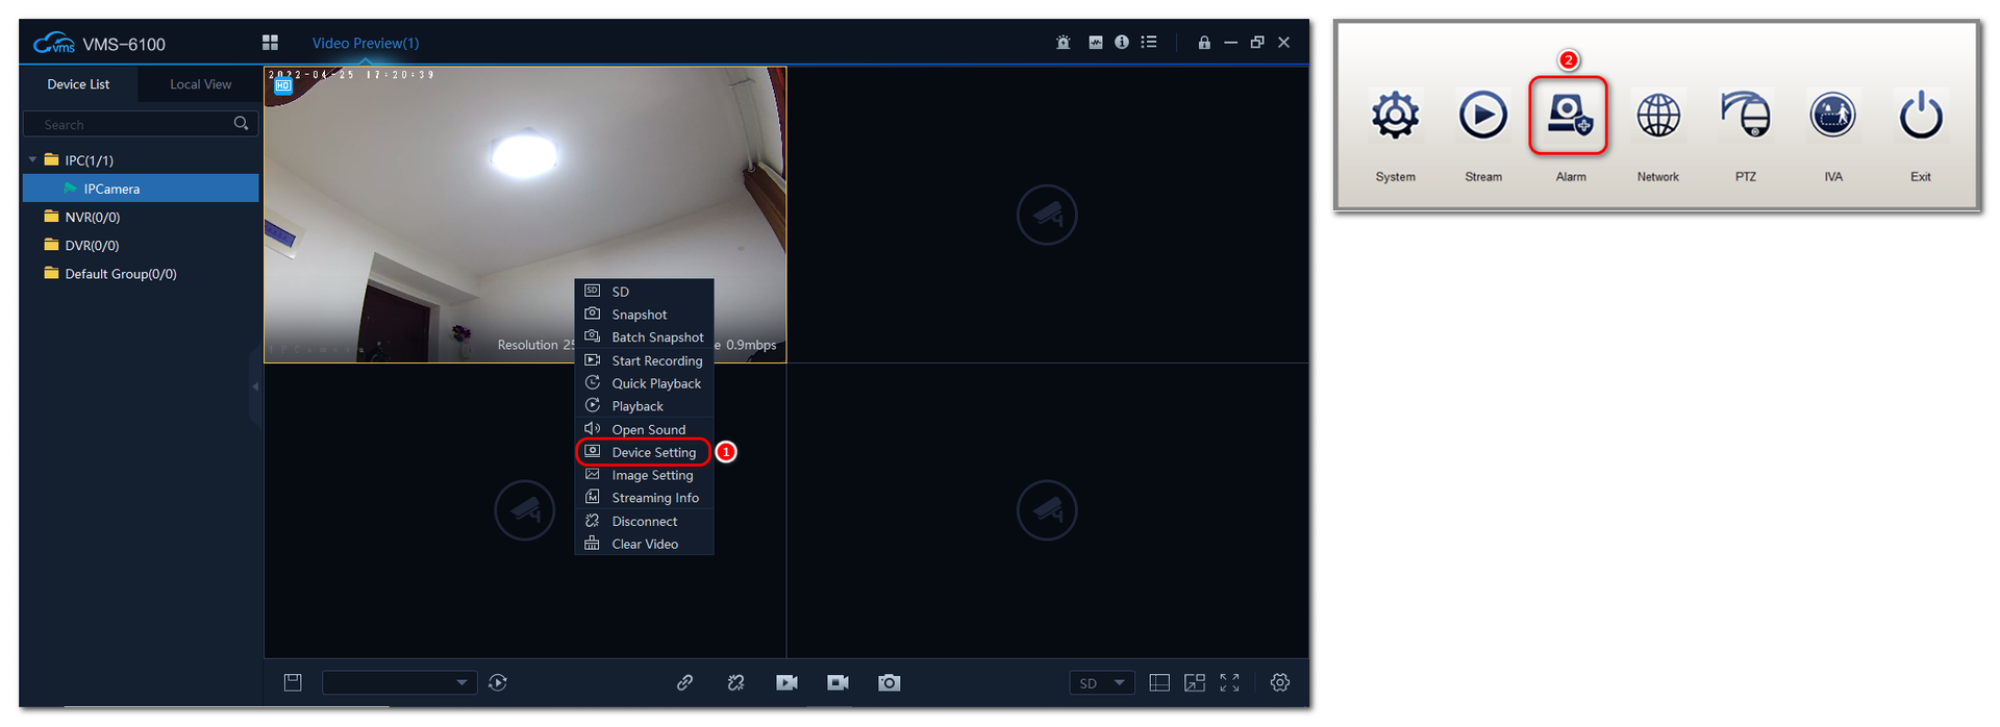
Access the IPC web interface. Login with username and password. Or access the IPC settings by clicking the Device Setting in the VMS-6100 to access the IPC menu. Click Alarm and Motion Detection. Click Enable Motion Detection and then set the motion detection region. Draw rectangle on the mini display. Also, set the sensitivity. Once you set the region and sensitivity.
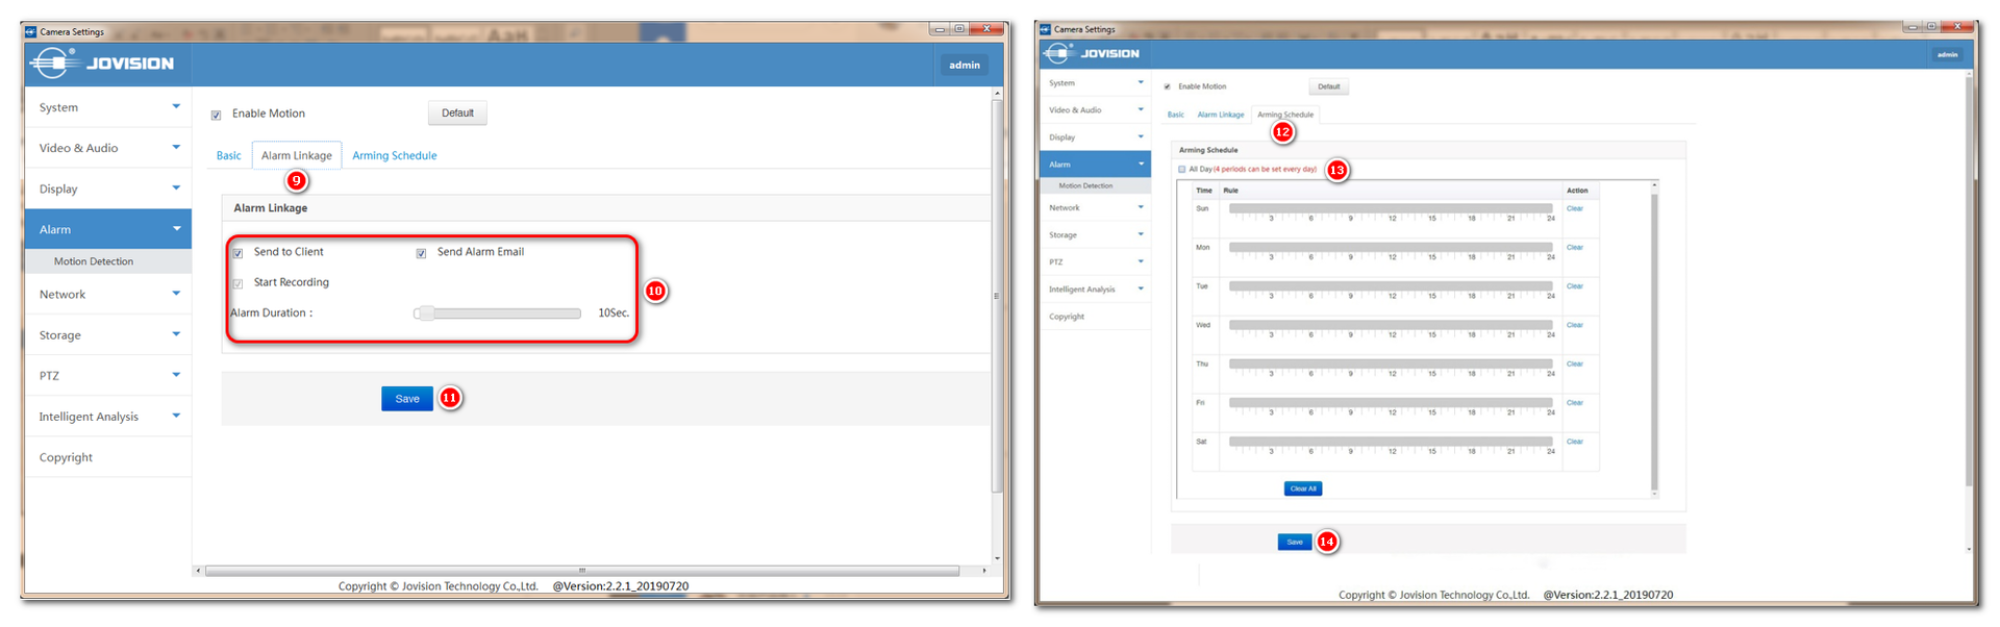
Click Alarm Linkage to set the alarm actions. You can set basic settings like Send to Client, Send Alarm Email and Start to Record (Support IPC with SD Card). You can schedule the alarm if you required. Click Arming Schedule to set. By default, its 24x7. After all this, you set the motion detection configured successfully.
2.Setup Motion Detection in CloudSEE1.0 IPC
Access the IPC by Internet Explorer. Login with username and password. Click on System Config on the top of the main page, the IPC menu will open. (Please make sure you install the Web plugin and enabled the ActiveX controls.) Or access the IPC settings by clicking the Remote Setup in the VMS-6100 to access the IPC menu, the IPC menu will open. Click Alarm button and then click Motion Detection tab.
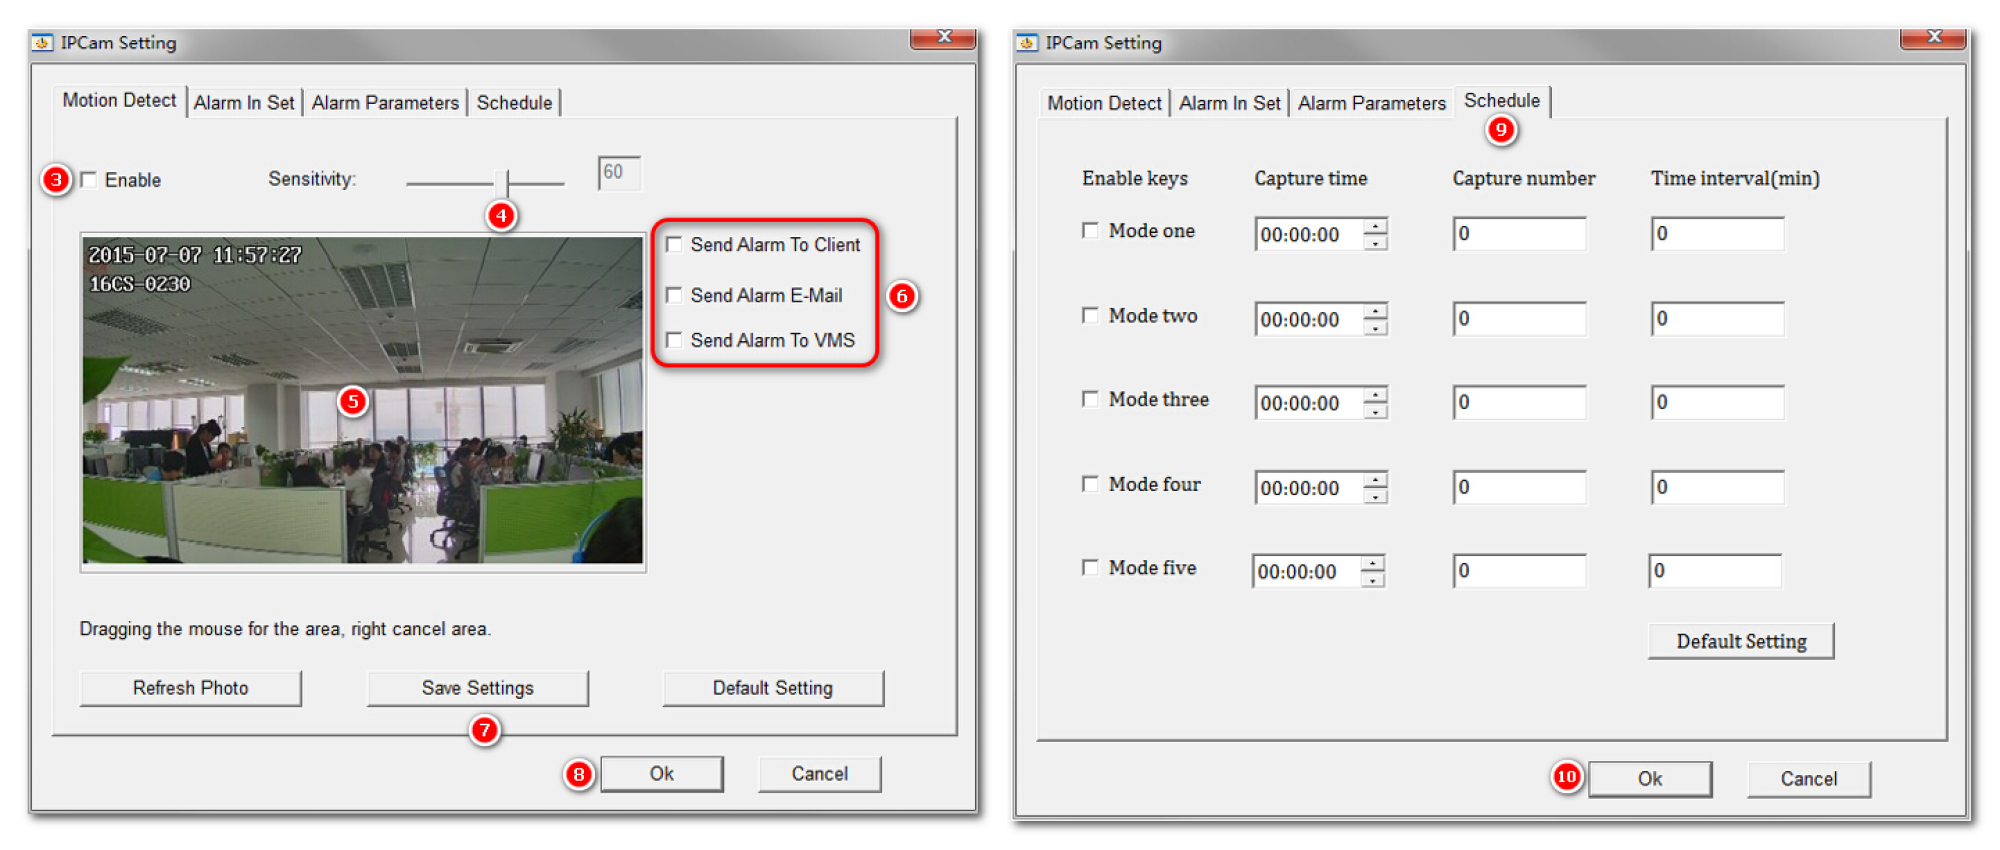
Tick to Enable the motion detection and then set the motion detection region. Draw rectangle on the mini display. Also, set the sensitivity and enable the alarm actions you required. There you can set the basic settings like Send Alarm to Client, Send Alarm Email and Send to VMS. Save the settings and then schedule the alarm. Click Schedule tab. By default, its 24x7. After all this, you set the motion detection configured successfully.
My monitoring device shows as online, but I am unable to play the footage. What should I do?
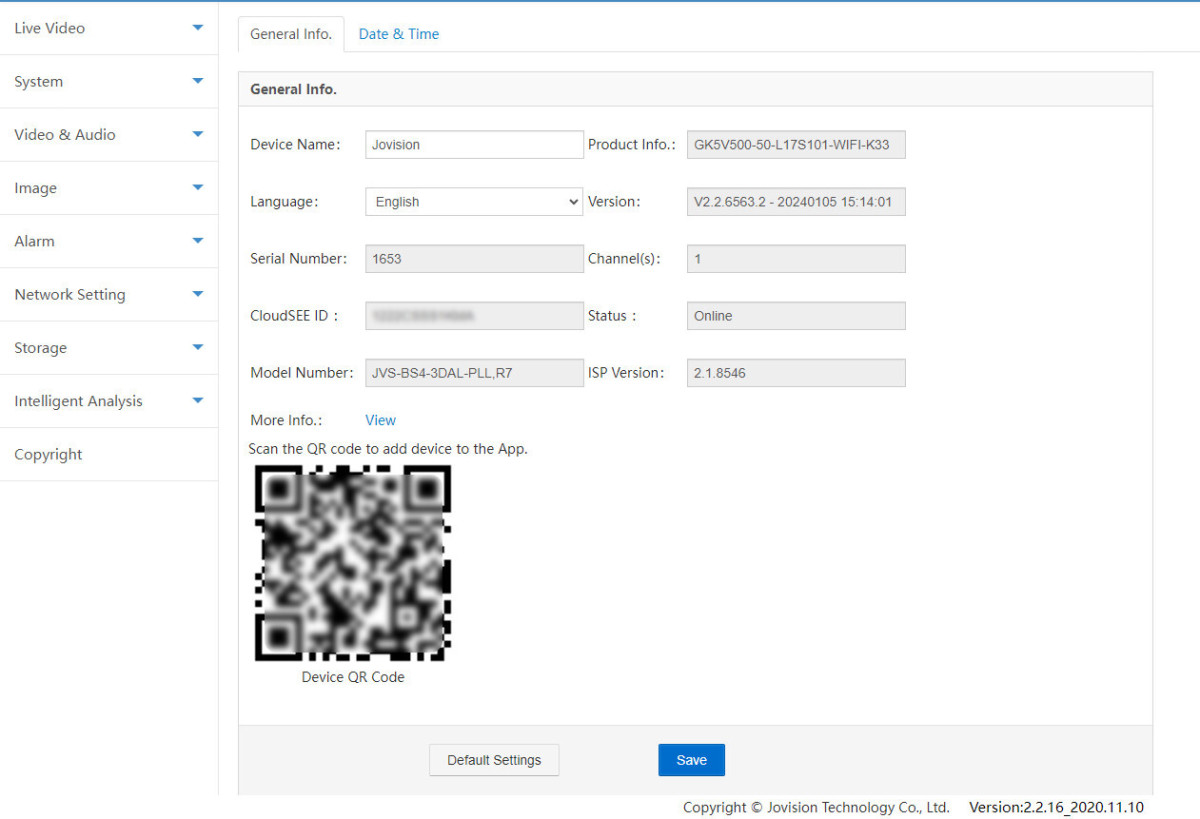
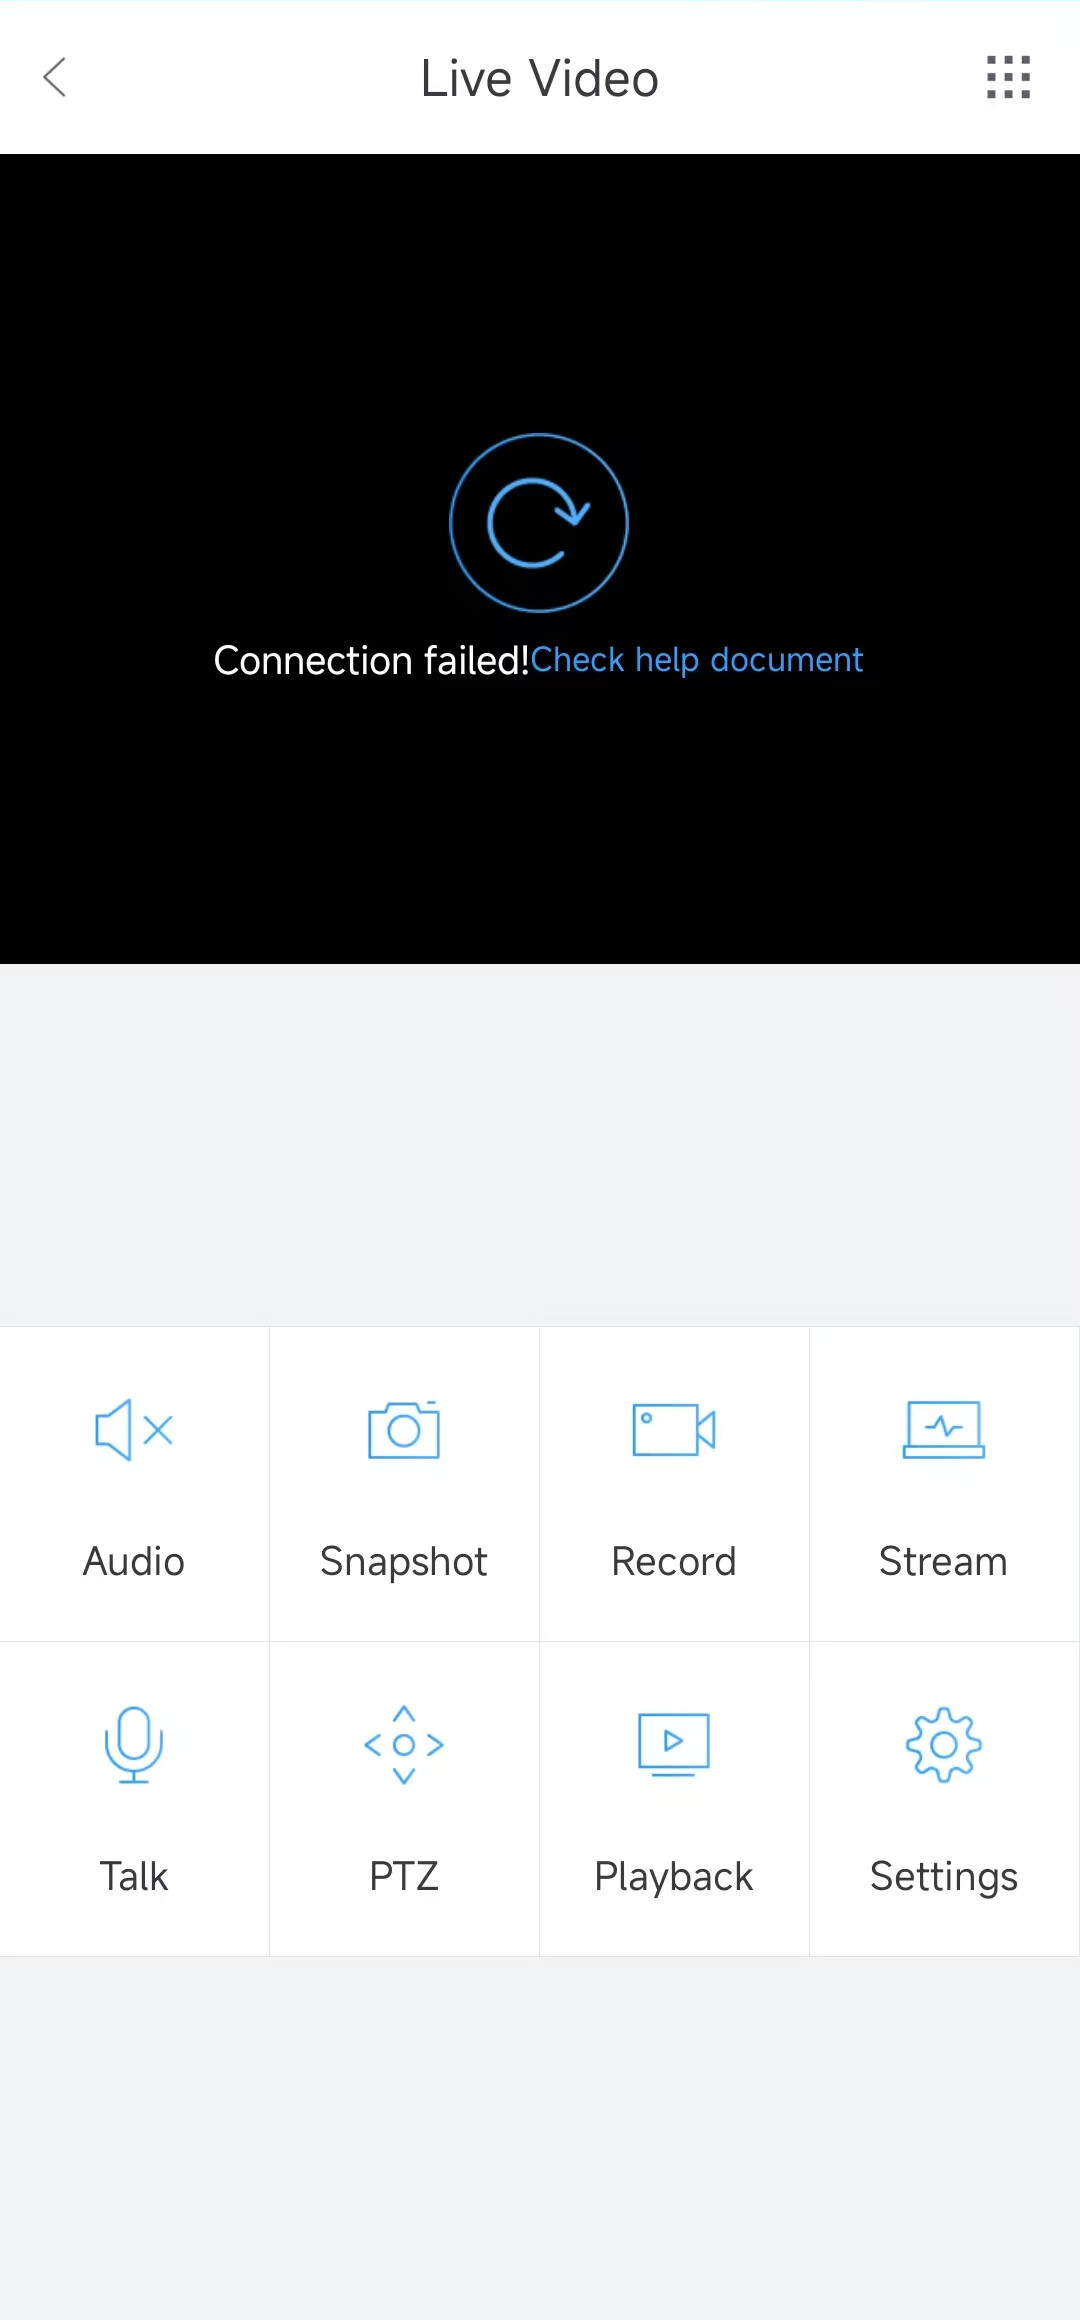
1. Ensure you are using the latest version of the app and that you have a stable internet connection.
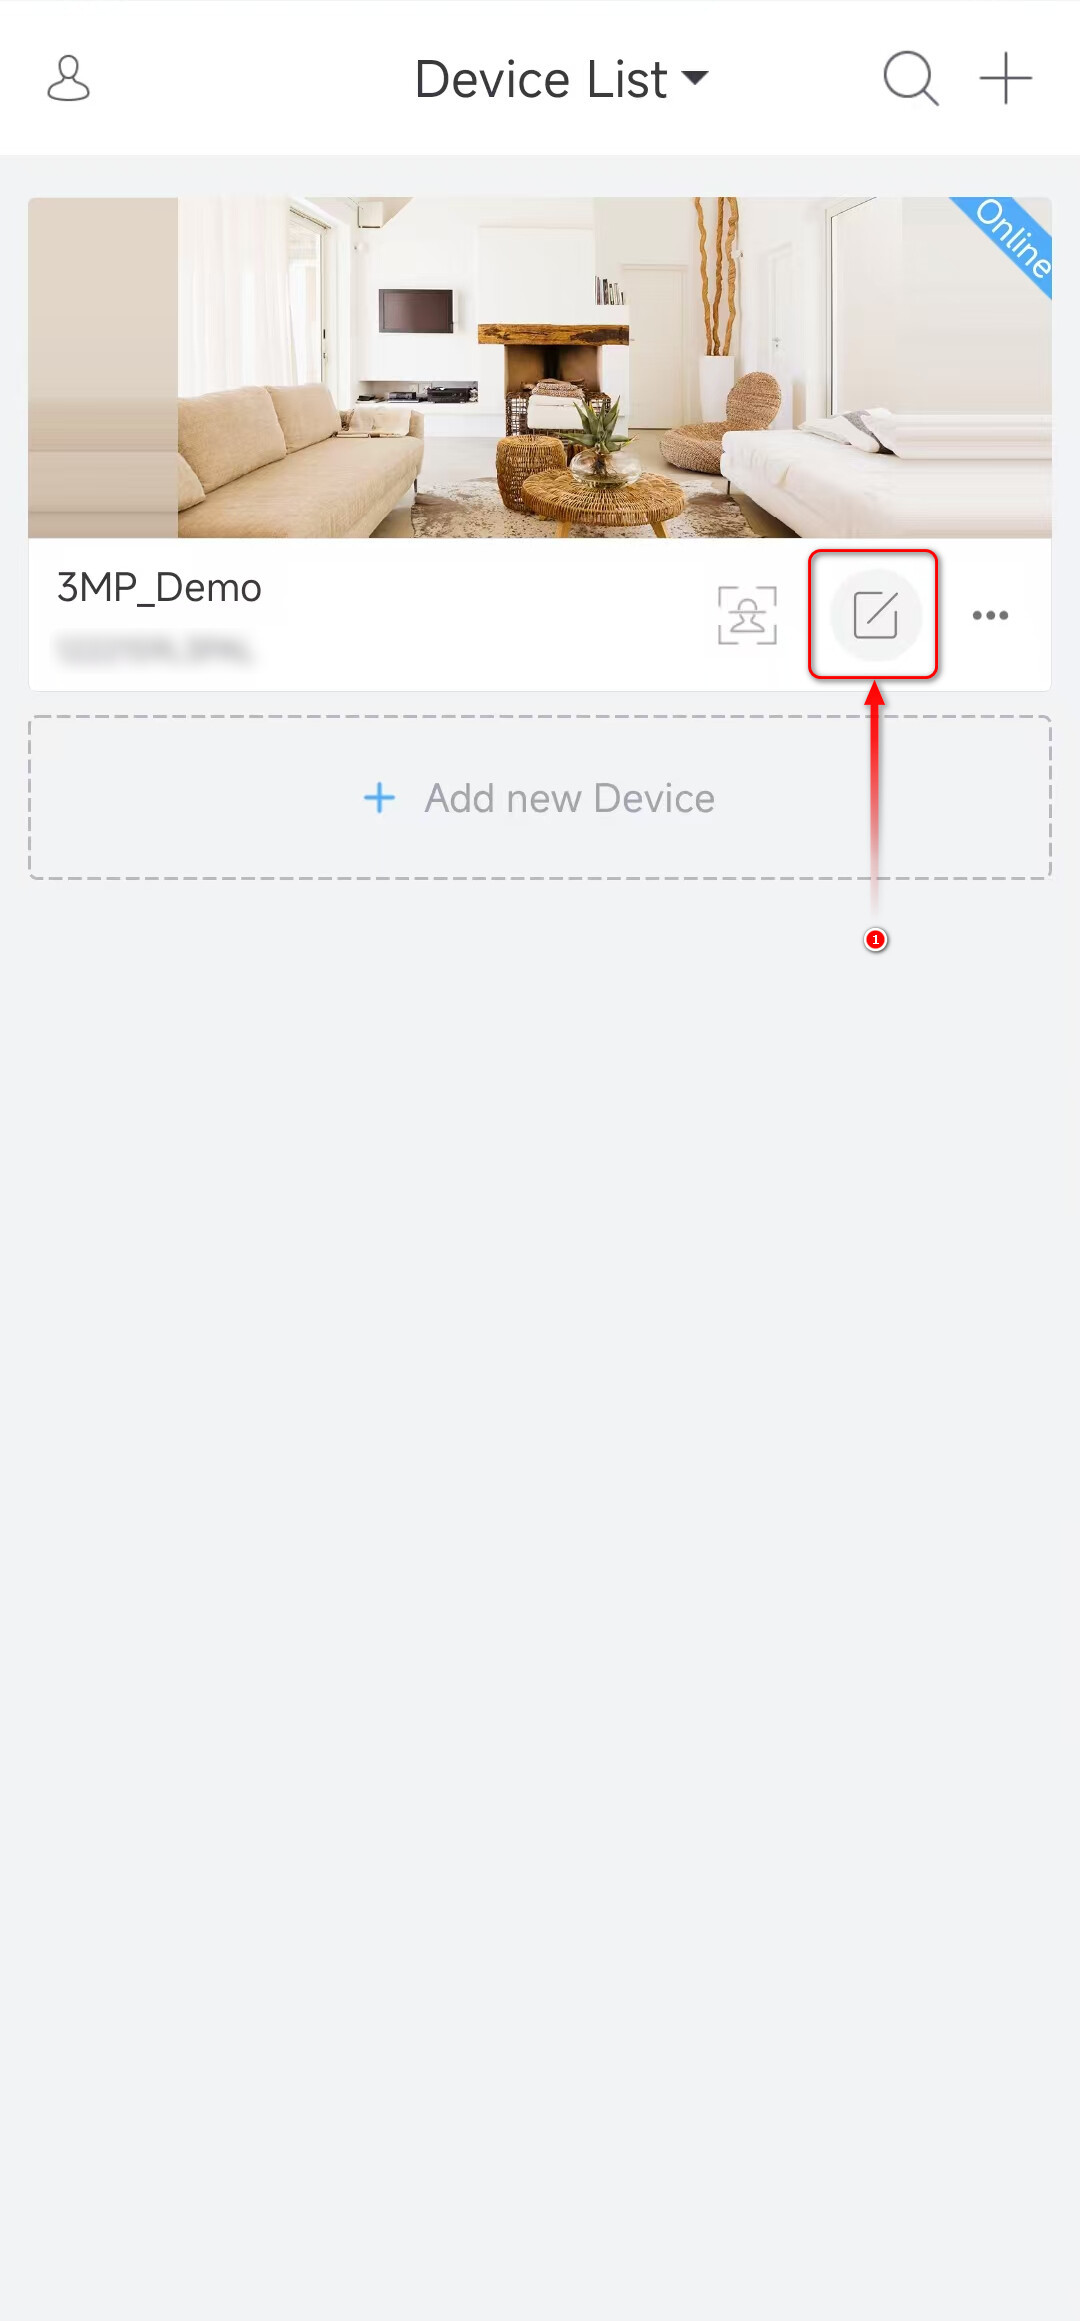
2. Tap the Edit button next to the device in the device list to open the device connection settings.
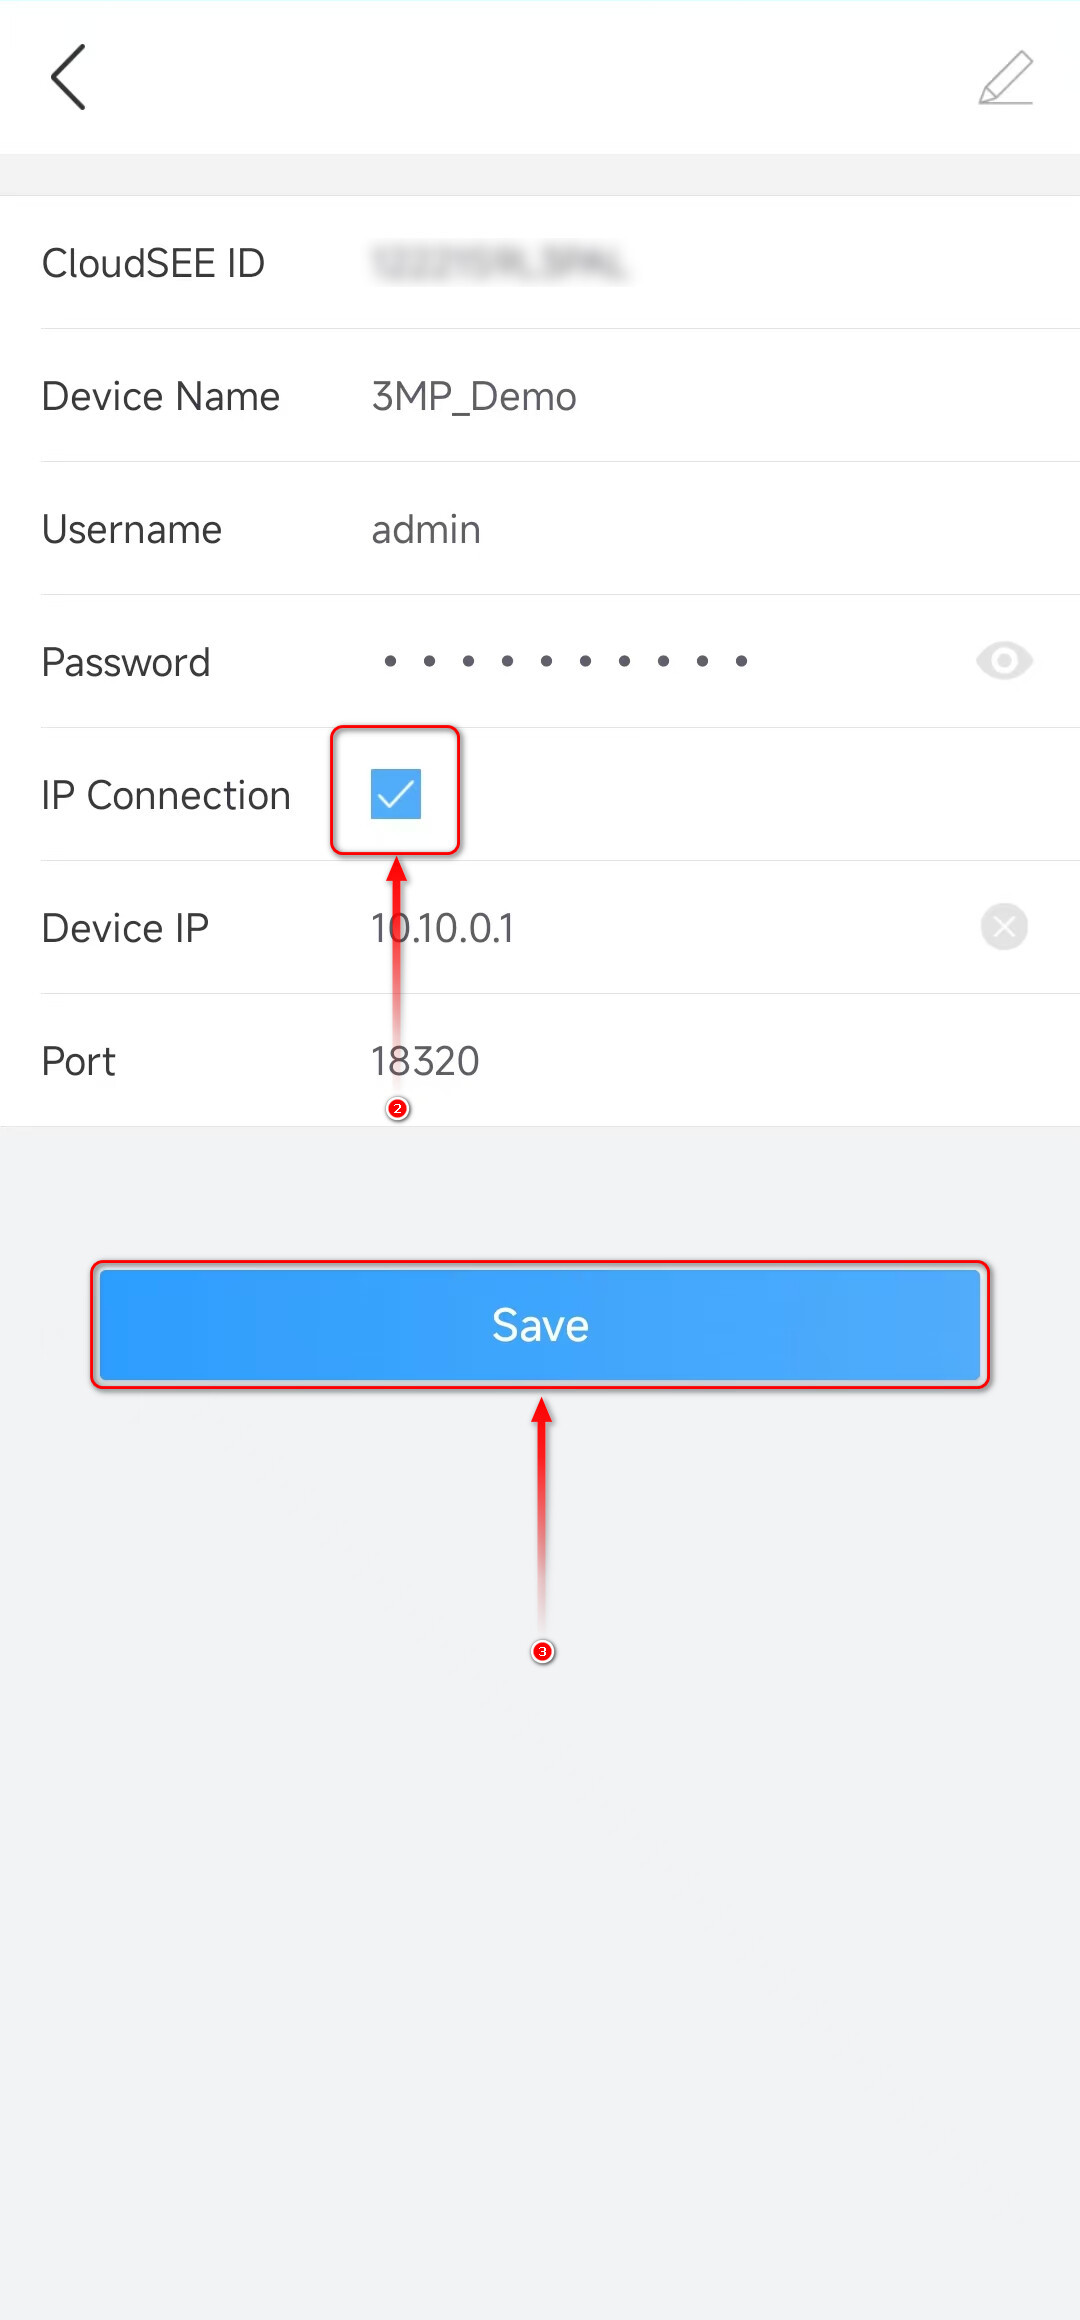
3. In the connection settings, if IP Connection is selected, disable it and Save the settings.
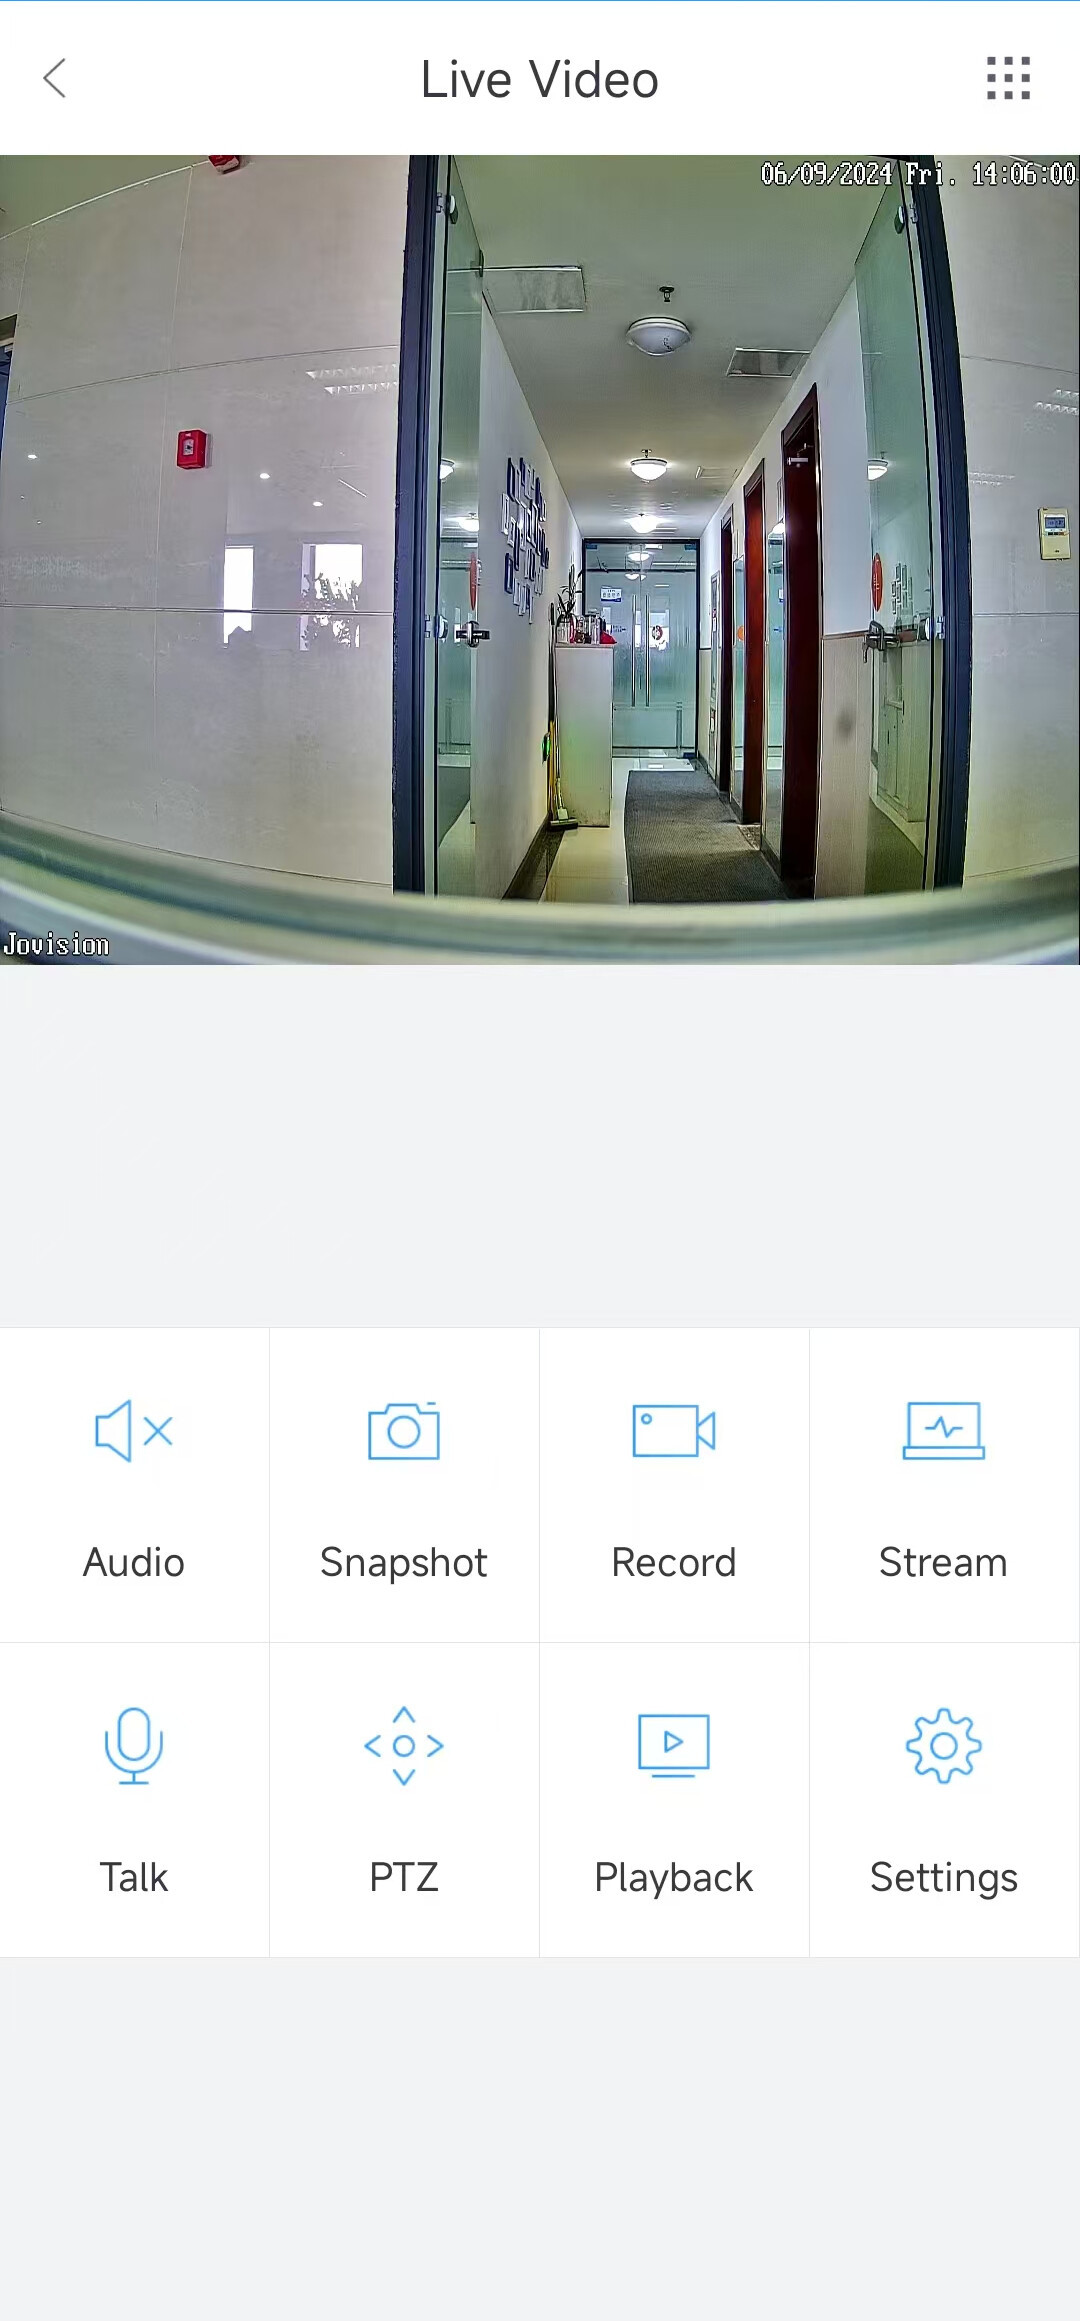
4. Return to the preview screen, and you should now be able to view the live feed of the monitoring device.
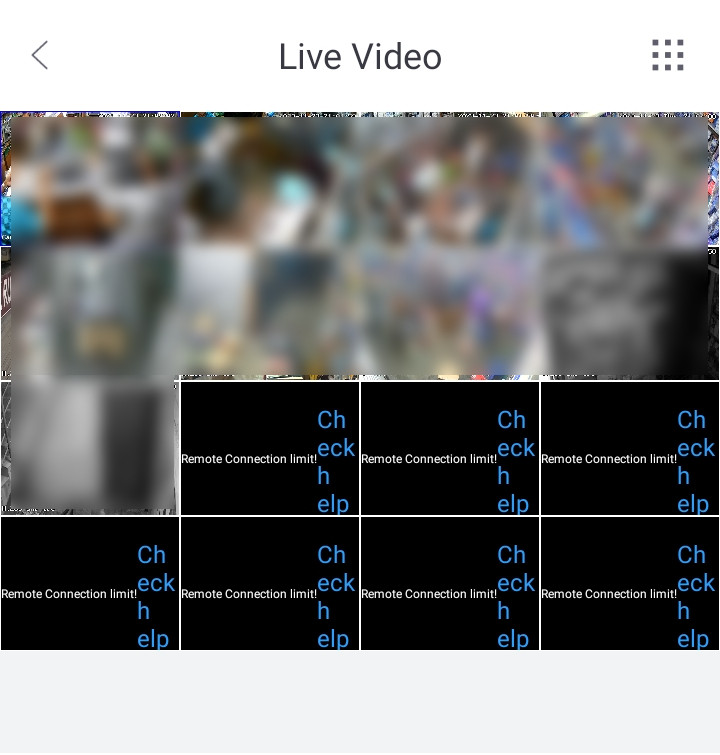
The "Remote Connection Limit!" message indicates that the NVR has reached its maximum allowed external connections from WAN or LAN. This limit is inherent to each NVR, and when exceeded, the app or client software displays this message.
Navigate to the NVR Main Menu.
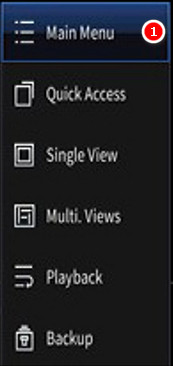
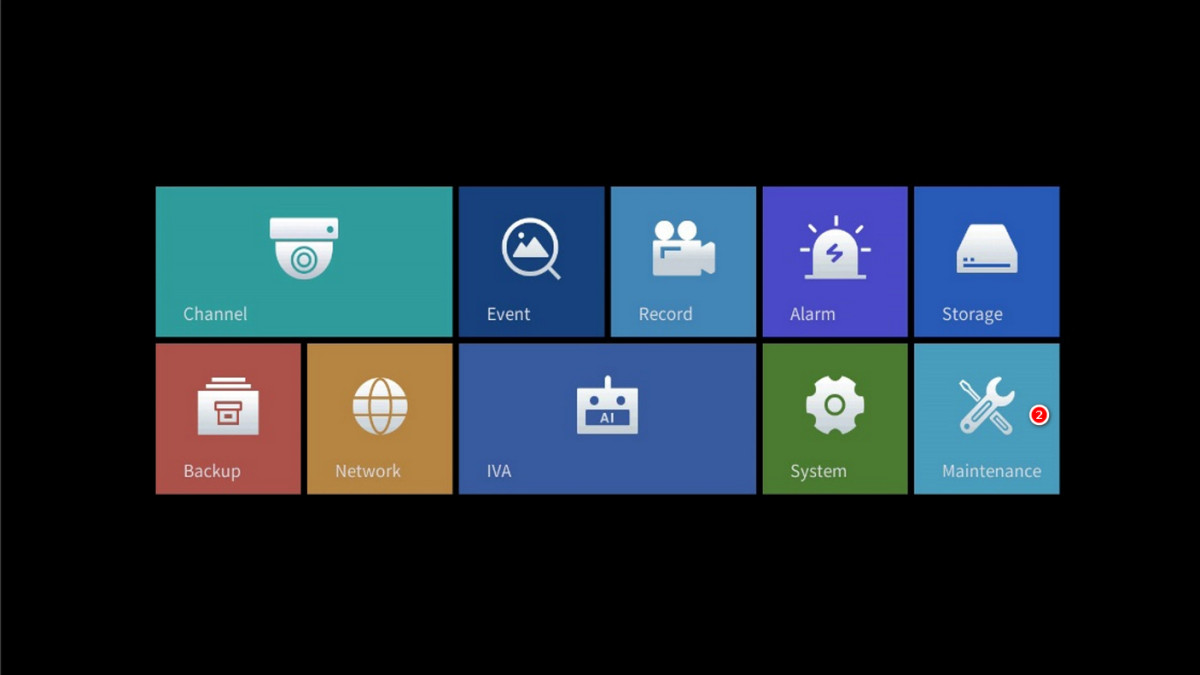
Select "Maintenance." Then find the "Remote Channel" option.
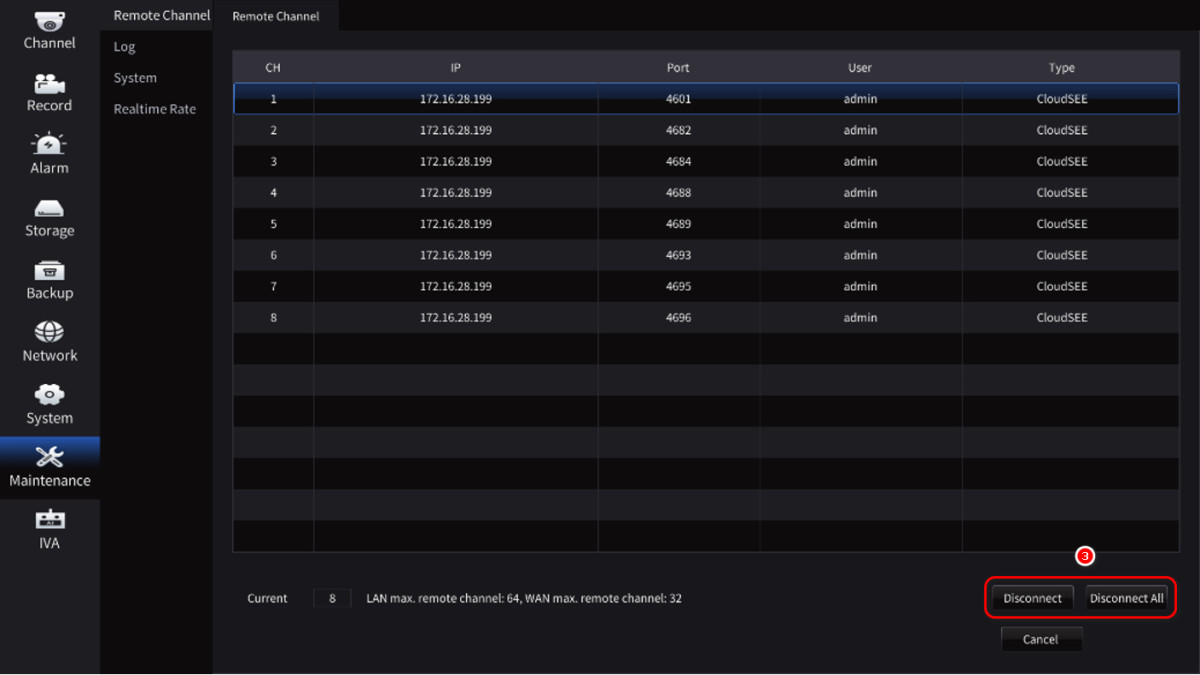
Disconnect unnecessary channels or disconnect all channels.
Recheck your app or client software.
By doing this, you manage the remote connections on the NVR, resolving the issue. If the problem persists, reach out to technical support for further assistance.
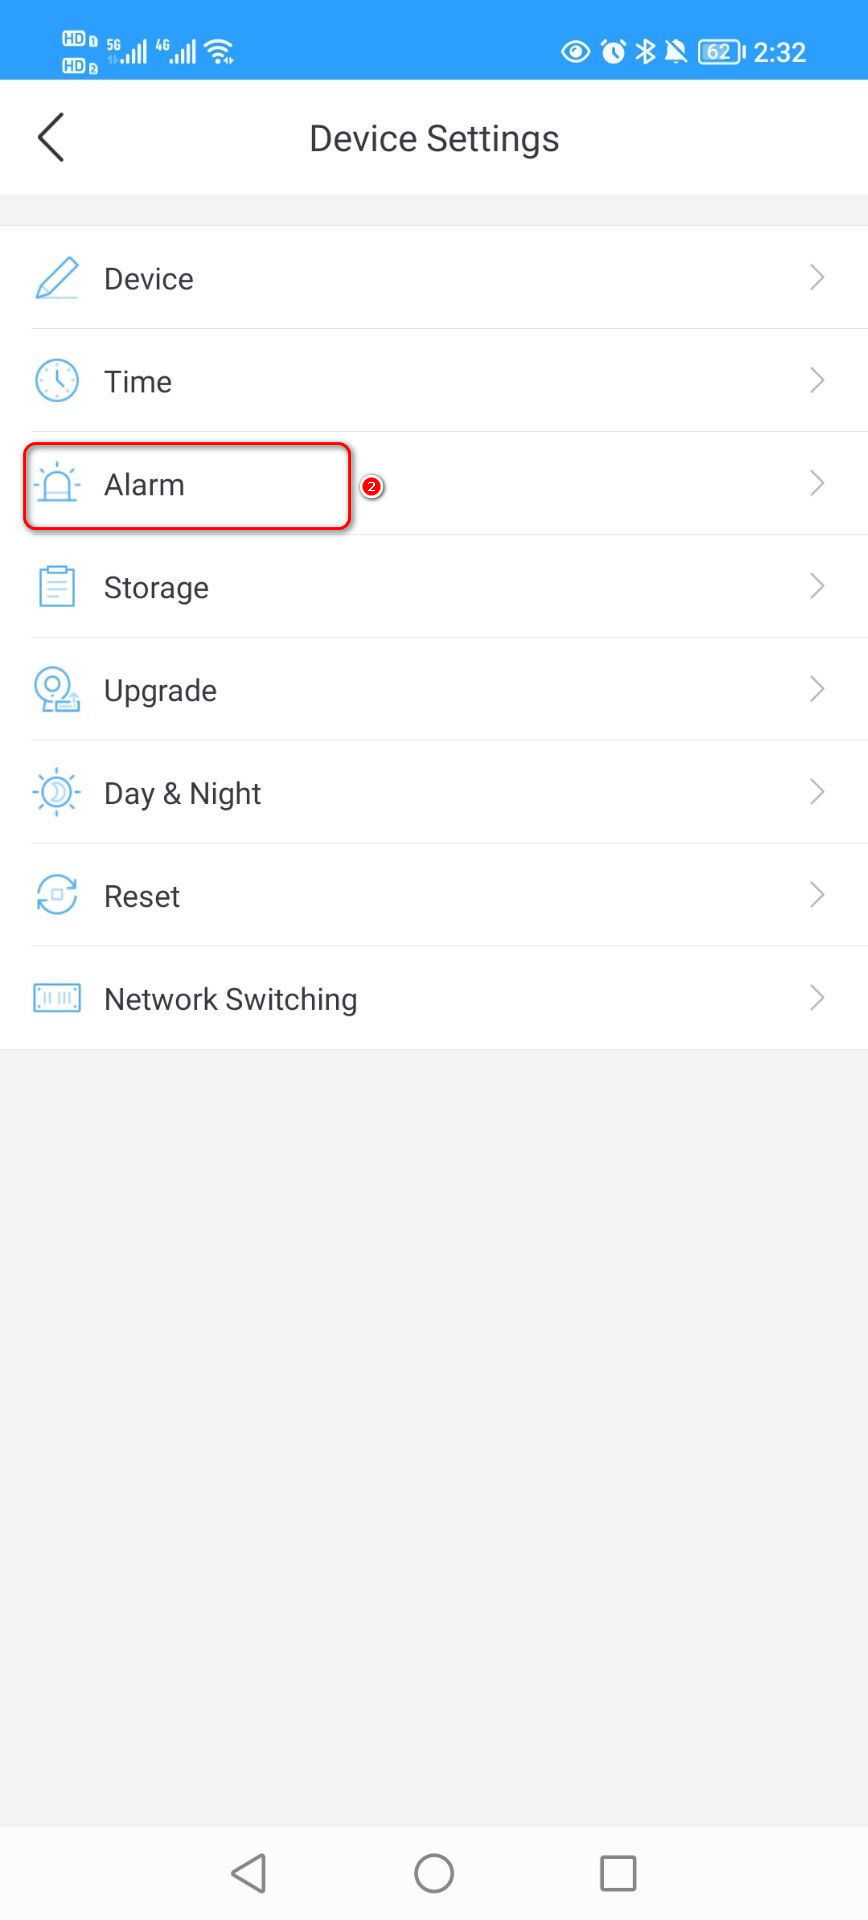
1. Open the CloudSEE Int’l Pro software on your mobile phone to watch the real-time video, and open the Settings option.
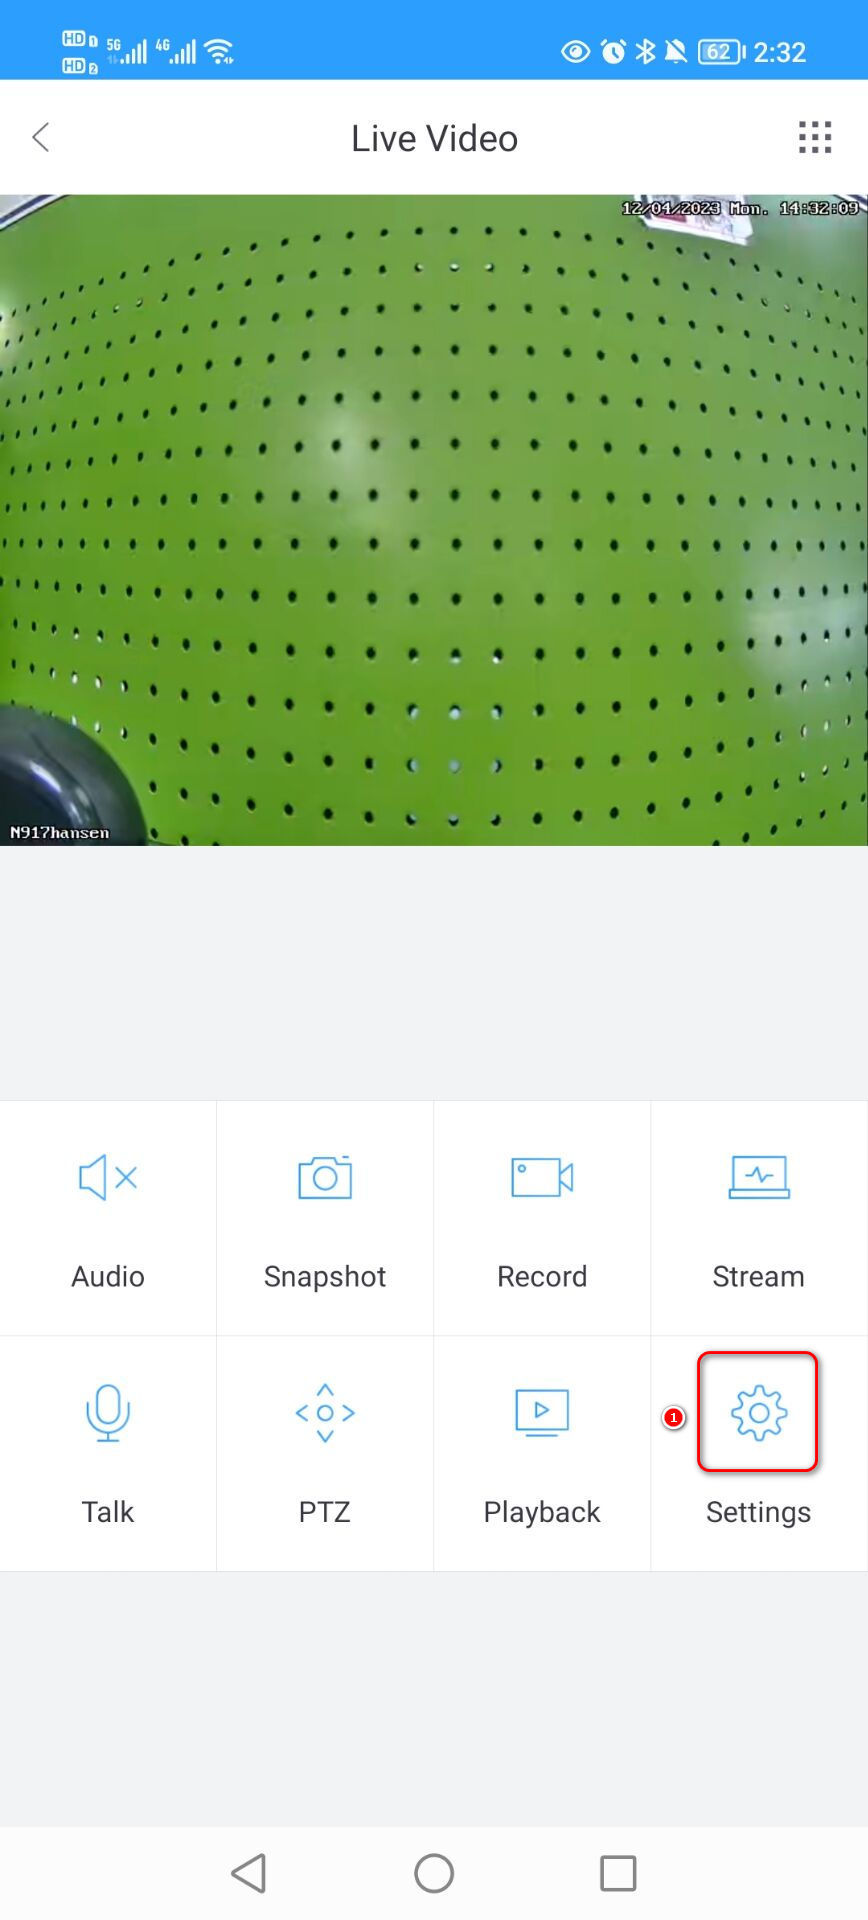
2. Enter the Device Settings list interface and select the Alarm function.
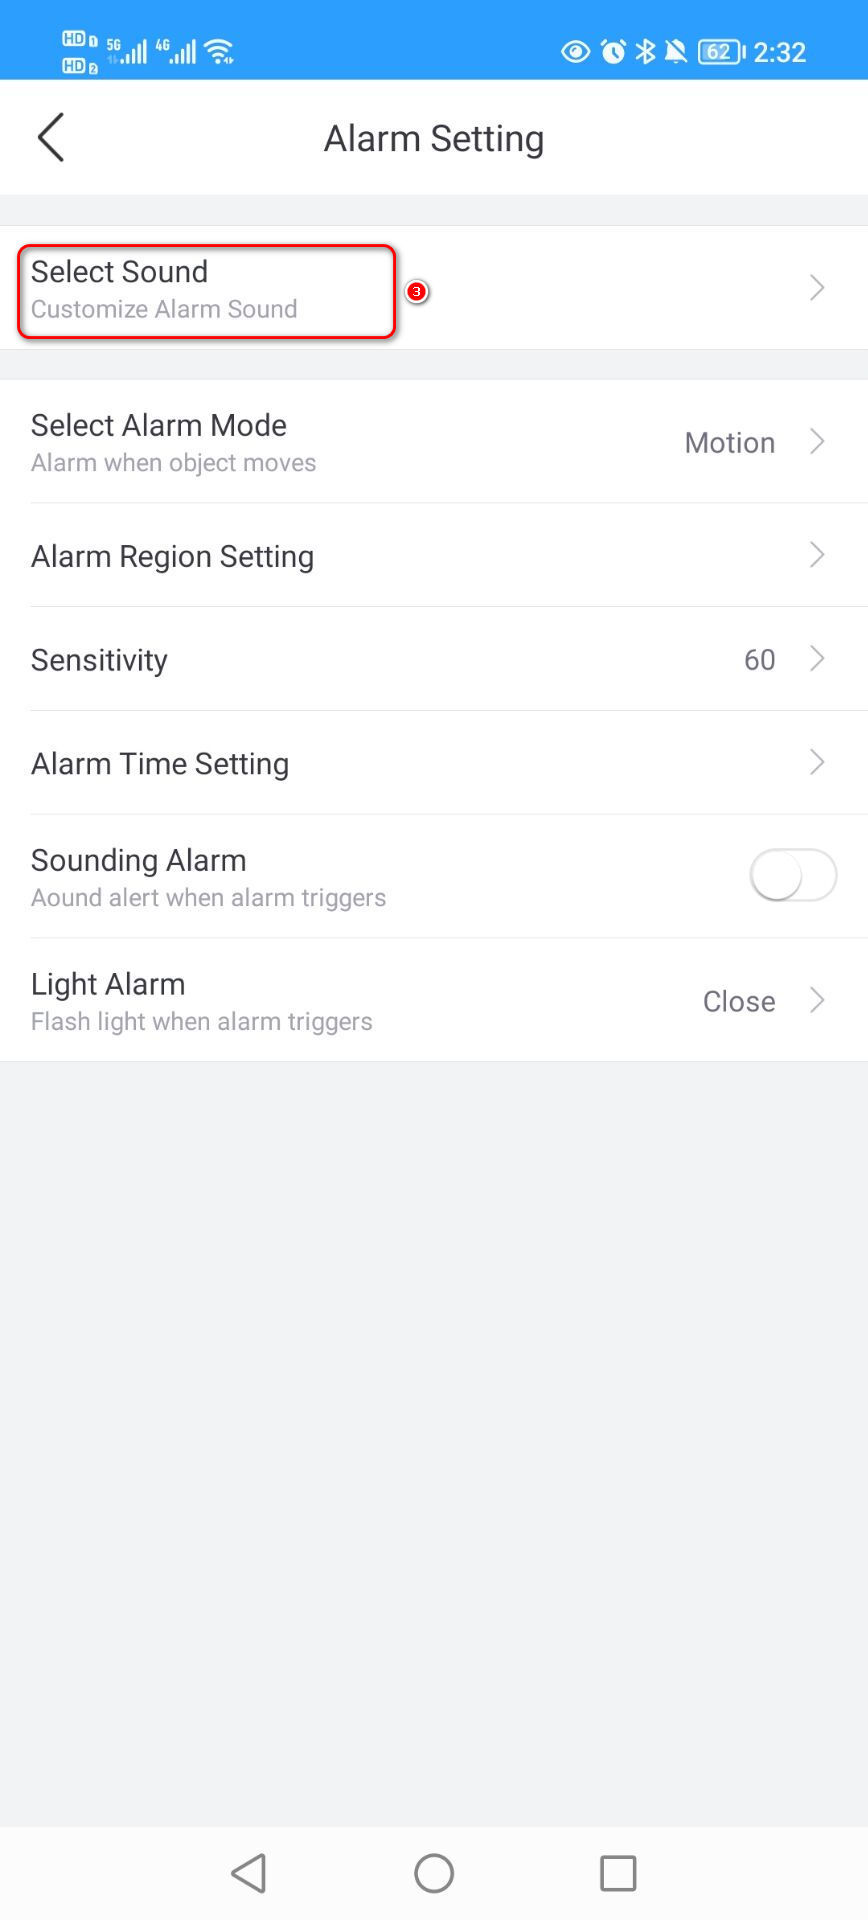
3. Enter the Alarm Settings interface and select the Select Sound option at the top.
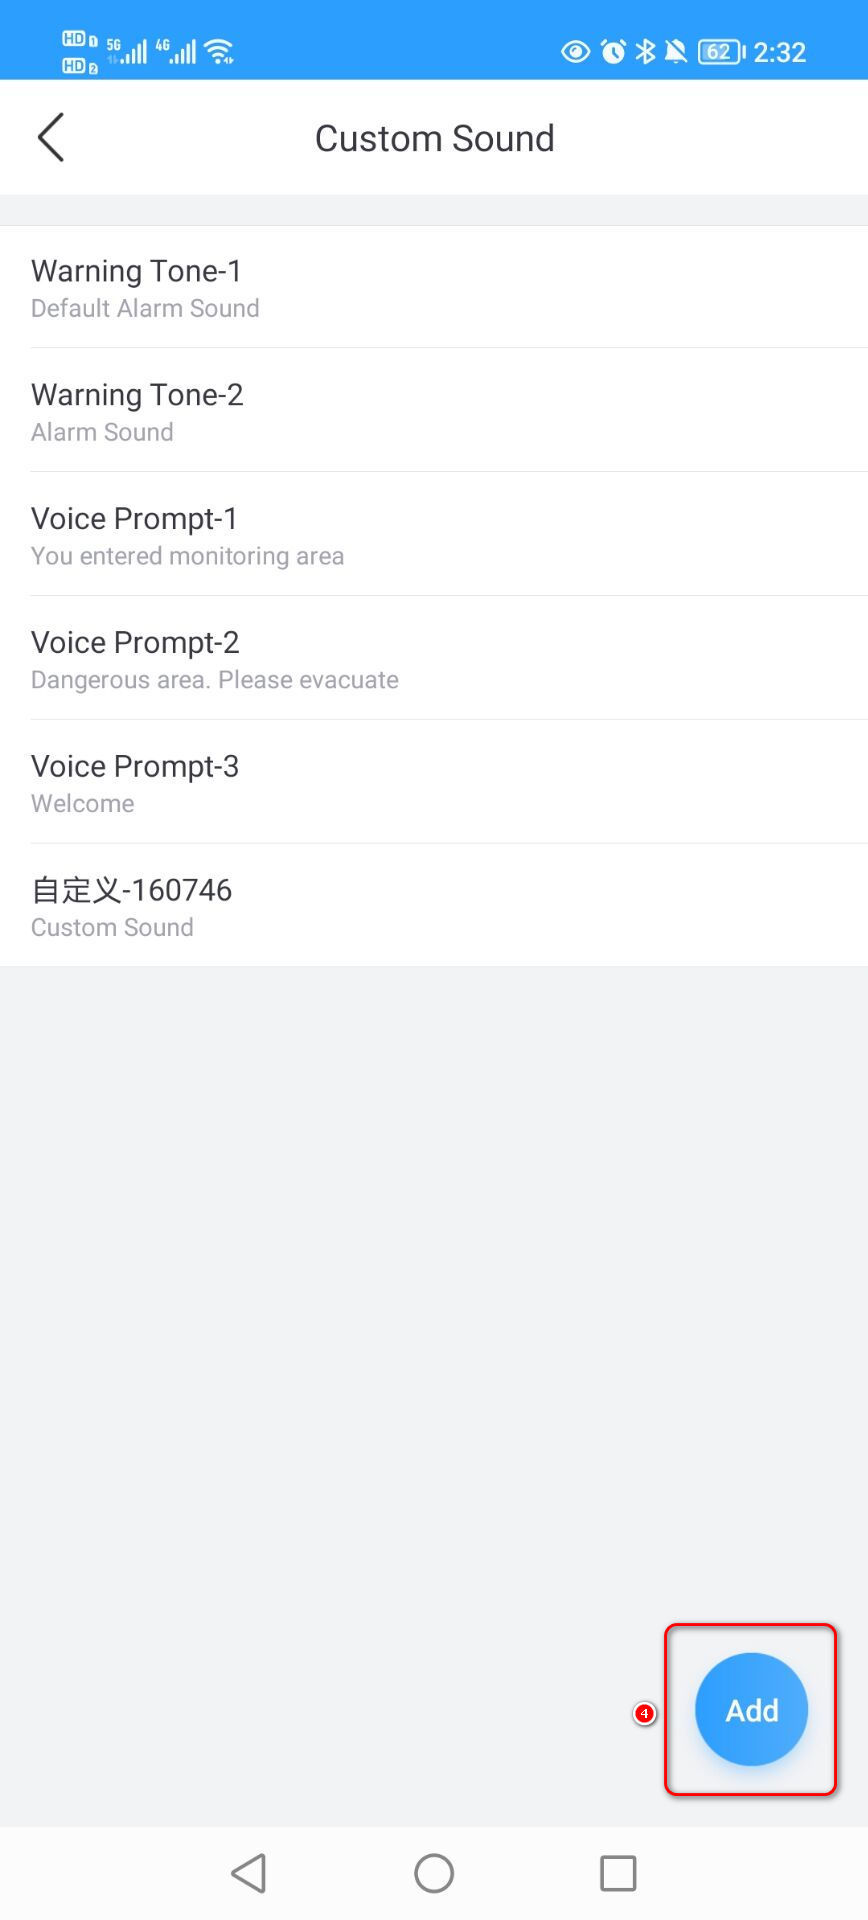
4. After entering the Custom Sound interface, click the Add button in the lower right corner.
5. Press and hold the microphone button to make customized voice alarm settings, such as "Welcome to our store", "You have entered the surveillance area, please leave as soon as possible" and so on.
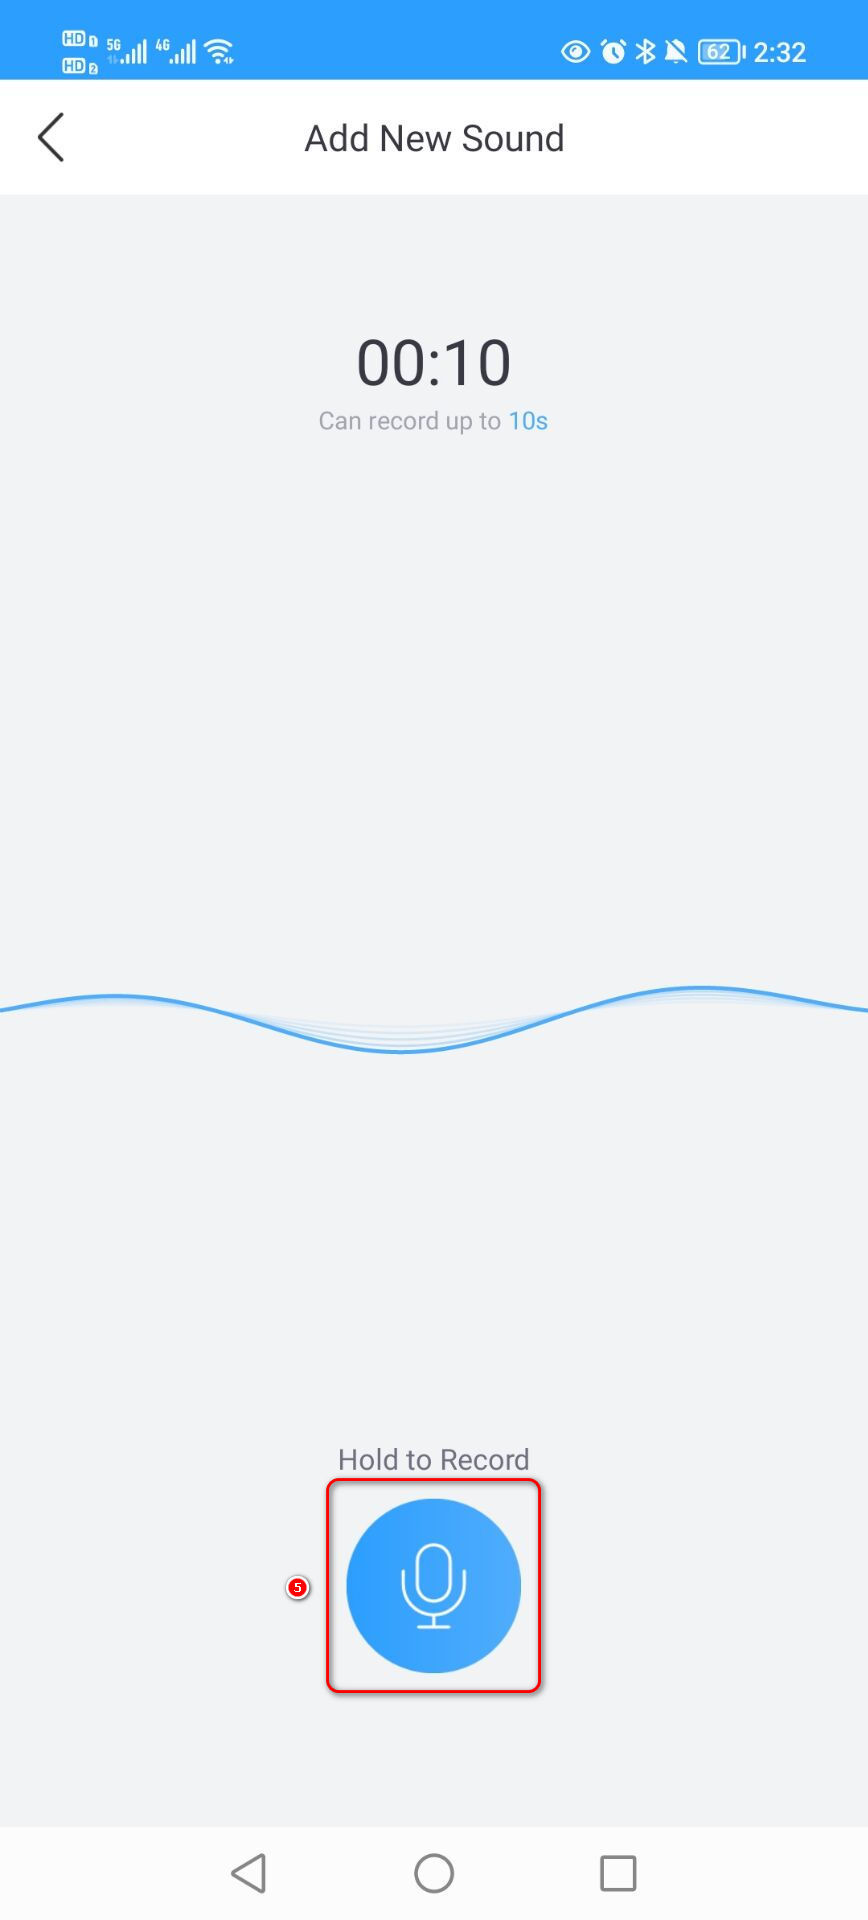
6. In the last step, select the alarm sound that has been set.
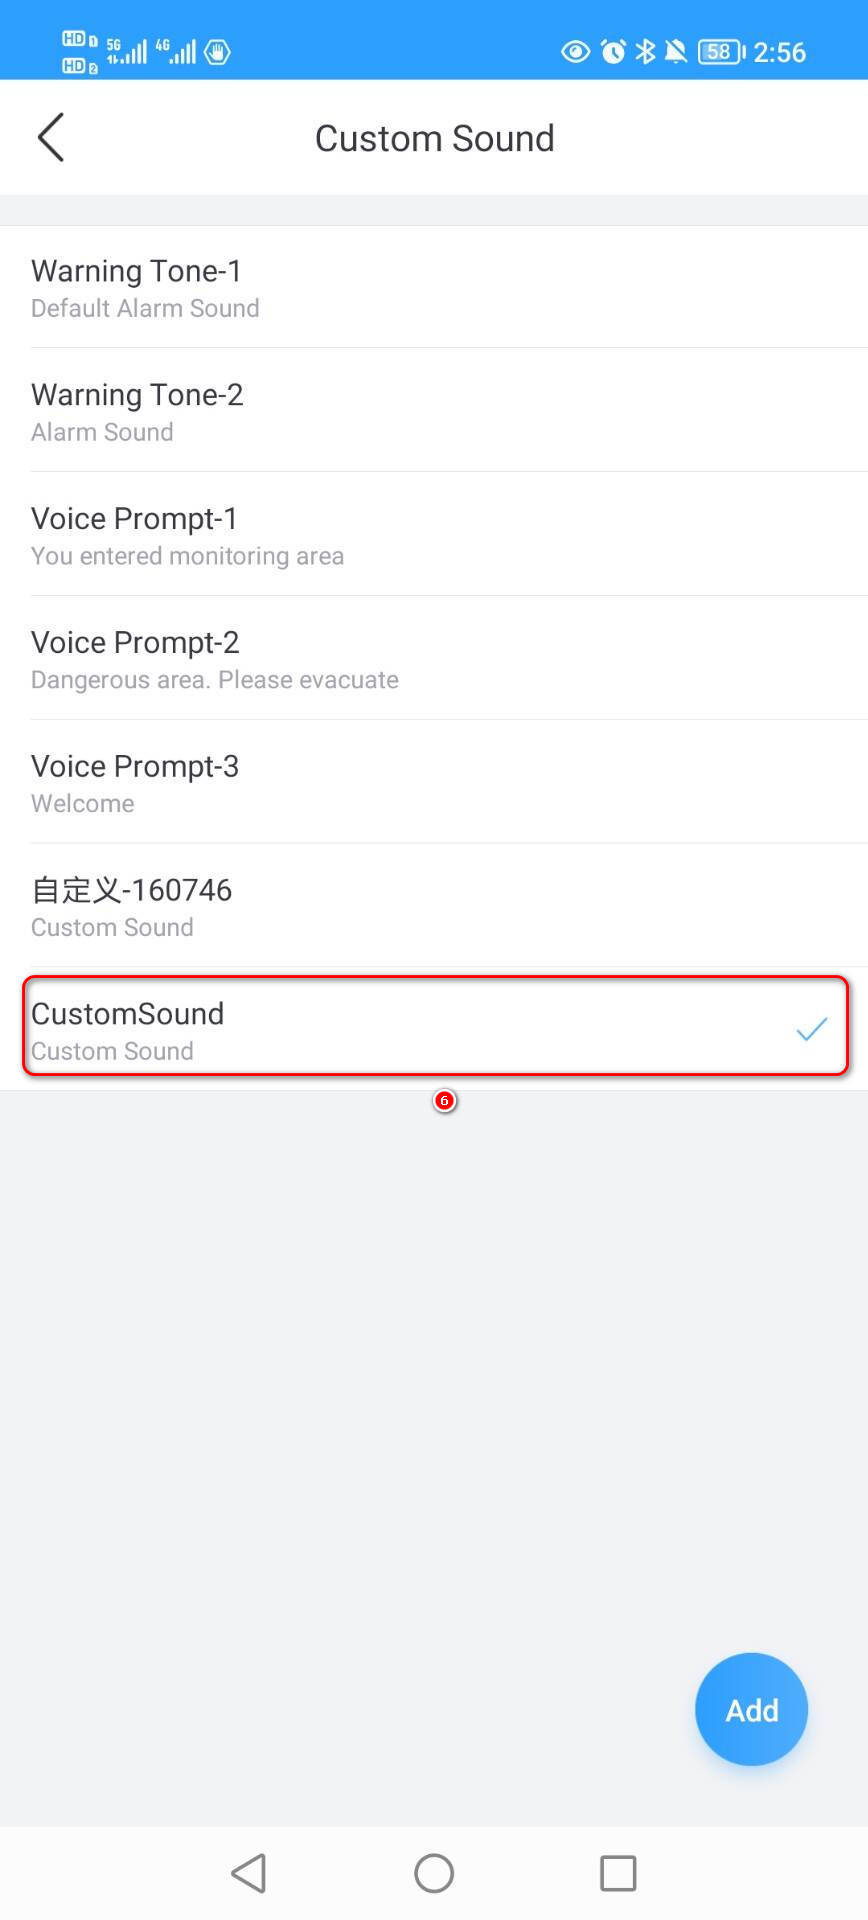
Ans:
For enhance the security and user privacy, we have changed the device adding policy in CloudSEE Int’l Pro App. You need to use the “Device Sharing” function to add same device with multiple accounts. You can share the device with maximum 10 users. Check the steps to share the device.
Before you start
The App interfaces on iOS and Android may different, but the functions and configuration methods are similar.
Steps
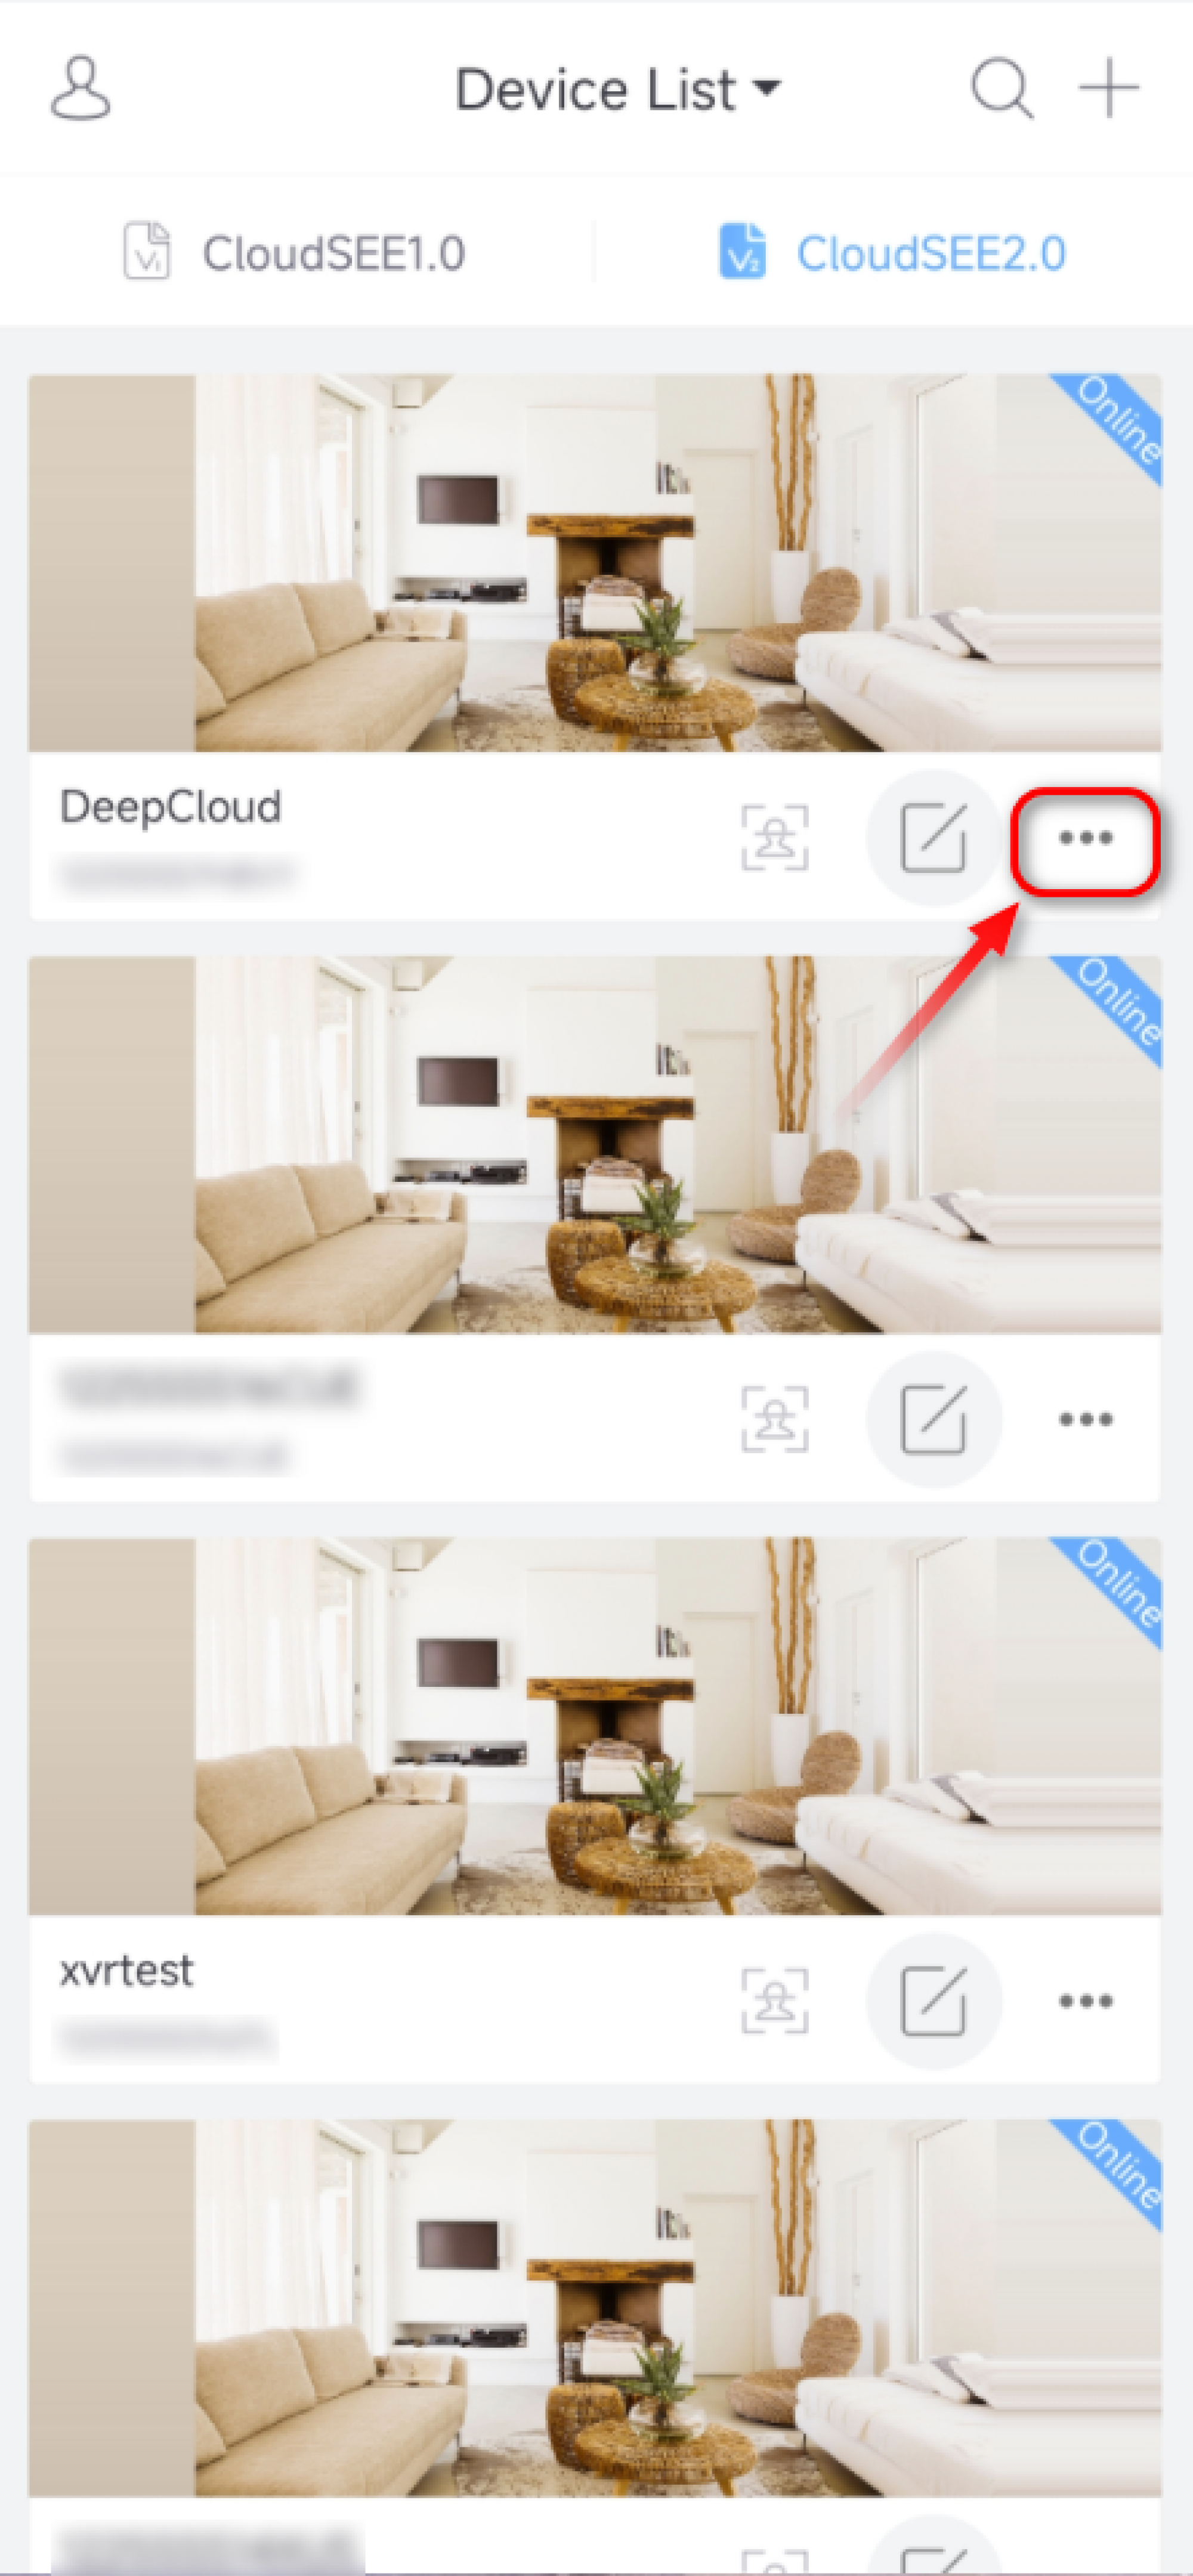
Tap … (Three dots) of the device you want to share with others.
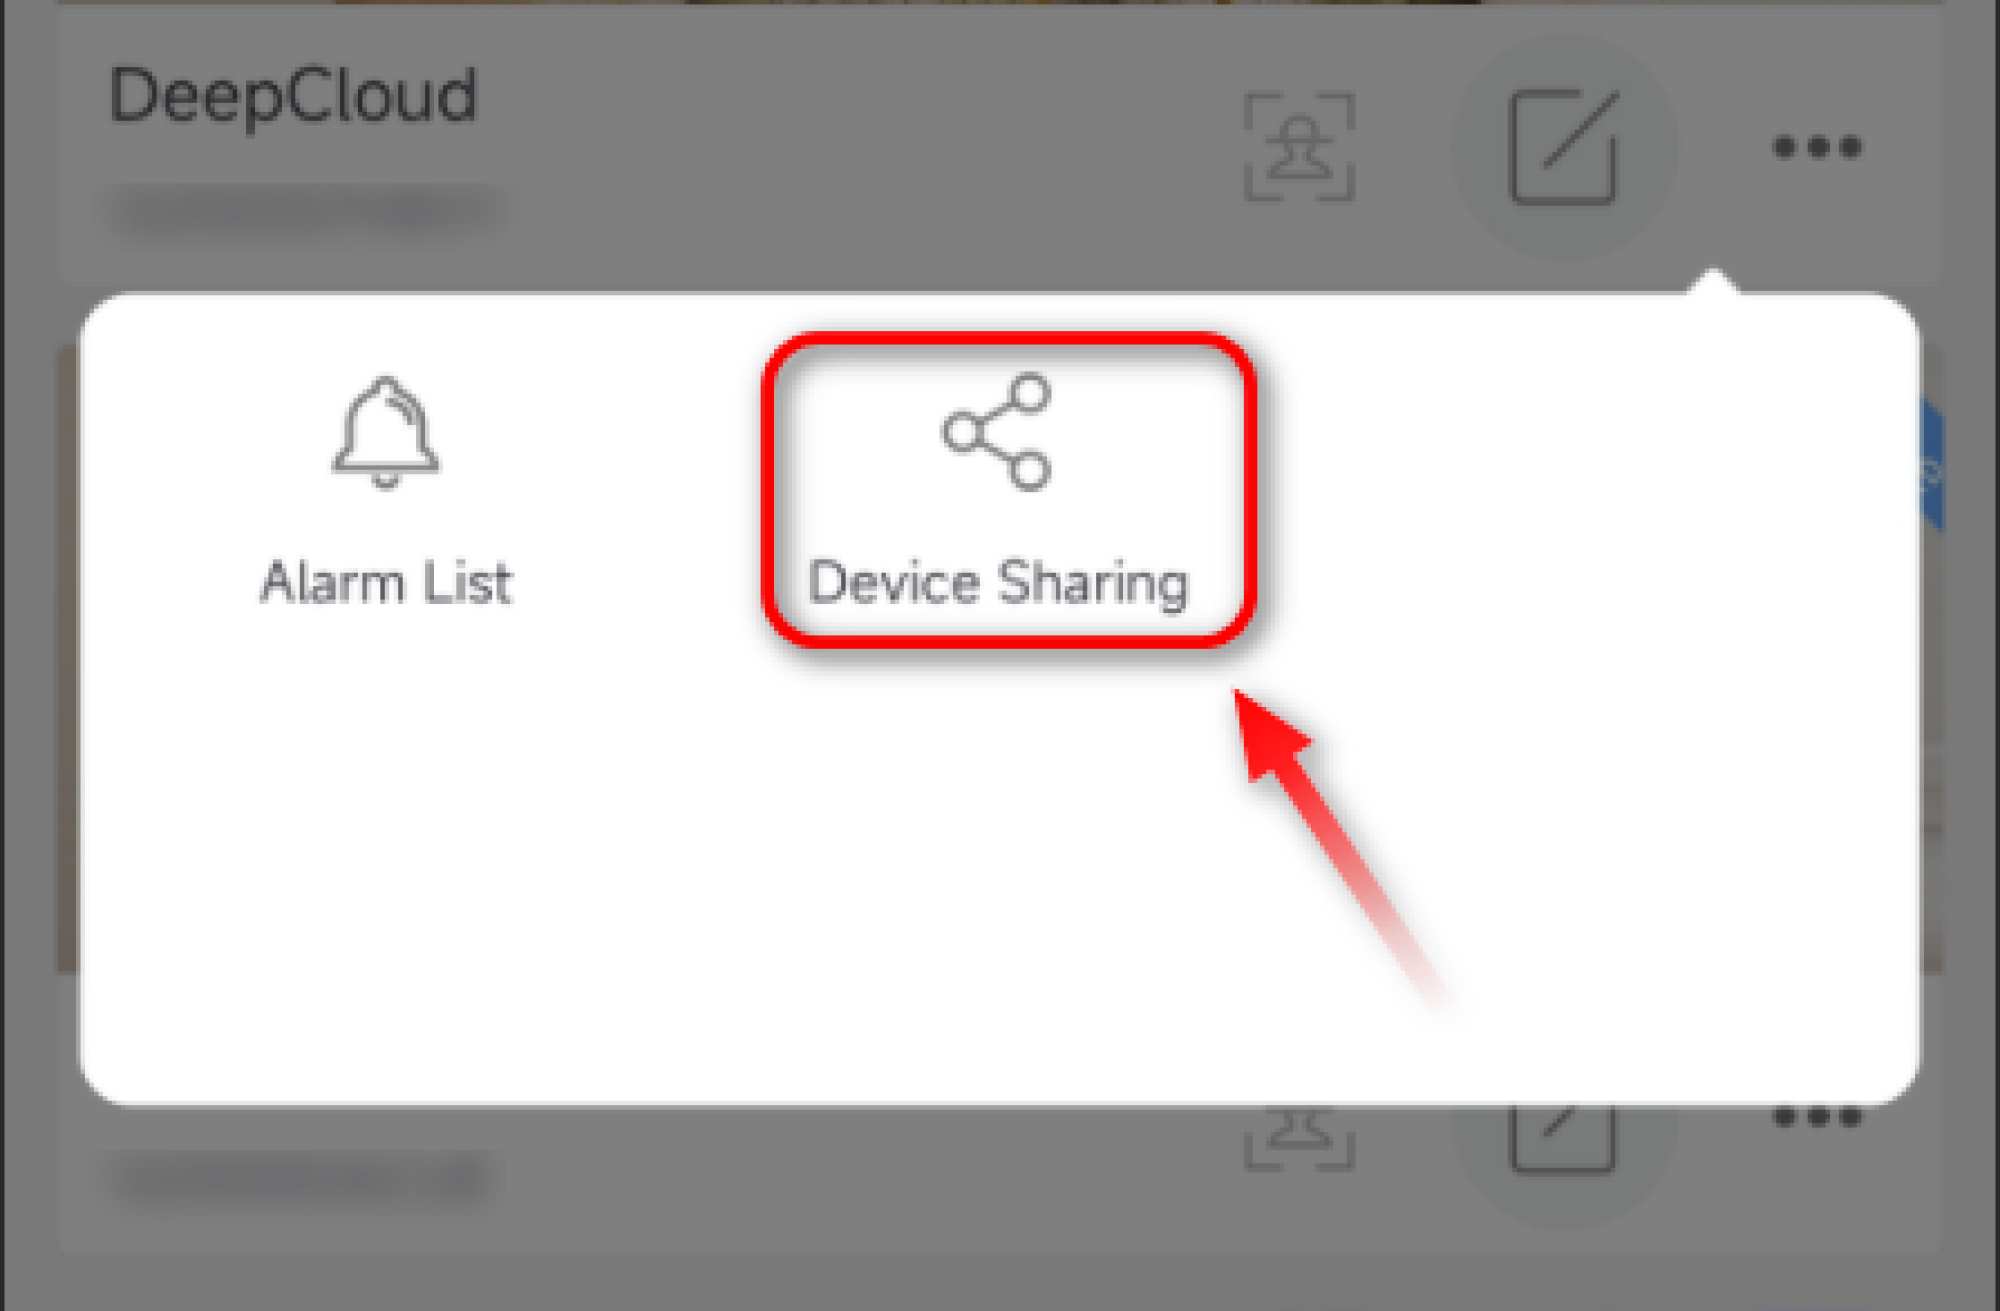
2.Tap the Device Sharing button
3.You need to use a QR Code to share the device with friends and family. Tap the Use QR Code to invite friend option
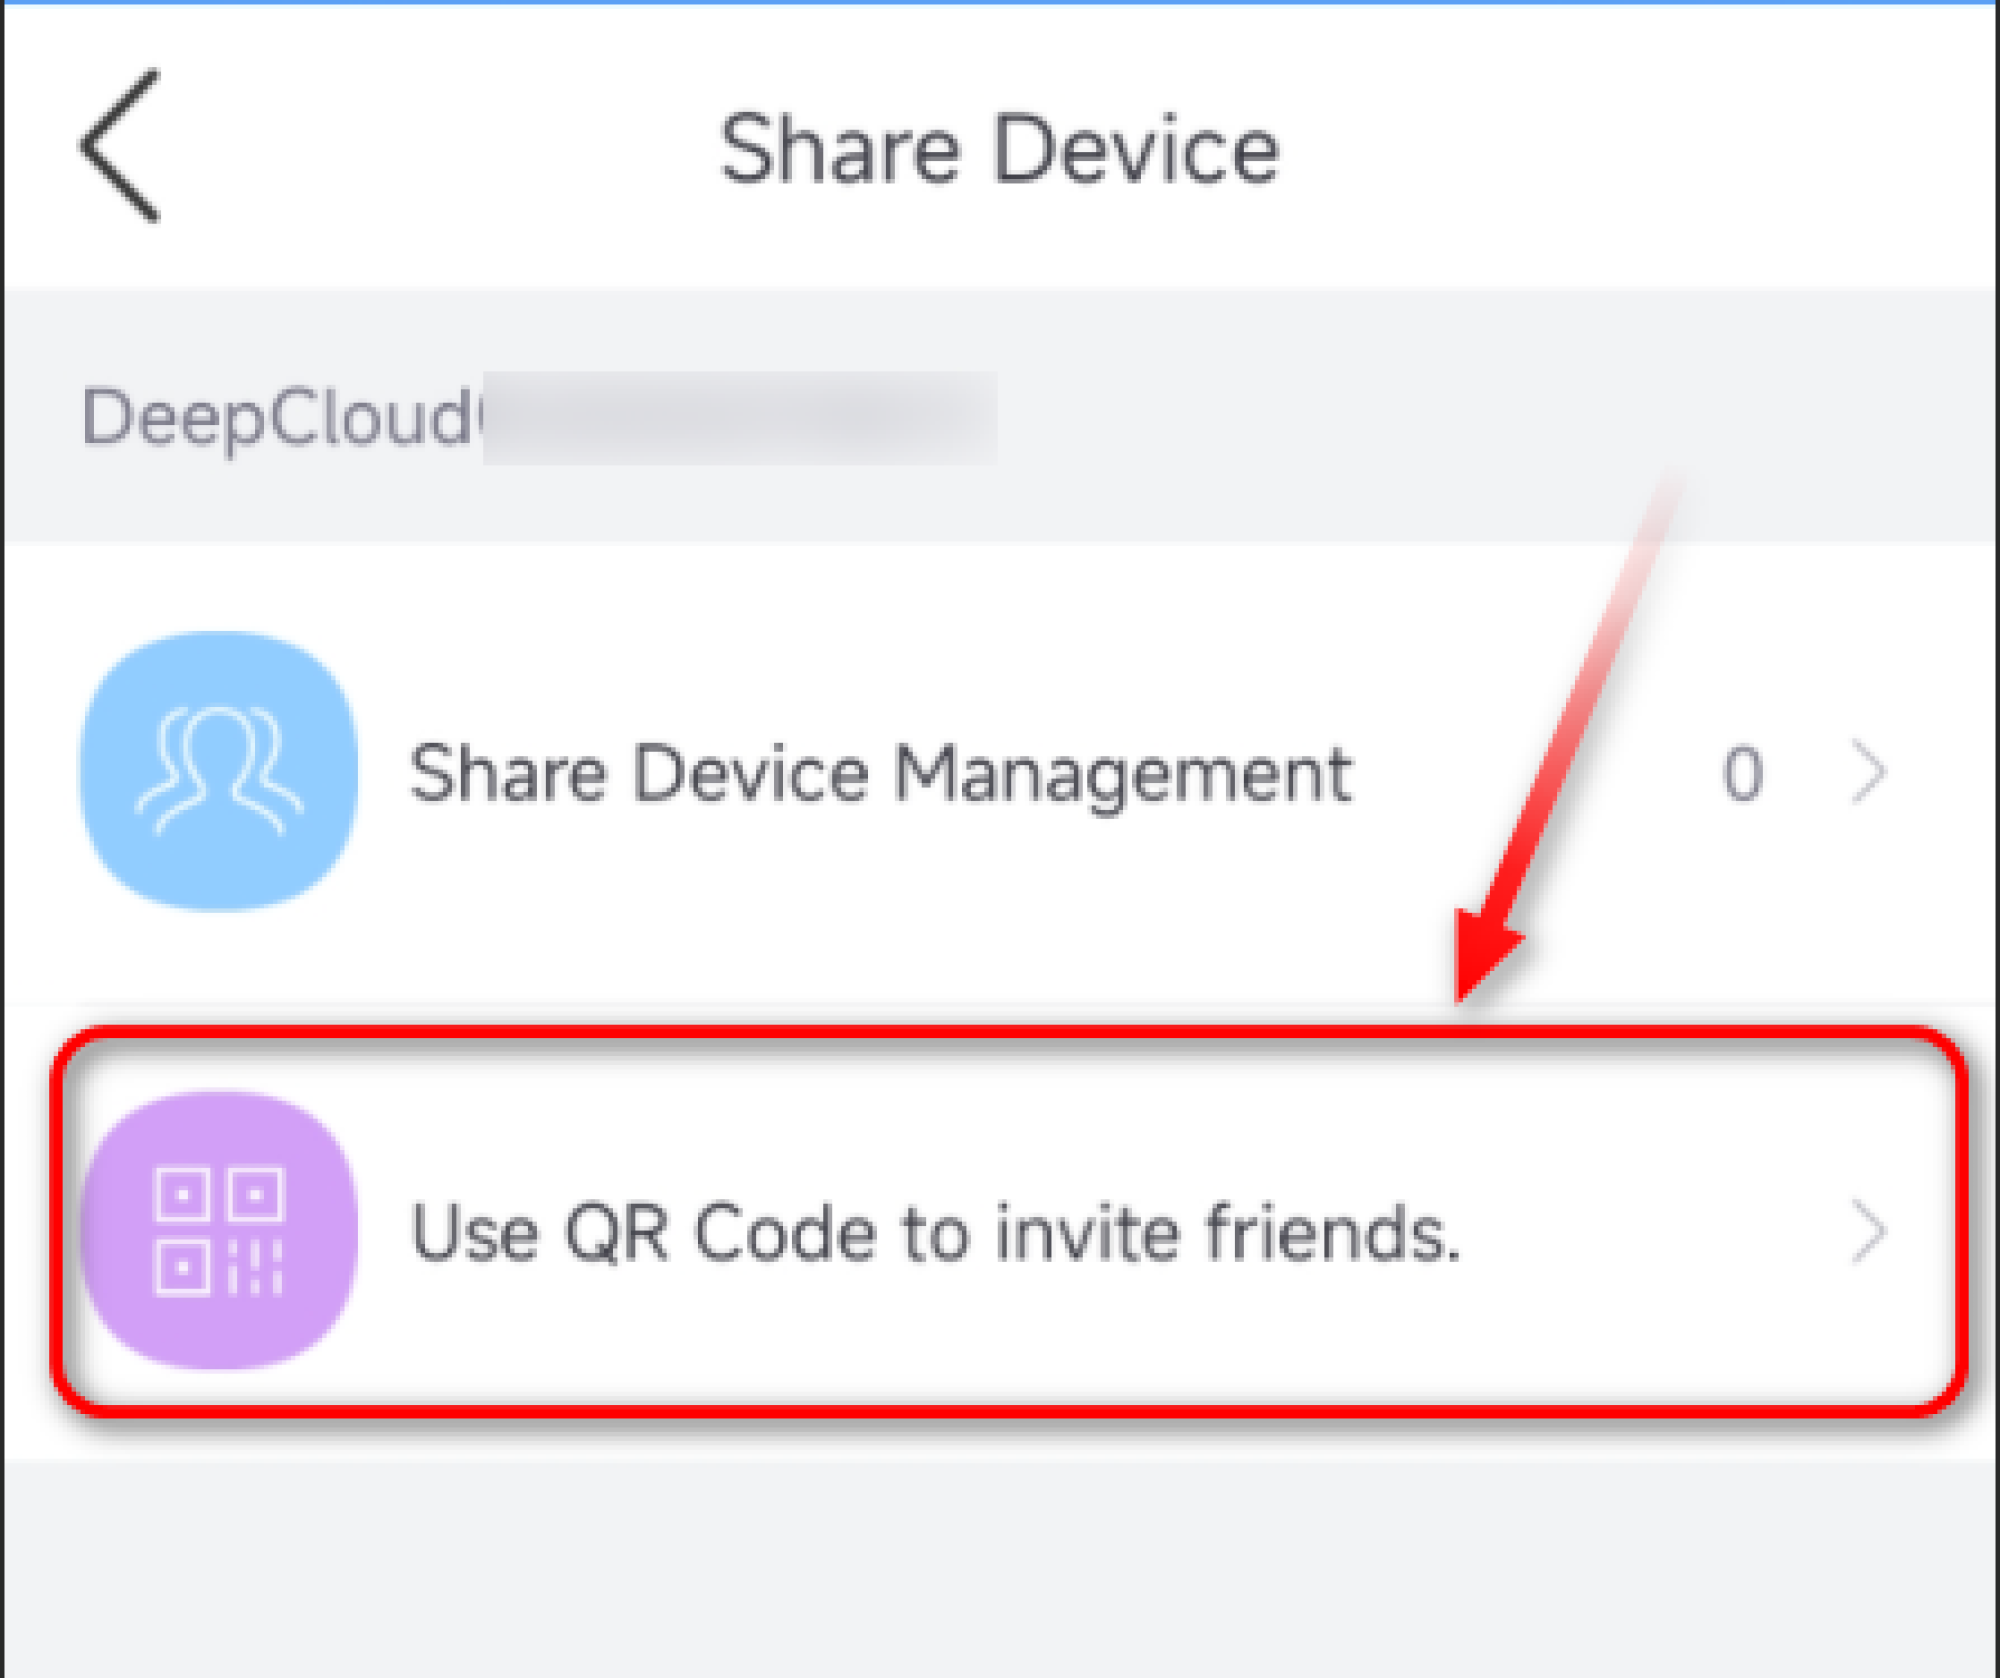
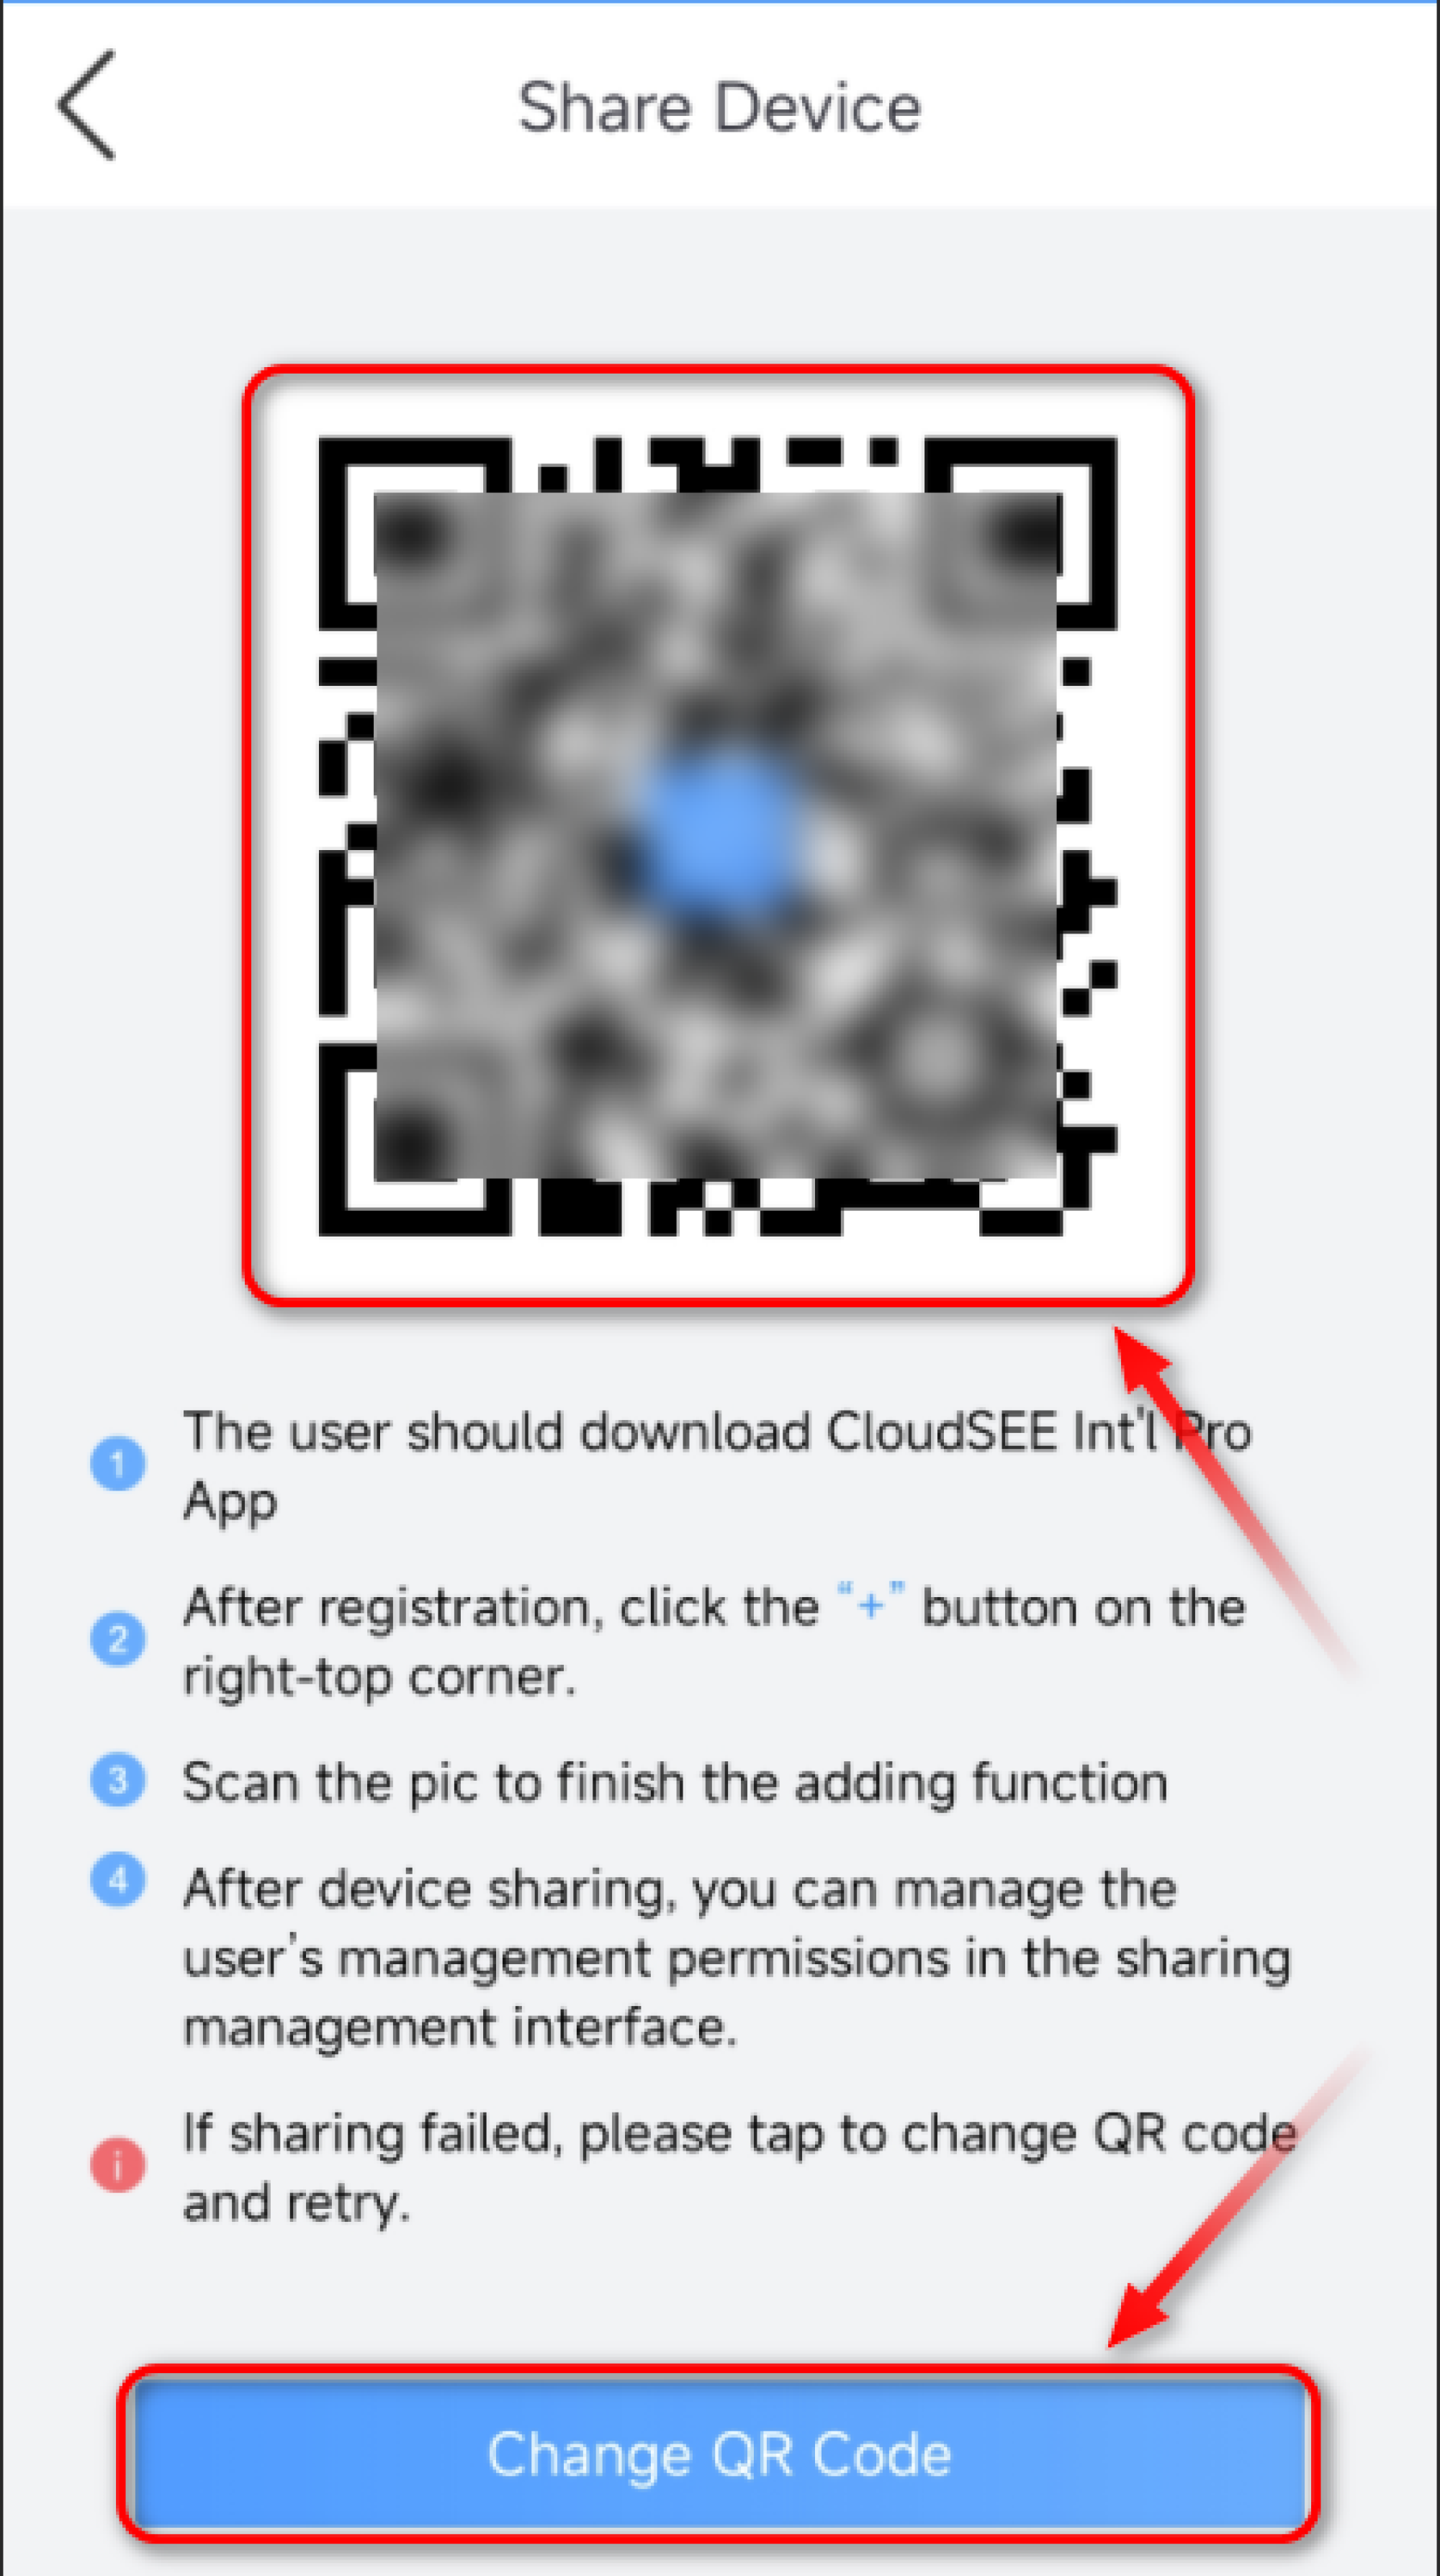
4.Scan the QR Code to add the device into another account. The validity of the QR Code is 30Min. If the QR Code expires, tap Change QR Code and share it again.
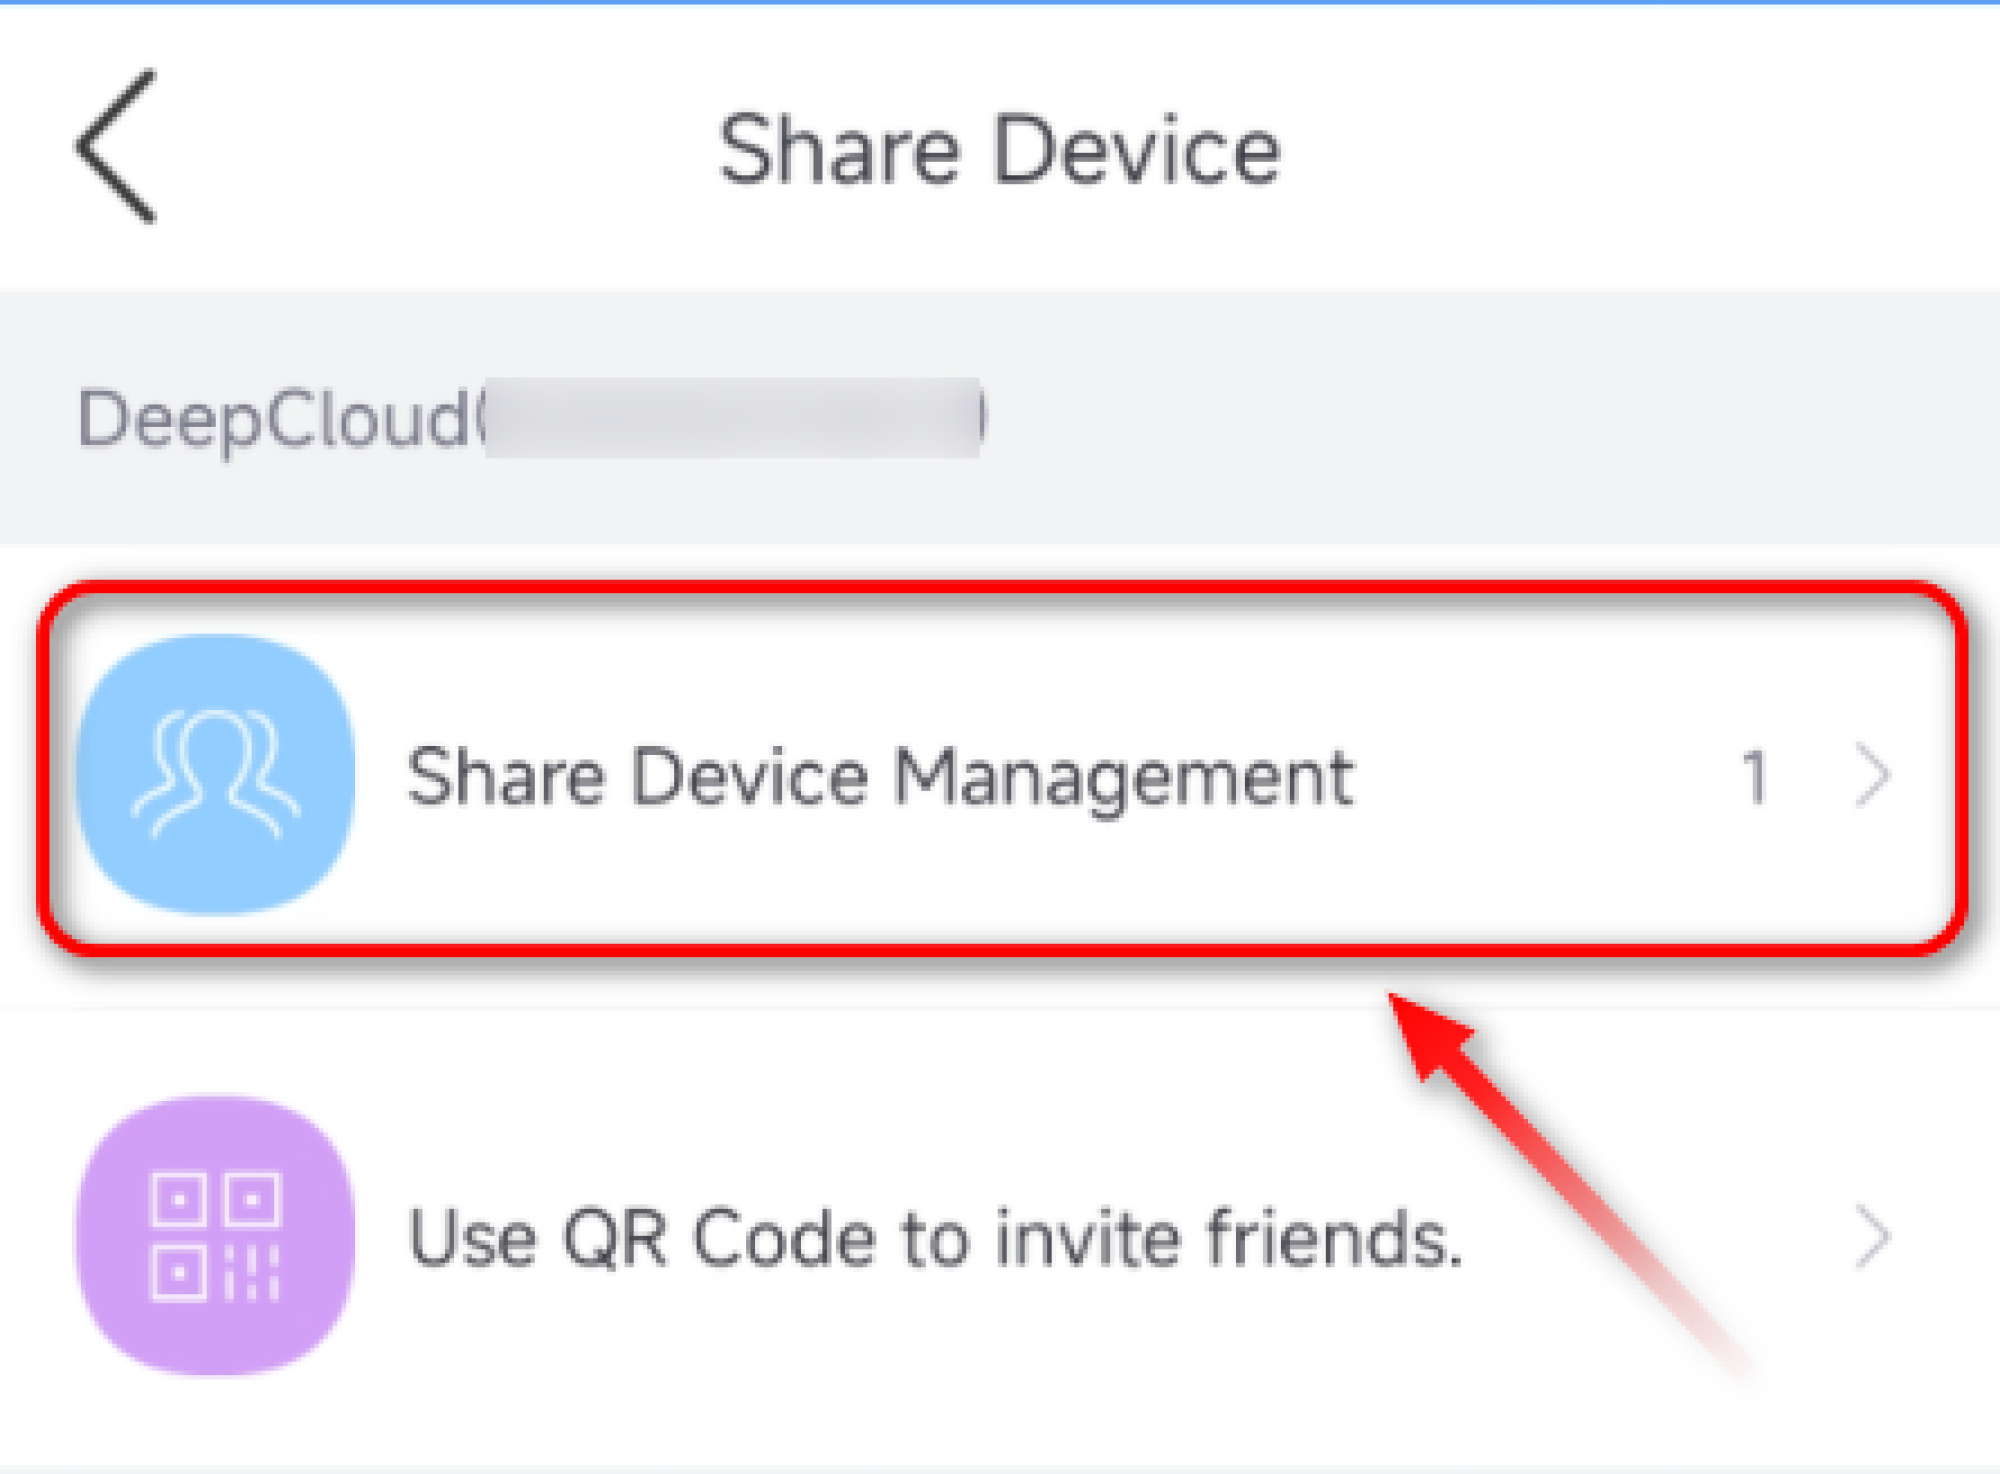
5.Once the device added into another account, you can see it in the Share Device Management
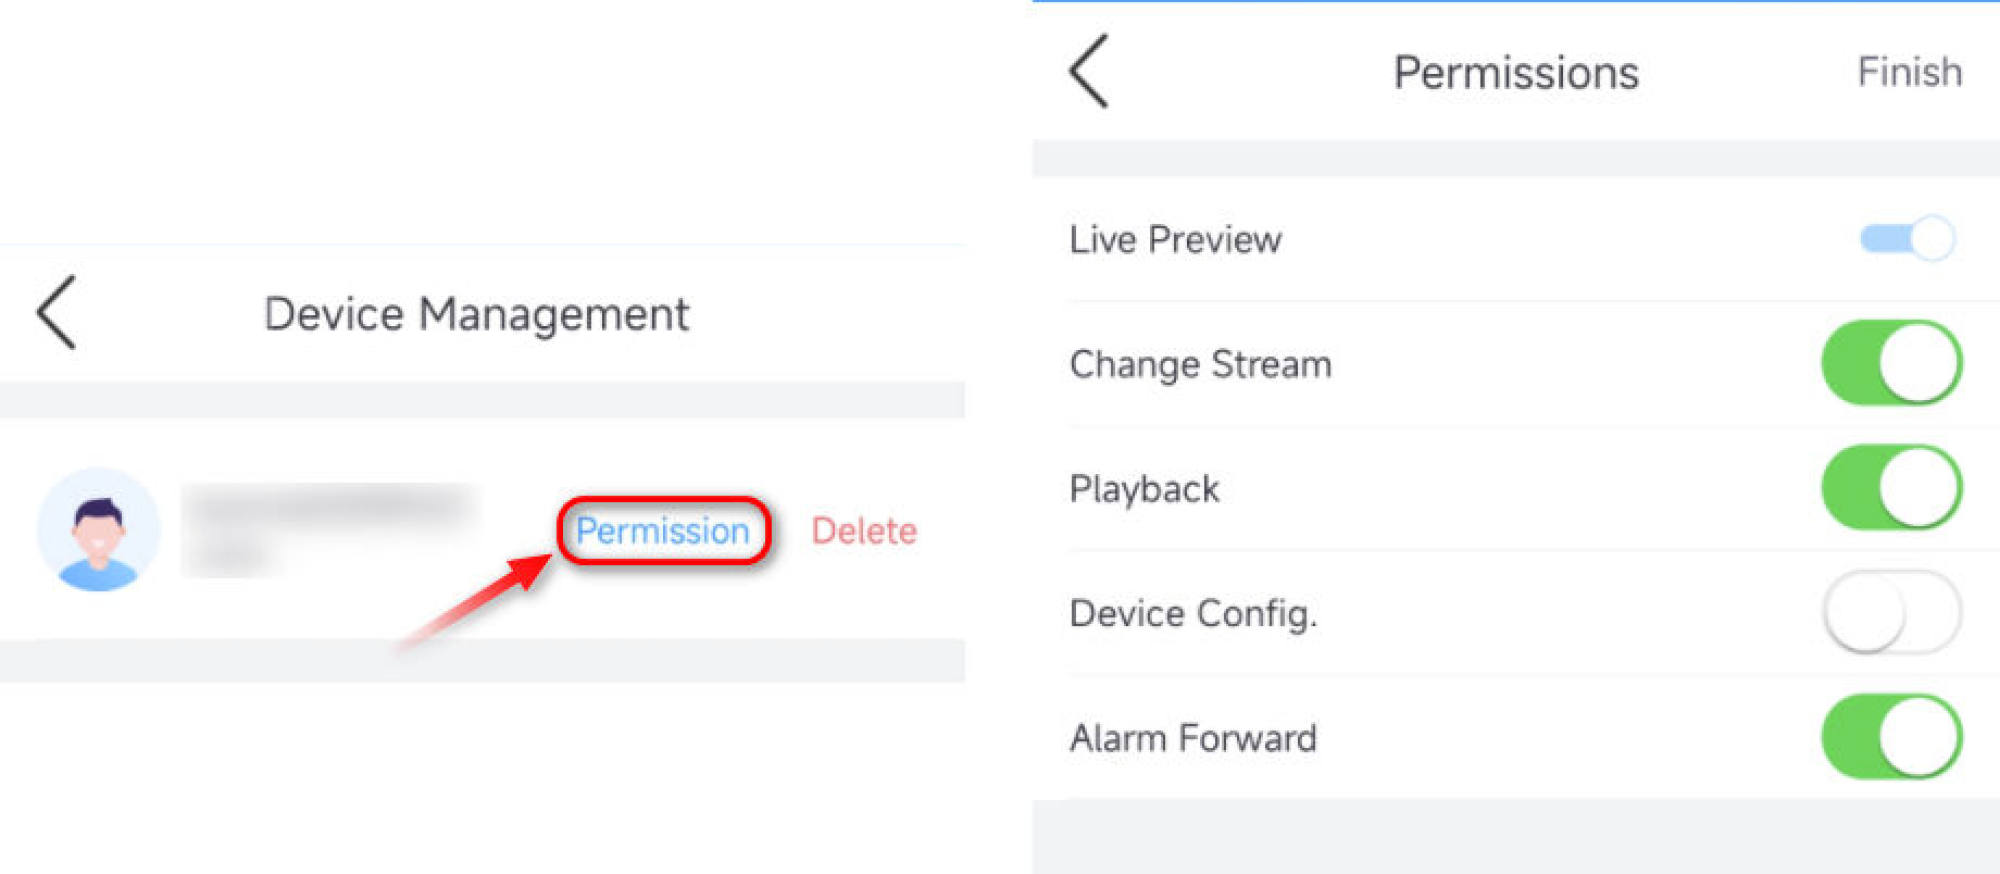
6.You can change the usage Permission or Delete the sharing in the Share Device Management.
Note: If the App showing “Device bound by other!” message and you don’t know who added the device, please send us the CloudSEE ID to support@jovision.com. We shall help you to unbind the CloudSEE ID from the account.
Steps:
1. Download software VMS-6100 and install it on your PC ( you can find VMS-6100 on our website: https://www.jovisionsecurity.com/download.html), connect the Camera in the same subnet with your local network, and use VMS-6100 software to search and access the Camera.
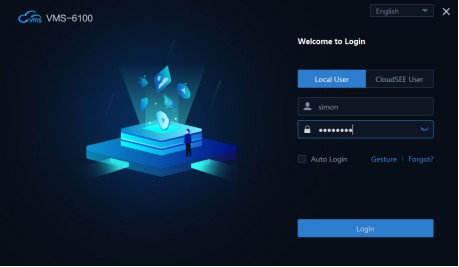
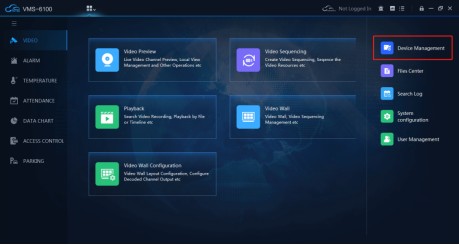
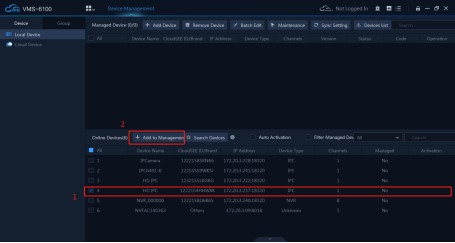
2. VMS-6100 will add device with default IP Camera account (Username: admin Password:<empty password>). If you changed the password, the device will not connect and show “Wrong Username or Password” in the Status.
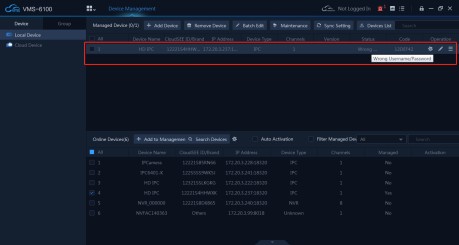
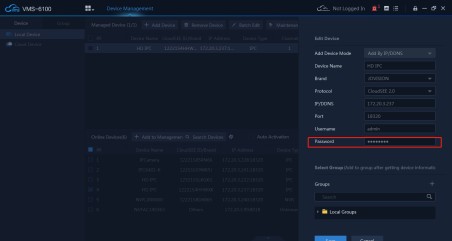
3. Double click the device or click  , and input correct Username and Password. Click OK. The camera status will become Online.
4. Press button“Video Preview” to preview camera, then right click your mouse to select “Start Recording” on menu to record local videos.
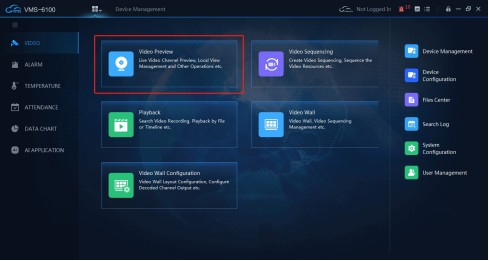
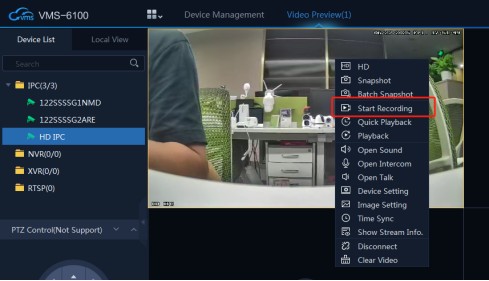
5. Find “Files Center”, then select“Local Recording”page to search and locate local video files.
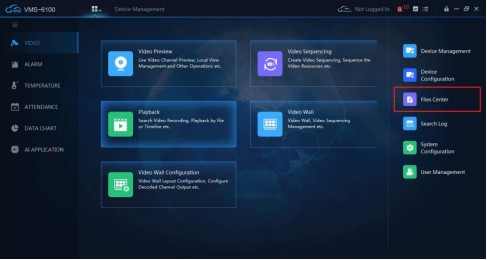
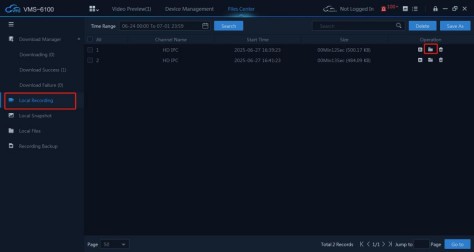
Steps:
1. Download software VMS-6100 and install it on your PC ( you can find VMS-6100 on our website: https://www.jovisionsecurity.com/download.html), could select and login with Default Superuser:
Username: admin
Password: 123456
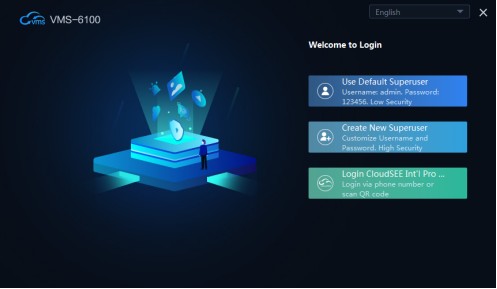
2. If you forget the login password for VMS-6100, open the login interface, Click "Forgot?".
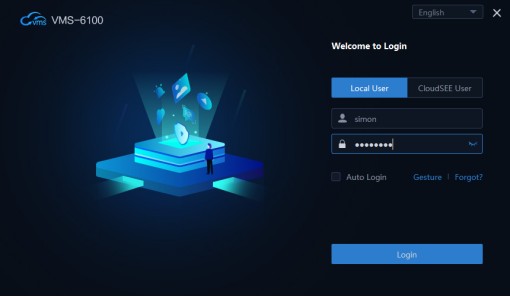
3. Reset the login password as required.
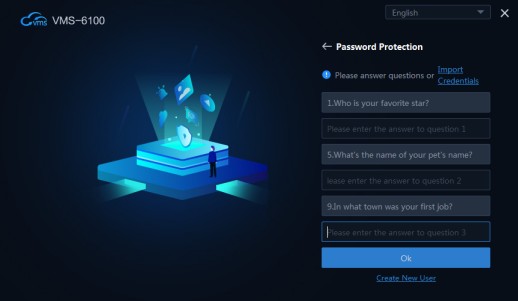
4. If you don't remember the login username, password and password protection, re-download and install VMS-6100.
1. Open [Video Preview] and select the number of patrol screens
Click the lower right corner of the video preview, select the [Split Screen Selection] icon as shown in the figure, and select the number of channels to preview.
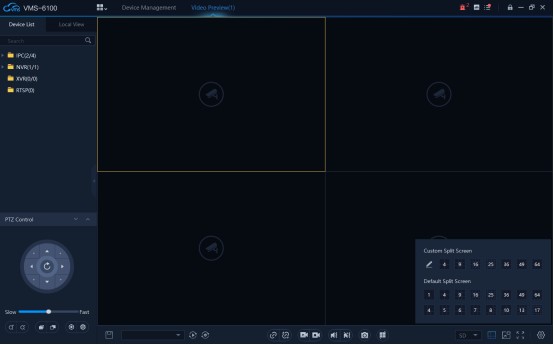
2.You can double-click a NVR to connect all the screens for display. After saving, the first round will be all the screens of this NVR.
You can also click the blank window of the display screen first, and then select one of the screens of IPC or NVR from the [Device List]. After saving, the first round will be mixed screens of multiple devices.
3. Click the icon of position 1 in the picture below. Position 2 will pop up
[Name] You can fill in according to the scenario
[ Group] The default is ok
Click [Add]
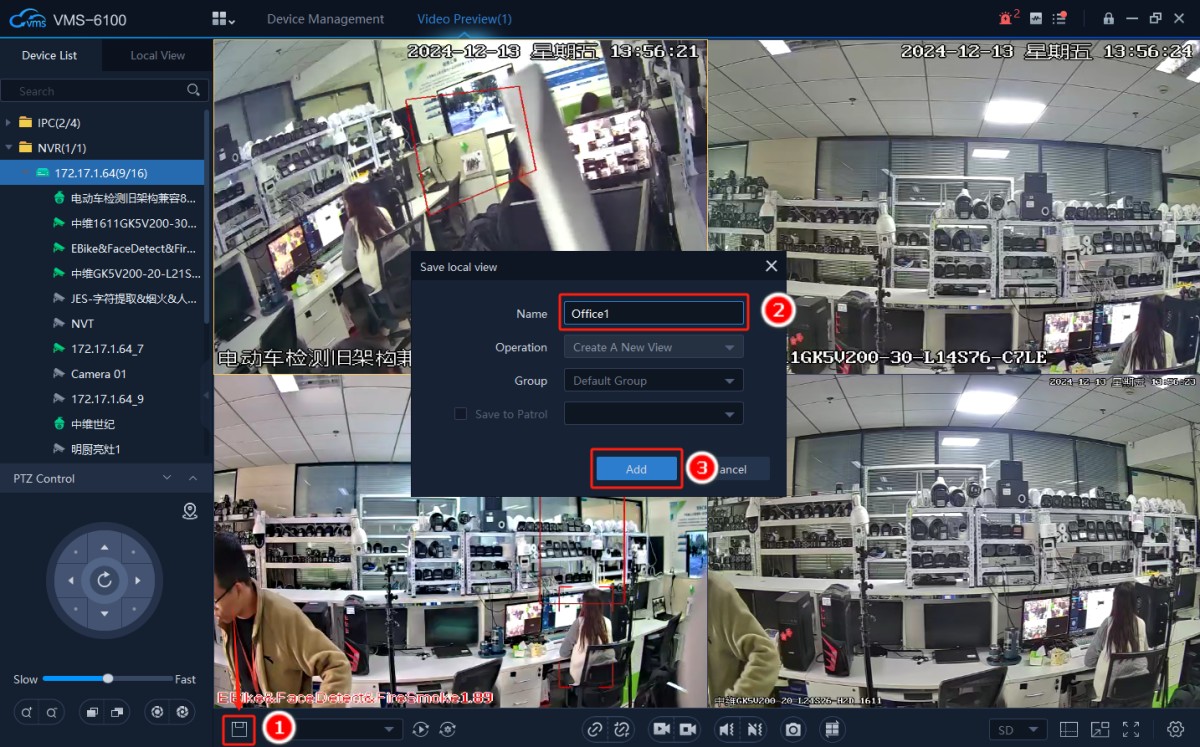
4. Close the video preview and reopen it, and repeat the above steps to add the second round of images to be displayed.
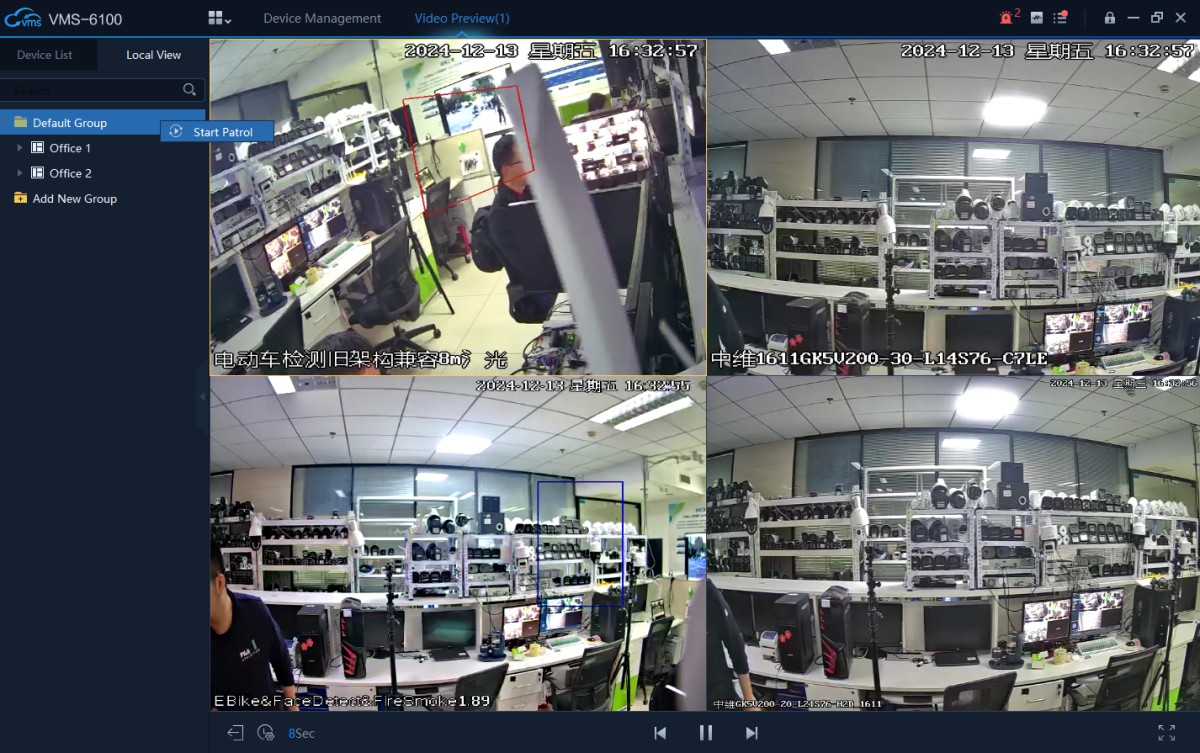
5. After saving all the views that need to be displayed in patrol, click [Local View] and right-click [Start Patrol].
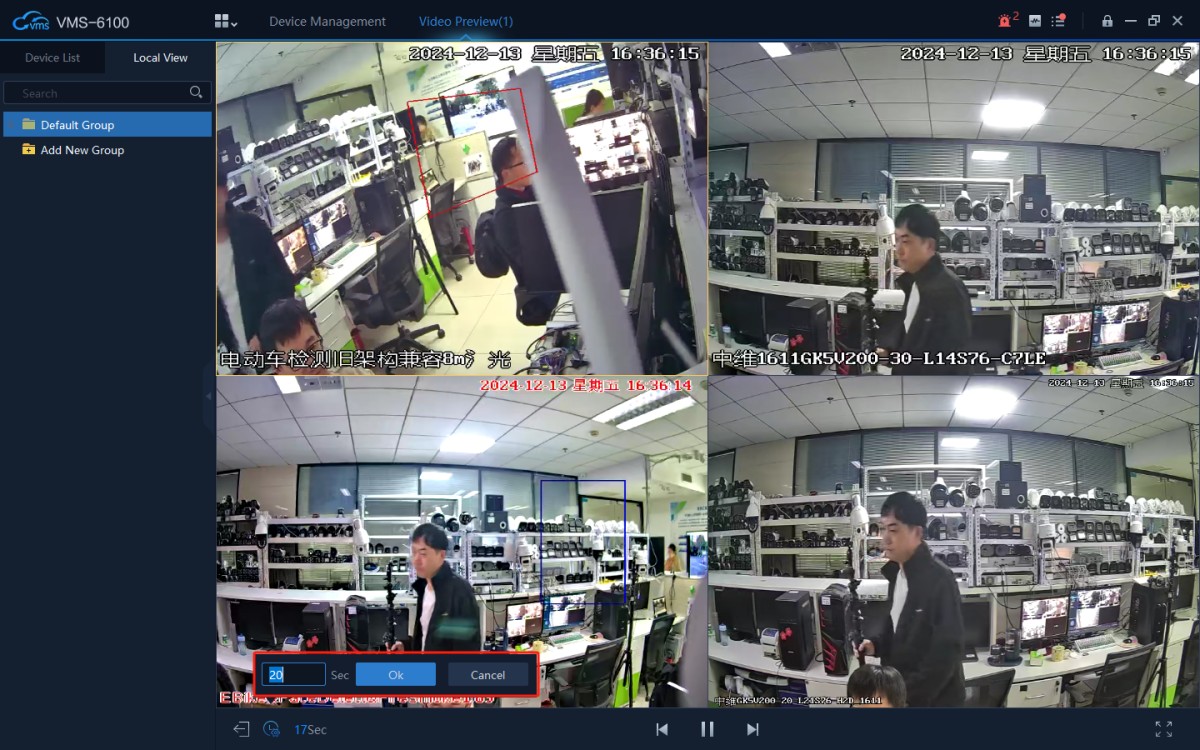
6. Patrol interval setting position
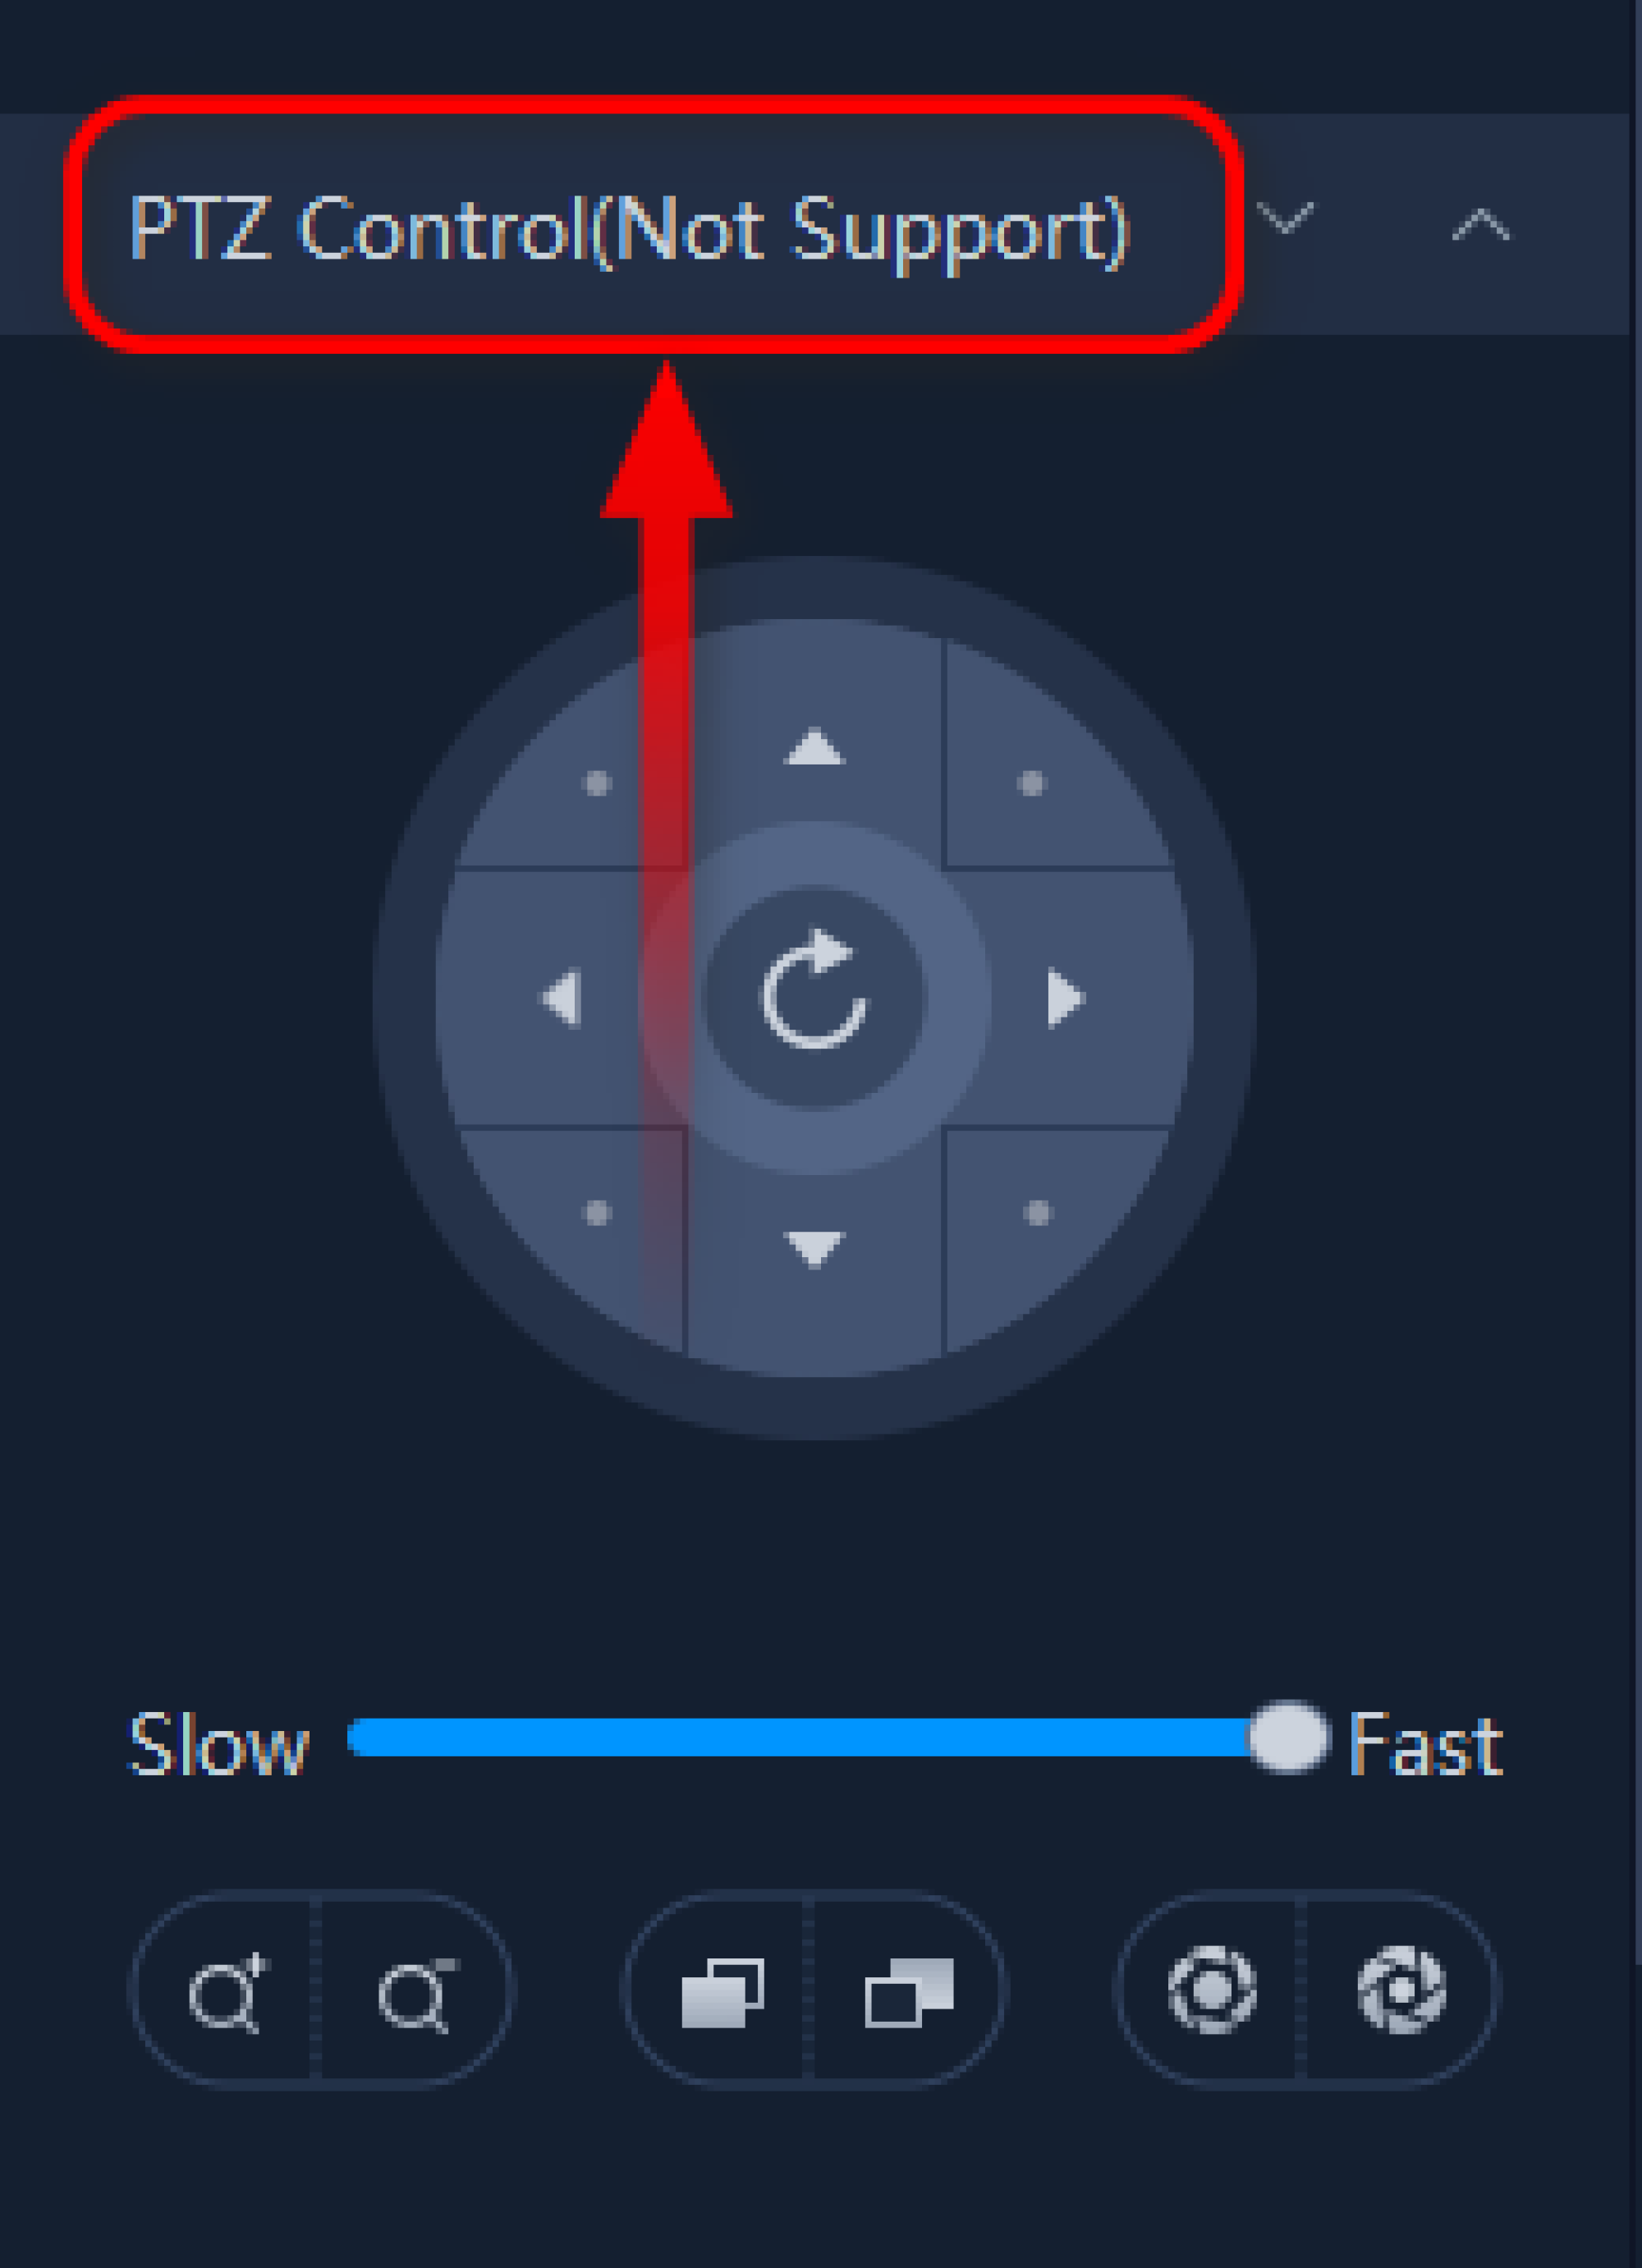
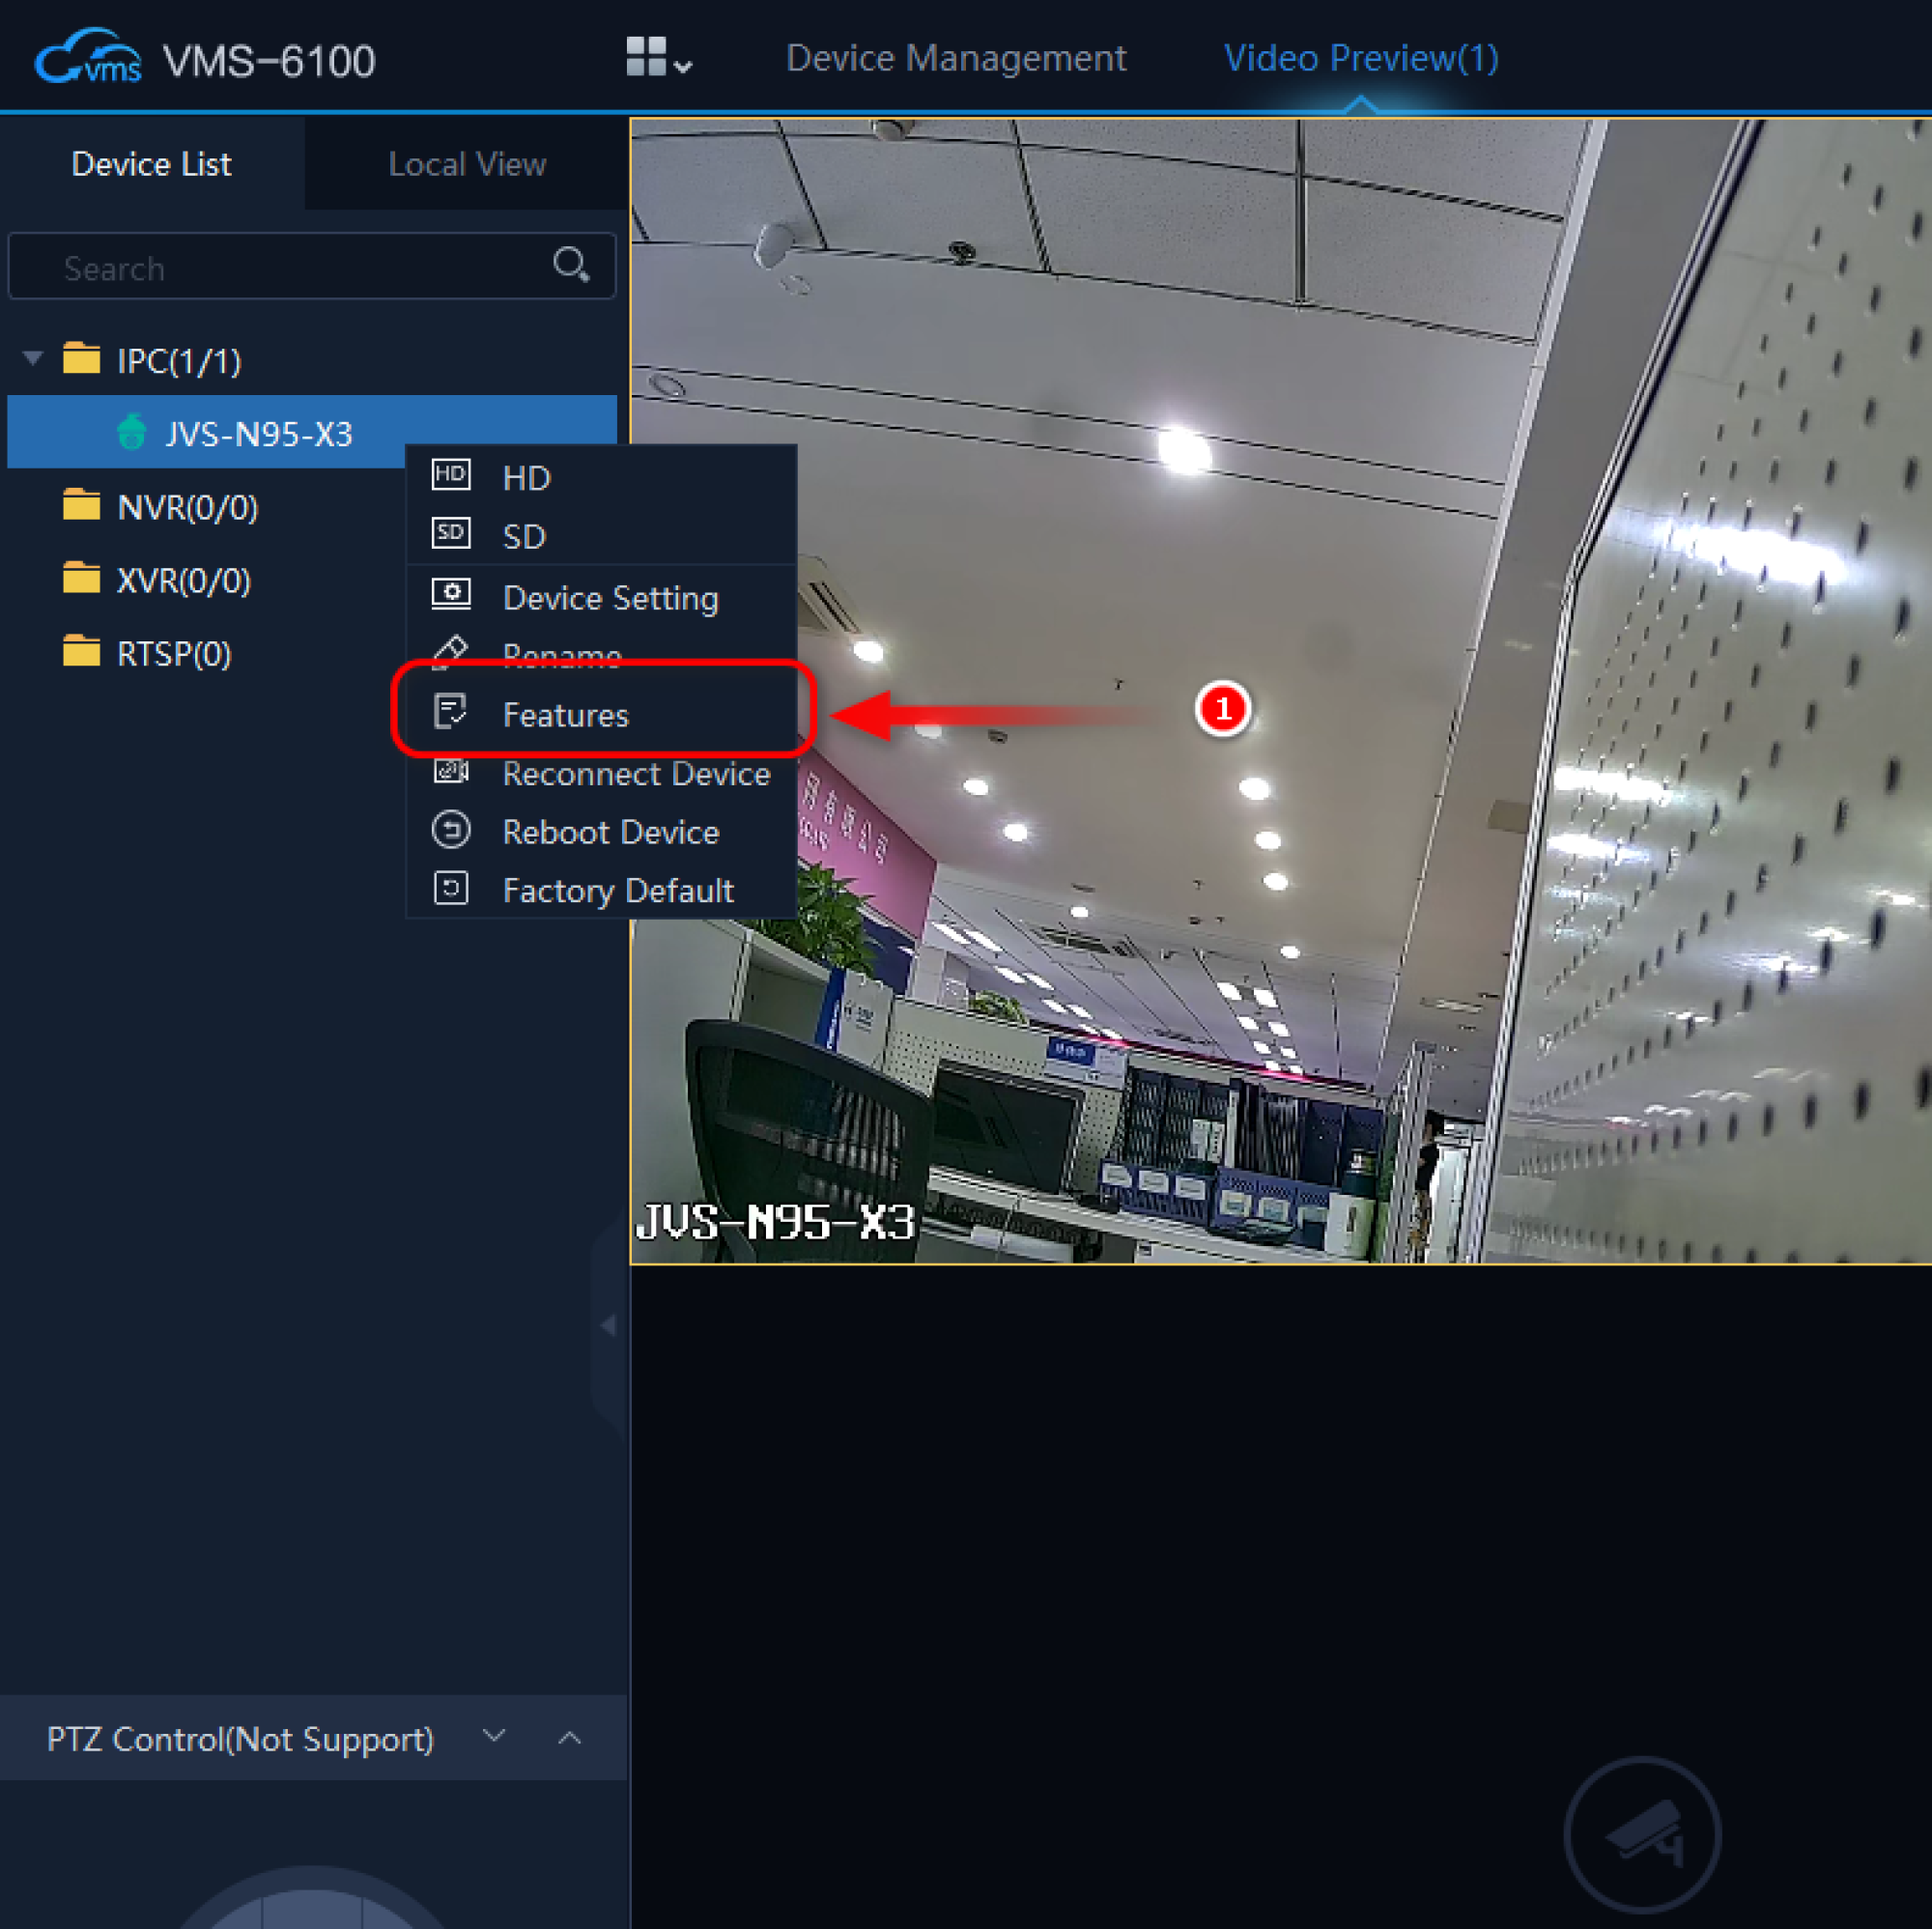
Select the device from the device list on the left side of the Live Preview window.
Right-click on the device and choose Features
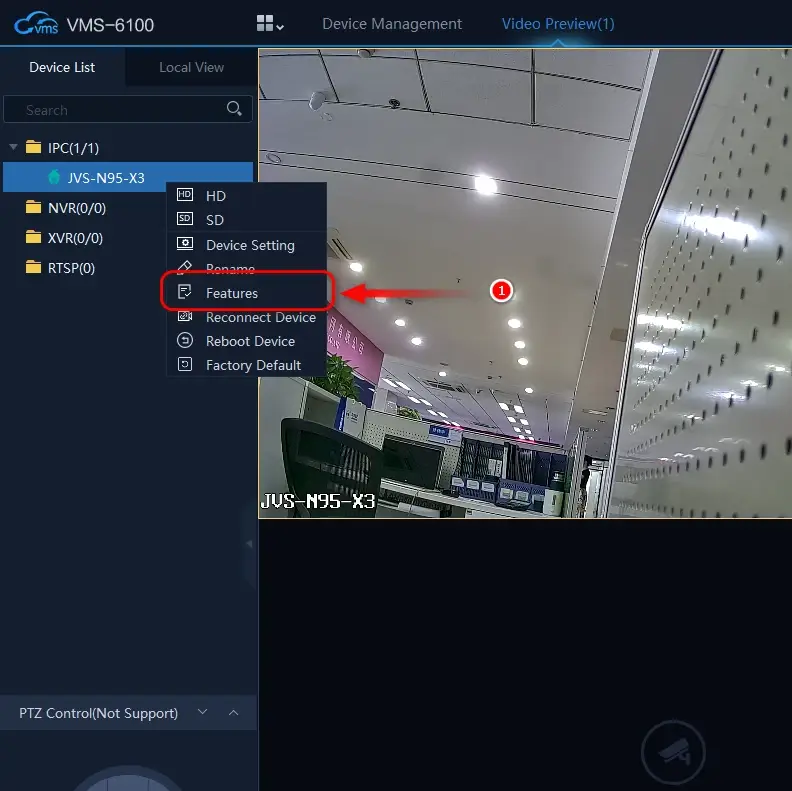
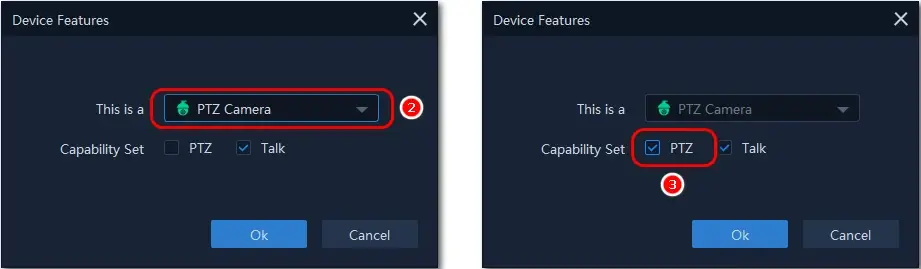
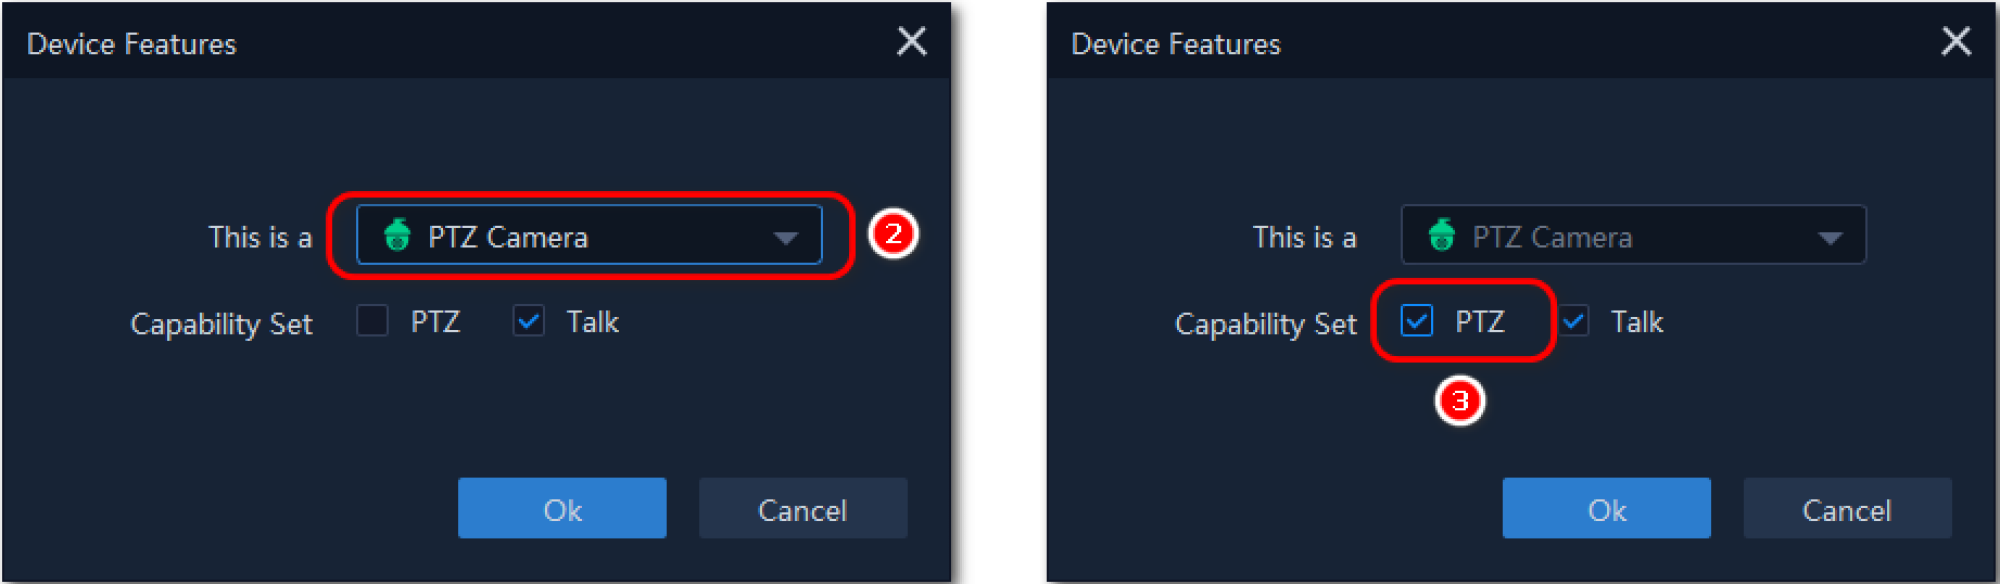
Choose type of your camera and enable PTZ then click Ok.
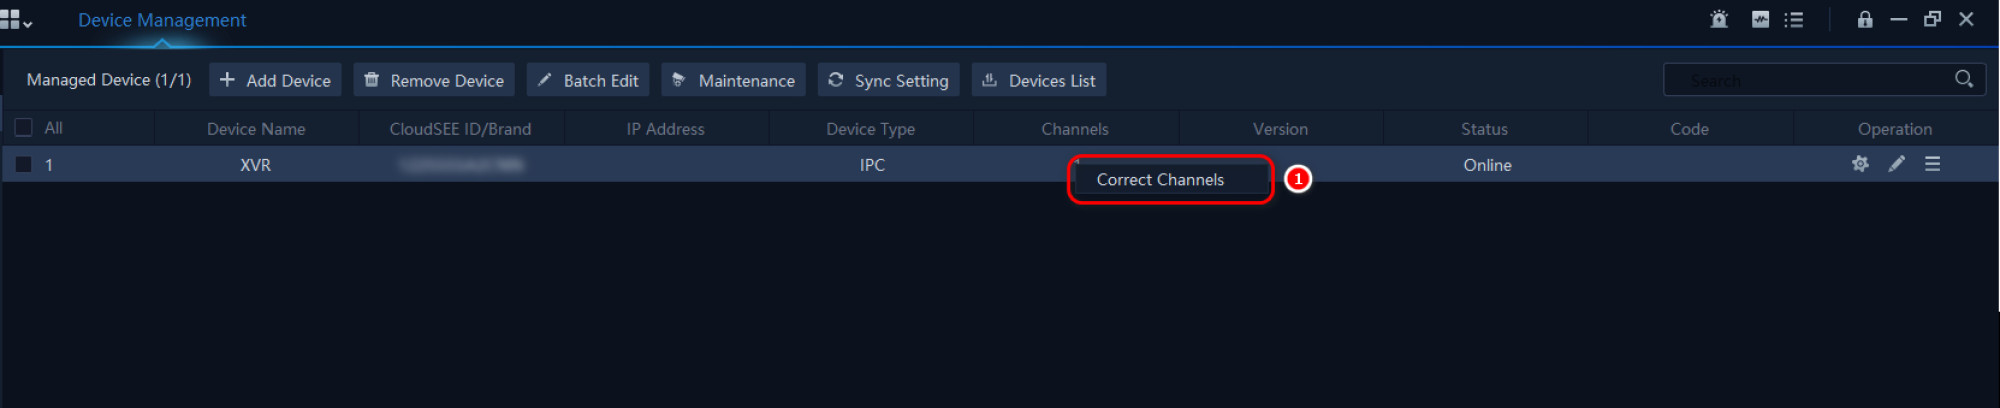
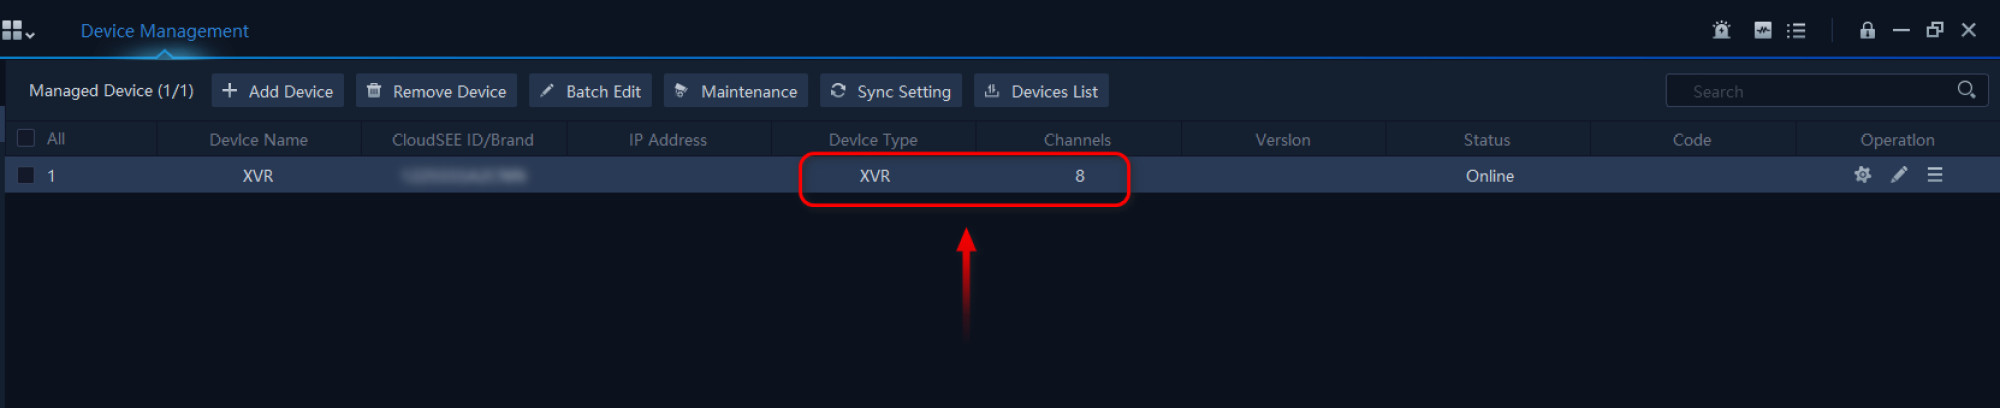
Some of the XVR models you need to manually correct it. For that, right click on the channel number and click “Correct Channel” option.
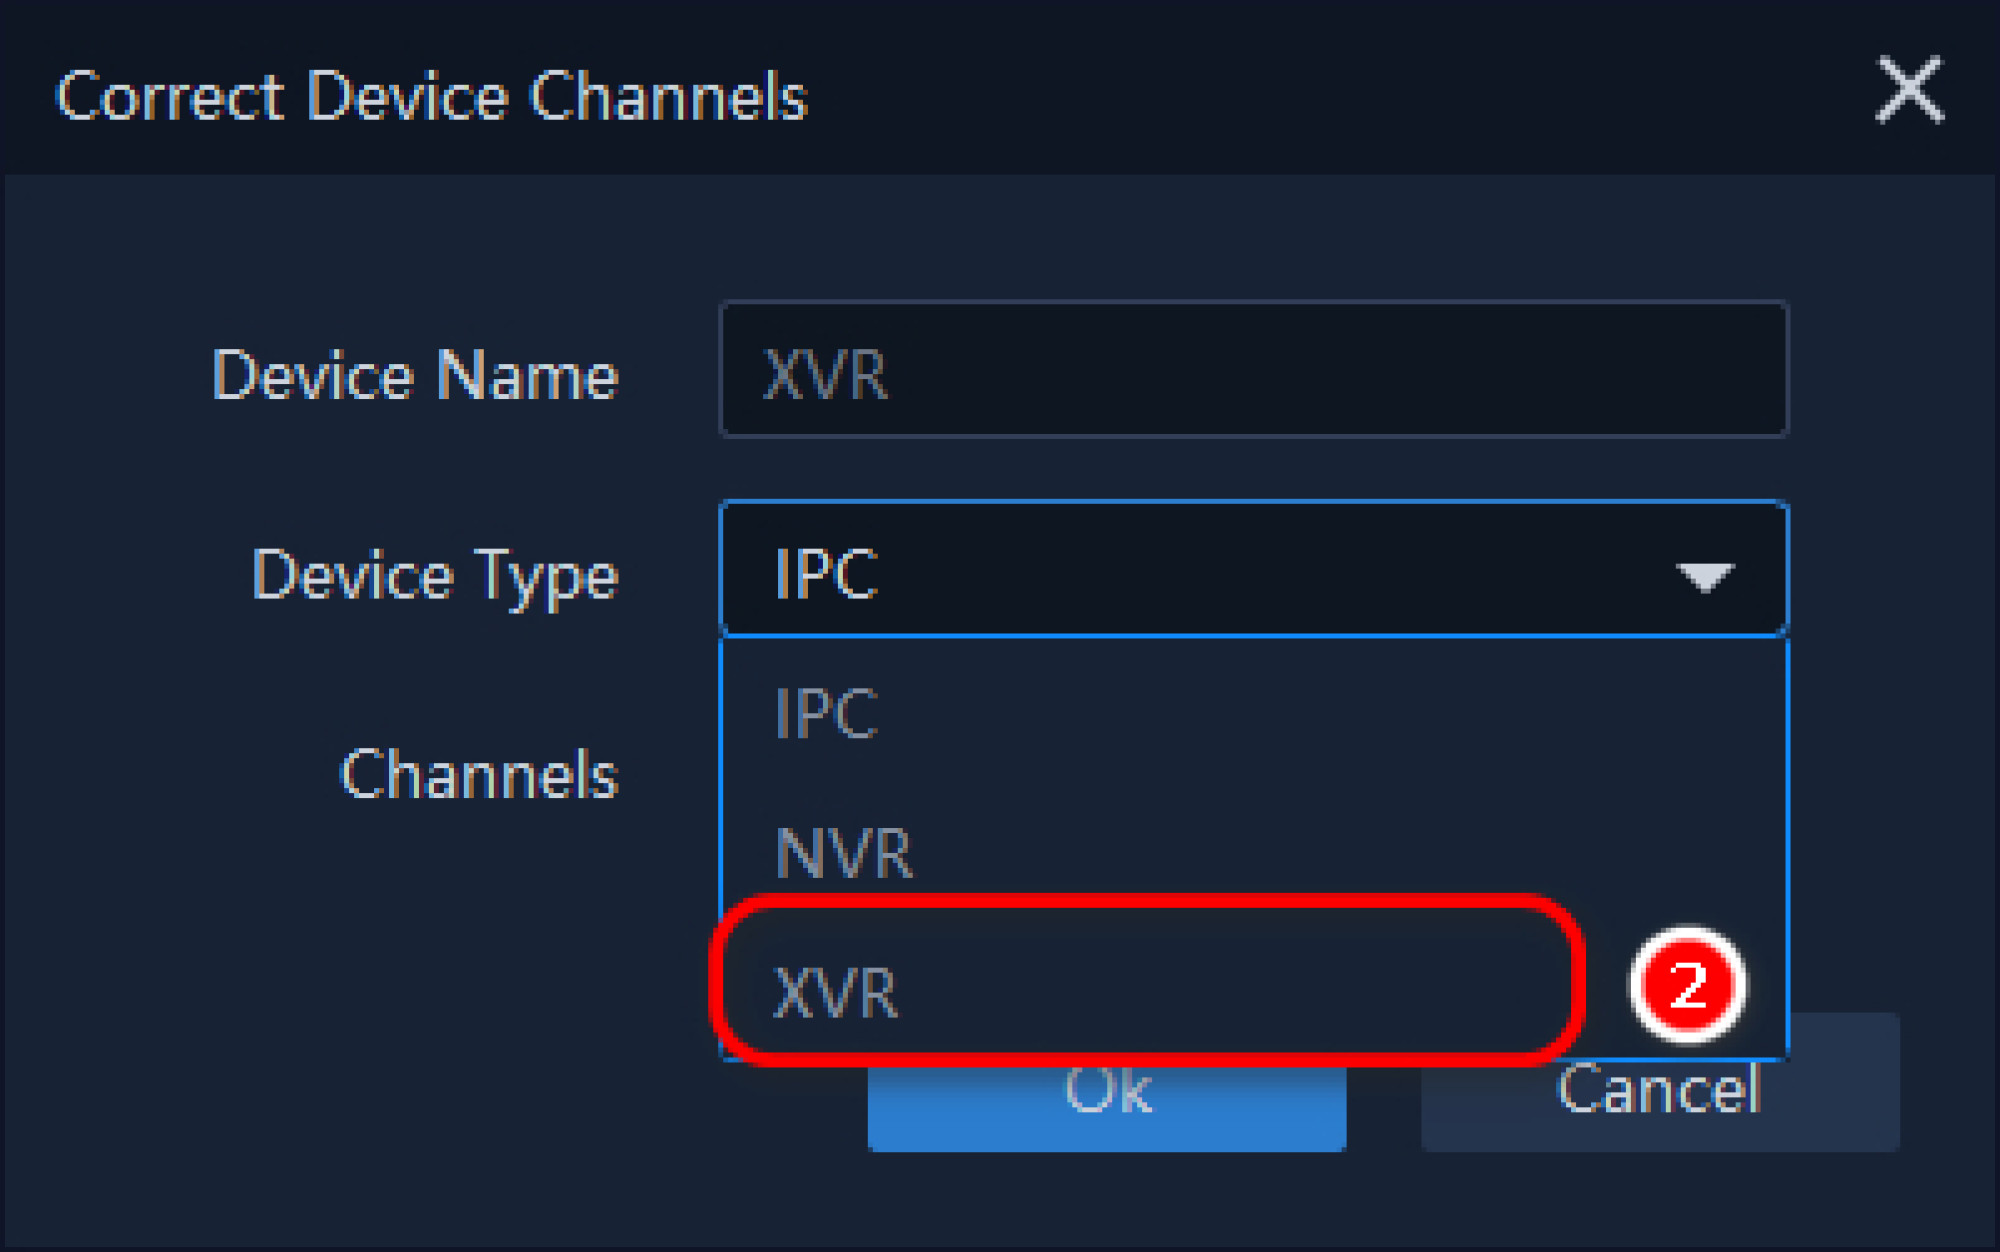
Select Device Type XVR then input Channel manually according to the XVR model channel count you are using.
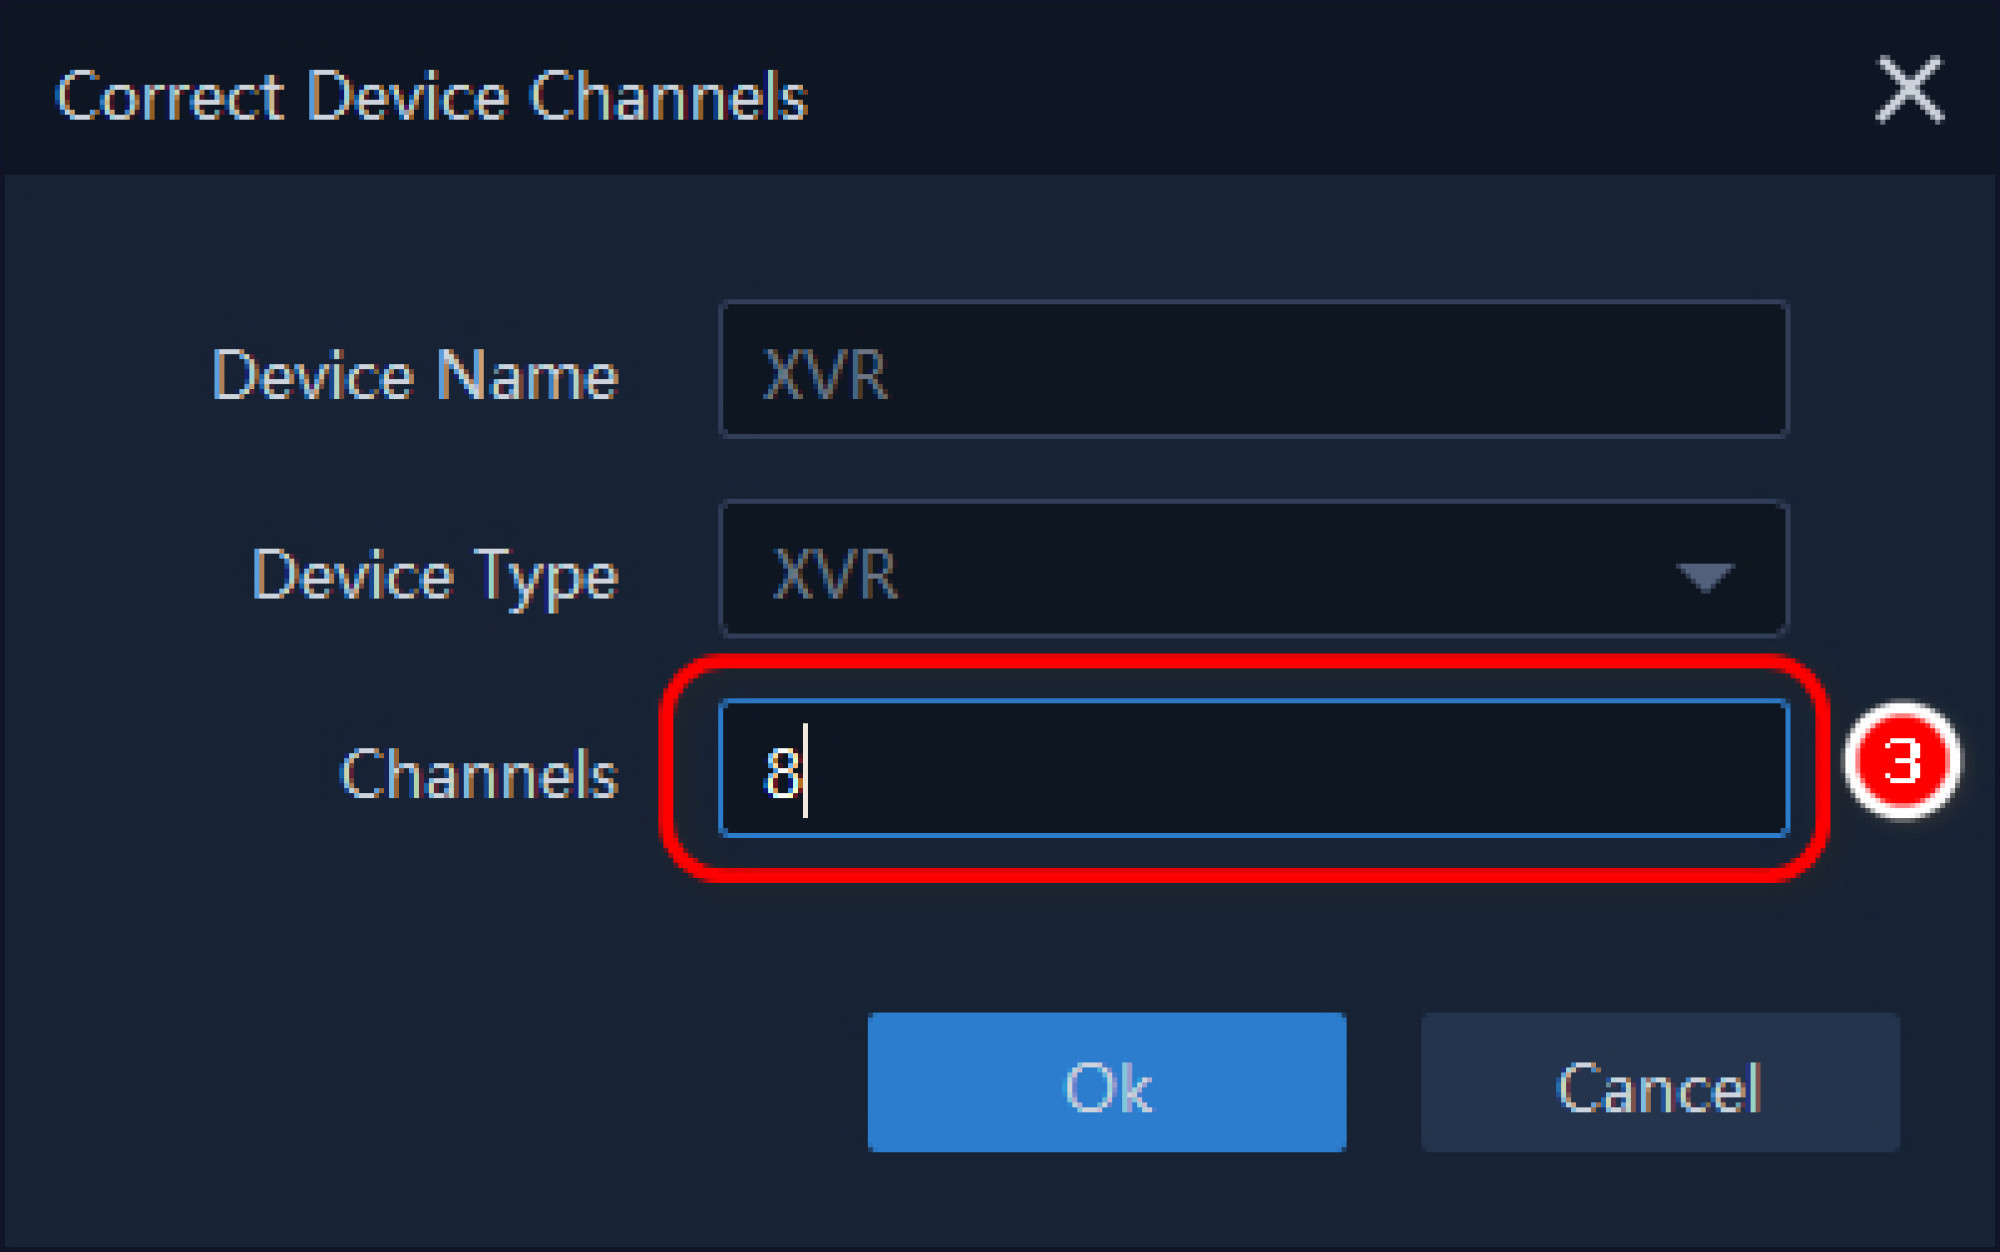
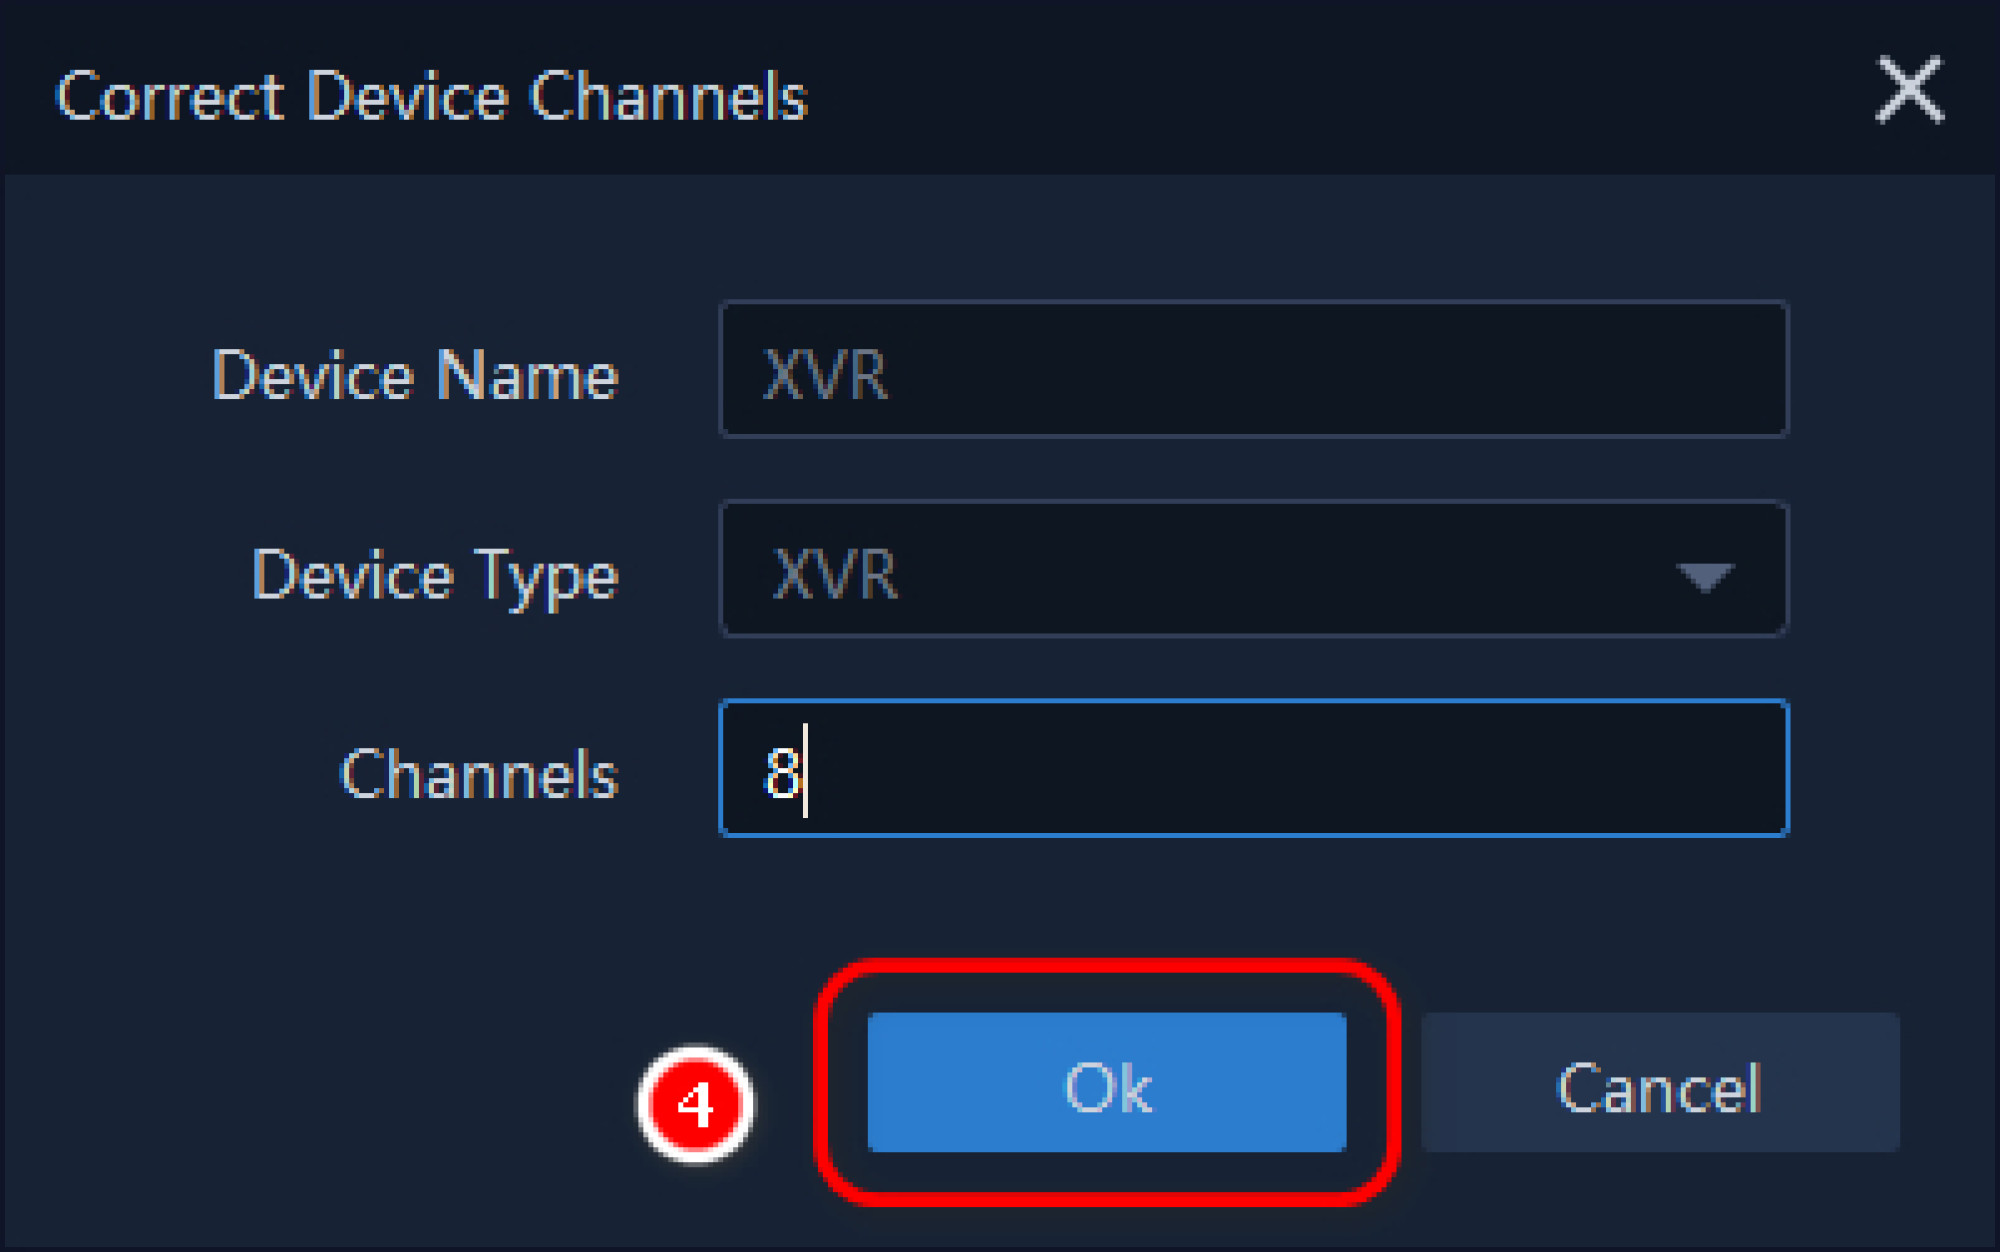
Click Ok to save the settings and you can see the XVR display normal.
Ans:
Download VMS-6100 from our official website.
https://www.jovisionsecurity.com/download.html
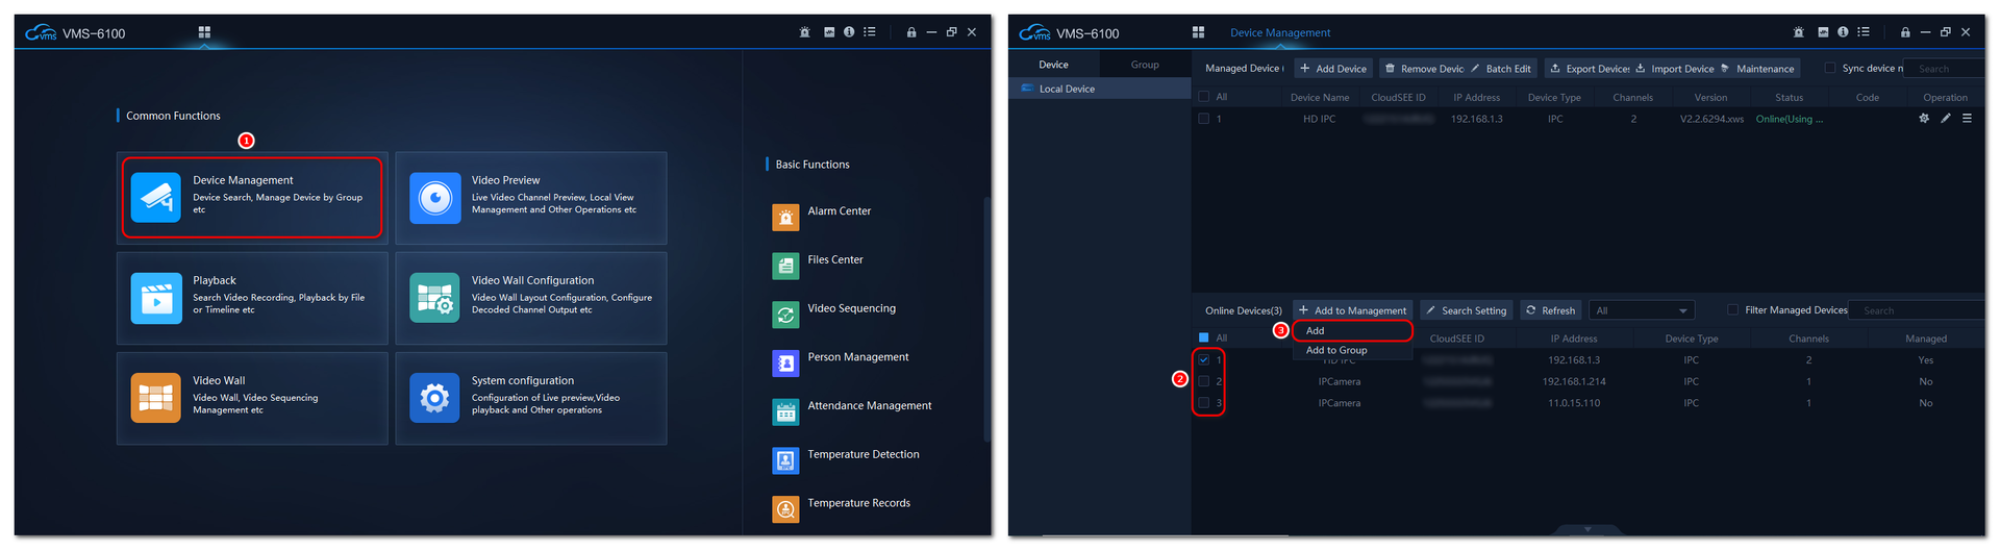
Install it into your PC. Go to Device Management and all the IP Cameras in the LAN will detect there. You can select the cameras you want to connect, Click Add to Management button. The IPC will be added to the Managed Devices list. The software will add the camera with default username and password. If you set your own password in the camera, click on edit button and input the correct password and save it.
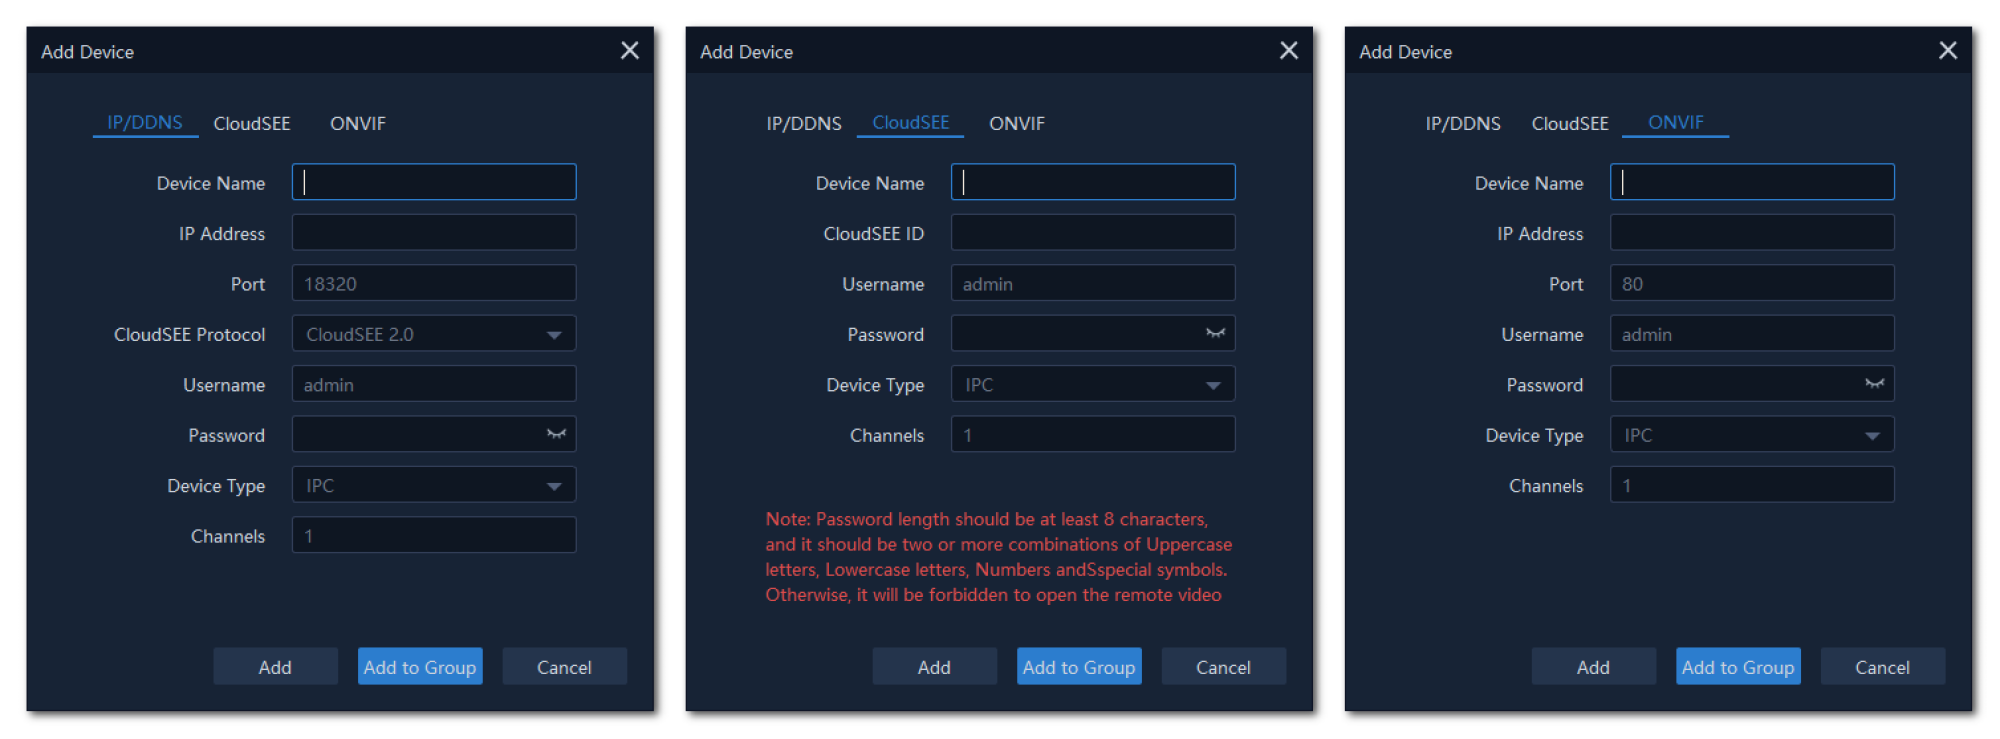
Also, you can add the devices manually by clicking Add Device button. There will be three ways to add devices. Add by IP or DDNS, add by CloudSEE ID or add by ONVIF Protocol.
Go to Home screen and click Video Preview. You can see the devices listed on the left side. Double Click the device or right click and chose the streaming method in HD or SD. The device will start previewing on the software.
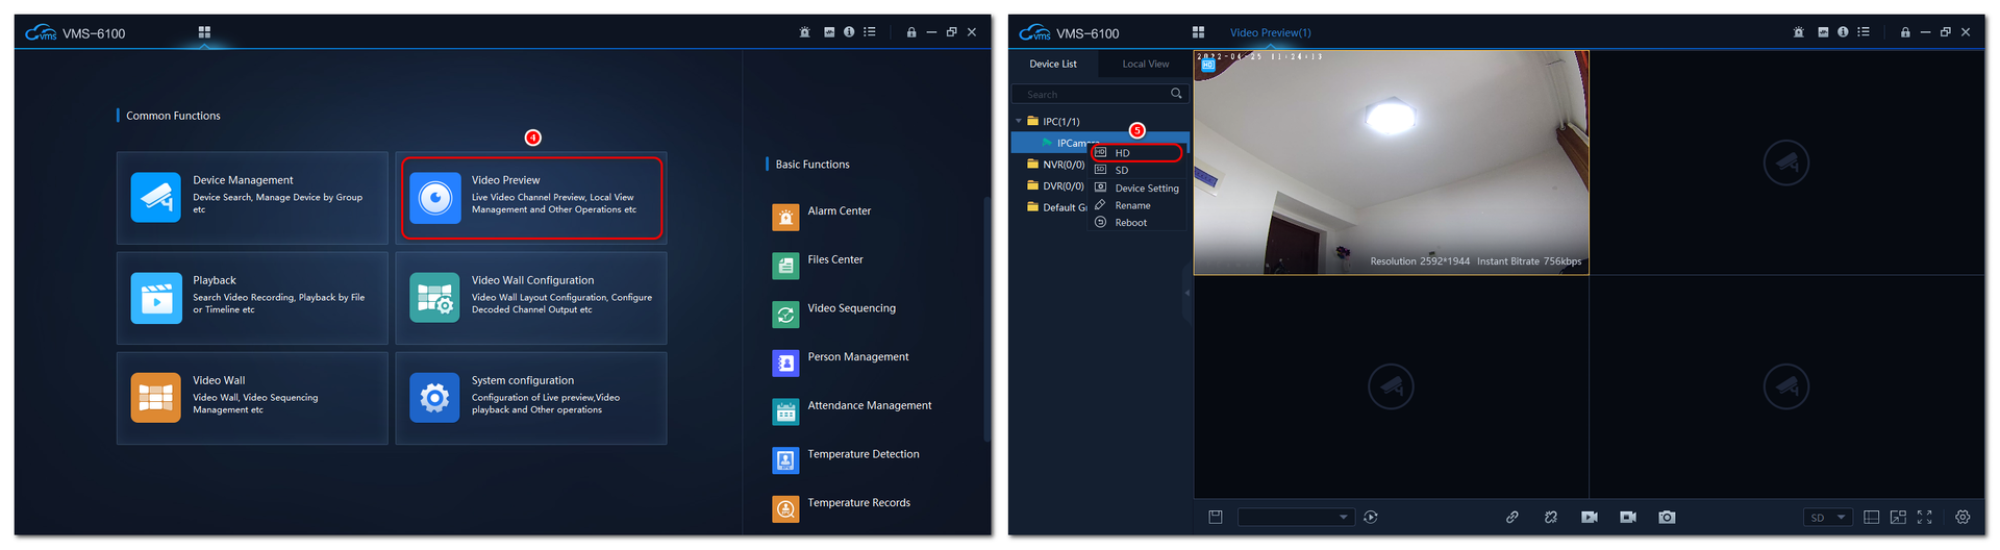
Note: You can use the same method to connect the NVR as well.
- Make sure the sender and recipient email address are correct.
- Check the SMTP server details you given according to email provider data. List of SMTP Servers (Click Here)
- Make sure you given the sender email password is app password generated from your account settings.
Here's a step-by-step guide on how to create an app password for a surveillance device email alert. (Gmail as example)
Step 1: Access 2-Step Verification
- Open your email and find the profile on the right-top corner.
- Click “Manage your Google Account”
- Click in the “Security” tab in the left-hand menu.
Step 2: Locate App Password
- Under “How you sign in to Google”, select 2-Step Verification. (If the status id OFF, turn it ON and follow on screen instructions.)
- After enable 2-step verification, scroll down to the bottom and click on “App Password”
Step 3: Choose App and Generate Password
- Click on the “Select app” drop-down menu and choose “Other” (Custom name)
- Enter a name for your app password, such as “Surveillance System”
- Click on the “Generate” button.
Step 4: Copy and Use App Password
- A 16-character app password will be generated. Copy this password and paste it into the appropriate field in your Surveillance System settings.
- Click on the "Done" button.
Step 5: Remember and Manage
- Your app password is now created and ready to use. Keep in mind that app passwords are only valid for the specific app or device you created them for.
- You can manage and create additional app passwords by returning to the "App passwords" section within 2-Step Verification settings.
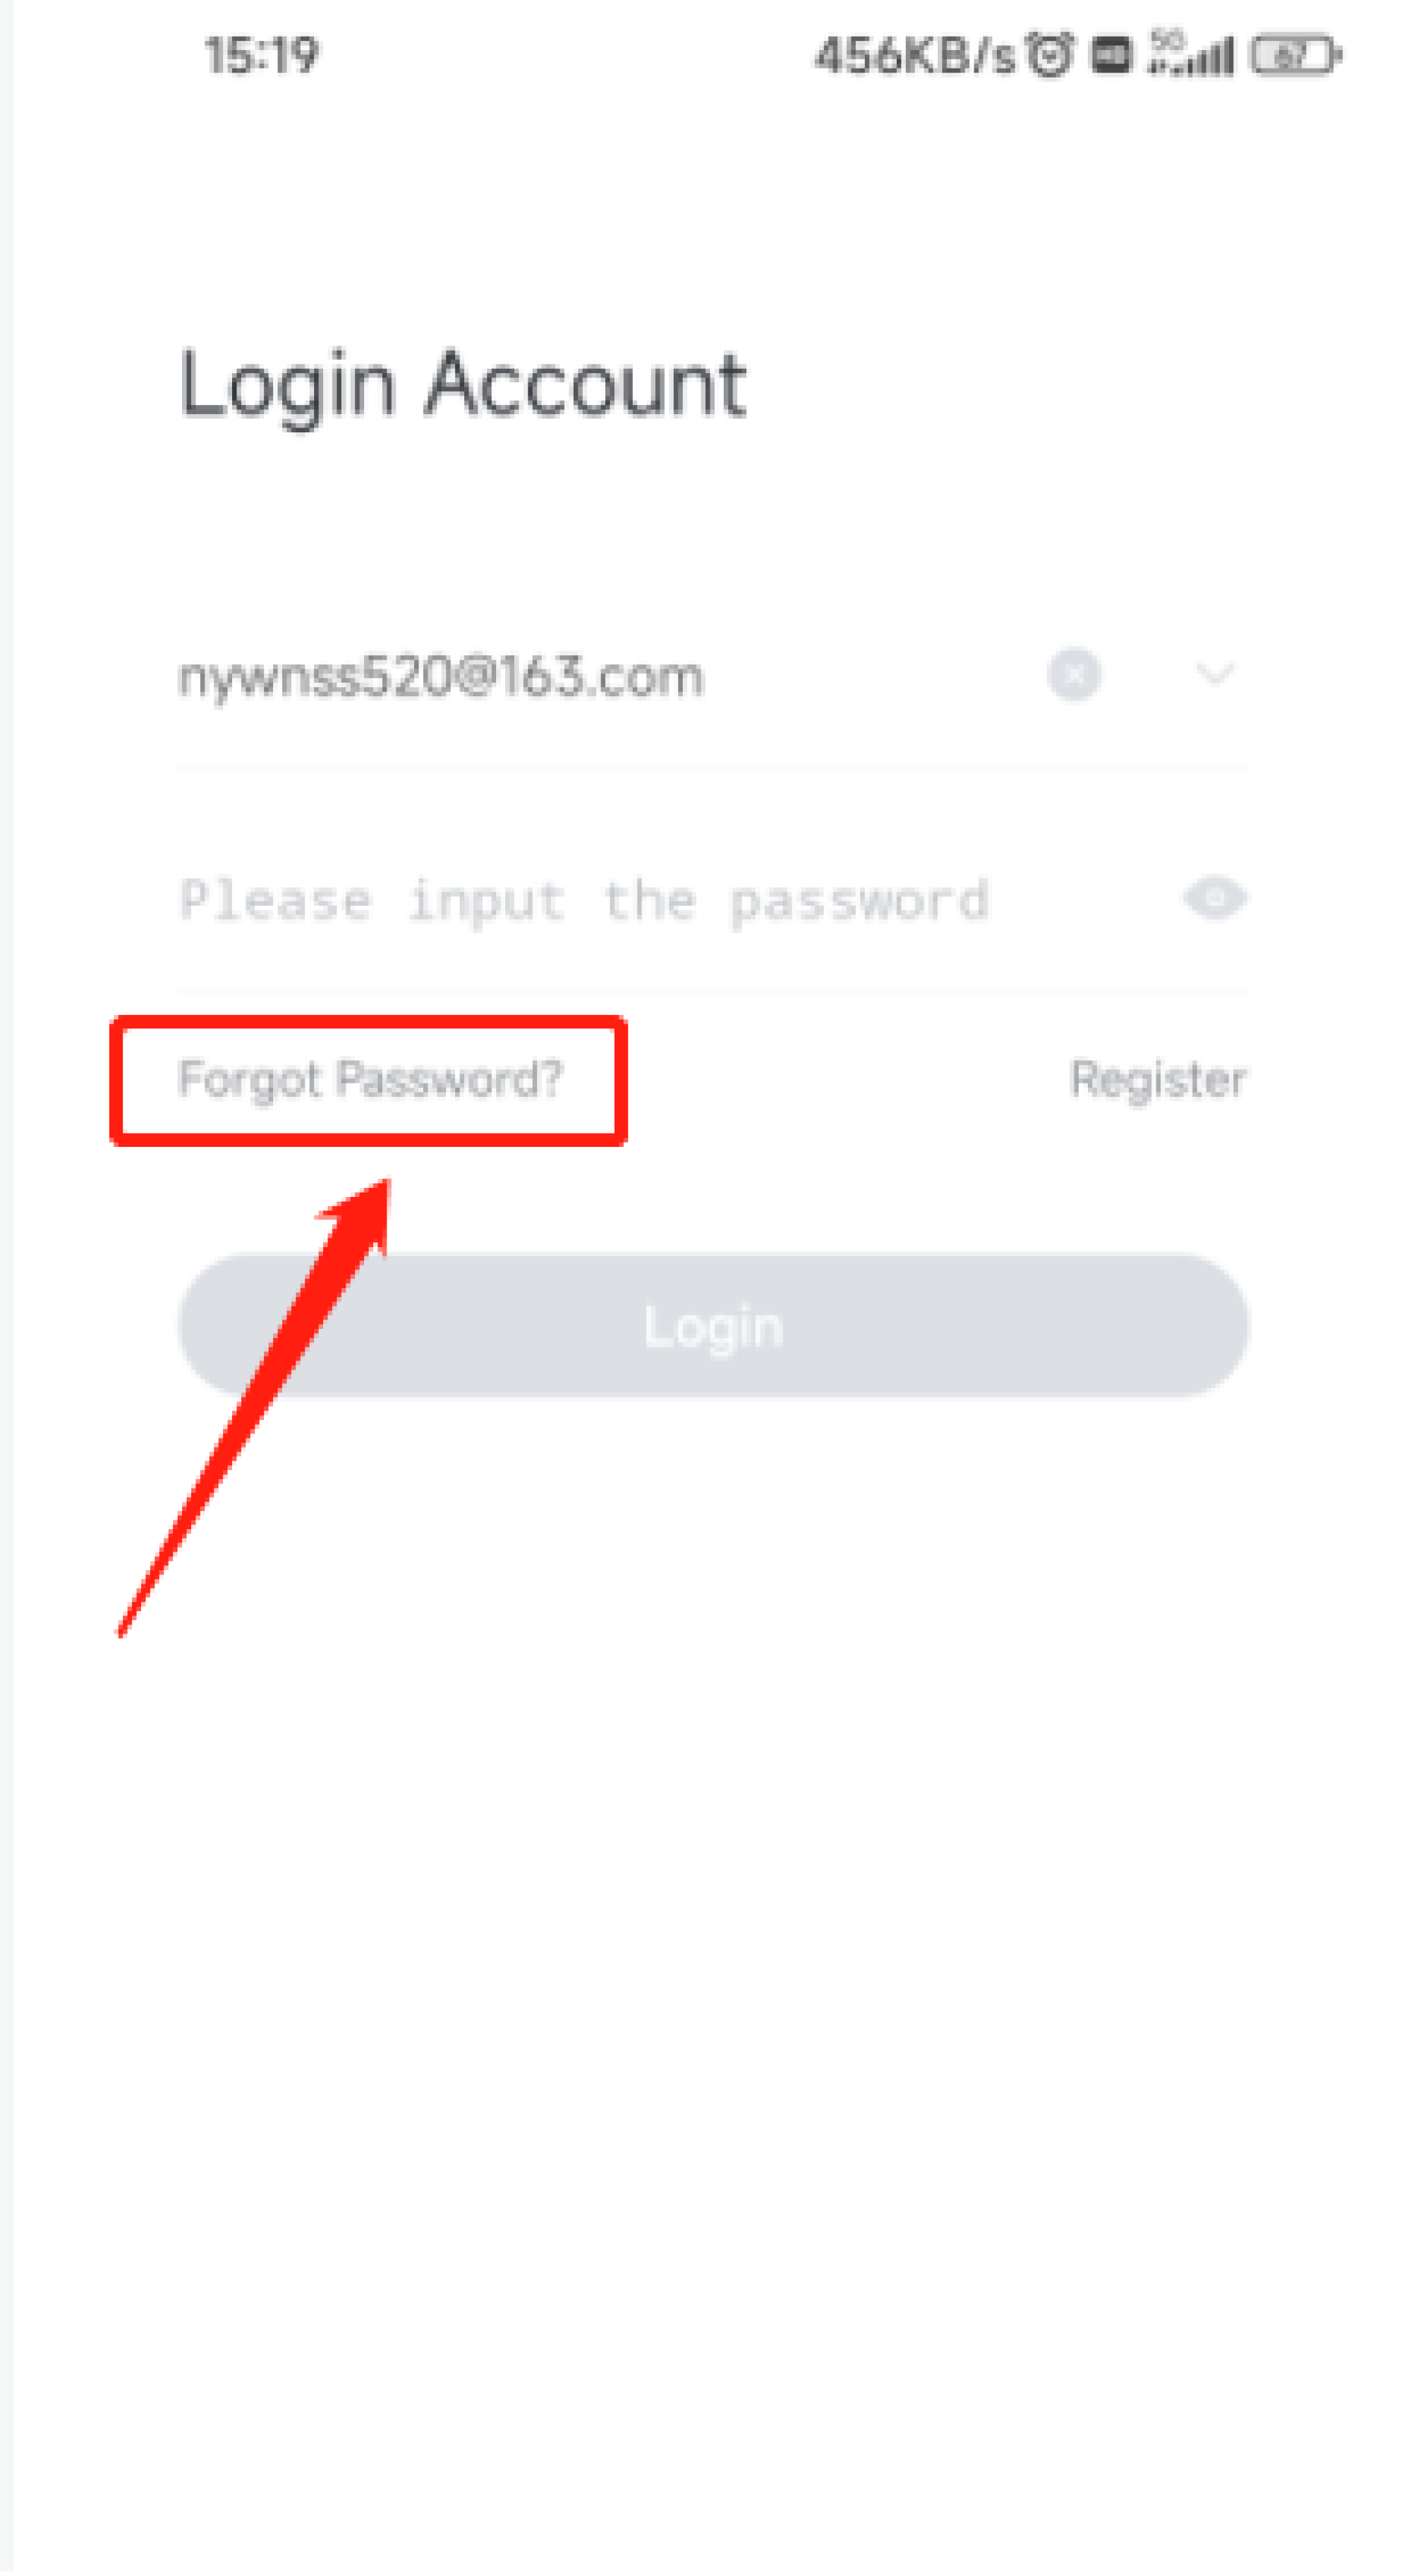
Please open App (CloudSEE Int’l Pro or SOOVVI Int’l). Tap Forgot Password on the login screen as below picture. Then follow the screen instructions to reset the password.
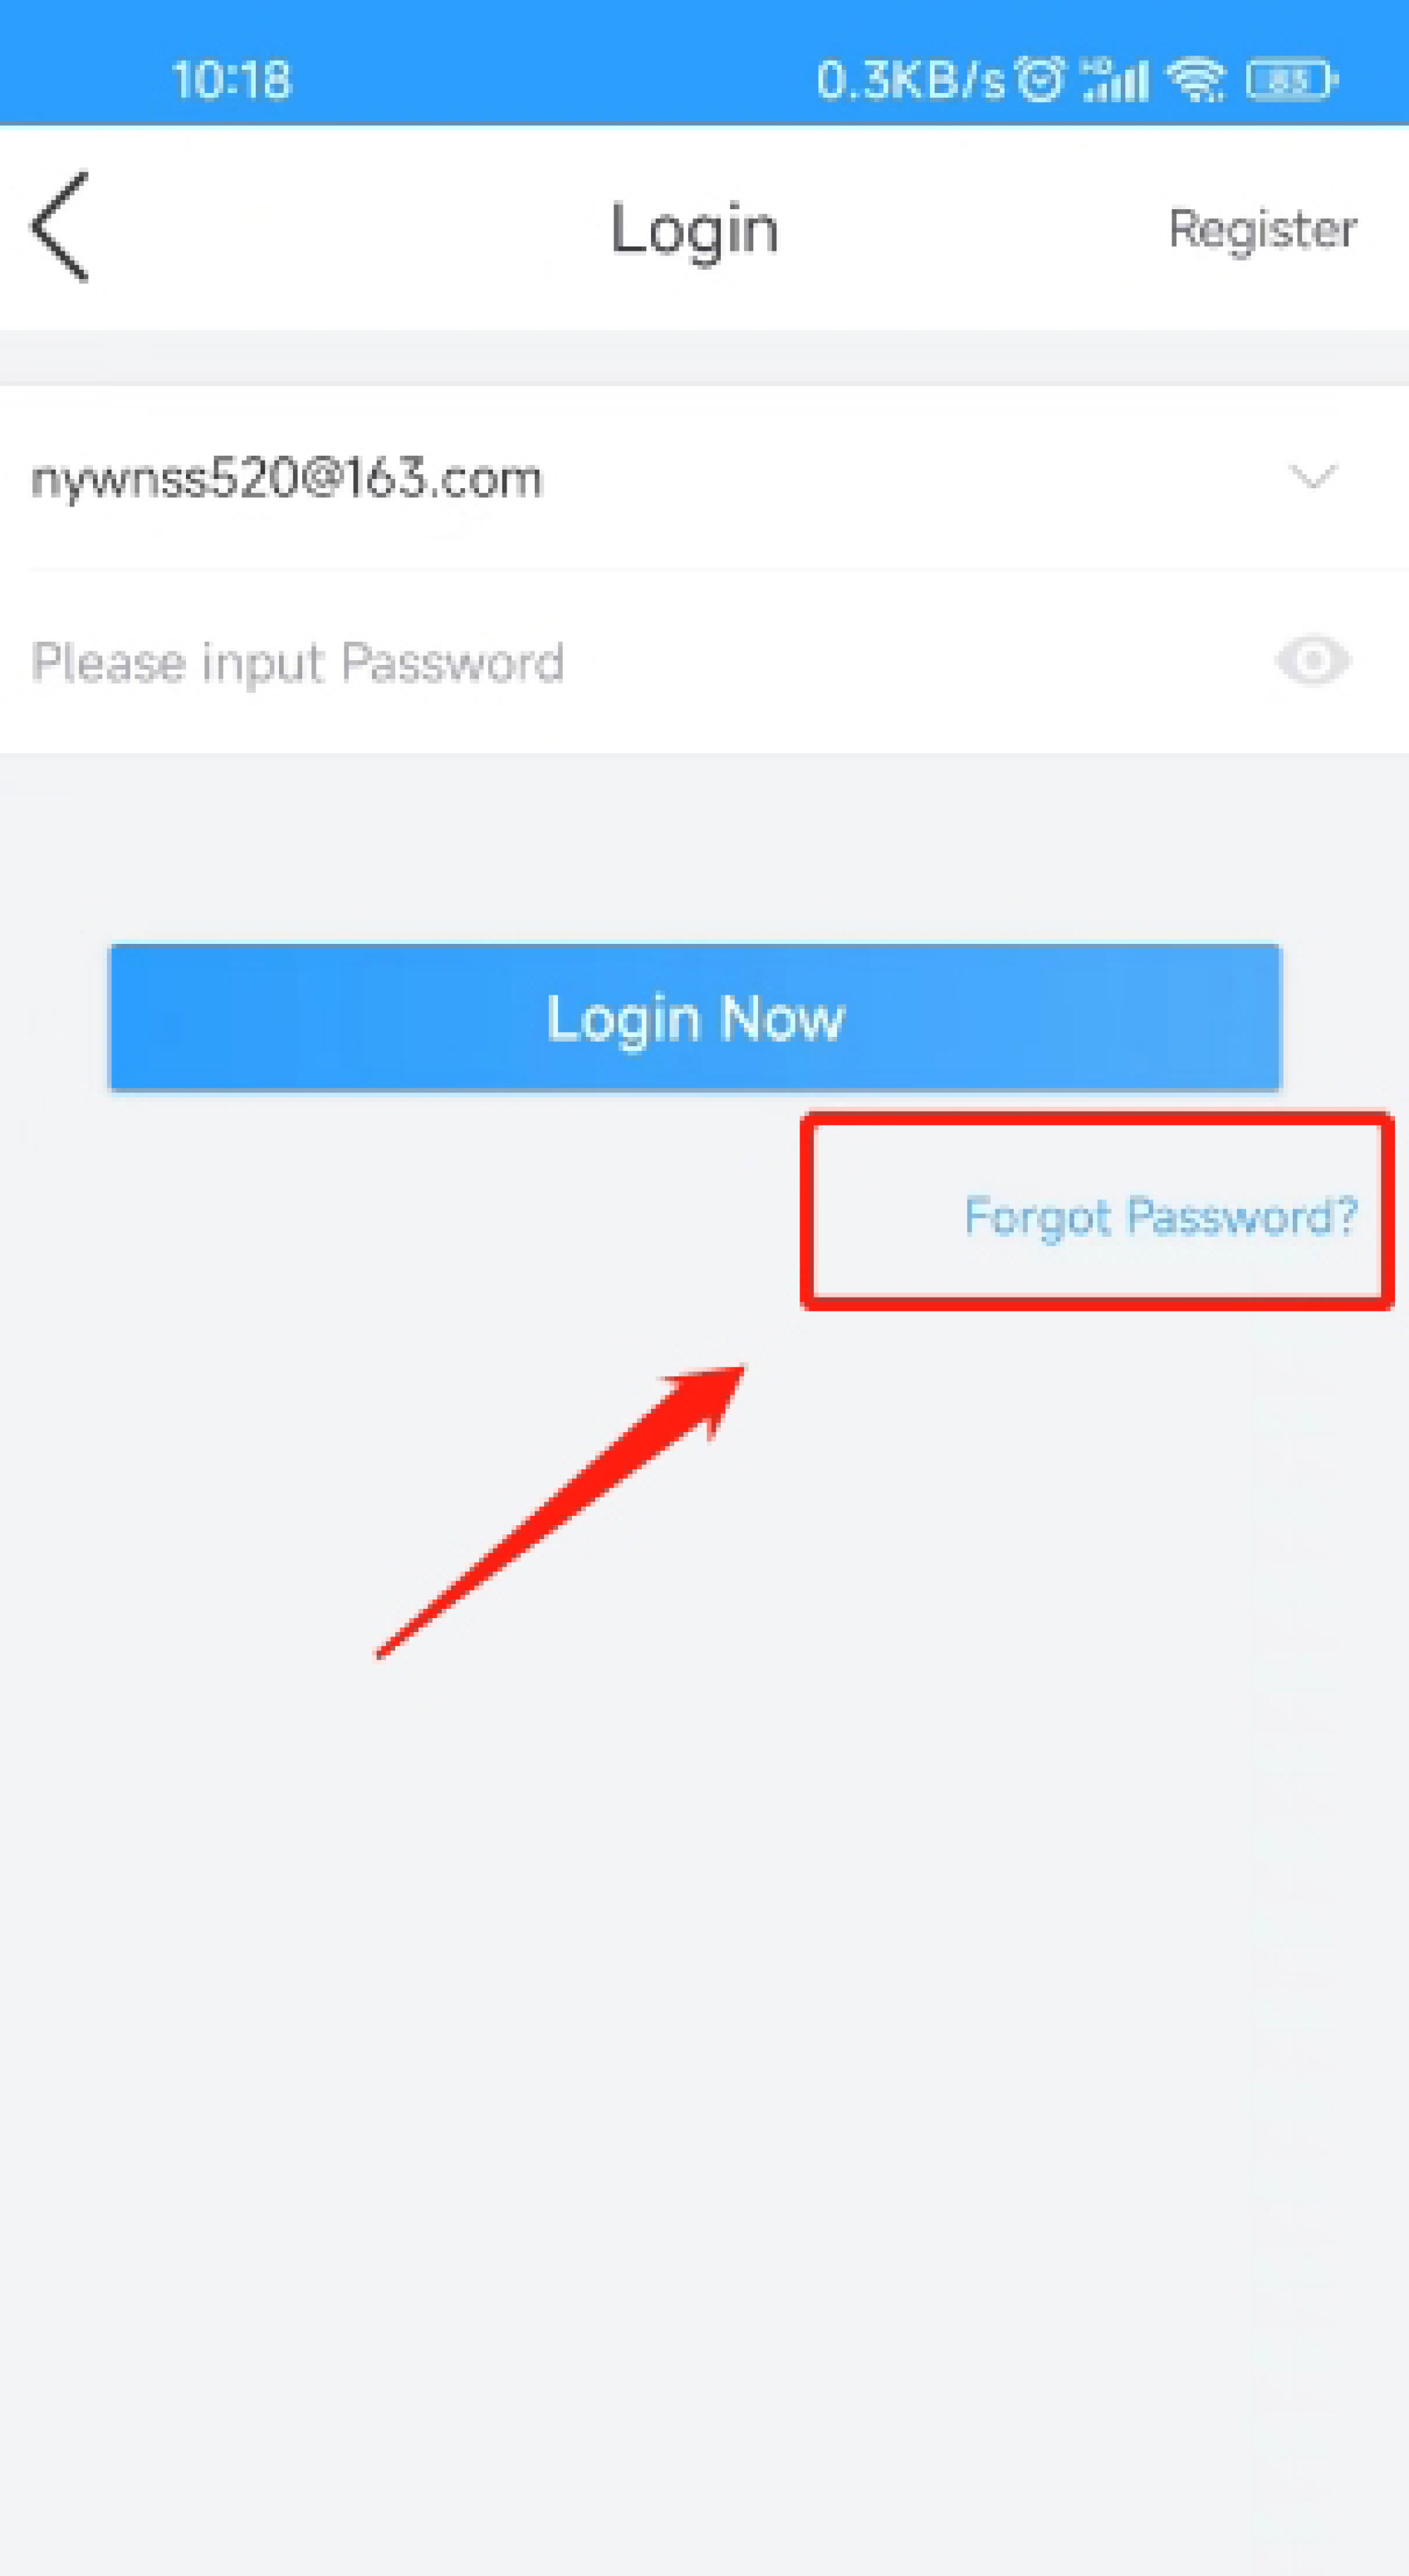 .
. 
Unfortunately, you cannot unbind the device by yourself. Please send the device CloudSEE ID to support@jovision.com. We shall unbind it from the account server then you can try to add device again. Please note that when we unbind the CloudSEE ID from the server, the device will be removed from all the added accounts.
Ans:
1.IPC ClooudSEE2.0
Access the IPC web interface. Login with username and password. Go to Network then Advanced. Input the Sender Email, SMTP Server, Username, password, SMTP Port, Encryption and Recipient Email addresses. Once you input all these information, agree privacy statement then click Test Email button. If the settings are correct, you will receive a success notification.
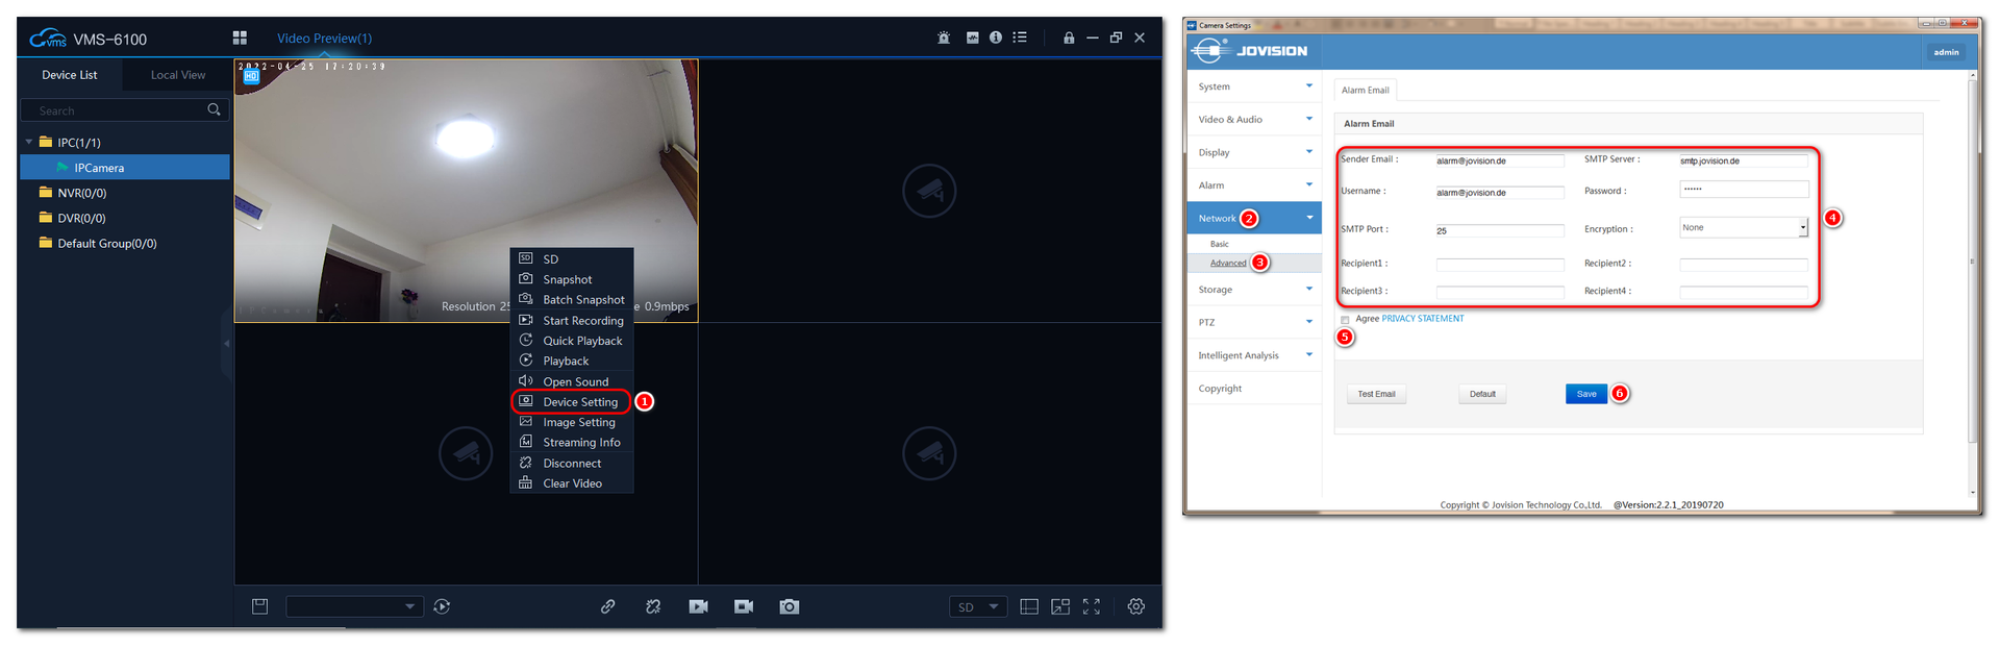
2.IPC CloudSEE1.0
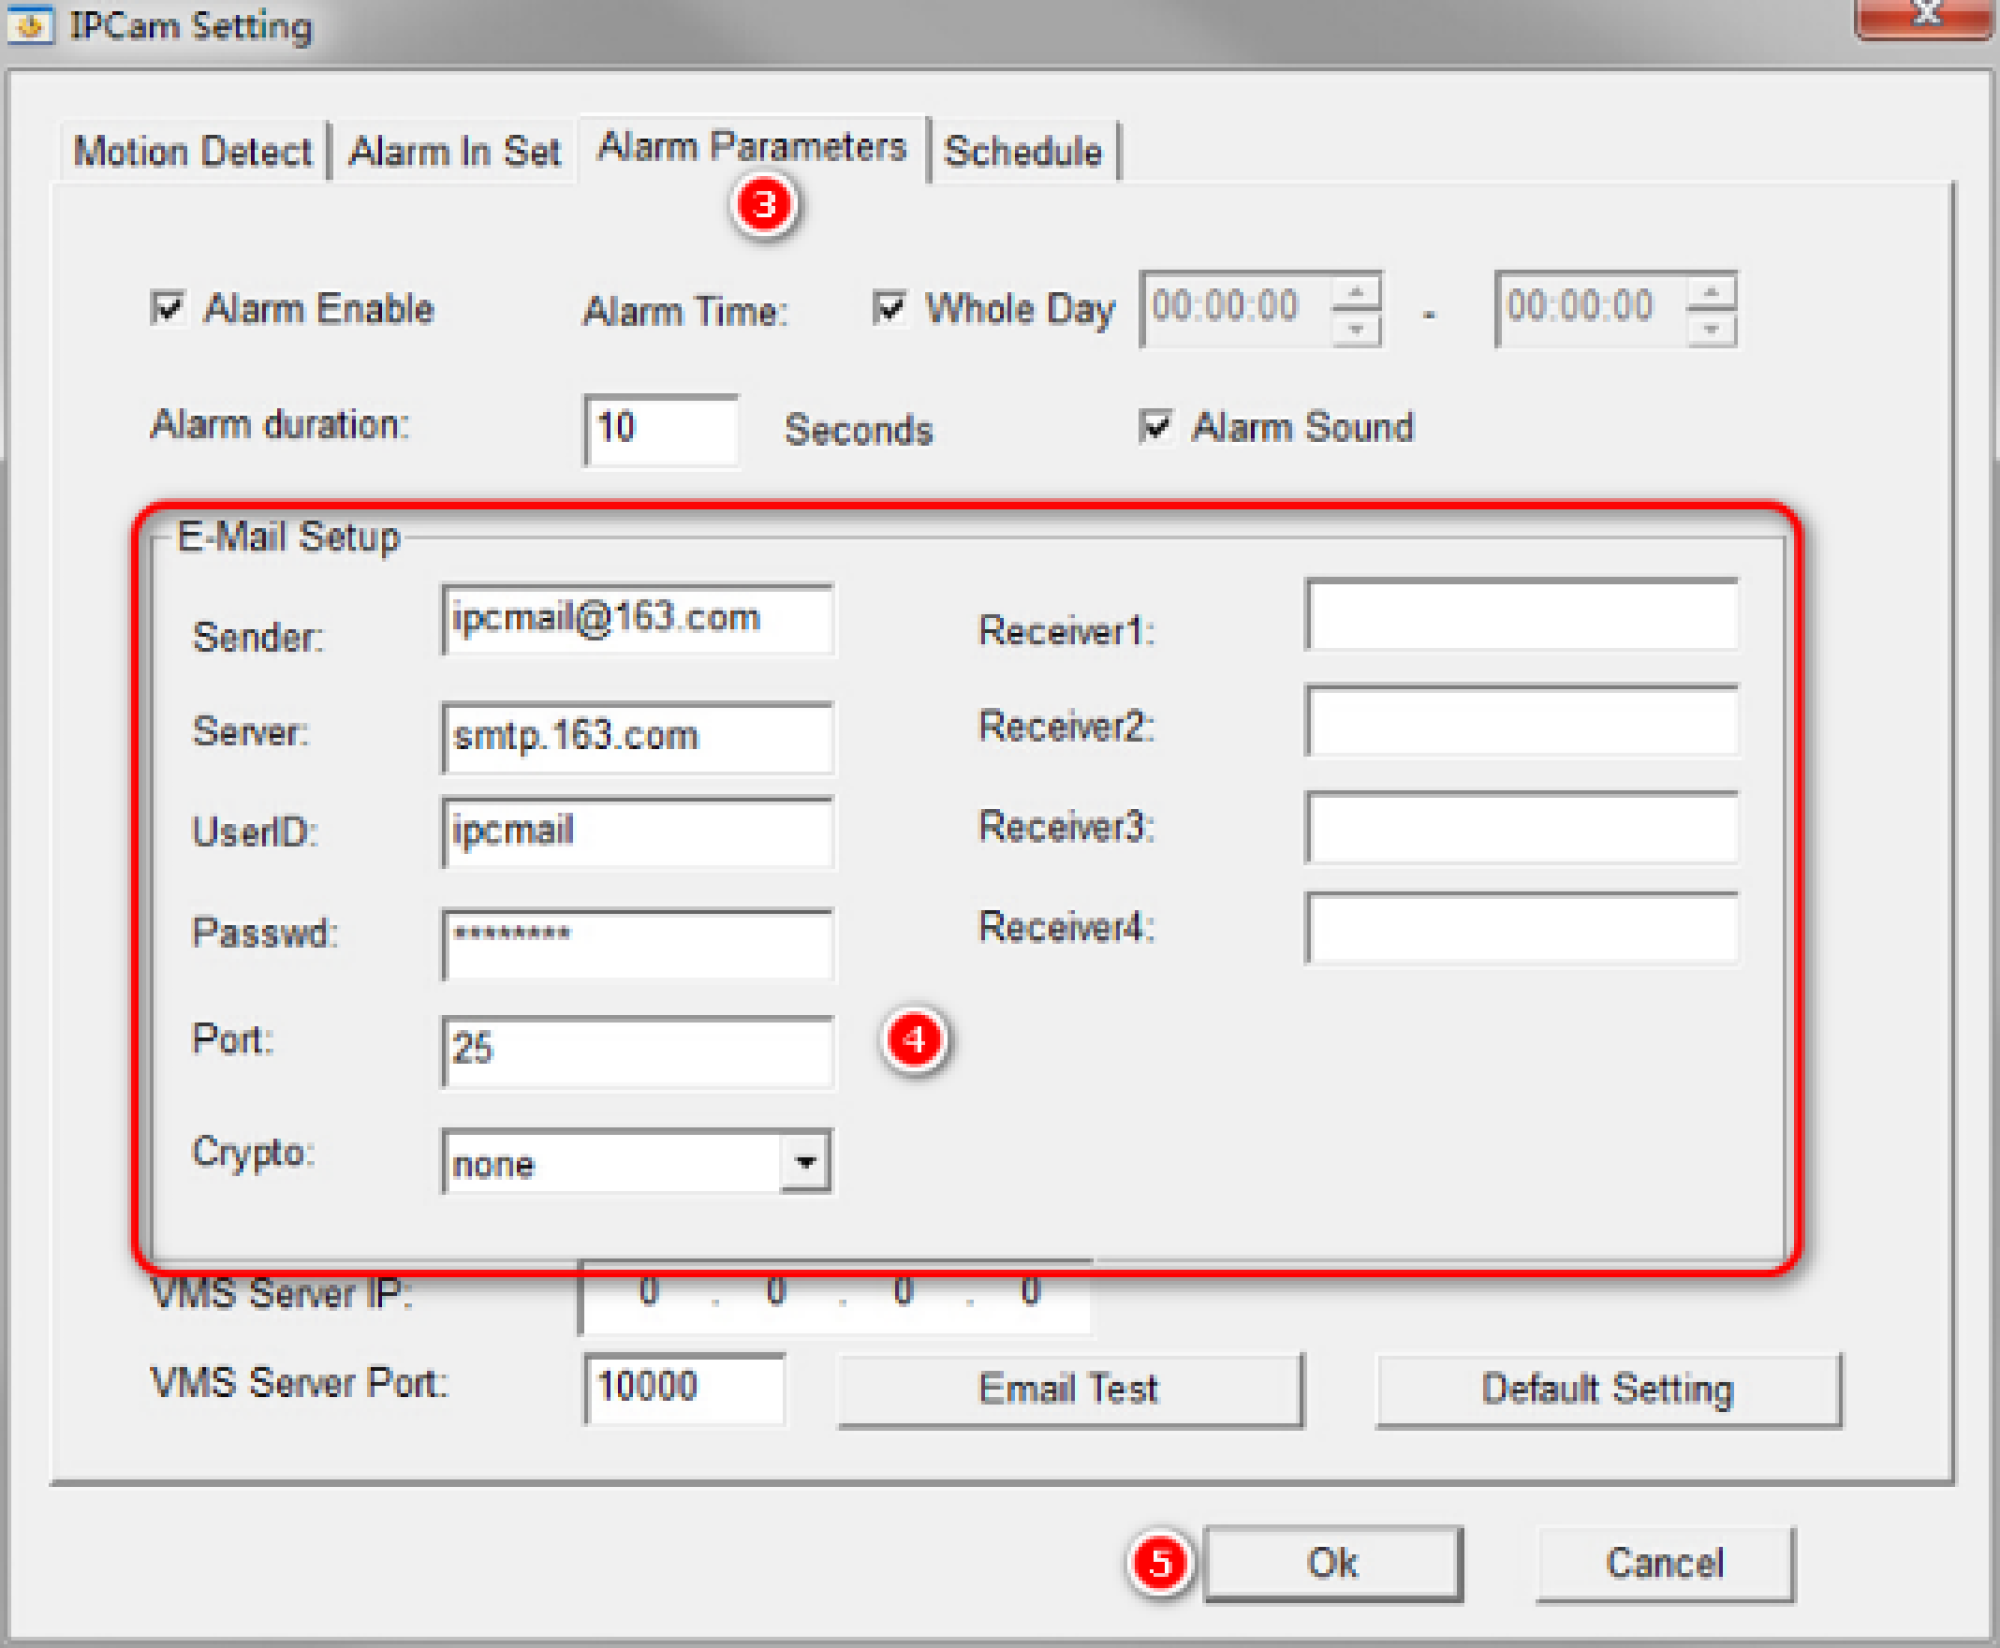
Access the IPC by Internet Explorer. Login with username and password. Click on System Config on the top of the main page, the IPC menu will open. (Please make sure you install the Web plugin and enabled the ActiveX controls.) Or access the IPC settings by clicking the Remote Setup in the VMS-6100 to access the IPC menu, the IPC menu will open. Click Alarm button and then click Alarm Parameter tab. Tick Alarm Enable and then input the Sender Email, SMTP Server, Username, password, SMTP Port, Encryption and Recipient Email addresses. Once you input all these information, click Email Test button. If the settings are correct, you will receive a success notification.
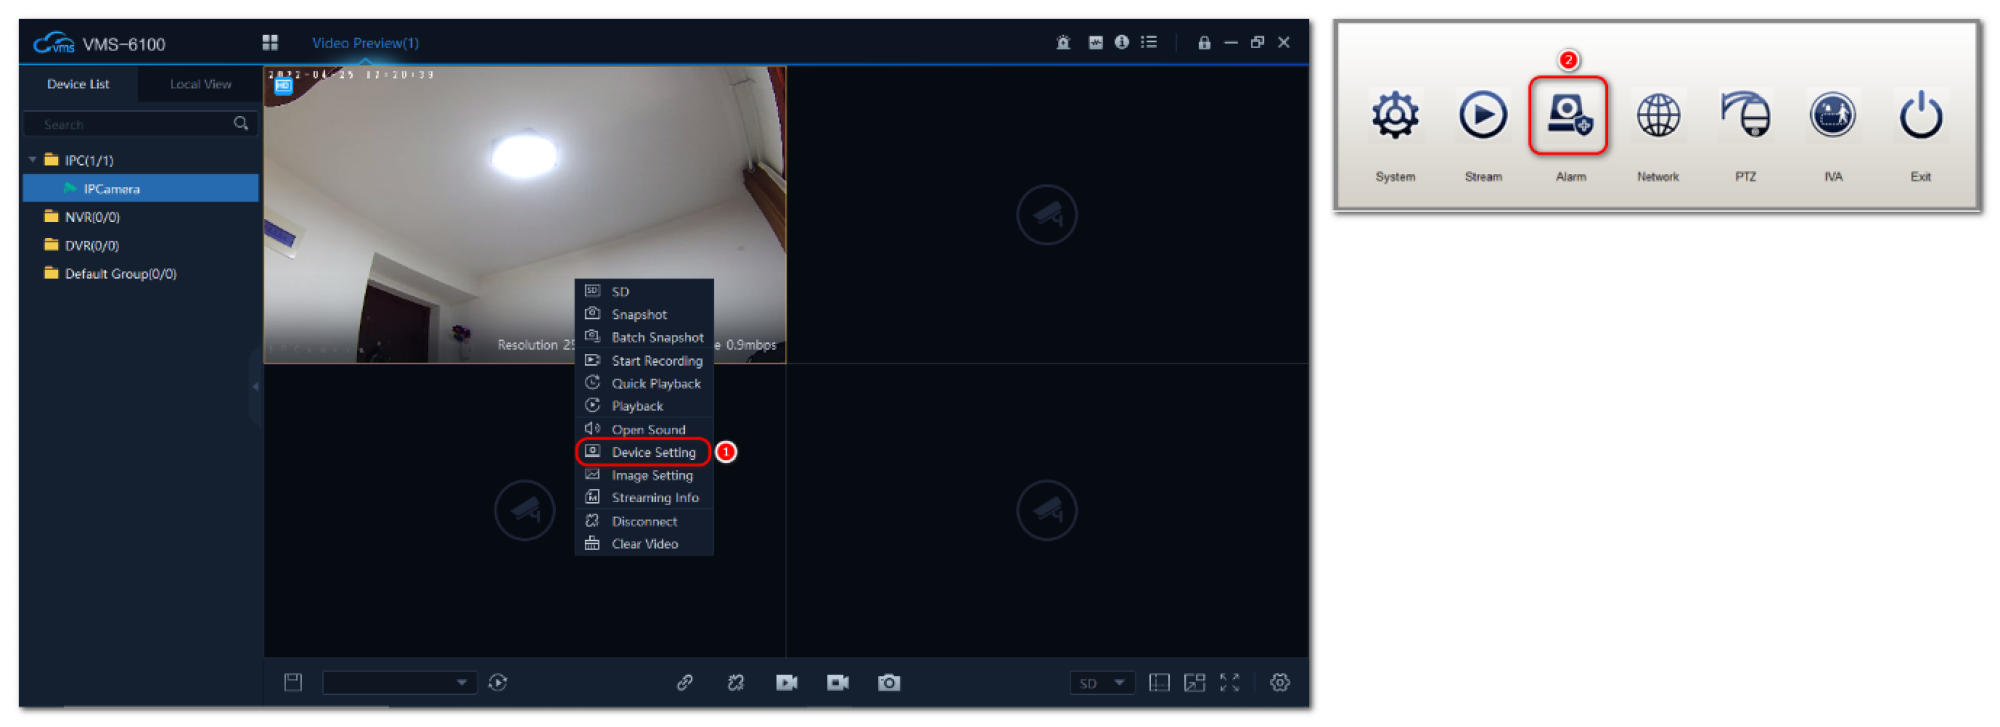
3.NVR CloudSEE2.0
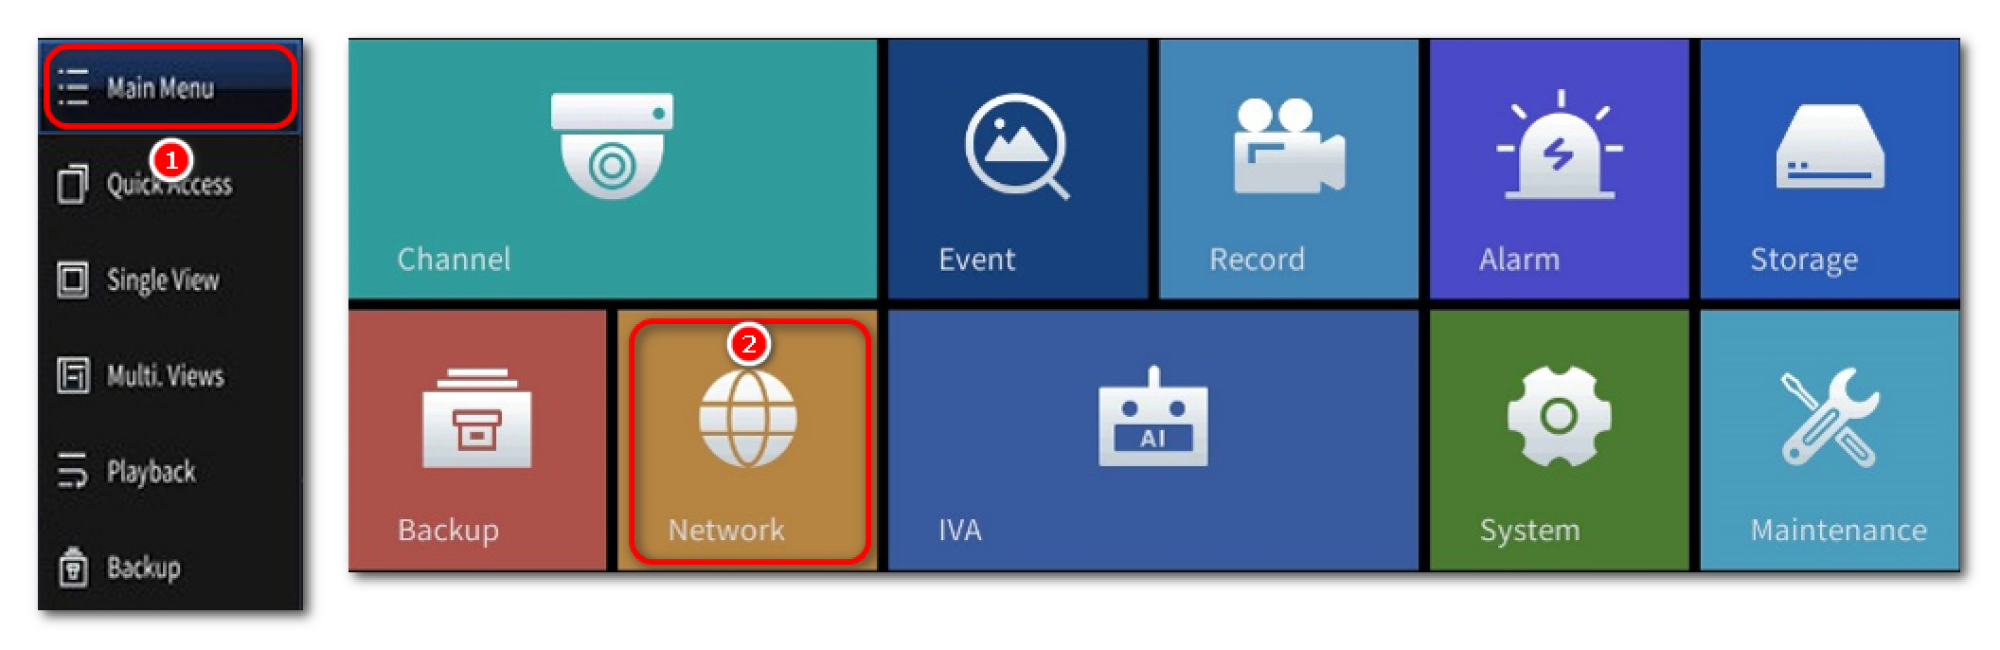
Right click on the video preview screen and select Main Menu. Login with username and password. Then click Network icon.
Click Email and input all the necessary information and then click the icon under Test. If the settings are correct, you will receive a success notification.
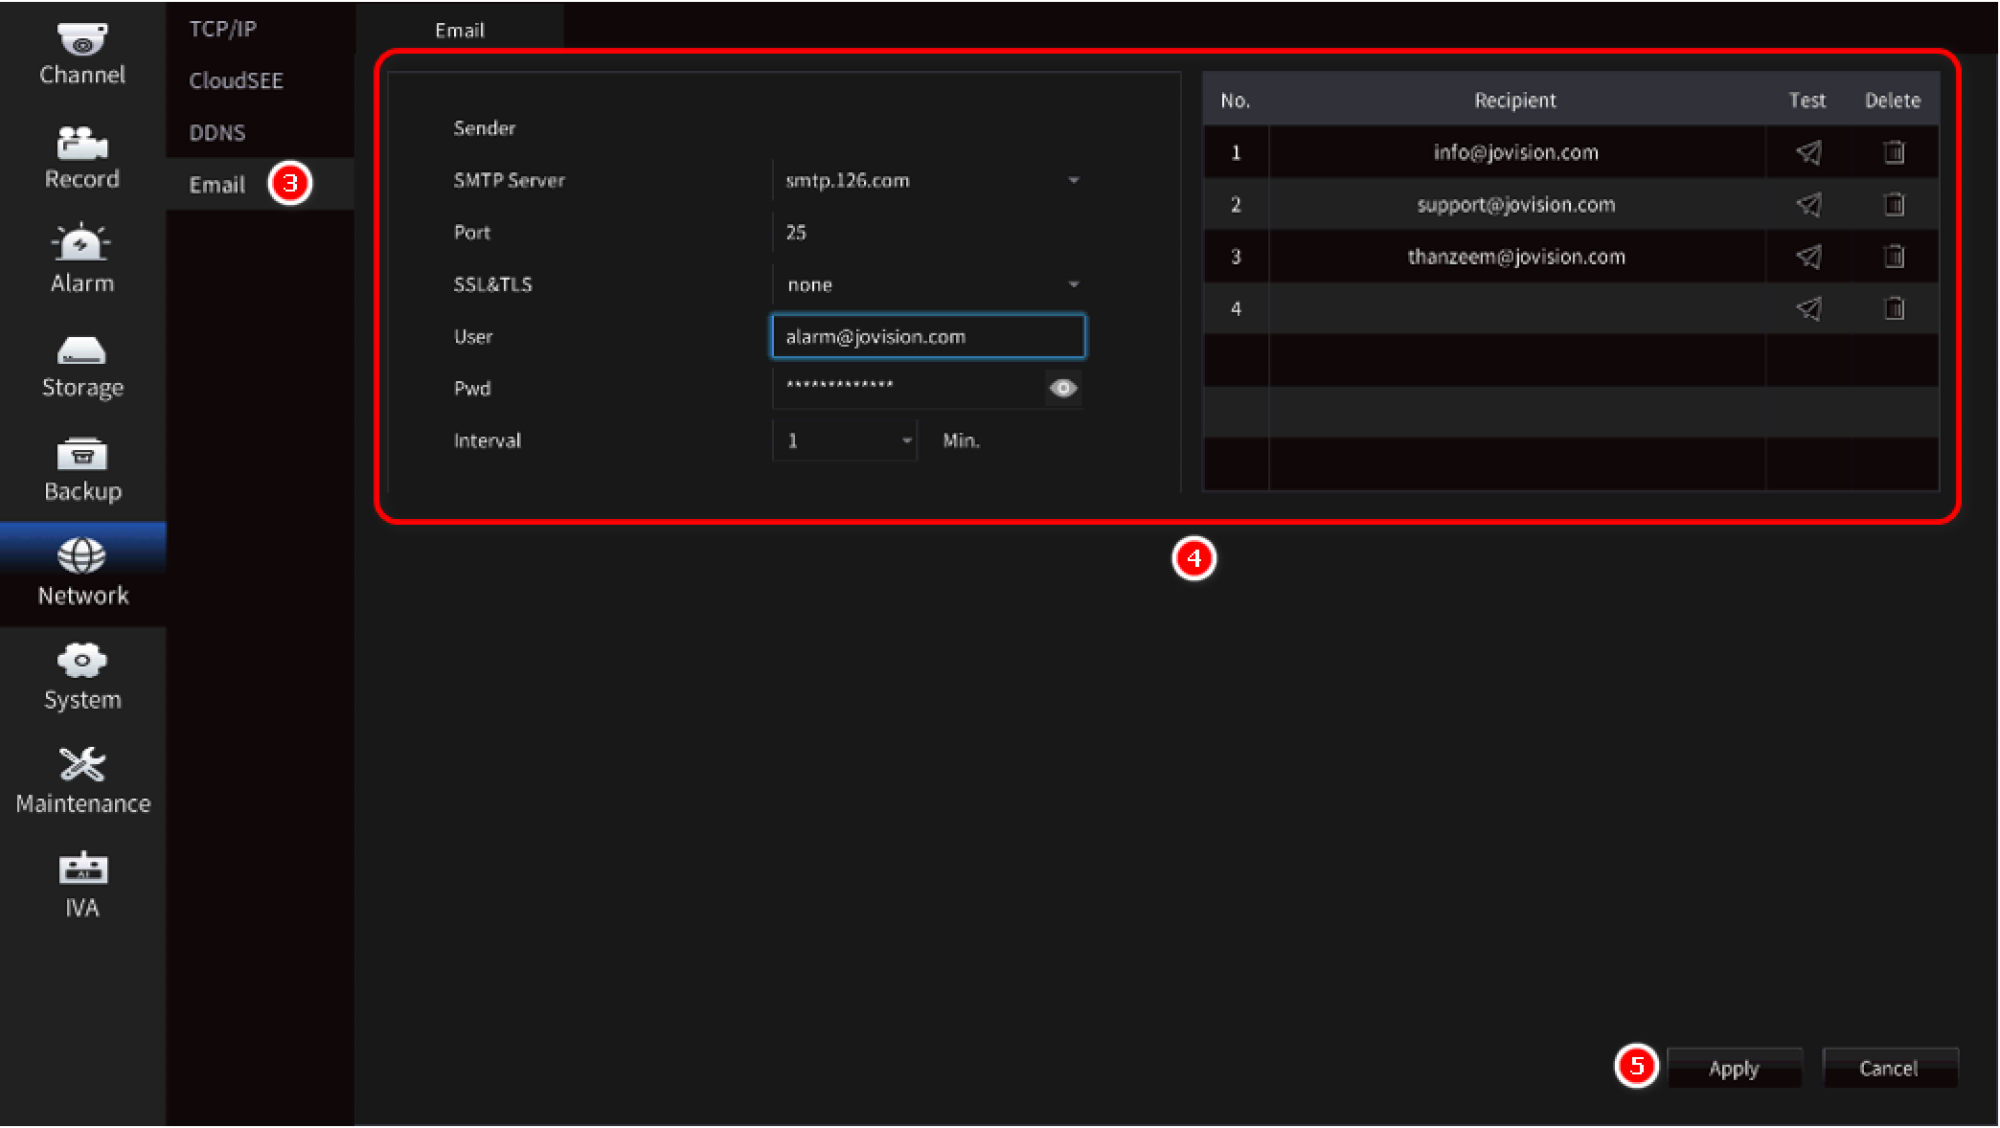
For SMTP information, you should check the email provider website. Each email providers SMTP server information is different. For the sender email password, you cannot use your own email password. You should create App Password in your account settings. Your email provider generate a random password and you should use that password in the device. For more information, please visit your email service provider website.
4.NVR CloudSEE1.0
Right click on the video preview screen and select System Setup. Login with username and password. Then click Alarm and then Email. Input all the necessary information and then click Mail Testing button. If the settings are correct, you will receive a success notification.
Preparation Before Adding a Device
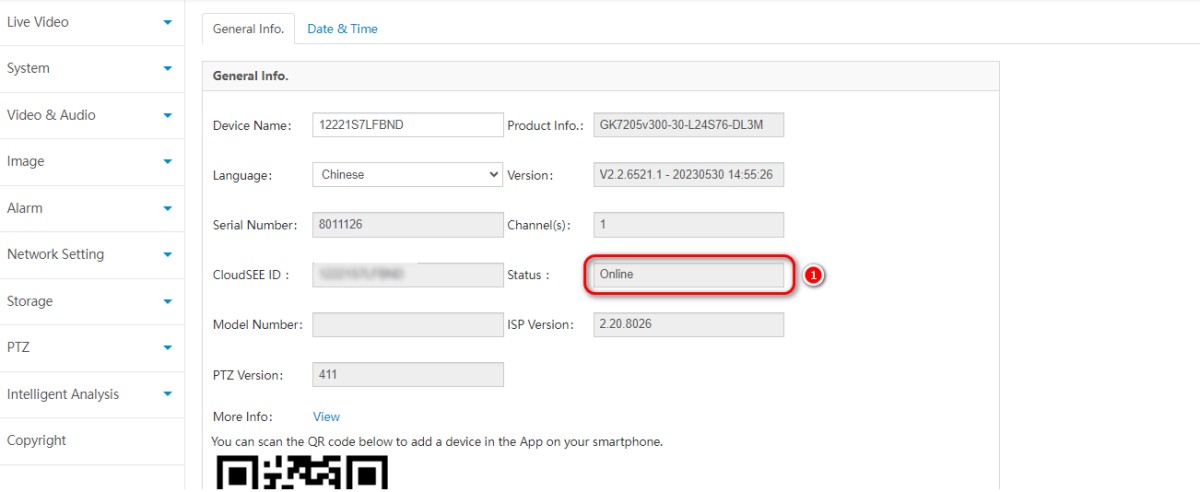
1. Ensure the device is connected to the Internet. Check the CloudSee status on the device home page:
Online: Connection completed
Offline: Check the network connection
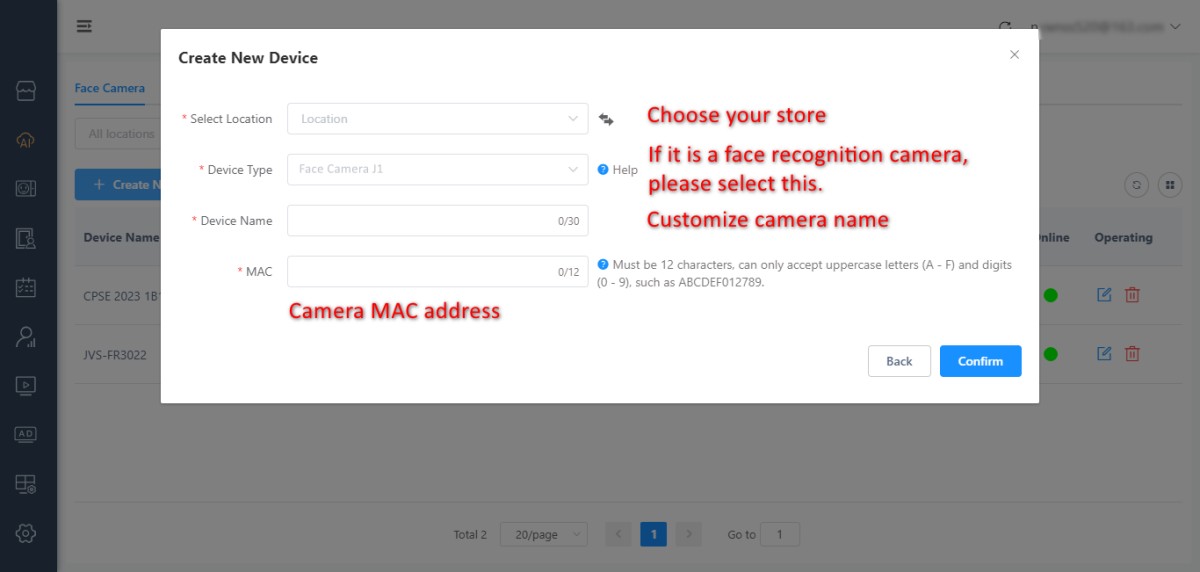
2. Obtain the camera's MAC address from the network settings page.
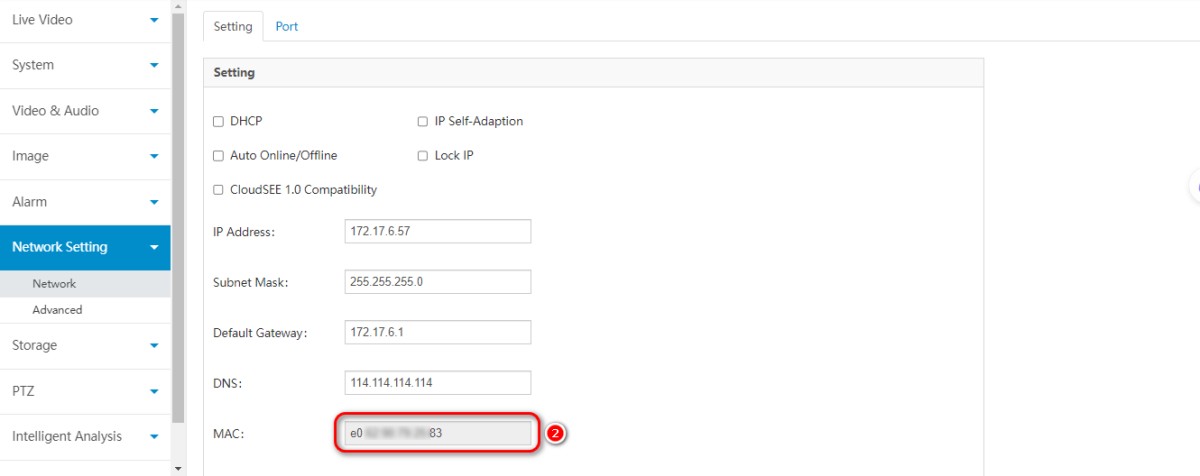
Add Devices to the Platform
1. Log in to your DeepCloud management platform: https://deepcloud.linksprite.com/
2. Create your store information on the main page.
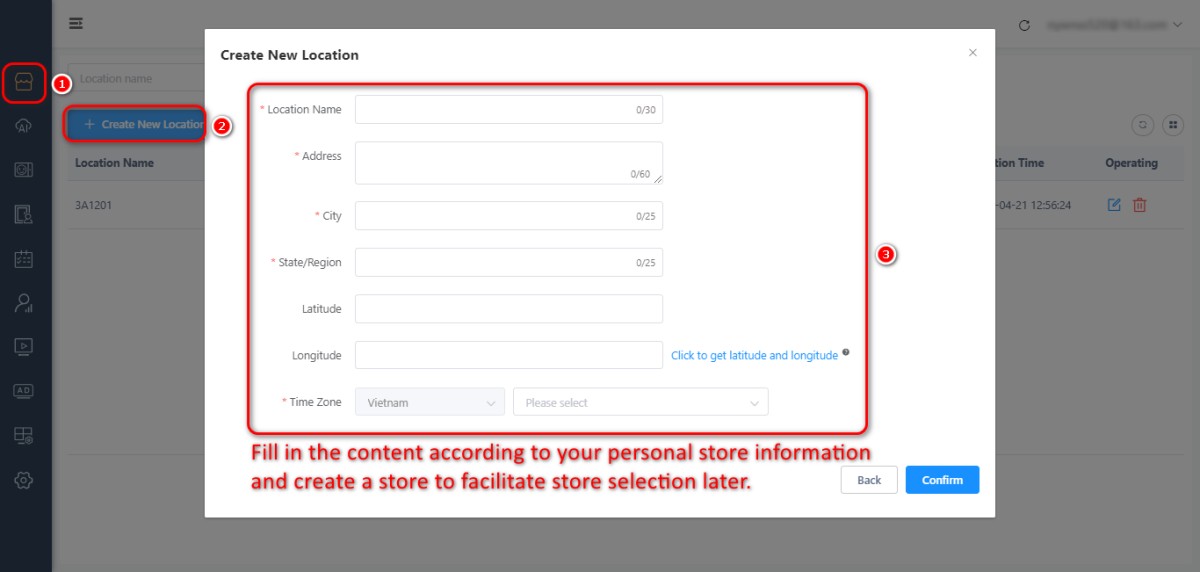
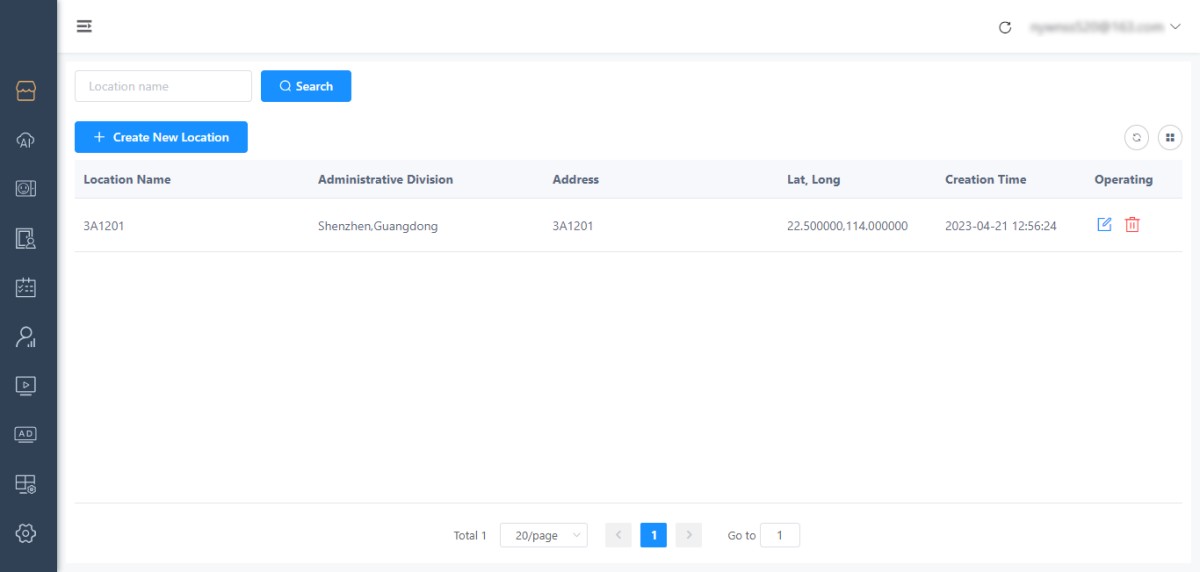
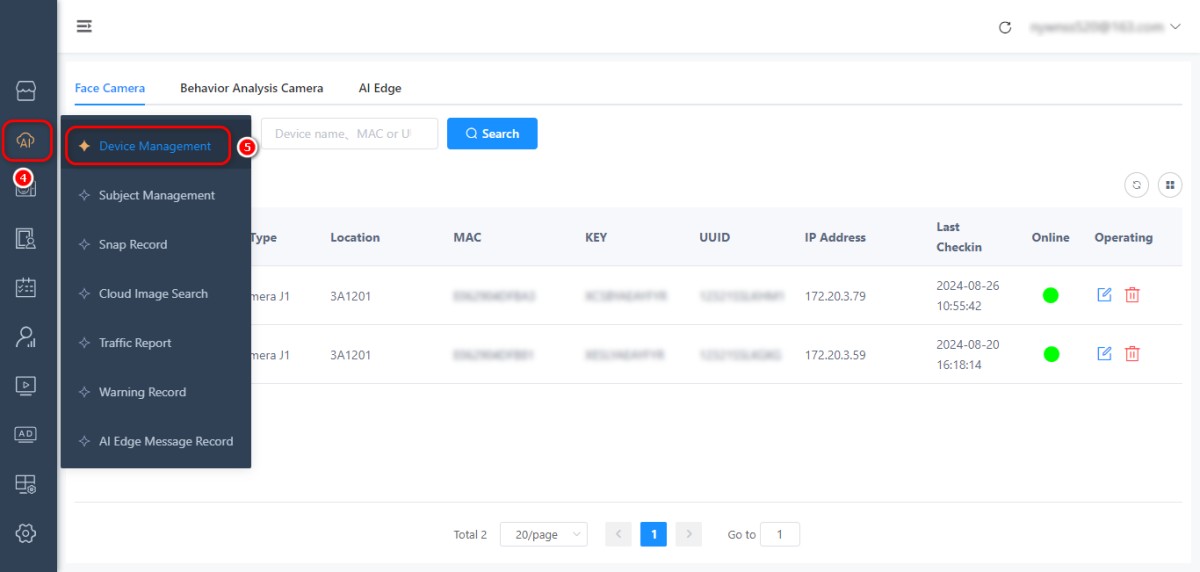
3. Go to the device adding page, select the corresponding store, and add the device.
| No. | Name | Description |
| 1 | SAFE | Smart Anti Face-over Exposure |
| 2 | VQC | Video Quality Catalyst. Jovision Unique Video Quality Technology which focus on debugging on DWDR and 3DNR, and optimizing in Sharpness, Gamma, Contrast and HLC to provide remarkable Full-Color video quality. |
| 3 | AQC | Audio Quality Catalyst. Jovision Audio Quality Technology, applying unique AI algorithms to reduce the audio noises, which offers clearer and longer distance audio performance for users of Jovision cameras. |
| 4 | MFO | Multi-Lens Focusing Optimizing. Cameras Equipped with this unique technology have advantages of focusing more rapidly, accurately without shaking the image. |
| 5 | JVAE | Jovision Authorized Engineer |
| 6 | VSS | Video Surveillance System |
| 7 | SDL | S Series Dual Light Full-Color IP Camera |
| 8 | DV | 4x HDD NVR Series |
| 9 | LPR | License Plate Recognition |
| 10 | AgiSense | Agile Sense. Jovision AI technology which detects the Human being only and provide much more accurate alarms. |
| 11 | ND | NVR |
| 12 | HV | 2x HDD NVR |
| 13 | CPC | Cost Per Channel. CPC= XVR Cost / Total Channels that can be input |
| 14 | SCB | Smart Codec Boostering. Jovision Smart Codec technology on XVR which can boostering the SOC ability to input utmost cameras. |
| 15 | ColorNext | Jovision Full-Color series cameras. "Your Next Generation of Full-Color." |
| 16 | YDL | Y series Dual Light Full-Color IP Camera |
For playing back up video footage, you can use VMS-6100. It has a preloaded video player. You can go to File Center and click Local Files. Brows the directory contains the backup files. Double-click the file you want to playback. Download VMS-6100 from below link.
https://www.jovisionsecurity.com/download.html
Or
You can use PotPlayer it can playback almost all the video types. Check the link below.
Minimum of 2mbps upload bandwidth required on device side and 2mbps download bandwidth on monitoring side.
Ans:
For resetting the password, you need to generate temporary password. Click below link then input CloudSEE ID and Error Code. Then click Generate button to generate Temporary Password.
http://tmppwd.jovision.com/tmppwd/en_local
The temporary password is randomly generated based on the error code and the validity of the temporary password is just for 3days only. So, please make sure you modify the user account of your device or factory default the device before temporary password expires. Otherwise, the device will generate a different error code after 3days.
1. IP Cameras (CloudSEE2.0)
If you are using IPC stand alone, connect the IPC with VMS-6100 and add the device into to software. Then the software will display the error code.
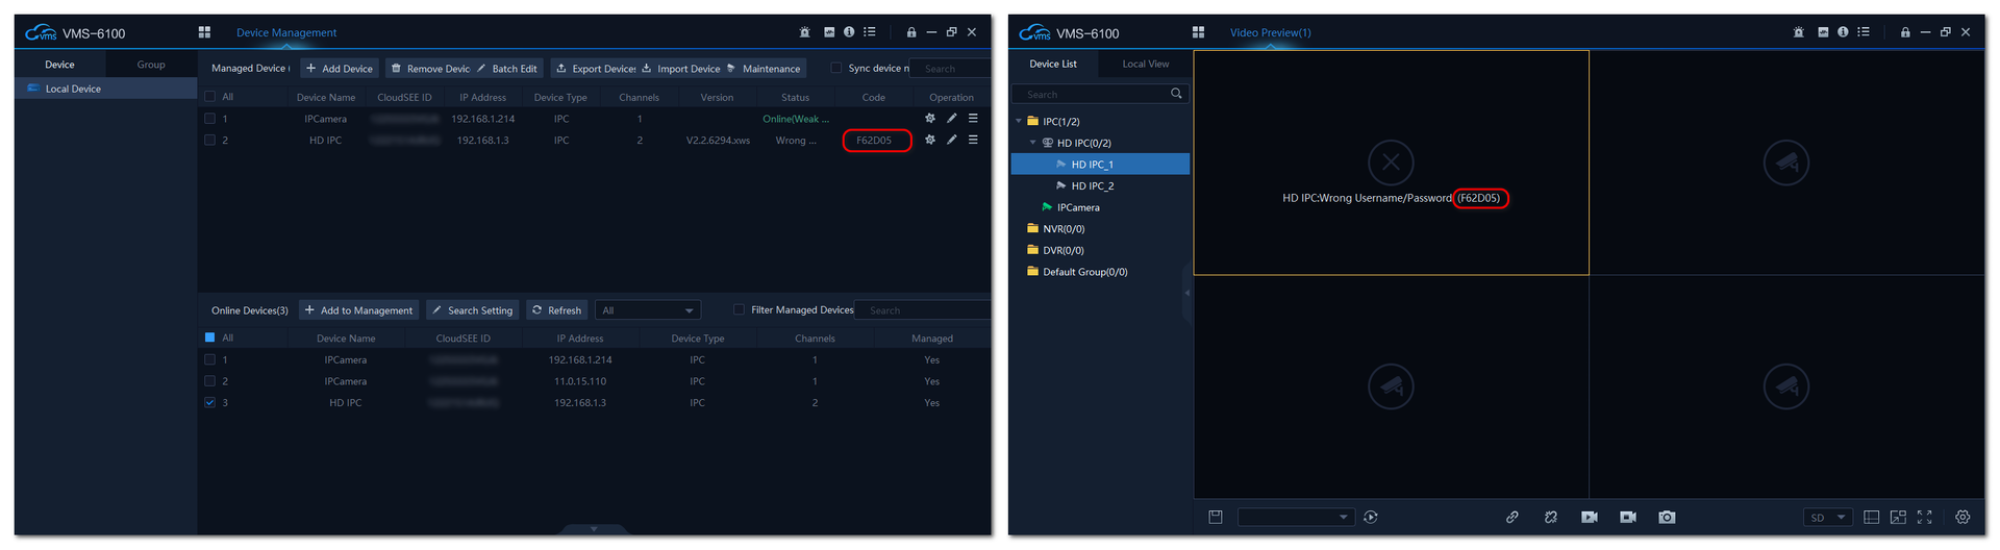
Submit the form with the error code and you will receive temporary login password in your email. Access the web interface of the IPC by input the IP address of the IPC into the web browser address bar. Input the temporary username and password received in your email and login the device. Then go to System then User and modify the current user. Input the new password and save the settings. Or go to Maintenance and click Factory Default button to reset the device.
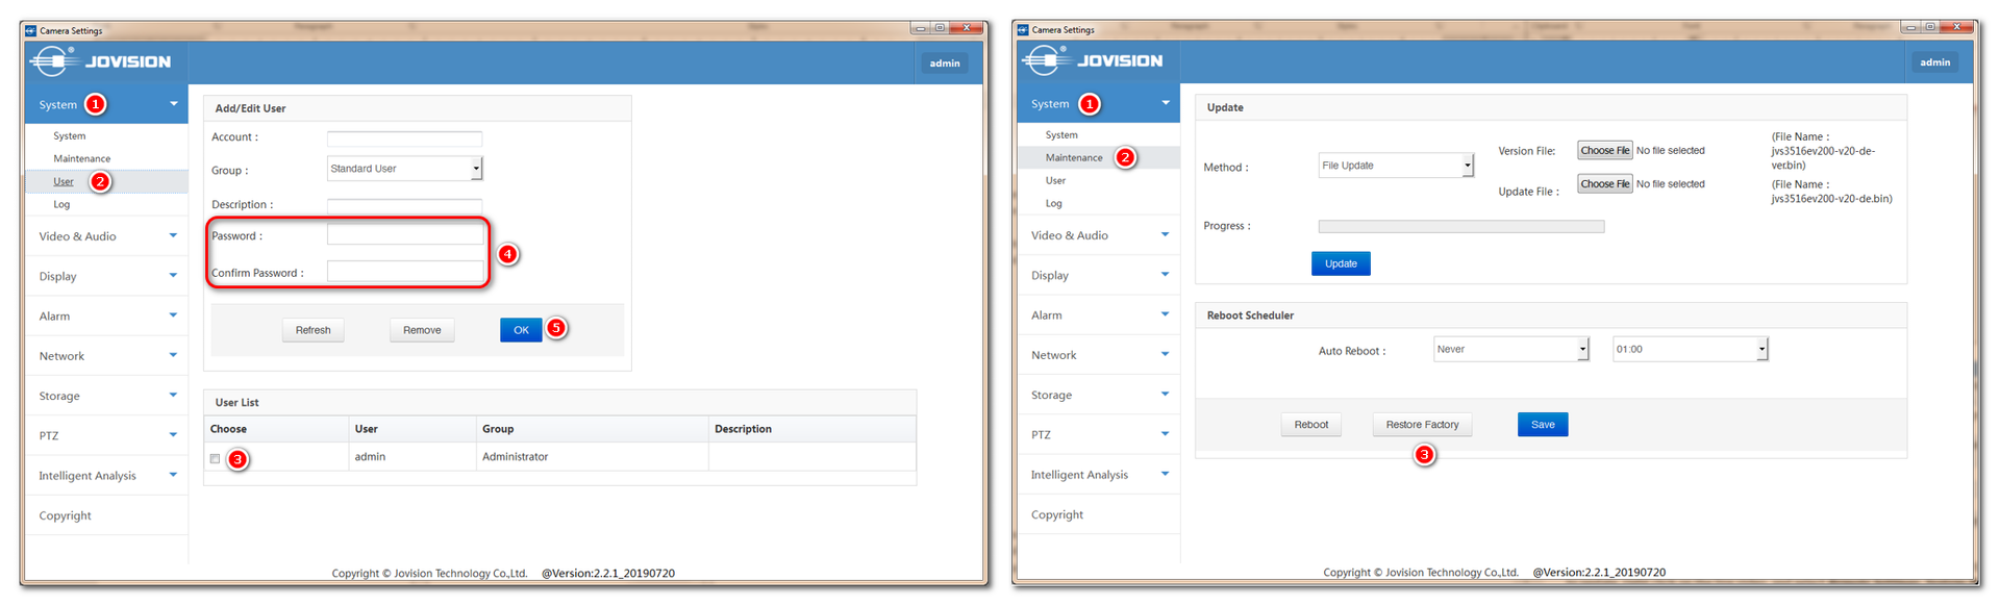
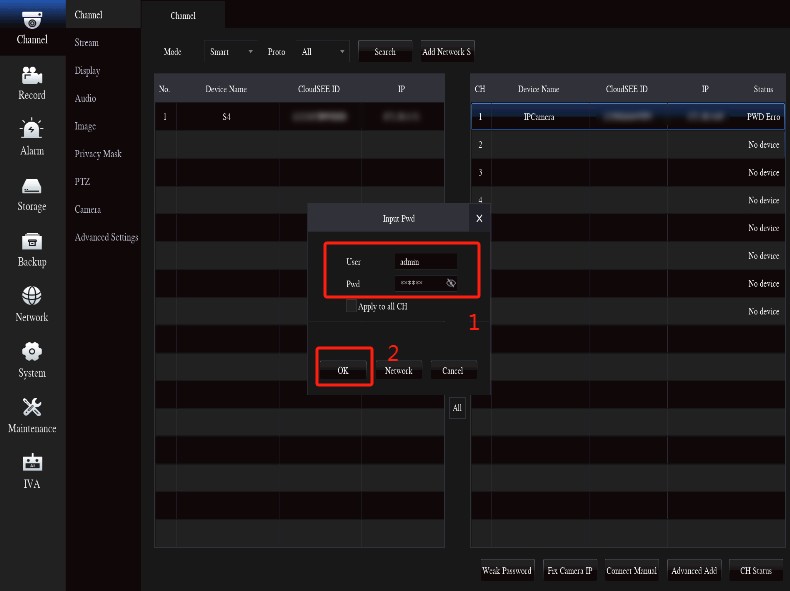
If you are using IPC with NVR, the error code of the IPC will display on the video preview screen and channel list as well. Submit the form with error code and you will receive temporary login password in your email. Go to Channel list an select the IPC you need to change the password. Click on Input PWD button and input the temporary username and password you received. After you check the Status, the IPC will showing connected. Go to Camera option and click the icon under User column of the desired IPC then modify the password. Or click the icon under Maintenance column of desired IPC and click Factory Default. Once IPC user account modified or factory defaulted, you need to go back to the Channel list and input the new password by clicking Input PWD button if you modify the account. If the IPC is factory defaulted, then remove the existing IPC and search and add it again.
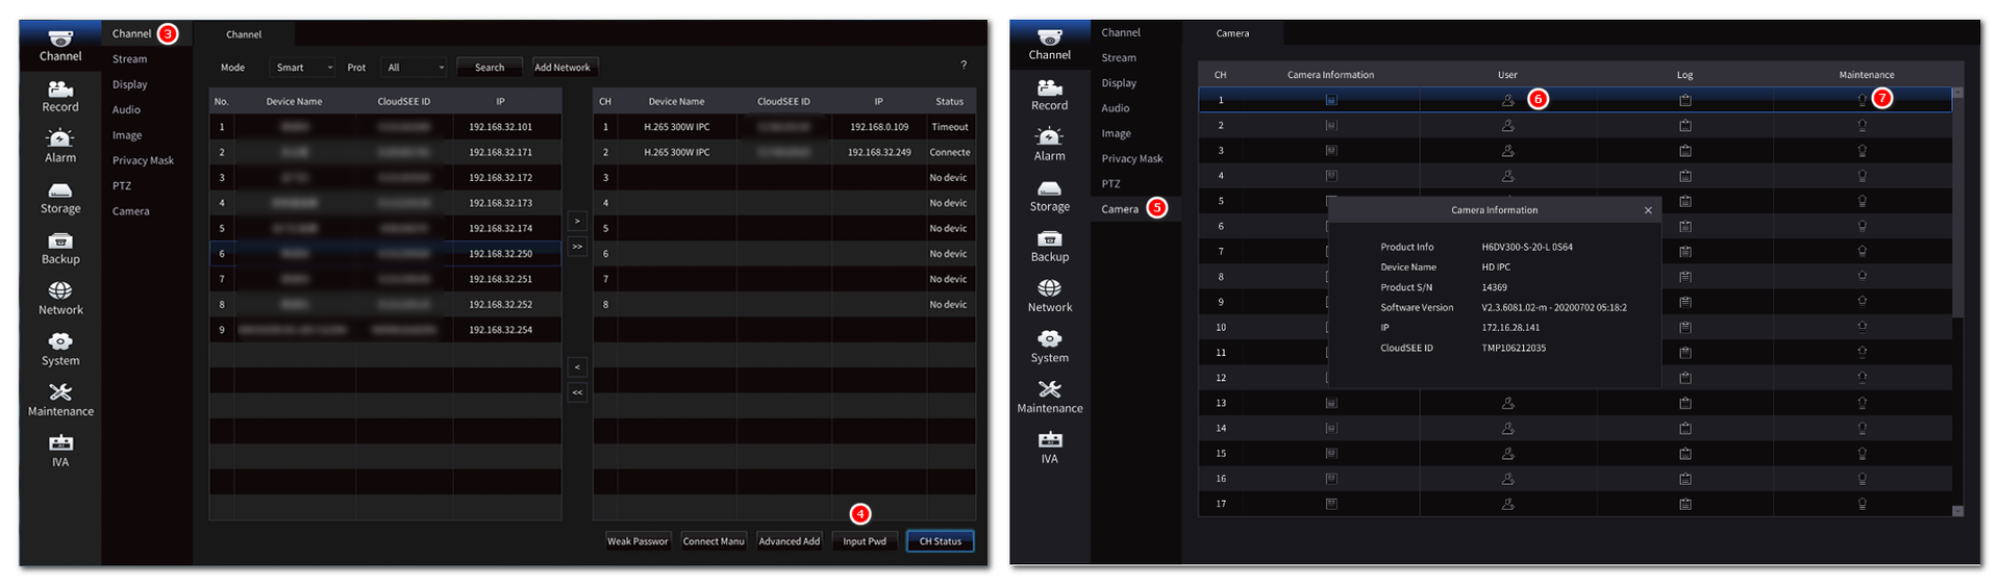
2. IP Cameras (CloudSEE1.0)
If you are using IPC stand alone, connect the IPC with VMS-6100 and add the device into to software. Then the software will display the error code.
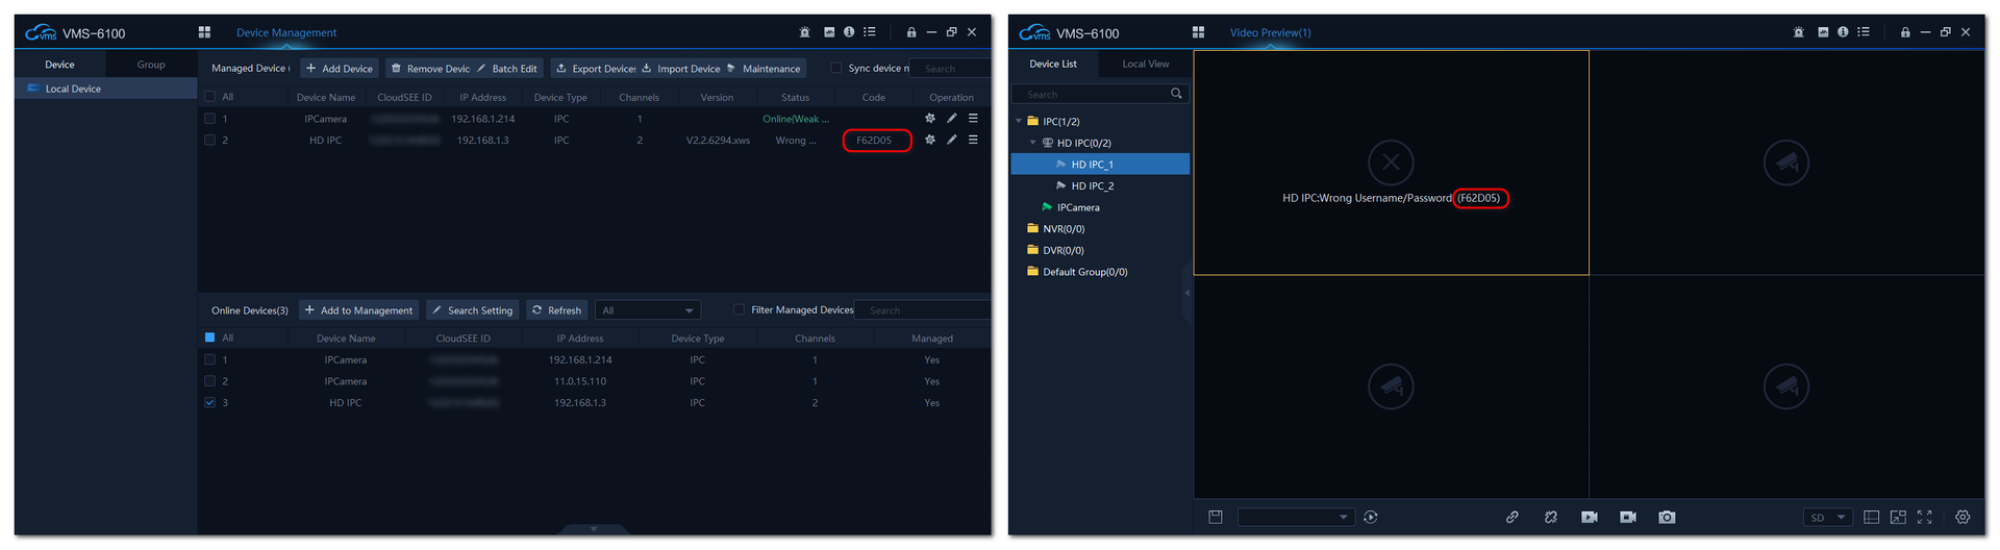
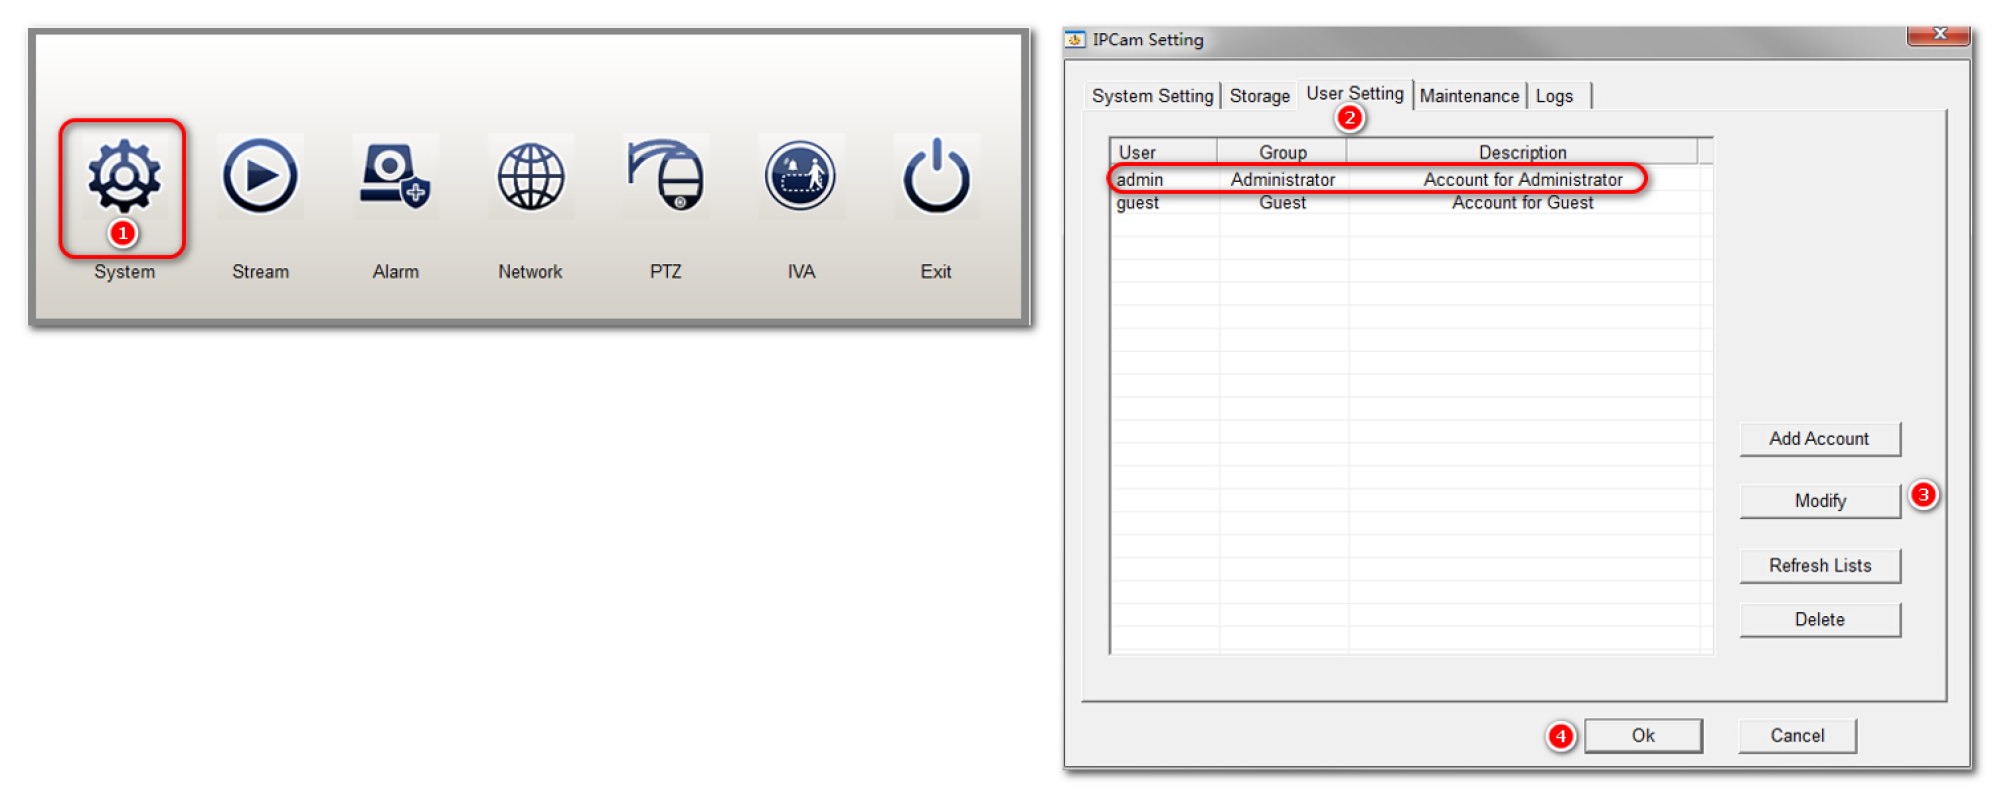
Submit the form with the error code and you will receive temporary login password in your email. Access the web interface of the IPC by input the IP address of the IPC into the web browser address bar. Input the temporary username and password received in your email and login the device. Click on System Config on the top of the main page, the IPC menu will open. (Please make sure you install the Web plugin and enabled the ActiveX controls.) Click System then User Setting. Select the user account from the list and click Modify button. Input the new password and save the settings.
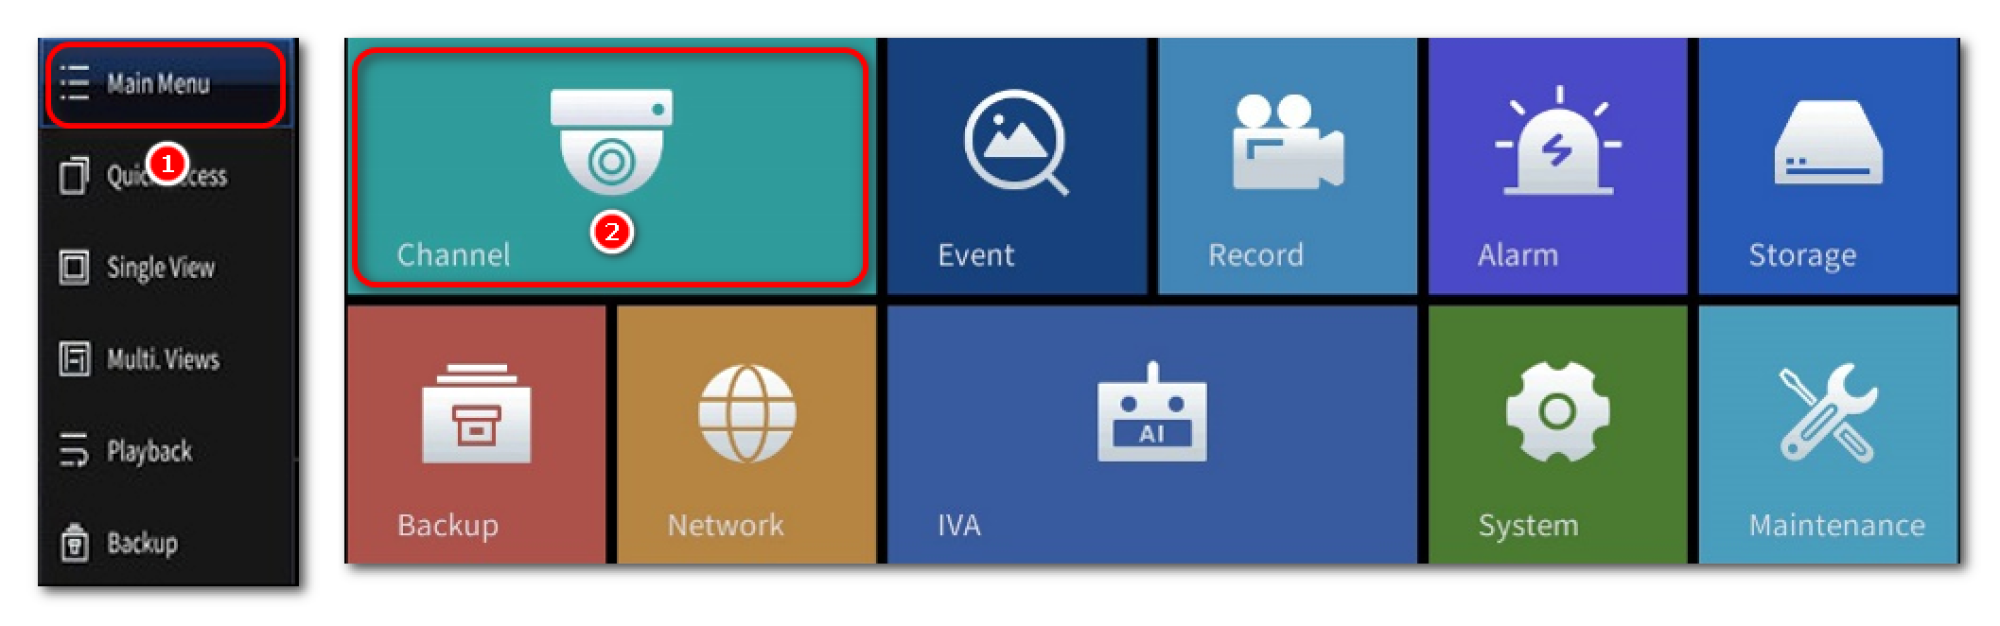
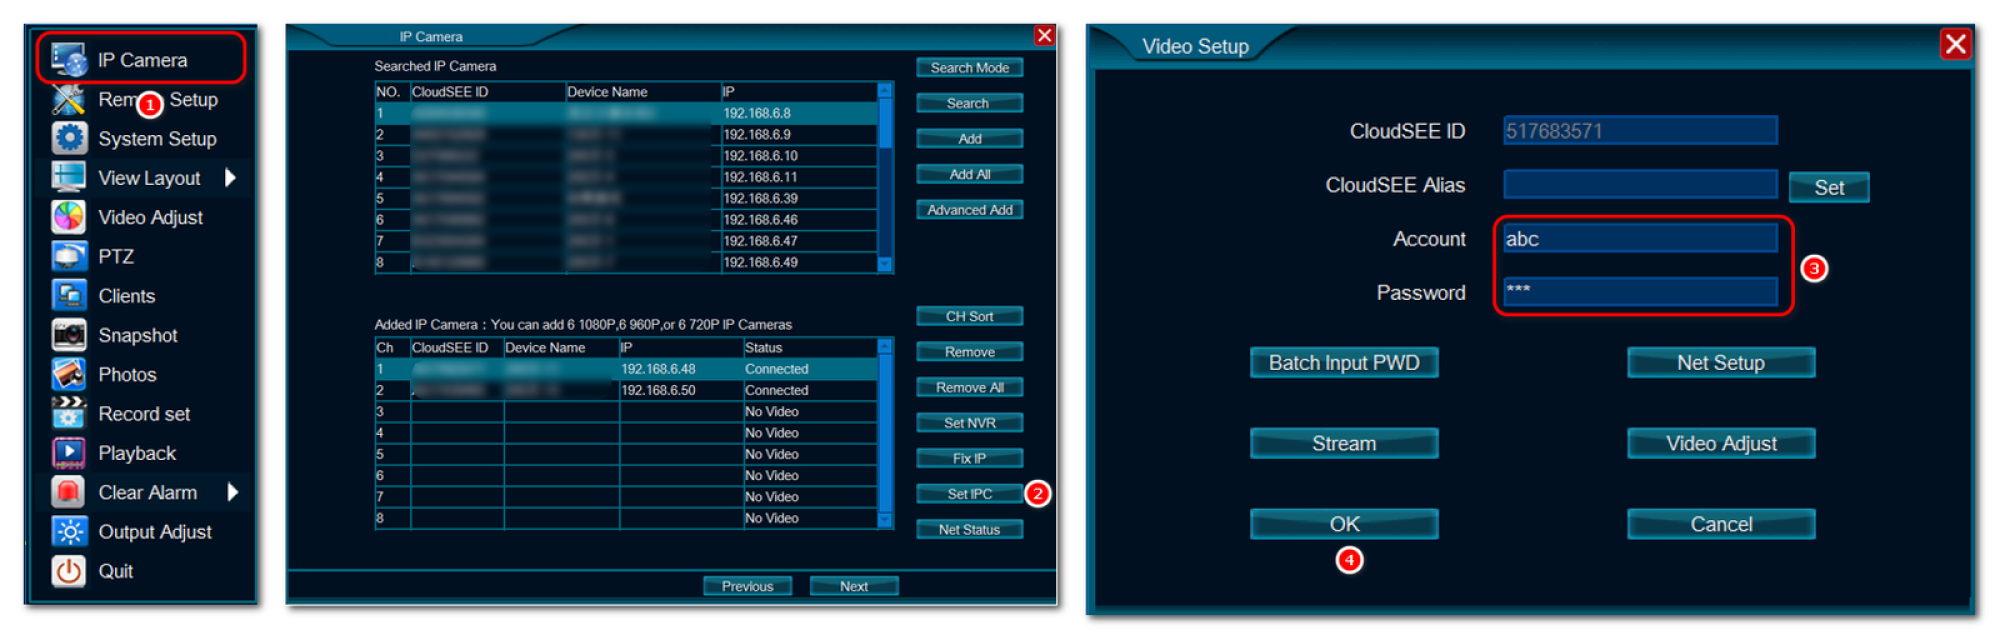
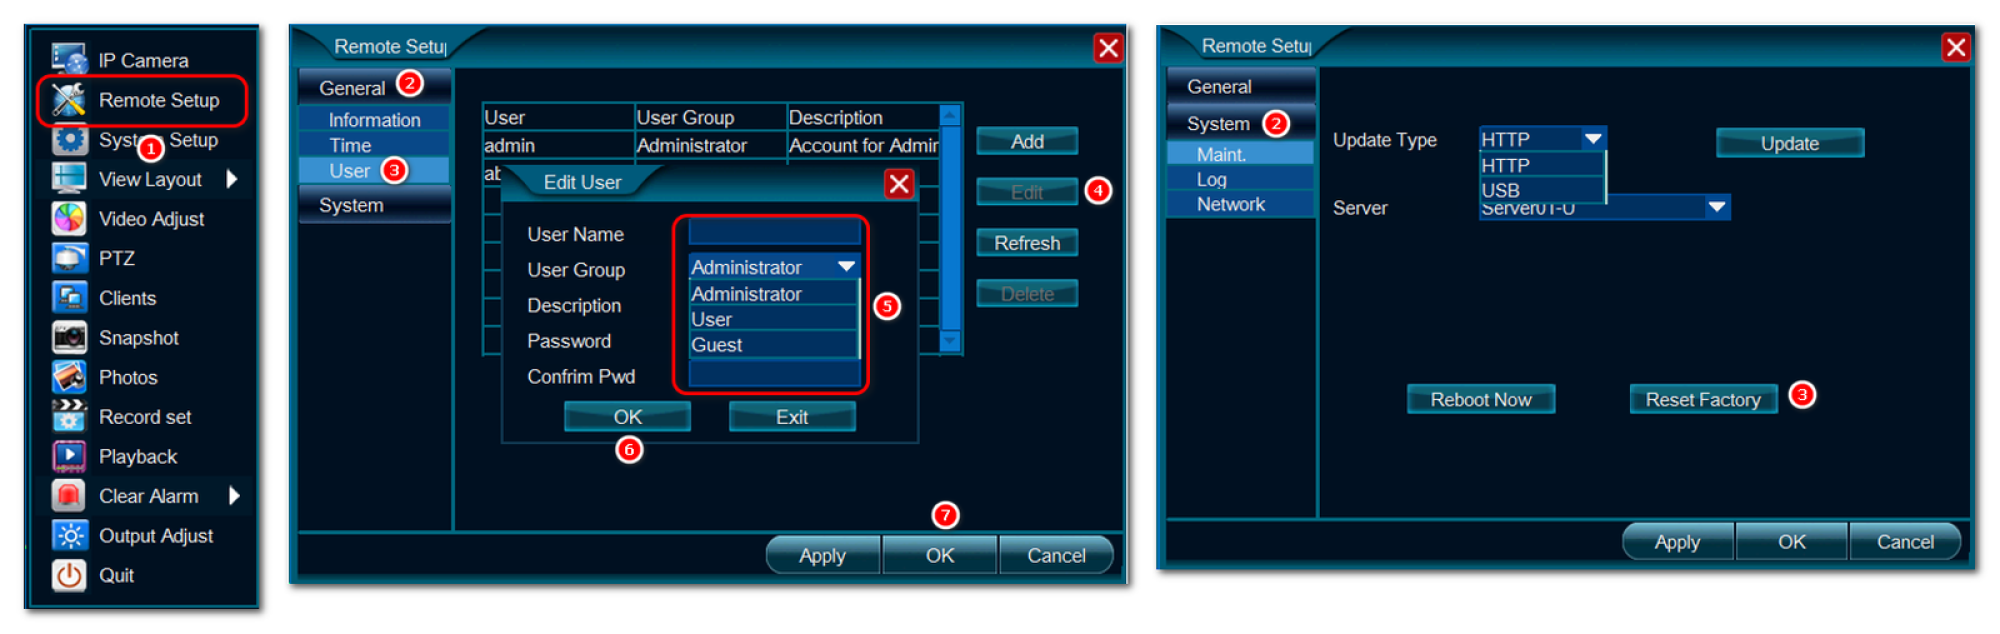
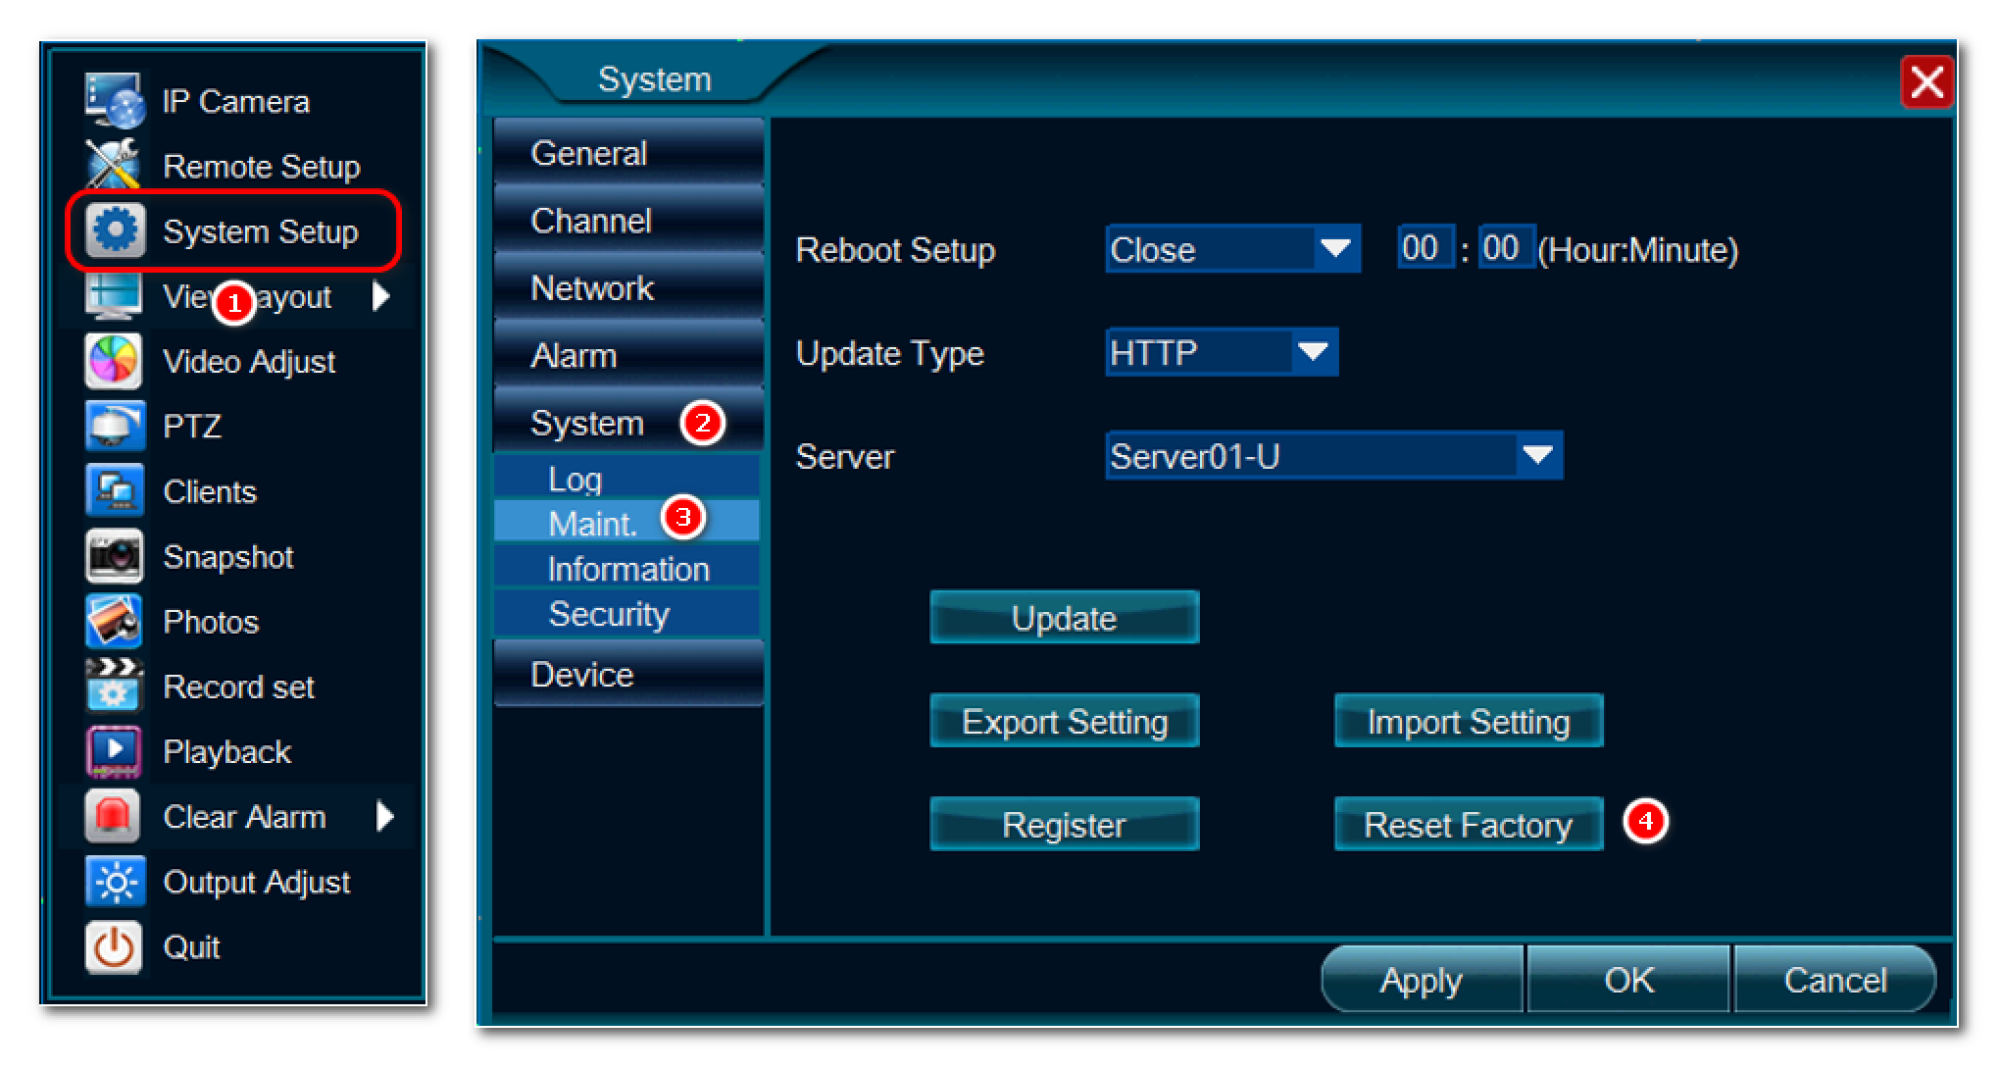
If you are using IPC with NVR, the error code of the IPC will display on the video preview screen and channel list as well. Submit the form with error code and you will receive temporary login password in your email. Right click on the video preview screen and select IP Camera. Select the camera you want to reset the password and click Set IPC. Then input the temporary username and password you received. After you check the Status, the IPC will showing connected. Go back to the video preview screen then right click on the channel you want to reset and then choose Remote Setup. Click User under General menu. Select the user account you want to reset and click Edit button. Then input new username and password. Or click Maintenance under system then click Reset Factory to reset the IPC. Once IPC user account modified or factory defaulted, you need to go back to the Channel list and input the new password by clicking Set IPC button if you modify the account. If the IPC is factory defaulted, then remove the existing IPC and search and add it again.
3. NVRs (CloudSEE2.0)
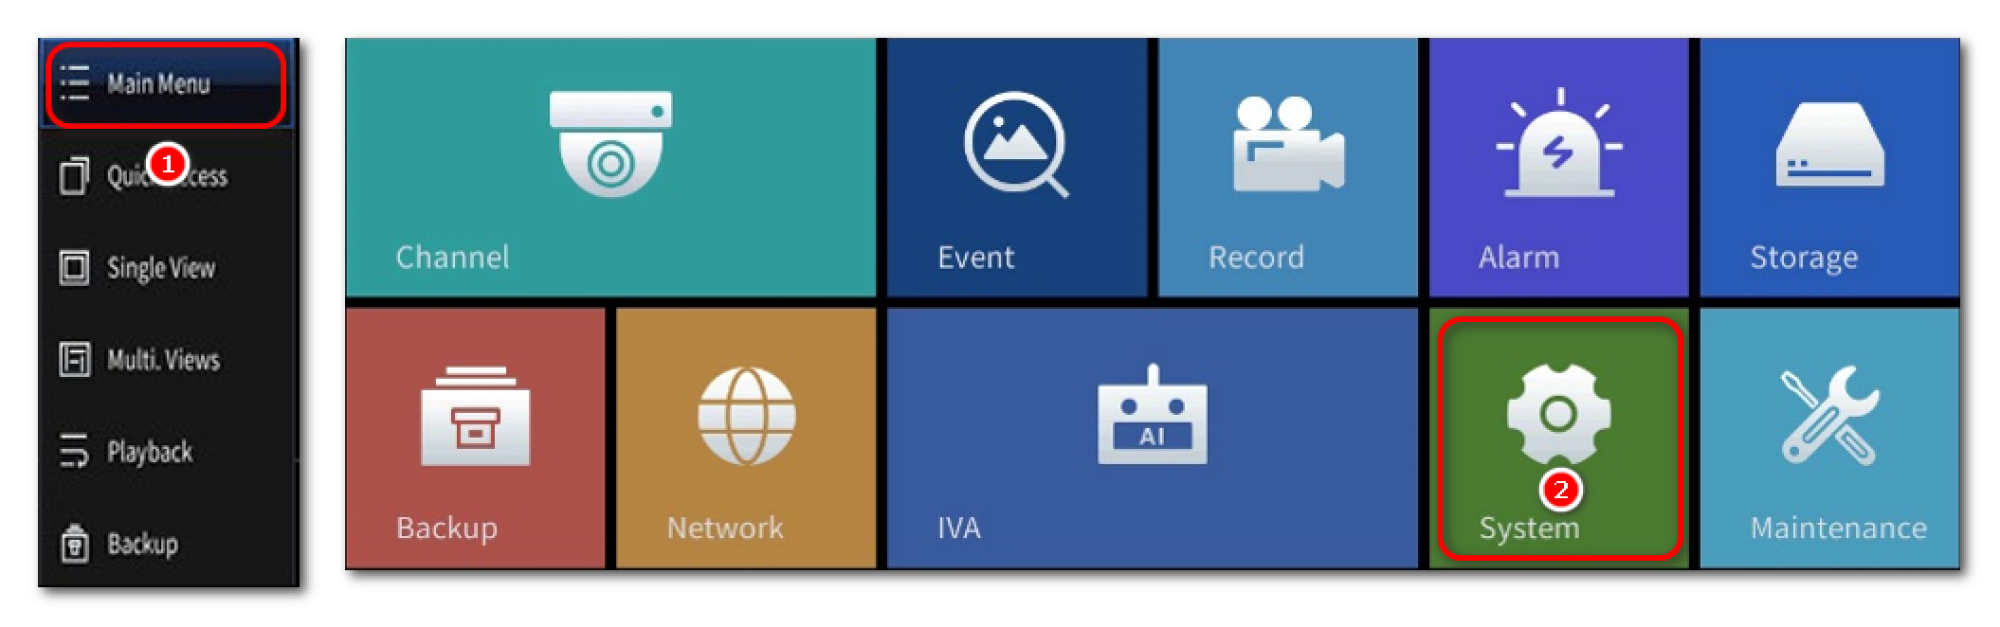
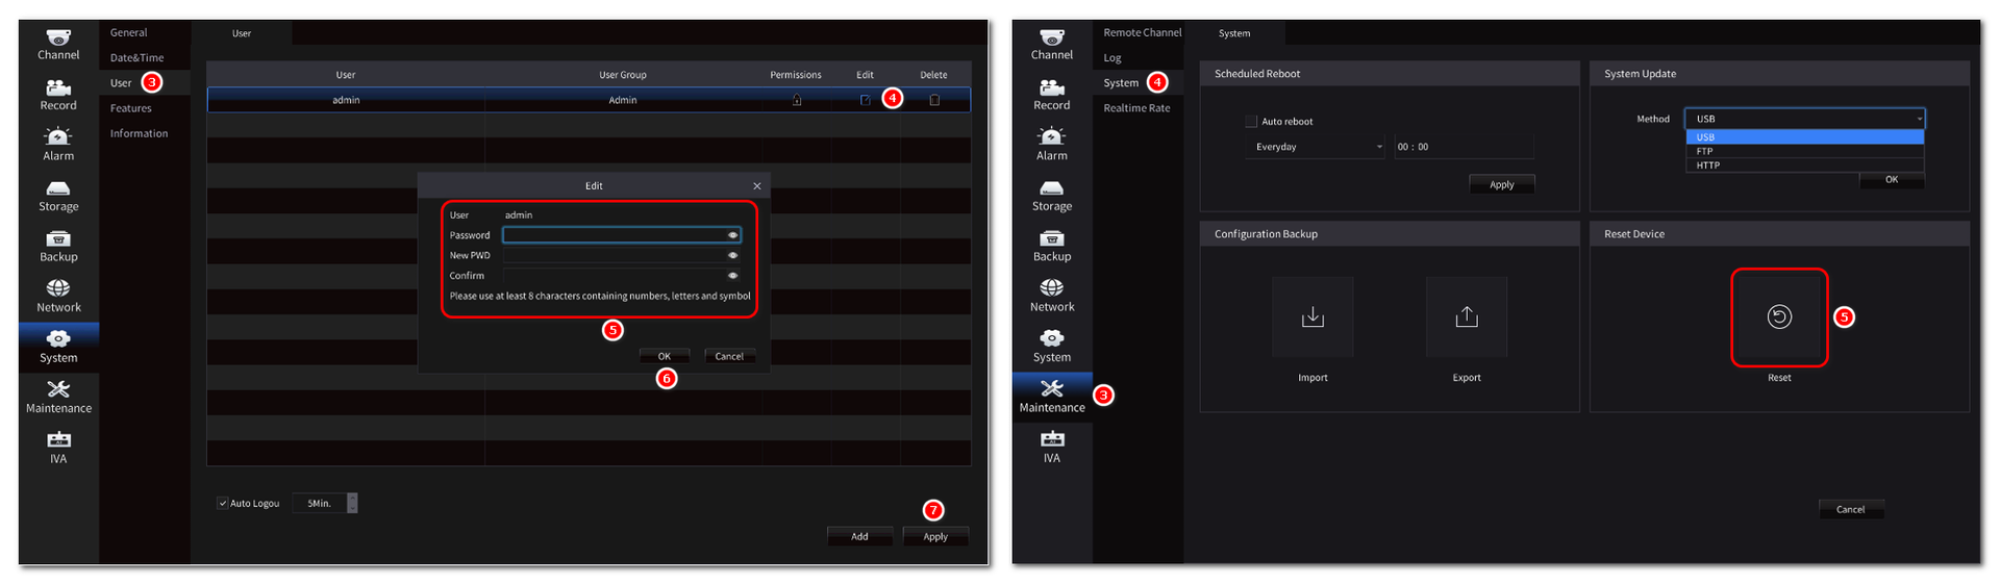
When you try to login with incorrect password, the NVR GUI will display the error code. Submit the form with the error code and you will receive temporary login password in your email. Login with the temporary username and password then right click on the video preview screen and select Main Menu. Login with username and password. Then click System icon. After that click User option then click the icon under Edit column. Then modify the password. Or Click Maintenance then System, click Reset button to factory default the device.
4. NVRs (CloudSEE1.0)
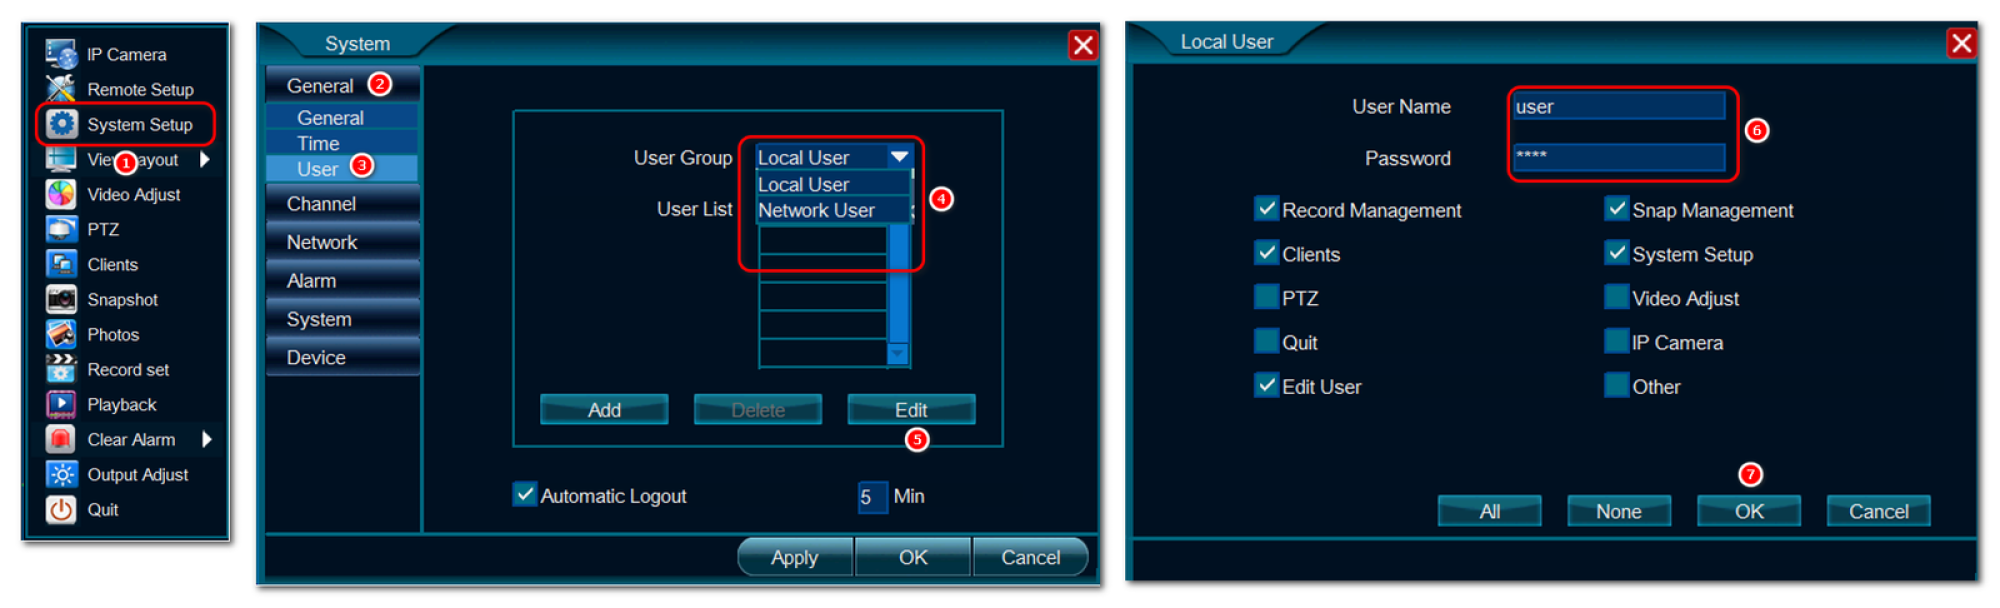
When you try to login with incorrect password, the NVR GUI will display the error code. Submit the form with the error code and you will receive temporary login password in your email. Login with the temporary username and password then right click on the video preview screen and select System Setup. Click User under General menu. Select the user you need to modify, then click Edit button. Input the new username and password. And save the settings. Or go to Maintenance under System menu. Then click Reset Factory button.
Note: If you do factory default the NVR, you need to configure the entire system again.